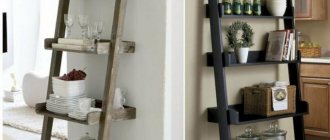
TVs are becoming more compact. TV models make it easy to mount them on walls using special brackets. Despite all the newfangled interior solutions, the TV stand does not lose its relevance.
The interior itself does not always support the possibility of wall mounting. This can be prevented by the window opening or the materials from which the walls are made, which do not allow the bracket to be secured. In addition, the functionality of the TV stand allows you to place a variety of equipment or other items on it.
Each buyer draws for himself an ideal model that will not only fit into the interior in size, but will also match it in color and style.
Not every material requires finishing.
Wooden elements can also be decorated in the form of artistic carvings on the outer walls or table top.
Advantages of a homemade bedside table
Each buyer draws for himself an ideal model that will not only fit into the interior in size, but will also match it in color and style. A wide selection of furniture products, including TV tables, allows you to purchase seemingly any model. However, when faced with the specific task of choosing, a person is often faced with the fact that the size, color, or design are not suitable. It is this factor that pushes many people to start making furniture with their own hands.
Making a TV stand with your own hands is quite simple. To do this, you just need to choose the right model, focusing on your professional level. The choice of material for the construction is also critical. Some materials make it easy and convenient for even beginners to work with them, while others require not only skills, but also special tools for processing. Assembling a TV stand with your own hands requires meticulousness and a correctly structured step-by-step scheme for installing parts.
By assembling a TV stand with your own hands, you can not only get a unique design, but also save significantly on the purchase of a ready-made model.
However, when faced with the specific task of choosing, a person is often faced with the fact that the size, color, or design are not suitable
In addition, you will need screws, self-tapping screws and four guides for further securing the manufactured drawers to them.
The inner wall should not be removed, because it gives the structure additional strength, preventing it from bending under the weight of the TV.
Peculiarities
The main advantages of self-made furniture include the ability to come up with a cabinet design and select building materials.
Despite the large selection of ready-made furniture in stores, consumers are often not satisfied with the dimensions of the product, its color scheme or model. You can make a cabinet yourself that will fully meet all your requirements. In addition, making furniture items yourself will cost much less than buying ready-made ones .
Important : before starting production, decide on the level of your skills. This determines what materials you can use in your work.
Drawing a drawing of the future bedside table
For beginning furniture makers and just amateurs, it is best to use ready-made drawings of a bedside table. A lot of options can be found on specialized websites. When choosing a drawing, you need to focus not only on the final result, but also on the complexity of manufacturing and assembly. An important factor is the material recommended for manufacturing.
Some designs require certain materials that may not be suitable for the craftsman in terms of cost or durability. For example, models with narrow countertops and shallow cabinet depths can withstand a lot of weight when made from solid wood. The use of chipboard in such cases will sharply reduce, possibly, the permissible load on such a bedside table. Therefore, it is extremely important to evaluate the weight and width of the TV that will stand on it. It is also necessary to remember about additional accessories that will be needed when operating the TV, these could be speakers, a video player, and more.
Often, a TV stand can accommodate CDs, magazines, newspapers and decorative items. This should also be taken into account before you start making your own drawing.
Making a TV stand with your own hands is quite simple.
The list of tools can be shortened or expanded depending on the complexity of the product and the selected materials.
Often, the decor of TV tables consists of combining different materials and decorating it with glass parts.
Project, diagram and drawing
Before you start making a cabinet, you need to draw a detailed drawing of it. This will need to be done on a checkered piece of paper or on special graph paper. If you do not know how to draw up competent drawings, you can find a suitable option on the Internet. There will already be a well-thought-out model with all sizes. You can also use special computer programs. With their help, drawings are created in different projections indicating the dimensions of all parts.
For modern plasma TVs, stands are made narrow and long . Popular dimensions are:
- length – 186 cm;
- width – 42 cm;
- height – 75 cm.
Advice : since such a piece of furniture is quite long, it is better to install it not on 4, but on 6 legs.
Selecting the best materials for the job
The variety of materials allows you to make very cheap and simple models, as well as go for the chic. Not every TV stand can be made with your own hands using any available material. Some designs involve only wood or only plywood. There are also more universal designs that you can make with your own hands from existing scraps or leftovers from other furniture.
When making a cabinet you can use:
- MDF.
- Chipboard.
- Plywood.
- Beam.
- Wood, in the form of glued panels.
- Array.
You can also make a cabinet partially from glass or decorative plastic. These materials are most often used for countertops and furniture doors.
Chipboard is the most unpretentious option for work; it does not require any special cutting tools or sanding machines. It is easy to cut and process. Its obvious advantage is its price.
When purchasing wood, you should pay attention to its quality. An important nuance is the absence of defects and the dryness of the purchased material. Damp wood can warp indoors, thereby ruining the finished product.
An important nuance is the absence of defects and the dryness of the purchased material.
Damp wood can warp indoors, thereby ruining the finished product.
You can make a bedside table with your own hands using only a jigsaw.
Materials
An important point is the choice of basic materials that will be used to make the cabinet. This could be one material or several. Please note that some of them are easier to work with than others.
Wood is the most common material for making furniture.
How rich the product will look also directly depends on the material. For example, for a country house you can choose remnants or scraps of old furniture as the basis, and for a luxurious living room interior - real wood. The doors or table top are sometimes made of glass or plastic.
Even the simplest TV stand requires care in its manufacture.
Let's take a closer look at the types of materials:
- Chipboard and plywood are the most economical options and the easiest to work with. However, their disadvantage is their fragility and simplicity of appearance.
- Drywall - this material is easy to work with and is often used to make unusual furniture models. However, it is not able to withstand heavy objects.
- MDF is a higher quality material that looks attractive and has a longer service life.
- Natural wood is an expensive but environmentally friendly option, characterized by high durability and luxury. It may be in the form of a solid solid wood or in the form of laminated wood panels or timber.
Important! When purchasing wood, be sure to pay attention to the dryness of the material; humidity can deform the cabinet during the manufacturing process or later during operation.
Each material from which you want to make furniture has its own performance properties.
Preparing tools for work
You can make a bedside table with your own hands using only a jigsaw. Some craftsmen even do without it, ordering cutting according to the drawing when purchasing the material. Assembling furniture with your own hands still requires the following professional and non-professional tools:
- Pencil, marker or other writing object.
- Thick cardboard for making patterns.
- Ruler and tape measure.
- A compass if some workpieces will have a round shape or rounded edges.
- A jigsaw with files of the required size.
- Clamps for gluing parts.
- Glue.
- Tape for finishing cut edges.
- Screws, self-tapping screws, confirmations.
- Grinding machine.
- Guides for bedside table drawers.
The list may be shortened or expanded depending on the complexity of the product and the selected materials.
Chipboard is the most unpretentious option for work; it does not require any special cutting tools or sanding machines.
When purchasing wood, you should pay attention to its quality.
Stained glass doors look beautiful, although these designs are more fragile than solid sheets of glass.
Element edging
To make the ends of the cabinet itself look attractive and unique, it is recommended to trim all parts before assembly. For this purpose, it is considered optimal to use a special edge made of PVC or other material. PVC edging is considered inexpensive and easy to use, so the work is accessible even to beginners.
PVC edging can be embedded or glued to the edges of existing parts, and the choice of method depends on the wishes and skills of the person creating the structure.
A wooden cabinet can be edged in different areas, but most often this process is performed for those places where there is a high probability of damage during operation of the product. The entire process of edging parts is divided into stages:
- The cutter is correctly positioned in the center of the end;
- the edges of the parts are polished, and it is important to ensure that chips or other problems do not appear that are almost impossible to eliminate;
- various grooves are carefully milled;
- Next, the edge is stuffed carefully, for which you need to use a rubber mallet, and during work you need to ensure that impacts do not lead to damage to the integrity of the parts;
- the ends of the edging are cut off from the ends, after which the elements are ground flush.
A design made with such edging will look really attractive and modern, so there will be no unsightly and untreated areas.
Fastening the edging
Step-by-step instructions for making a bedside table
- We prepare the drawing. We take a ready-made and proven drawing, or we develop it ourselves, taking into account the size of the TV and its weight.
- We make patterns for all elements. This stage will allow you to accurately calculate the material consumption and not make a fatal mistake.
- We cut out the materials.
- We sand the cut edges. When working with wood, you will have to sand not only the cuts, but also the remaining surfaces.
- Cover the edges with tape. This step is necessary when using chipboard material. To glue the tape you will need an iron and a soft cloth.
- We assemble the cut parts. Assembly is always carried out according to the same scheme. You should start with the countertop. Legs or side backs are attached to it. Then the bottom shelf is screwed on. After the general structure is assembled, we fill the cabinet with additional parts - middle shelves. The rear backrest and doors are attached next to last. If there are drawers, provision should be made for preliminary fastening of the guides on the inner sides of the side walls.
- The last stage of assembly is attaching the legs, rollers or pads.
Assembling a TV stand with your own hands requires meticulousness and a correctly structured step-by-step scheme for installing parts.
Not every TV stand can be made with your own hands using any available material.
There are also more universal designs that you can make with your own hands from existing scraps or leftovers from other furniture.
You can also make a cabinet partially from glass or decorative plastic.
Divider stand
A popular design technique for decorating a large room is dividing it into zones. A simple but original TV stand can serve as such a separator. The secret of this product lies in its L-shape, which provides not only a place to place equipment, but also a vertical surface on which you can hang a small panel, or simply use it as a fence.
What will be needed to implement the project
Boards (for example, thick plywood):
- 10.5x1x4 inches;
- 5x1x4 inches;
- 5x1x6 inches;
- 15 fence boards of varying widths should be cut to 5 inches in length;
- 4 square bars 1x1x5 inches;
- flat metal staples – 3 straight, 3 angular;
- ½ inch screws for installing metal brackets;
- screws;
- electric drill;
- screwdriver;
- 1.5 inch flat nails;
- glue that is suitable for working with wood;
- spade drill;
- Heavy Duty Velcro;
- white paint, roller, brush;
- extension wire;
- ceiling lamp sockets;
- LED bulbs.
If the parameters of the TV stand in this project do not suit you, you should take individual measurements at the beginning of work. Then recalculate the parameters of the components, namely: height, width, depth. The structure of the shelf is simple, so no drawings are needed.
Instructions for use
- First of all, we assemble the side and middle L-shaped posts (3 identical ones) using metal corners and strips, as shown in the photo. We additionally lubricate the joints of wooden parts with glue. Protruding excess should be removed immediately.
- We attach a wide strip to the lower base of the L-shaped posts, which will be installed on the floor. We prepare the holes, connect them with nails and screws. During operation, we control the connection angle at 90 degrees.
- Assembling the front part of the back of the stand. First, we attach wide boards: one at the top, the second at the bottom. Then we select 1 narrow strip at a time. We install the remaining wide ones between them. We use glue and screws.
- We place the stand-bedside table in a vertical position, lay the boards on a horizontal plane-table top.
- We install the product in order to make the back part. Use boxes or other objects to avoid damaging the stand. We attach only wide planks to nails. In the lower part, you can not install the last board or prepare large holes in it for the wires. You can also make this part removable using Heavy Duty Velcro.
- Attach the strip at the top of the structure. The L-shaped bedside table is almost ready.
- Drill a hole on the front for the wires after you decide where exactly the TV panel will be installed.
- All that remains is to do the finishing coat. Take safety measures and cover the product with white (or other paint of your choice). Let the nightstand dry.
If desired, you can install colored lamps in the niches of the stand. They will provide soft light and a pleasant atmosphere in the dark.
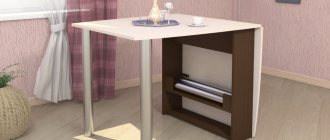
Making a long TV stand with your own hands
To make a cabinet with your own hands, take laminated chipboard in the color you like. Chipboard width 16 mm or 18 mm.
Insert a picture – https://prntscr.com/fit8k0
Required parts:
- Two sheets measuring 1600x454 mm for the table top and the bottom of the product.
- Three walls 545x454 mm.
- Shelf 767x454 mm.
- The back wall is made of MDF 1600x545 mm.
- Two drawers measuring 759x223 mm.
- 4 decorative handles.
- 4 legs.
- 4 thrust bearings.
In addition, you will need screws, self-tapping screws and four guides for further securing the manufactured drawers to them. Between the drawers, it is advisable to make a shelf from MDF, measuring 767x454 mm.
To make the boxes you will need two pieces of MDF 750x445 mm each, which will be used to create the bottom of the cupboard. The side walls of the drawers will require four pieces of chipboard measuring 450x220 mm. And two pieces of chipboard measuring 755x220 mm, from which the back wall of the drawer will be formed. Assembling the drawer begins with connecting the side and back walls. Then the MDF bottom is attached. The last element is screwed on the front part, on which decorative handles are pre-fixed.
Making a bedside table with drawers is quite difficult, so this model should only be attempted by craftsmen who already have certain skills in assembling furniture.
The same model can be assembled without using drawers. The second compartment can be left without a partition in order to be able to place larger elements of equipment or decor there. Or it can be made identical to the first compartment. The inner wall should not be removed, because it gives the structure additional strength, preventing it from bending under the weight of the TV.
By assembling a TV stand with your own hands, you can not only get a unique design, but also save significantly on the purchase of a ready-made model.
The variety of materials allows you to make very cheap and simple models, as well as go for the chic.
You can use transparent, dark, mirror glass.
Overview of varieties
Corner cabinet for kitchen sink: sizes, types and 90+ options for convenient placement
The corner TV stands produced nowadays are made in different ways. The products differ from each other in several ways. Let's get to know them.
By facade type
When choosing the best corner TV stand, it is very important to pay due attention to the type of its front part. There are two types of similar furniture designs
Open. Popular and attractive products. Their design may include shelves and other functional elements of internal content. All components will always remain visible, so it will not be possible to hide anything in them from prying eyes. Some users refuse to purchase open copies precisely because of this. And their insides often become overgrown with dust.
By type of opening system
It is equally important to pay attention to the door opening system of the corner TV stand. There are several popular options available today
Swing. In this common type of design, the door is attached directly to the side of the cabinet. For this purpose, special and reliable furniture hinges are used. In such systems, the sash should not be opened with sudden movements or pressed hard on it.
We personalize the cabinet through decor
Not every material requires finishing. Laminated plywood looks quite self-sufficient without additional decoration. Chipboard has glued decorative surfaces and, apart from gluing the cut edges, does not require painting. Solid wood is perhaps the most finicky in this sense. It must be primed and treated with stain. This coating helps highlight the grain of the wood and protects the wood from dullness, dust and moisture. If desired, the wood can be painted or varnished. Wooden elements can also be decorated in the form of artistic carvings on the outer walls or table top. Any materials can be painted, covered with decorative film, or applied with stencils.
Often, the decor of TV tables consists of combining different materials and decorating it with glass parts. The glass used should not be less than 8 millimeters thick. You can use transparent, dark, mirror glass. Stained glass doors look beautiful, although these designs are more fragile than solid sheets of glass.
For beginning furniture makers and just amateurs, it is best to use ready-made drawings of a bedside table.
Some designs require certain materials that may not be suitable for the craftsman in terms of cost or durability.
Often, a TV stand can accommodate CDs, magazines, newspapers and decorative items.
"Masonry"
The most expensive but durable method. These options are used in homes. Both sandstone and granite are used. Most often, they create a frame base, and then cover it with plasterboard.
The material can be used either from your own production or purchased.
A do-it-yourself slide wall is best made from wood. The variety of this material will allow your imagination to truly unfold, and the many ways to process it guarantee you a quick and high-quality result.
The middle part usually houses racks, display cases, cabinets, shelves for dishes, books, and jewelry.
The wall manufacturing process includes:
- Creating a sketch.
- Calculation and purchase of materials and components.
- Preparation of electrical wiring behind the façade of the future wall.
- Assembly of the entire structure.
We wish you fruitful work!
By following the list step by step, you can bring to life a product of any style, reproducing all the planned details.
In general, walls can hide behind a simple device many interesting and varied mechanisms that simplify life and storage of things.
Designing a sketch from scratch
Has the same meaning as a drawing of a building in architecture. Calculation and arrangement of the exact dimensions of the structure will affect the amount of purchased wood, the compatibility of different parts of the wall, its durability and resistance to mechanical deformation. The drawing should be drawn up taking into account the maximum use of the material, because every centimeter of unused wood is money thrown away. Also, a correctly drawn up drawing in advance, which takes into account all the little details and nuances, will save you from the need to redo or finish it during installation. It is necessary to carefully measure the dimensions and calculate the area of the required material. If you doubt your paper design abilities, it is better to entrust this task to knowledgeable people, because the drawing is the basis of the entire product.
The upper area is usually occupied by mezzanines and cornices, which serve as conductors of lighting.
Important! When measuring, it is necessary to take into account not only length, width and height. A very important parameter is thickness. If you forget about it, you will get a lot of problems with “inconsistency” of drawings.
Speakers or suspended video equipment are sometimes built into the upper tier.
Wall selection rules
Initially, you should calculate the dimensions of the wall. The main task at the design stage is to prevent clutter so that the room looks like an area littered with furniture.
Try to ensure that after installing the wall, the room does not look cluttered. For limited spaces, modular varieties that can be arranged at your own discretion are more suitable. You should immediately decide on the height, but it is not recommended to focus only on the dimensions of the wall.
When choosing a furniture wall, of course, you need to take into account its size and height. Serious emphasis is placed on its compliance with the future interior of the room. Dark colors are more likely to irritate, while light colors visually increase the area and make the home more spacious. For large rooms, this factor, of course, is not decisive, and you can safely choose dark colors.
It should fit well into the overall interior. Furniture for the living room with your own hands is only an addition to the overall atmosphere, so it should not create a feeling of dominance over everything around you. Since there are only more offers on the construction market every year, the final choice remains solely with the person who must first think through everything to the smallest detail.
Before purchasing a wall, you should think through all the little details in your design. Do-it-yourself wall slides in the hall look beautiful, with different sections for the wall, designed for a TV, display cases, chests of drawers, wardrobes, and linen closets. Low or hanging cabinets, open shelving and other varieties are in fashion.
You can make a similar slide wall yourself. The original configuration is also ensured by different installation heights of individual units. Considering the great popularity of modular compositions, manufacturers specially produce separate sections from one series, straight, U-shaped, corner walls. In rectangular rooms, a straight wall with your own hands is the best solution.
Individual units are installed at different heights.