Swinging in a hammock is the true embodiment of relaxation. Hanging chair hammock, this is a special type of hammock that enlivens our home or garden and simply makes life more exciting. And not to mention the health benefits. Did you know that a hanging chair strengthens the immune system, rejuvenates the brain and improves memory? Believe me, this is so, proven by science!
Some are scared by the possible difficulties in manufacturing and installation, but if you want to make a hammock chair with your own hands , then don’t worry, it’s even easier than putting together a simple stool. The article presents several simple examples with step-by-step photographs - look and be inspired.
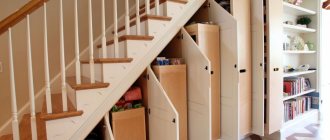
Selecting a location
Let's consider where a hanging chair for the home would look best in the interior:
- If you plan to place the structure outdoors, it is better to choose a shaded place for this, since it will be difficult to withstand the sun for a long time, and this is not at all good for health.
- For a child's room, this design is an excellent choice. Children simply love unusual things where they can also swing and play. Such types of hanging chairs as wicker mesh, cocoon or transparent glass are perfect. For a girl, a small hammock chair made of elegant macrame may be suitable, which will also become an excellent decorative decoration for the room.
- A hammock chair is rarely placed in the living room due to the fact that the size of the room usually does not allow it. But if the apartment is spacious enough, then a hammock chair made of thick, soft fabric can be an excellent place to relax. It can be made to order from a material whose color and texture will be in harmony with the design of the living room. In this case, such a swing will fit as organically as possible into the surrounding interior.
- On the veranda or terrace of a country house, a hanging hammock chair is the interior detail that will look most appropriate.
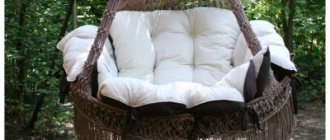
Chair hammock on the veranda Chair hammock on the site
Round chair hammock on the area near the pool
What materials and tools will be used to create a hammock?
For those familiar with the macrame technique, such a task will seem like a mere trifle. Others with even minimal weaving experience will also be able to cope with the task perfectly.
Photos of the finished hanging chair can be viewed on the Internet. So, to organize a fruitful workflow we will need:
- A pair of metal hoops with a diameter of 70 and 110 centimeters;
- 900 meters of durable cord;
- Sling (12 meters);
- A pair of thick cord and wooden rods;
- Construction tape;
- Scissors;
- Gloves for work.
Please note that the cross-section of the hoops should be at least 3.5 centimeters, and the cord itself for weaving should be at least 4 millimeters.
Preparation and process of making a dream chair
You don’t need to be a special specialist to assemble a suspended structure yourself. It is enough to prepare the essentials and then diligently follow all the recommendations. To build the frame you need to prepare:
- work suit and gloves;
- measuring and cutting tools;
- thick fabric;
- blanks for rigid structures - rods or hoops made of metal, wood, PVC or acrylic;
- rigid cushioning material, grosgrain ribbons;
- nylon threads;
- filler (sintepon, foam rubber, balls);
- chain, cable, rope or sling.
These materials are available in a sufficient assortment in hardware or construction stores.
Scheme and drawing
Before you start making your own hammock chair, you will need to make a drawing of it. To do this you can:
- Use options found on the Internet. Among their variety, each person will choose the option that suits them, which can be modified according to their own preferences.
- Draw a diagram of the future product with a pencil on paper. For this option, you must be able to independently determine the dimensions and calculate every detail .
How to make a hammock swing with your own hands
Building a swing on your own is not difficult. Most of the work is done on a sewing machine, and installation most often requires only a strong tree branch.
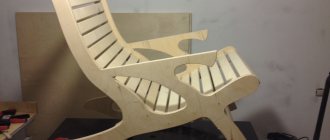
Hammock swing made of wood
The model received its name for the appearance of solid wooden elements in the structure. This DIY hammock swing is the most successful homemade product for a summer residence. It looks more like a chair than a hammock, so it relaxes your back when sitting. Thanks to the wooden slats, the swing retains its configuration, so it is easy to reinstall. The presence of “improvements” does not make it at all difficult to build with your own hands.
The tools you will need are a drill, a hammer and a screwdriver, and the materials will be 2 thin wooden blocks 90 cm long and 3 thick slats 80 cm long.
Manufacturing does not take much time.
- Holes with a diameter equal to the smaller of the slats are made in two thick bars. The distance from the edge is 9 cm. After another 5 cm, smaller diameter holes are made on both sides for ropes. Planks are inserted into them and secured with nails or screws. This creates a frame for a swing.
- The panel is cut out based on the fact that its width should fit between the holes for the ropes, and the length should be sufficient for the finished seat to sag slightly. It must be remembered that the fabric should be folded. A narrow piece of fabric is wrapped around the strip with your own hands and sewn up with thread.
- Cut the ropes to the required length - 2 shorter for the upper part of the hammock, 2 longer for the lower. The rope is threaded through the hole made in the bar and secured with a knot. In 3 thick timber, 2 holes are drilled for the rope. This is a horizontal bar. All 4 ropes of the swing are tied to it. A 3 thick rope is threaded through the crossbar itself, by which the structure is suspended or fixed.
Important! Instead of fabric, you can use woven panels made using the macrame technique. This product is, of course, more impressive.
Hammock swing for children on rings
An additional element is the rings to which the ropes are attached. They rotate freely on a wooden crossbar, simulating a real swing. Models with rings are most suitable for children.
For a swing you need appropriate fabric - preferably made from artificial fibers, as it is easier to wash, eyelets for fastening with a diameter of 12 mm, nylon thread 8 mm and a pair of stronger ropes. You will also need rings, carabiners and a wooden strip with a diameter of 25 mm, depending on the design.
The manufacturing technology is as follows:
- For the base of the hammock, it is recommended to fold the fabric in half and stitch it to ensure sufficient strength. Places for holes for eyelets are marked on two opposite sides - with a deviation from the edge of 5 mm and a distance between holes of 87 mm. Then cuts are made in the marked places.
- 8 mm twine is cut into fragments of different sizes: from 400 to 1000 in increments of 100 mm - 2 pieces each, 7 pieces 1075 mm long. When secured, ropes of varying lengths create and hold the chair configuration. Thicker twine is cut into 2 fragments 750 mm long. Eyelets are inserted into the holes of the fabric. Then ropes are threaded through them and secured with knots. The shortest strings are attached to the upper part of the backrest, the longest ones - to the seat. Then tie all the twine tightly into a ring with your own hands.
- A beam 1000 mm long is sanded and treated with an antiseptic, and then 3 holes are made in it. The main thick rope is threaded through them, so that the twine fits into the hole and is tied with a double knot on each side of the block. On the other side, the slats repeat the same operation. Both ropes are tied to the 3rd ring.
The swing can be fixed directly to the ceiling on the veranda. You can also place them in the garden. To do this, straps are tied to the upper ring, and then a tree branch or beam is tied.
Round swing hammock
This option is very convenient because it has some semblance of a frame. Moreover, to build the latter, you do not need to waste effort, since an ordinary hoop, but only a metal one, is used as a base.
In addition, for the swing you will need 4 tie straps, fabric, padding poly and stationery pins. The procedure is as follows:
- Cut several strips of padding polyester 20 cm thick. They wrap the hoop with them and secure it with threads.
- Cut the selected fabric into strips of the same thickness or greater. The material is wrapped around the hoop so as to hide the padding polyester. The result is a strong, but not hard base, comfortable for the baby. Place the hoop on the fabric and cut out a circle of the appropriate diameter. For hanging the hammock, 4 symmetrical notches are left. The fabric is sewn to the hoop, slightly stretching it. The seam must be very strong, since it bears the main load. In the recesses left, the hoop remains visible. Here it is wrapped with a belt so that the latter forms a loop and sewn. Do the same with the remaining 3 belts.
The finished structure is attached to any suitable element with your own hands: the straps are tied to a hook, to a branch, to any horizontal crossbar anywhere.