- June 14, 2019
- Tools and equipment
- Eugene
Information on how to make a bunk bed with your own hands will be of interest to owners of small-sized homes and families with children. This design will fit well into the interior without taking up much usable space. Let's look at different options for making such beds, as well as step-by-step instructions for making them.
Advantages and disadvantages
Purchasing a finished product in a store is quite expensive, and selecting such models to suit the characteristics of the room causes some difficulties. Therefore, it is better to study the question of how to make a bunk bed with your own hands. Homemade designs can be combined with a small sports corner, retractable cabinets, a desk, and storage compartments.
Any home craftsman with minimal carpentry skills can make basic modifications to a summer cottage. In apartments, such sleeping places are often equipped in children's rooms, which makes it possible to free up space for homework and games.
The disadvantages of double-decker beds include a high risk of injury. For children's versions, it is necessary to organize reliable sides on the upper floor. It is strictly not recommended to place children under three years of age on the second level.
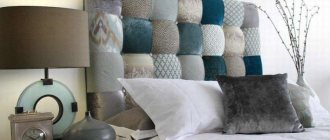
Changing the headboard
You can convert the headboard into a panel. This is an interesting option for changing the appearance of a part, transforming it into a more fashionable style. To do this you will need a sheet of chipboard or plywood. It is cut to the size of the bed or made a little wider. At the same time, you can adjust the height according to the parameters that you like most. This sheet is secured and then decorated.
The hard headboard is decorated with a soft finish so that the foam sheet is covered closely with the material. You can use any fabric or leather, but it is important to ensure that it does not stretch too much and does not tear during use. Puffs are placed on top, which are attached in previously designated places under decorative buttons.
Advice
The surface can be made smooth. This is a good option if there is a child in the house. Security will be guaranteed. This panel is covered with parquet or decorative fittings. You can attach lamps to it or even build soft shelves.
It is interesting to redesign the headboard by turning it into a screen. To do this you will need:
- assemble a wooden screen frame with three or more sections;
- cover it with fabric (read more about covering the headboard in this article);
- arrange adjacent sections so that their width is equal to the width of the bed;
- the screen is fixed on the wall or placed behind the bed;
- the finished headboard is decorated with fabric drapery of the required size;
- At the floor, horizontal fasteners are attached to the wall in an open or closed way;
- the fabric is attached taking into account its desired placement in the decoration area.
The headboard can be supplemented with additional materials, for example, by ordering additional structural parts or small mobile structures. You can place shelves, drawers and even make a tabletop in them. The latter can serve as an excellent shelf for lamps and decorative items that decorate the interior of the room.
From the video you will learn 5 design options for the head of the bed:
Find out how to decorate the wall near the headboard, make your own headboard and cover this element of the bed with various materials.
Equipment for a children's bed
The dimensions of a children's bunk bed are determined by the standard sizes of mattresses. Most often, this figure is 1600 x 700 mm. More complex transformers allow you to increase the length of the bed as the child grows.
Before learning how to make a children's bunk bed with your own hands, it is advisable to consider several options in order to choose the optimal version in each specific case. Among them:
- classic variety for two children;
- increased variation for three or four people;
- an attic-type model, when a sleeping bag is arranged on the second tier, and below is a place for relaxation or activities;
- corner modifications, in which the sleeping compartments below and above are placed at right angles to each other;
- option with a retractable lower floor;
- folding beds.
Adult two-level designs
Sleeping rooms with two tiers for adults are mainly equipped at tourist camps, barracks and other places where it is necessary to accommodate a large number of people in a relatively small space. Knowing how to make a bunk bed yourself may be necessary when arranging a country house.
In small apartments, a combined option is quite appropriate, when the lower place is provided for the parent and the upper one for the child. In addition, there are many variations of the attic type that are suitable for both children and adults. If there is a need, it is quite possible to build a structure with a pair of double beds to accommodate guests.
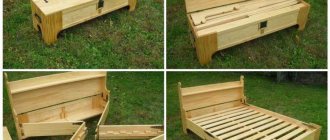
Preparing parts
Racks
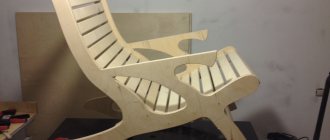
The bed post consists of two boards fastened with four screws at right angles. To do this, we tighten both boards with a clamp. We drill out the intended holes with a drill, screw in the screws, and remove the clamp. In the same way, we prepare three more racks, and those that will go to the head should be longer. When thinking about how to make your own bunk bed with modern shapes, we rounded the top of the posts. To do this, we cut them along the radius with a jigsaw, chamfer the corners of the radius, and sand the surface with sandpaper.
Bed shelves
We cut them out of 8mm plywood. To make the material deform less, we make two blanks for each bed. One sheet should have dimensions of 124x70 cm, the other - 62x70 cm, so that their joint falls on the transverse beam.
Ladder
For the crossbars, you can take 3 ready-made gymnastic poles and cut each one into 2 parts of 50 cm. We make the staircase posts from 70x40 mm timber. The top of the posts is rounded in the same way as the bed posts.
Beam for installing shelves
We cut the timber to install the bottom shelf:
- Longitudinal parts 1860x50x40 mm – 6 pcs. (3 per shelf),
- Transverse parts 700x50x40 mm – 8 pcs. (4 timbers per shelf).
Manufacturing materials
To assemble a bunk bed, you need to choose the right material. Most often, the structures in question are made of wood. Other popular options include:
- chipboard;
- plywood panels;
- polypropylene pipes;
- metal constructions.
For beginning craftsmen, the best choice is plywood or chipboard, which are easy to process and do not require specialized tools. In addition, this material is the cheapest.
Experts recommend making the side parts from a single sheet of particleboard, since any additional cuts weaken the entire structure. Each material has its own processing nuances:
- When working with wood, certain experience and relevant skills are required. At the same time, the product is environmentally friendly and quite durable.
- How to make a bunk bed out of metal? In this case, you will need a welding machine, special cutting tools, as well as skills in working with special equipment. Such models are the most durable and can withstand heavy loads.
- Some “homemade” people even make furniture from polypropylene pipes. Such sleeping bags do not differ in design sophistication and beauty, but are very easy to assemble. To do this you will need a drawing, a hacksaw, pipes and fittings to connect the elements.
Tips for creating borders
So, the existing bunk bed must be measured using a measuring tape for this purpose. It is important to accurately size the overall height, width and depth of the side support panels. Because they must exactly match the size of the frame. Measurements play an important role in this regard.
Another “Sputnik”: in Yakutia, a unique yellow diamond was named after the vaccine
The coldest places to live on earth in ten photos
Psychotest that reveals all hidden sides (they may turn out to be dark)
Side supports are also critical in creating individual panels of fabric. Be sure to measure each side of the beading individually, taking note of the dimensions of each panel. For this purpose it is better to use a simple pencil.
The panels are cut from a fiberboard sheet using sharp scissors for this purpose. It is important to adhere to the dimensions exactly so that the panels fit inside the frame. When all the parts are cut out, you need to attach fabric upholstery to each of the future sides.
For this purpose, staples with a stapler are used. The practical device allows you to secure the fabric faster and more firmly.
To make the upholstery soft, you can additionally use such a modern filler as batting. It must be folded in half and cut to the size of a piece of fiberboard. The batting is attached to the board using the same stapler with staples.
Knitted pullover - spring supertrend: review of fashion news
A woman was looking for her lost twin brother: she found her where she did not expect
Apple pie with cream and raisins: a simple dessert with an exquisite taste
When all the sides have been successfully cut and covered with batting and fabric, you can begin to install them. The principle of fastening is extremely simple. It will be enough to place the panel inside the frame, having previously applied strips of double-sided tape. This material quite reliably attaches various parts to the surface. Why not use it in this situation too!
These are the soft and beautiful sides that resulted. They not only give the furniture a more comfortable look, but also ensure the safety of children.
Using the same principle, you need to upholster the side bed wall on the side where the pillows are located. Then you will get a kind of soft headboard. And if the baby accidentally lies down too hard, he will be protected from a possible blow by the soft fabric.
In addition, the presence of a side on the wall also serves a practical function. Since no wallpaper can withstand children's activity. But the sides made of thick fabric will do the job perfectly.
Always on top without effort: the easiest haircuts to care for spring 2021
There is a risk, but it is small: the expert spoke about the transmission of COVID-19 in the air
Scientists have discovered how harmful radiation from smartphones is
Arrangement of bed stairs
How can you make a bunk bed for children or its adult equivalent as safe as possible? This indicator largely depends on the reliability and type of stairs leading to the second level. The specified element can be in several configurations:
- Vertical type, in which a pair of planks or bars are connected by wooden or metal crossbars. The staircase can be built-in or attached.
- Marching option. This model, the regular version with steps, takes up more space than its vertical counterpart, but is much more convenient. The structure is made from a board with a cross section of 3/8 cm, while the width of the steps should not be less than 35 centimeters, the distance between the rungs should be 20-30 cm. The angle of inclination is taken to be about 70 degrees.
- Option with built-in cabinets or drawers. Since there is free space under the stairs, it is used as storage for things. To do this, drawers are installed on the sides or a kind of cabinet is built.
The type of staircase you choose depends on who will be using it. For small children, it is advisable to build a marching version; other versions are quite suitable for teenagers and adults. For children, it is recommended to make a model with railings and correct calculation of the step, which will make it possible to make the operation of the system as safe as possible.
What to look for when purchasing
Now let's look at the most important factors that you must consider when choosing. All of them are important, and if you miss at least one moment, then instead of joy you will receive disappointment from the purchased furniture.
Material of manufacture
Unlike traditional non-demountable structures, cheap chipboard and MDF are not used here, which is very good, because all the furniture produced is durable and reliable. As for specific solutions, there are only three of them:
| Illustration | Description |
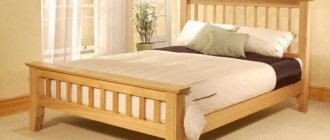
Wooden version. The most common and popular solution with the following advantages:
| |
Metal version of beds. This variety is less common, but also has many advantages:
| |
| A combination of metal and wood. An interesting option that combines the advantages of the two materials described above. The beds are quite light and at the same time strong and durable. The appearance deserves special attention; the combination of two materials looks stylish and unusual and will attract the attention of everyone who sees this bed. |
Bed size
This aspect also requires special attention, since the convenience of placing children and the duration of use of the bed directly depends on it. Let's look at the main parameters:
- Width. We advise you to start from the figure of 70 cm, since this is what is suitable for both children and teenagers; the 60 cm option is good only up to 7-8 years. It is best to use beds 80-90 cm wide; they are comfortable and will provide a comfortable sleep even for those children who toss and turn a lot in their sleep.
- Length. The generally accepted norm is that the length of the bed should be at least 20 cm greater than the person’s height. But since we are selecting furniture for children, we should be guided by the fact that they are constantly growing, and roughly estimate for what period of time the bed is being purchased. The length of the beds is usually 190-200 cm, which allows you to use the bed for more than ten years without spending money on new furniture.
The length of the berth in a children's bed determines the period of use of the structure
- Height of berths. Typically, the lower level is located 40-50 cm from the floor, and the upper level is no higher than 180 cm. Another important indicator is the height of the space above the sleeping area, it should be at least 60 cm, or better yet, 70-80 cm You need to measure from the mattress of the lower bed to the partition of the upper and from the mattress of the upper bed to the ceiling.
Stair type
The safety of using the bed directly depends on this element, so you need to choose it responsibly. First of all, make sure that the steps are strong enough and that the ladder itself is well secured to the body. As for the varieties, there are three of them:
| Illustration | Description |
| Vertical structures. They are also called built-in stairs, as they fit tightly to the frame and are securely fixed to it. The advantage of this solution is that the staircase does not take up extra space in the room and has the most compact dimensions, and due to the tight connection, the element is fixed very firmly, which is also important. But there is also a significant drawback - such solutions are not very convenient to use; in order to rise and fall, you need to hold on to the side racks with your hands. It is recommended to purchase similar models for older children, as it can be difficult for little ones to climb up and especially go down. | |
| Extension ladders. A more convenient solution, which differs in that it is located at an angle to the frame and rests its lower part on the floor. It is much more comfortable to climb and descend on such structures, especially if they have flat, wide steps as in the photo, and there are slots in the upper part to make it easier to hold on with your hands. An additional advantage is that many models with ladders require quick removal of the element so that it does not interfere with movement around the room during the day. | |
| Modular designs. This is the best solution in terms of safety and ease of use. The ladder is a separate module, attached from the end side and secured to the body for safety. Full steps and fencing make this option optimal for use by small children. Drawers, which are often built into such spans, make them even more functional, because you also get additional storage space. |
Other Important Aspects
Now let’s look at a few more nuances that directly affect the safety and comfort of the bed:
| Illustration | Description |
| Bed base. For a children's bed, it is best to use slatted options consisting of special slats. They allow you to evenly distribute the load and ensure maximum anatomical effect from using the mattress. In addition, the slatted structure is inexpensive and weighs little, unlike solid flooring. An additional advantage is good ventilation of the lower part of the mattress, which significantly extends its service life, since moisture does not accumulate inside. | |
| Mattress. The quality of sleep and the proper development of the child’s musculoskeletal system directly depend on this element, so you should not skimp on it. It is best to use an orthopedic mattress that is selected according to the child’s age and physical characteristics. The right foundation allows for optimal conditions for baby's sleep and development. Remember that options with an independent spring unit are not recommended for children; they can only be used from 12 years of age. | |
| Fencing. This element is most often located on the second tier, although it can also be present on the first. It ensures safety and prevents the child from falling while sleeping. When choosing, check the reliability of the structure; the fencing elements should hold firmly and not bend under pressure. The height of the structure is also important; it must be at least 25 cm above the level of the mattress, this is the only way to guarantee complete safety. If you assemble the bed yourself, then attach the fence as securely as possible. | |
Additional design components. This may include different elements:
|
Create a drawing
Craftsmen who decide to make a bunk bed with their own hands must begin work by constructing a drawing on paper or a computer. The diagram will allow you to calculate the required amount of material, fasteners and additional elements. Special design skills are not required for this, if you take into account a number of important nuances.
The distance between the levels should be such that an adult can sit below without the risk of hitting their head on the upper part. There is enough space between the second floor and the ceiling to ensure that the child is comfortable while laying down and sleeping. In addition, if there is insufficient free space, it will be difficult for the baby to breathe, since hot air tends upward. This is especially true during the heating season. When creating a project, it is necessary to take into account the standard dimensions of mattresses.
Conclusion
Now you know about all the features of collapsible bunk beds and can easily choose the right model using this review as a guide. The video will provide additional information on the topic so that you can delve even deeper into it. If anything is unclear or you have any questions that require additional clarification, write in the comments under the review.
Address: Academician Anokhin Street, Moscow
See also:
Similar tasks
Other tasks in the category "Repair and construction"
A private house with an autonomous 2-circuit diesel heating system. The boiler is working and 1 circuit out of 2 is working. In the second circuit, hot water is supplied to the comb and then to the incoming pipes (sinks.
Vladislav N. village of Manyukhino
Ksenia Aviatsionnaya street, 59, Moscow
The most hygienic shower was purchased for this purpose, what is needed along the way, please buy it Payment via Sberbank online We will discuss via WhatsApp Thank you
Alek M. Tulskaya metro station, Moscow
Required Craftsmen to Work on Ceilings in New Buildings in Moscow Peak Group Payment Every 2 Weeks
Owners of small apartments have to solve the problem of saving space. A standard layout with a small area of rooms forces you to look for compact, functional furniture to make the environment as ergonomic as possible. A good option is a DIY bunk bed, which will free up space for games in the children's room.
Necessary materials and tools for the corner option
How to make a corner-type children's bunk bed? First you need to prepare a drawing, as well as the necessary components. This includes:
- four wooden blocks with sections 5 x 10 x 300 cm and 5 x 10 x 240 cm;
- a pair of boards (2 x 10 x 300 cm), as well as one similar element (2 x 15 x 300 and 2 x 20 x 300 cm);
- a pair of plywood sheets (1.2 x 120 x 240 cm);
- 75 mm mounting screws;
- 40 mm self-tapping screws;
- hexagon screws 6 x 150 mm with washers (8 pieces);
- ten bolts (6 x 75 mm), two bolts (6 x 150 mm) with nuts and washers;
- fine and coarse sandpaper;
- putty mixture for wood;
- screwdriver;
- circular saw or hand saw;
- electric jigsaw;
- drill with router;
- tape measure, building level.
How to make a bunk bed with your own hands: step-by-step instructions
To begin with, cut out the prepared material according to the drawing. The further stages of work are as follows:
- It should be taken into account that the dimensions of the frame for the sleeping place should be larger than the dimensions of the mattress by 8 centimeters in length and 10 cm in width. On the ladder fastening side, add another 4.5 centimeters.
- All external ribs are chamfered using a hand planer or similar tool. All elements are sanded and polished.
- Markings for fasteners are made on the prepared parts.
- Using screws and cut bars, the top and bottom of the frame are assembled. To enhance the rigidity of the structure, at least one partition is introduced into it.
- Boards (2 x 15 and 2 x 20 cm) are attached to the adjacent parts of the frame using self-tapping screws. These elements will serve as sides.
- To make a bunk bed yourself (you can make a real masterpiece with your own hands, the main thing is to want it) stable and safe, build a corner support. To do this, connect the bars (5/10 cm) at right angles, the end part should be L-shaped.
- At the place where the upper level is fixed, a hole is drilled in the support. A similar nest is made in the frame part with a side of 20 cm. They need to be widened so that the screw head and washer are hidden.
- The frame is attached to the stand using screws.
- Then the structure is fixed to the walls. If the ceiling is plasterboard, the fasteners must pass through the rack profiles to prevent them from popping out. The attachment points are marked by leaning the frame against the wall, and the structure is leveled using a building level.
- Additionally, through holes are made in the frame part through the profiles, into which hexagonal screws are screwed until they are fixed.
- Holes are drilled in the brick wall with a hammer drill, and the frame is secured with anchors. A similar procedure is carried out with the second frame.
- Assemble the upper tier fencing and screw it to the frame and wall.
- A staircase is constructed from a pair of bars and crossbars, which is attached to the supporting frames.
- Let's continue studying the instructions on how to make a bunk bed with your own hands (photo of the finished product is below). The staircase can be attached or built-in. The second option will require special cutouts that are needed when fixing the frames.
- Plywood is screwed to the top and bottom of the frame to accommodate the mattress. The base for it is prepared from slats.
- The bars are attached to the support frame bar, between which the slats are laid. To strengthen the structure, it is better to nail them to the bar.
- At the last stage, all that remains is to putty the working sockets for the screws, clean them with sandpaper, and varnish or paint the product.
Experts recommend that the chipboard versions be assembled using euroscrews; the slats for the mattress and the rungs for the stairs are made of wood. It is undesirable to build boxes on the upper level, since the large mass of chipboard makes the entire system heavier.
Two tiers from one
If the house has a one-level model, it can be used to build a structure with two floors. How to assemble a bunk bed in this case? The existing variation is taken as the base, and the upper part of the frame is made according to its dimensions. To ensure the stability of the system and support significant weight, the fixation of the supports with the frames is made as strong as possible. The modification with a sofa on the first level is installed in a similar way. In this case, the dimensions of the upper part should be compared with the dimensions of the lower sofa.
Tools and materials for restoration and alteration
Tools for bed restoration:
- Hex keys for confirmations, as well as spanners (needed for disassembling bed parts), screwdrivers for self-tapping screws.
- An industrial hair dryer to soften the paint and a sander with an emery set. The set should contain tools of different grain sizes. All these accessories are useful for sanding surfaces.
- Various painting equipment - brushes, rollers, sprayers, spatulas and sandpaper to evenly apply a leveling layer of putty.
Advice
The materials you need to prepare are paint, stain and varnish. A primer and special impregnation will be required to increase the adhesion of the material. To level the relief, you need putty, oil and wax impregnations, which will mask the old coating and eliminate cosmetic defects.
How to make two beds from a bunk bed?
A pull-out version of the bed is ideal for this. This model is as comfortable and safe as possible for arranging a child’s room. The height of the sleeping place is taken to be slightly more than 700 mm. During the daytime, the lower part hides in a niche, freeing up space for activities and games. The peculiarity of this design is that both elements are not fixed to each other, and this allows them to be used separately.
How to make a pull-out bunk bed yourself? There are no particular difficulties here. All elements are made from chipboard or a laminated equivalent. Stages of work:
- The base of the bed is made from a solid board 18 millimeters thick. It is attached to the side parts using a minifix and a pair of dowels on each side.
- Additional reinforcement of the structure is carried out with metal corners (bottom, top and sides).
- The sides are fixed to the bottom with four eccentric ties and three dowels on each element. These parts are connected to the side walls using bolts with a wide head.
- Four wheels are attached to the sides of the lower part. Under them you will need to cut recesses of suitable size, and metal overlays will be installed on top.
Retractable modifications have many advantages, including: saving usable space, ease of manufacture, and the possibility of obtaining an additional separate place for sleeping. The main drawback is the lack of a compartment for storing bed linen.
Metal pipe version
Next, we’ll look at how to make a bunk bed from metal pipes. This option is considered the most durable and hardy. Despite the fact that such a design is simple in nature, its assembly is quite labor-intensive and requires special skills. You will need equipment for welding and cutting metal, as well as appropriate experience in handling it.
Models of this type are manufactured as follows:
- To assemble the base, use a metal corner 45 x 50 mm. Grooves are cut along the edges of the pipes to connect to the frames and ensure maximum joint density (a 32 x 65 mm channel is suitable).
- The frame part is fastened by welding, carefully observing that the corners are strictly straight and the mating elements are parallel.
- The racks are cut from thin-walled pipes (25 mm). Frames are welded to them, followed by processing of the seams.
- The sides are made of metal rods, resulting in a kind of fence with railings.
- A ladder is welded from pipe elements and attached to the structure.
Collapsible children's version
How to assemble a children's bunk bed? A standard configuration bed is easier to assemble, and instructions for its manufacture are listed above. But there is also a collapsible option. Its advantage is the ability to mirror the location in the room. This means that the right or left position of the steps can be changed by rearranging one panel.
In addition to the fact that it is very convenient, since the ladder also serves as a shelf for books, the design is very compact. The extra weight gives added stability to the system. Another nice thing about assembling this option is that no special tools are required for this purpose. Pliers will be enough to disassemble the panel.
Family modification
How to make a family-type bunk bed? If a family has children of different ages, or an adult has to sleep with a child in the same room, this project will be the best way out of the situation, especially in small rooms. The lower part is intended for the older offspring or parents and should be larger in size. This method causes some inconvenience, but sometimes it is the best option.
Stages of creating such a design:
- First you need to build the top tier, consisting of a pair of footrests. To fix the slats in the headboard, you need to start this operation from the central part. If the elements do not fit tightly to the outer parts, the remains of the head part are used as a separator.
- For the lower level they make a full-size classic bed, without footboards, but with two headboards.
- The placement of the upper part is measured, marks are also placed on the caps of the lower level. A hole 100 mm deep is drilled in the center of the marks. On the upper bed, a similar nest is made in the center of the lower part of the legs. To fasten the floors, use 150 mm metal screws without heads or dowels made of hardwood.
- How to assemble a bunk children's bed with the possibility of an adult resting at the final stage, we will consider further. At this stage, the stairs are built. A pair of 20 x 40 mm bars, 1600 mm long, are cut, both edges are cut at an angle of 25 degrees from the square, parallel to each other. A mark is made at the upper end at a distance of 40 millimeters from the front upper corner. The square is used to draw a line perpendicular to the bottom cut. The cut is made along this line, which will be the sides of the stairs. The crossbars are screwed to the sidewalls using 50 mm screws. To increase the strength of the structure, the joints are additionally treated with glue. Metal brackets can be used as fasteners for stairs.
Advantages
There are many positive aspects:
- When assembled, the structure takes up minimal space. The arrangement of sleeping places one above the other allows you to save space, which is very important for small children's rooms, because the saved space can be used for games or other necessary furniture.
In the area occupied by one bed you get two sleeping places at once
- Reliability and durability. Since furniture of this type is subject to increased loads during operation, the structures are made stronger than standard ones, which ensures a long service life. All bunk beds from renowned manufacturers meet the highest quality and safety standards.
- Variety of options. There are many models on the market, each of which has its own advantages. Designs vary in size, design, color and a number of other factors. It will not be difficult for you to choose a suitable modification for any interior.
There are a lot of models, and they all have their advantages
- Various sizes available. You can find beds with different configurations of sleeping places, and sometimes there are solutions in which beds of different sizes are combined in one design, as in the example in the photo above. This allows you to choose the right solution for any child and use the bed for a fairly long period of time.
- Many useful additions. Some modifications have shelves to store the necessary little things that should be at hand. Often under the lower berth there are drawers for linen, which is very convenient, because everything you need will be at hand.
The presence of drawers for linen is a big plus for the design
- If necessary, you can quickly turn a bunk bed into two separate single modules. You need to carry out a series of simple steps - and you will get two identical beds, which can be placed side by side, or can be placed in different rooms, if necessary.
Each level of a bunk bed turns into a full-fledged single bed in just half an hour or an hour
Flaws
As for the minuses, they are as follows:
- Some children find it uncomfortable to sleep on the second floor. Of course, the opposite often happens and children argue about who will be on top, but sometimes it turns out that no one wants to occupy the top tier.
- In terms of injury risk, such beds are more dangerous than traditional ones. And this is not surprising, because you need to go up and down the stairs carefully, and children like to do everything by running. Plus, during games, a child may hit the fence, so it is better to choose options without protruding corners.
Choose models with a minimum number of traumatic parts
- A bed can clutter up a space. This applies to assembled two-tier structures; if there is little space and the bed obstructs natural light, then it will look too bulky in a small room.
For the little ones
Above are options on how to make a bunk bed with your own hands. Finally, let's look at a model for very young children. Everything is quite simple here. Take two sheets of plywood and several screws. The base length is taken to be the same as a children's mattress (1300 mm). The modification is designed for preschool children.
There is nothing complicated in the basic design of this model. You will need five plywood panels (for the sides, headboard and middle part). The dimensions are adjusted using a milling cutter, grinding and assembly are carried out. Consumables will require a couple of plywood sheets (1200 x 2400 mm, 6 and 20 mm wood screws, protective coating - paint or varnish).
Preparation of parts
How to make a bunk bed with your own hands? Having prepared everything you need, you can begin preparing the components of the bed and assembling the furniture. The first step is to measure the mattress; the shape and configuration of the future bed depends on it. On each side, 2 cm is added to the obtained values to make it convenient to tuck in bed linen in the future. All outer edges of the bed must be chamfered, as there should be no sharp corners on children's furniture. To solve this problem, a plow is used
When choosing materials, it is necessary to pay increased attention to quality: children love to jump on the bed, testing its strength
Headboard
Side wall
Frame
The basis of the frame is made up of 4 side parts - drawers. They are side boards to which longitudinal slats are attached to support the mattress and bars are stuffed. Between these bars will be held the transverse slats on which the mattress is placed. The upper inner side must be chamfered - the drawers should not have an internal sharp corner, as this can lead to scratches. The bars hold the mattress boards, preventing them from moving to the sides, so the slats do not need to be screwed in with self-tapping screws.
Next, you need to assemble the frame of the headboards, that is, the footboard and headboard. The ends are assembled from timber support posts and crossbars; the assembly instructions will help you do this correctly:
- drill holes in the posts and crossbars to install dowels;
- connect the support post and the headboard using dowels soaked in wood glue. The glued frame is tightened with clamps to dry completely to ensure strength;
- apply external covers to cover the fasteners;
- At the top of the headboard, attach three decorative pads to which the fence will be attached.
Frame assembly
Legs
The role of the legs in such a bunk bed is played by the vertical posts of the frame; assembly is carried out using screws or other types of connections. The lower part of the legs can be given any decorative shape yourself. Carved wood looks beautiful: processing of the legs can be pre-ordered at a turning workshop. Round figured bed legs will become an important element of nursery decor.
Ladder
It is necessary to make and assemble a ladder with three steps. For this purpose, vertical posts are used, in which it is necessary to make cutouts 38 mm deep for attachment to the frame. Guide holes are drilled in the racks for attaching steps
When placing the lower step, it is important to ensure that the fasteners do not fall into the same place where the fastening of the lower tier board is located
If the staircase is installed obliquely rather than vertically, it is advisable to provide it with handrails for maximum safety. For this, a beam of small thickness is used; it is selected in accordance with the circumference of the child’s arm. The railings are firmly fixed with self-tapping screws.
Stair parts
Assembling the stairs