There are televisions in every home.
Some people have them installed in bedrooms, living rooms, kitchens and children's rooms. Therefore, TV stands do not lose their relevance.
It is worth noting that they are provided by different manufacturers in a wide range, but if you wish and have some carpentry skills, you can make such a piece of furniture with your own hands.
Peculiarities
The main advantages of self-made furniture include the ability to come up with a cabinet design and select building materials.
Despite the large selection of ready-made furniture in stores, consumers are often not satisfied with the dimensions of the product, its color scheme or model. You can make a cabinet yourself that will fully meet all your requirements. In addition, making furniture items yourself will cost much less than buying ready-made ones .
Important : before starting production, decide on the level of your skills. This determines what materials you can use in your work.
Materials
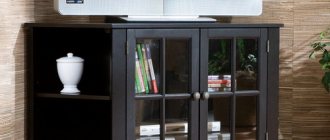
Bedside tables and shelves for a TV set are furniture components, and the choice of materials in such a situation is quite extensive, varied and limited only by the consumer’s budget. Wood, glass, steel, plastic - the use of the appropriate material will both increase the functionality of the product and add additional sophistication to the interior decoration.
Glass stand. It can be colorless, tinted or matte in the form of tempered glass (Stalinite), which meets safety standards.
All presented materials have excellent performance qualities, will perfectly complement any interior space and, with proper care, can last for many years.
What to make it from: wood or chipboard?
Depending on the materials chosen for the manufacture of furniture, its appearance, practicality and ease of use will depend. Most often, home craftsmen use for these purposes:
Natural array.
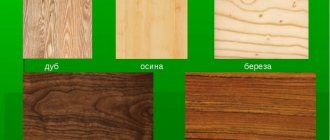
This material is valued at all times for its naturalness and nobleness. You can make a TV stand from any type of tree. Most often, craftsmen use: oak, ash, pine or birch. For elite and luxurious furniture, which will be the highlight of a classic interior, it is better to choose oak, beech or black walnut .Linden, birch and pine are considered more budget options. When listing the advantages of solid wood furniture, it is worth highlighting: long service life, elegant appearance, beautiful texture. But not all tree species can be processed at home. For example, making oak furniture without the skills is quite difficult.
- MDF. This material is made from natural wood. TV stands made from MDF are extremely beautiful and aesthetically pleasing. But it costs much more than chipboard. The advantages of the material include: environmental friendliness and safety, low weight and uniform structure.
- Chipboard. This material is considered the most common due to: a large selection of colors, ease of processing, and affordable cost. Chipboard is a natural and safe material that does not emit toxins and does not provoke allergic reactions in people .
Chipboard.
In principle, this material is practically no different from chipboard. The only thing is that its surface is covered with a melamine film, which increases the material’s resistance to moisture. Like chipboard, laminated chipboard is resistant to defects, environmentally friendly and is supplied by manufacturers in a wide range.- Furniture board. It pleases craftsmen with its even and smooth surface and ease of use. It is attractive in appearance, durable and resistant to cracking. Thanks to the wide range of furniture panels, you can make a bedside table of any thickness.
Tip : Chipboard is considered the easiest material to process.
No special tools are needed to process it.
Classification
The width of the shelves directly depends on the size of the TVs being installed, so if you have a wide TV of an older model, then the shelf should be appropriate. Flat models are attached with special brackets and plugs that allow you to position the TV screen at a certain angle for the eyes. But if we talk about old “boxes”, then for their installation large structures are used that can withstand heavy weights.
Samples of shelves for TV
When choosing a future design for a TV, you need to start from the size of the device. But if for old TVs shelves with simple designs that do not turn or tilt are mainly used, then for modern models there is a wider choice. Below are the main options for hanging shelves that you can make yourself.
Wide hanging shelf
Table. Types of hanging shelves.
| Shelf name, photo | Description |
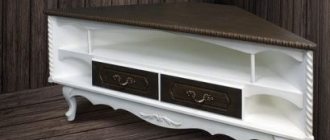
| Corner | A simple shelf, made in external or internal version. Making a corner shelf is not difficult, so many beginners choose this option. |
| Wall-mounted | An excellent presentable shelf that allows you to conveniently and beautifully install a TV or other items. But if the TV is an old model, then it will not look so stylish on such a modern shelf. |
| Hanging | Another type of wall shelves. This option will fit perfectly into the interior of small rooms where you need to save space. The disadvantages of hanging shelves include the complexity of their design. |
| With bracket | This type of shelf is used quite rarely, although it looks very attractive. It is very difficult to make such a product yourself, especially without special skills or experience working with wood. |
| Shelf-stand | A small cabinet that does not stand on the floor, as is usually the case, but is attached to the wall. The design of the shelf-cabinet has additional shelves where you can store useful things, for example, a tuner or discs with films. |
Wall shelves in the interior
Project, diagram and drawing
Before you start making a cabinet, you need to draw a detailed drawing of it. This will need to be done on a checkered piece of paper or on special graph paper. If you do not know how to draw up competent drawings, you can find a suitable option on the Internet. There will already be a well-thought-out model with all sizes. You can also use special computer programs. With their help, drawings are created in different projections indicating the dimensions of all parts.
For modern plasma TVs, stands are made narrow and long . Popular dimensions are:
- length – 186 cm;
- width – 42 cm;
- height – 75 cm.
Advice : since such a piece of furniture is quite long, it is better to install it not on 4, but on 6 legs.
Let's start assembling
The first stage, the most important, is creating a drawing. There are two options to solve the problem. You can find ready-made drawings in furniture catalogs. This will significantly save time and give a greater guarantee of the reliability of the structures, since the drawing was developed by engineers with experience. However, in this case, uniqueness is lost. The second, accordingly, is to do everything yourself. You will need at least some experience in drawing and calculations, although there is nothing complicated about it.
Important! Pay special attention to the shelves. It is necessary to correctly calculate the sizes of sections for equipment: speakers, console, subwoofer, game console and others.
Tools
We will consider making a TV stand from natural solid wood. Therefore, the tools you will need to prepare are:
- pencil and ruler;
- cardboard for making patterns;
- electric jigsaw;
- drill;
- sander;
- screwdriver;
- plane;
- clamps.
Materials you will need:
- glue;
- screws and self-tapping screws;
- guides and fittings;
- solid laminated timber.
Selection of materials for making the bracket
So, to make a swivel bracket on which you could install a TV, we will need:
Two perforated corners with stiffening ribs
This is very important, since the corners for making the bracket should not bend; Several M6 nuts, screws and washers; Aerosol paint.
When choosing mounting corners, special attention should be paid to their thickness. To make the bracket, it is recommended to use corners with a thickness of at least 2 mm
Just as mentioned above, stiffening ribs must be present at the corners.
The size of the corners depends on the dimensions and weight of the TV. At the same time, the wider the corners, the better and more reliable the homemade bracket will be. To install a small TV, the width of the corners for making the bracket must be at least 65 mm, for larger TVs, at least 100 mm.
How to assemble a stand at home?
Before you begin manufacturing and assembling a TV stand, you need to prepare individual parts:
- table top made of solid laminated veneer lumber, width 42 cm, thickness 3 cm;
- shelves made of edged boards or laminated veneer lumber 30 cm wide and 1 cm thick;
- timber for the cross with a section of 50 by 50 mm;
- timber for longitudinal jumpers between the legs with a section of 30 by 30 mm;
- a board measuring 80 by 30 cm for making crossbars and legs.
Important : the wood must be well dried without knots, cracks or other defects.
The process of assembling a stand for a modern plasma TV will look like this:
We prepare the frame and cut 6 legs. According to the drawing, their height will be 72 cm. It is better to cut the legs together with the crossbars .
They are the ones who will hold together the back and end parts of the furniture piece. The length of the crossbars will be 28 cm. As a result, from one meter board we get 1 leg and one crossbar.- Next we move on to fastening the legs with longitudinal jumpers. Here, a beam with a cross section of 30 by 30 cm is used. In total, you should get 12 identical parts, each 75 cm long. The jumpers are attached to the legs with screws, which are screwed in at an angle of 45 degrees. For the aesthetics of the product, it is recommended to embed the screw heads in lumber.
- Now you can start working on the shelves. The lower and middle shelves can be made of boards or solid laminated timber. For our cabinet, it will be enough to prepare one board 30 cm wide. We cut off 1.5 cm from it and adjust it to the width we need. It should be taken into account that the length of the shelves will be equal to the length of the product itself, taking into account the calculation of the width of the legs. Consequently, the length of the shelves will be 170 cm. The shelves are attached to the longitudinal jumpers with screws .
- Next, you can proceed to the installation of the crossbars of the cabinet. The cross members will connect the front and rear parts of the frame. The crossbars are fastened with furniture bolts, two on each side.
- Now we saw off two pieces 30 cm wide and 28 cm long from the timber. This part is attached to the legs with furniture bolts.
We prepare furniture crosspieces.
They are necessary for the strength and good stability of the product. The length of our blanks should be 66.2 cm. These parts are superimposed on each other, and markings are made with a pencil at their inner corners for the grooves. The assembled crosspieces are inserted into the frame, and a screw is screwed into the joints of the grooves. The crosspiece is attached to the legs with glue and further strengthened with screws .- The final step is installing the countertop. To make it, it is better to use ready-made solid wood from laminated veneer lumber. Since this material has a flat and smooth surface and does not require additional processing. The tabletop is secured with screws.
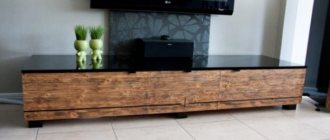
Wooden stand for LCD TV or monitor
The master begins work on a homemade product by printing out a multi-page template. It is designed to make a stand for a 24-inch Vizio D24F TV-monitor combo; the template will fit other devices of similar sizes with minimal or no alterations. The master glues the template page for making the stand onto a workpiece measuring 150x250 mm and 20 mm thick, after which he cuts out the corresponding part on a jigsaw. Using the same template, he drills holes in the base.
Having glued together two pages of the template at once (this solution allows you to repeat the stand, having only an A4 printer), the master cuts out a vertical part of the structure from a blank measuring 130x410 mm of the same thickness. In this case, it is important that the end touching the base is cut strictly at a right angle, otherwise the stand will come out crooked.
The master checks this and makes sure that the result is not crooked:
Based on the rectangular shape on the base template, the master connects it to the vertical part with three self-tapping screws:
Next, the craftsman cuts out a part that is directly connected to the mounting holes on the back wall of the TV or monitor. In most cases, their location is standard, but the threads may vary. You need to attach the device to the stand with the appropriate hardware. The master came up with M4 screws 16 mm long.
The master also installs an insert with an internal thread in the central hole, which plays the role of a wing nut with a screw:
And he carves the lamb himself:
In which the screw is glued with epoxy:
And saws off the head from it:
Varnishes everything and places a washer on the part attached to the monitor or TV:
Then he assembles the stand and installs the device on it:
This construction was repeated by a commentator under the nickname thehoss (on the Instructables website there is a function I made it that allows you to show the result of the repetition), let's see what he came up with:
Source
Decoration
After making a TV stand from natural solid wood, it will need to be given an attractive appearance. To do this, all fastening points with bolts and screws are puttied with a special filler for wood.
Next, the product can be coated with stain and varnished in several layers. Also, wooden furniture can be painted with water-based enamel or acrylic paints .
For classic motifs, a wenge shade is suitable, for country or Provence, white colors are chosen, and modern models can be painted in any color. Although people rarely paint over the beautiful texture of an array. If desired, you can decorate a wooden cabinet with carvings applied to the table top or external walls.
As for the range of use, the piece of furniture we made can be used not only as a TV stand, but also as a piece of furniture for storing things.
Tip : instead of a cabinet, you can place the TV on a home-made table or even a chest of drawers. And for comfortable viewing it’s worth making an armchair or sofa.
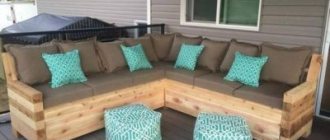
DIY TV stand with shelf
A similar cabinet can be bought at a furniture store, but high-quality furniture made conscientiously from reliable materials will not be cheap. It is quite possible to make a similar cabinet with your own hands; you just need to have basic tools that are in the arsenal of almost any home craftsman. Missing tools can be borrowed or rented. What you will need:
Before starting work, you need to stock up on: - metal pipes with a square section of different sizes; - plywood, boards, - varnish, black paint in a can. You will also need: - clamps, a vice, - a metal saw, - a welder, a drilling machine, - a grinding machine, - a tape measure, an awl, a metal brush.
Step 1. Estimate the size of the cabinet based on the size of the TV. Make a drawing of the product.
Stage 2. You need to cut the pipes into pieces that will become elements of the future table. Before cutting, markings are applied; it is more convenient to do this using a tape measure and an awl. Apply the markings by making notches with a metal awl.
Photo
Ideas for various stylistic solutions can be seen in the following photos:
Main functions of TV stands
A television, no matter what design it has, is a rather large and weighty device. Accordingly, the owner of the house tries to position it as securely as possible. These shelves are just for safety.
Stands with frosted glass transmit IR radiation well - they are convenient to use if some equipment is placed in niches.
In addition to their excellent holding properties, TV stands have some internal niches in which it is convenient to store various small items and additional equipment for the TV.