Which material is better to choose
There are several types of raw materials for constructing shelves:
- metal;
- plastic;
- tree;
- glass;
- combined material.
Metal structures are very durable and can withstand a lot of weight. This configuration looks expensive and solid. But it requires special care and special treatment, otherwise corrosion may occur and the flower shelves will deteriorate.
It can be ordered in stores or online. They are unpretentious and very easy to use. Sections can be chosen in any shade. Since plastic is very flexible, crafts made from it can have different shapes and sizes. They are easy to wash and move as they are lightweight.
Wooden crafts are very popular. But the furniture is not convenient to use. When watering plants, water often gets on the surface of the stand or board, which can rot and swell.
Glass structures have a simple, elegant appearance, but to build it you need to have experience working with glass. They need special care. And you can’t put a lot of weight on such stands. They are good if you need to place one or two pots.
Combination sections include several components. Usually it is wood with metal or glass with metal. The crafts have an unusual appearance. They can withstand a lot of weight due to the combination of materials, and are not very fussy about cleaning.
Where to start?
First of all, you need to think about the purpose and location of future shelves.
For small items, it makes sense to make neat, lightweight shelves or a modular system united by one style solution.
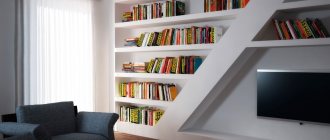
If it is necessary to store large or weighty items, it is important to correctly calculate the overall dimensions of the shelves and their strength. Bookshelves must be strong enough and securely fastened, e.g.
A simple wooden structure will be a good addition to a kitchen interior and a room decorated in a folk style.
Bright colors for a homemade shelf are permissible only if there are similar color accents in the design of the room.
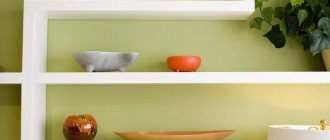
A good visual effect is created by shelves whose color matches the overall tone of the walls or furniture.
The shelf is an important detail of the interior, for this reason its appearance is very important to think through in advance. In addition, you should take seriously the choice of placement of the shelf and decide on the option for its fastening
In addition, you should take seriously the choice of placement of the shelf and decide on the option for its fastening.
Shelves are usually secured using metal furniture strips with slots.
Taking into account all the nuances, it is necessary to draw a sketch of the future shelf, take careful measurements, calculate the overall dimensions of the product and complete a competent drawing.
Drawing
No matter how simple the model of the planned shelf may seem, it is necessary to spend time on drawing work.
This work will help to correctly calculate both the dimensions of the future structure and the material consumption.
When making a drawing, you should additionally consider the functional features of the design. The shelf must be strong enough to withstand future loads.
Supporting elements are placed taking into account the characteristics of the material. In any case, the maximum step between the supports should not be more than 90 cm. The thinner and softer the material from which the shelf parts are made, the smaller the distance between the supporting elements.
Careful preparatory work will allow you to avoid annoying mistakes when making your own home shelf.
Hanging shelf-shelf
It’s easy to make your own hanging shelf that looks like a vintage bookcase.
To do this, you need to prepare 3 wooden blanks of the same size. Using a feather drill, holes are made in them with a diameter slightly larger than the cable or cord that will hold the elements together.
The boards are painted in the desired color and varnished. Then they are connected by passing a cord folded in half through the holes. The elements are fixed with knots, which are tied 2 for each element in increments of approximately 30 cm. With such double knots, each shelf is securely fastened. At the bottom, the cord can be loosened a little, forming tassels.
This shelf looks good in a children's room or in the bathroom.
With your own hands you can make an original and convenient shelf that will fully meet all individual requirements and fit perfectly into the interior. The work does not require much experience or serious financial investments.
How to make a simple wooden shelf?
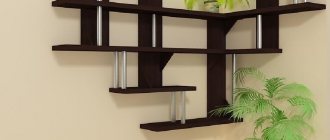
If you add different numbers of modules you need to the base, you can easily give it a completely new look
Please note that you need to look at the condition of your materials - they should not be crooked, cracked or covered with fungus. And if everything is ready, you can start creating the shelf.
Step one. Marking. For example, let's take a rectangular shape. We take a pre-prepared drawing of the structure and transfer the measurements to the boards. When we have completed this stage of work, we proceed to the next one.
Step two. Sawing. A jigsaw is best suited for this, but other tools are not excluded. Make sure that the cuts correspond to the markings. The result should be two short and two long boards.
Step four. Assembly. Place the bottom horizontally. Mark eight millimeters from the edges and then draw lines
Please note that they must be parallel to the cuts.
Next, on the drawn strips we mark the places where the holes for the screws will be made. Same with the top. After this, side boards secured with self-tapping screws are attached to the lower part of the product. Place the top board on top and secure it.
This is the simplest version of a wooden wall shelf that you can make. And you can build on it when constructing new products.
Corner shelf
This shelf option involves mounting the product on two adjacent walls at once.
For the inner corner, you can make a simple design from slats, connecting with them 2 or 3 figured bases located one above the other.
For a shelf that has several levels, it is convenient to make small shaped frames from slats. The shelves are attached to these frames.
The shelves themselves can be cut out from plywood or parts of old furniture.
The front cut can be covered with a figured strip.
To decorate a protruding external corner, a simple design of several small open shelves located with a slight offset relative to each other is well suited.
Photos, diagrams and drawings of various options for wooden shelves can be found on thematic websites.
Materials for making shelves
If we talk specifically about homemade structures, wood is most often used. Moreover, there are many options here.
These can be either ordinary boards or sheet materials in the form of plywood, chipboard or MDF. Some people use leftover OSB (although the material has no aesthetic qualities). Others specially prepare pieces of logs, as well as saw cuts and thick tree branches.
But the most accessible and popular material is boards. You can buy them in the store, or you can prepare them yourself by sawing a log.
You can also “get” boards for free by dismantling old wooden pallets. For many, they have been lying around idle for years.
You can read in detail how to make a shelf out of wood with your own hands on our website in our article.
This is just one of the possible options using boards and bars. Very simple, by the way. So take note.
Another popular material is metal. Most often these are profile pipes or strips. But you can use any rolled metal that catches your eye.
Metal structures are durable and can withstand significant loads. However, to work with metal you will need additional tools in the form of a grinder and a welding machine. However, sometimes you can do without welding by using bolted connections of parts.
Popular articles Dachny Alcohol Factory
Shelves can be made from other materials. For example, made of glass or plastic. In the first case, you will have to sweat a little, because working with glass is quite a task.
It’s not for you to cut wood “by eye” or cook metal according to the principle: “Oh, it’ll do just like that!” This requires accuracy, patience and sometimes even pinpoint precision in the glass cutting process.
With plastic, of course, everything is much simpler. It will also be much easier to make shelves from wood. Some people prefer to make shelves from cement mortar. But most often these are floor structures or small hanging shelves.
Shelves for flowers from furniture panels and bars
Scraps of glued furniture panels can be found in furniture workshops and bought for pennies. After all, shelves require very small pieces that are difficult to find other uses for.
This material is practically no different in appearance and characteristics from solid wood, it is just as easy to process and also requires a protective finish to increase resistance to moisture. The proximity to which is inevitable when placing living plants on shelves.
Step 1. Decide on the number and shape of the shelves, draw their outlines with a pencil on the furniture panel.
Step 2. From the wrong side we cover the outline with adhesive tape or adhesive tape to prevent chips from breaking off during cutting.
Step 3. Cut out the parts with a jigsaw.
Step 4. We secure the workpieces on the table with clamps and process their edges with a milling machine, rounding them or giving them a shaped shape.
Step 5. Remove all irregularities and minor defects by sanding. To avoid abrasive scratches on the surface, sanding should be done along the grain of the wood fibers.
Step 6. We also process the bars for the legs with a milling cutter, rounding the corners, and grind them until a smooth surface is obtained without scoring or burrs. If there is a desire and opportunity, they can be given a curly shape. If not, normal processing is sufficient.
Step 7. Turn the bottom shelf over, evenly space the legs on it and trace each one at the base with a pencil. Then in the center of the drawn square we drill a hole with a thin drill so that we can see where to screw in the self-tapping screw from the front side.
Step 8. Coat the ends of the legs with glue, set them in place according to the marks and fasten them with self-tapping screws using a screwdriver or screwdriver.
Step 9. Determine the position and height of the second shelf. It moves relative to the bottom to the side, so you will need two legs of different lengths: one to the floor and the second to the plane of the bottom shelf. We calculate these dimensions, saw off the bars of the required length and fasten them according to the already known pattern.
Step 10. We attach the third tier, one of the legs of which rests on the bottom shelf, and the other on the second.
Step 11. We cover the finished structure with paint or varnish or impregnate it with a protective impregnation in two or three layers.
Shelves and shelves for the kitchen
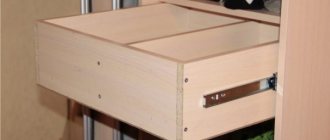
Say what you like, but in the kitchen the main thing is functionality. There is not much free space even on the walls: the cabinets take up a large area. Therefore, one of the tasks is to make the most of free space. There are interesting ideas for small or even very small gaps between the wall and the refrigerator or other household appliances. Strictly in size, you can make a pokka on wheels, which can be pulled out and completely hidden there. It is wide and narrow (see photo).
It’s easy to make such a retractable shelf-rack on wheels for different jars. Everything you need is at hand and out of the way
There are also interesting ideas for saving space. If the sink or station is located near the window, you can take the sides. There is an interesting hanging option - a grid on chains to which all sorts of utensils are attached. But such a shelf is possible if the desktop is not against the wall. Another option for saving space is if the kitchen-dining room is zoned with a counter, you can also make a shelf above it, which will be partially hanging. One part of it rests on the wall, the second on the counter or “hangs” on the ceiling.
We take up all the free space
Shelves near the window in a different style
Hanging shelf for small items
There is also unused space above the counter.
Read about ways to arrange kitchen furniture here.
Covering the entire wall above your desk with cabinets is not the best solution. They look heavy. The problem can be solved by using glass doors, but not everyone likes this. The solution is to make open shelves between the cabinets. They will add more lightness to the interior and the work area will not put so much pressure on the rest of the space.
Glass and open shelves will “lighten” the interior
Stylish accessories don't hurt
There is also room for glasses
Different style - same idea
Closed and open shelves in one system - convenient and non-standard
DIY shelf ideas and options with photos
Before proceeding directly to the manufacture of the shelf, it is necessary to draw up a preliminary drawing. For a do-it-yourself shelf diagram, draw its shape on a sheet of paper and apply the dimensions. Based on their design, shelves can be divided into two main types.
The first type includes hanging shelves, which are attached to the wall due to their own weight using special holders. They can also be attached to vertical supporting racks made of boards, bars or pipes (like shelves in a closet). This type of shelves is good if there are no excessive demands on them in terms of strength. They are also the easiest to manufacture, since the crossbars for them and the holders do not need to be connected to each other. Hanging shelves are good for saving material. The holders can be attached directly to the wall. After this, one crossbar is placed on top - and the shelf is ready. The linear size of the protrusion must be at least 3/4 of its width to avoid tipping over.
The second type of DIY shelf at home is more durable, because... In this case, holders are not required, since it is a monolithic finished thing. It can be removed and hung in another place, placed on a table or bedside table, or turned over. This will not change its properties. They are more often used where a large number of vertical compartments are required. For example, for filing cabinets or catalogs. Usually you have to combine these two types. You can make a large, durable shelf and add hanging ones. Or, conversely, put several portable ones on a large canopy.
Popular articles Congratulations on March 8th are not vulgar
Look at the photo of do-it-yourself shelf options, which illustrate a variety of design ideas:
Making your own wall hanging shelf
Once you have determined the size and shape of the shelf on the wall with your own hands made of wood, start sawing. For convenience, we will assume that your boards are the same size, i.e., the same thickness and width. Otherwise, in order to build a shelf, you will first have to master the profession of a carpenter and get acquainted with many hitherto unknown things. With such as sherhebel, a plane, as well as with a bandage, brilliant green or iodine.
Before you make a shelf on the wall with your own hands, measure “seven times” as accurately as possible the length of the workpiece. If you haven't made a mistake in the numbers, then you can cut. The blade should be slightly larger than the specified size, since it is better not to finish cutting than to spoil the workpiece. If you sawed off and made a mistake by a few millimeters, then put the sawn pieces together and, placing a board under them, press them together with clamps or a vice. They drank again at the place of the cut - and the extra millimeters will be removed.
To cut along and across the grain of wood, it is better to choose a saw with teeth in the shape of an isosceles triangle. Start sawing with a small cut with a light short movement of the saw towards you. At the same time, hold the saw inclined. As you work, gradually move it to a more vertical position to avoid distortions and make your work easier.
To avoid distortions, you can alternately, in small sections, saw on one side or the other, checking the control marks, which would be good to draw along a ruler with a pencil or nail. At the end of the work, hold the sawn part with your hand and you will avoid breaking and splitting of the board. In this case, you need to slow down the saw slightly.
After you have cut out all the necessary parts for the wall shelves, with your own hands, clamp each one in turn in a vice and adjust the ends with a file to the desired size, rounding off the sharp corners at the same time. After this, go over the entire surface with sandpaper and give the workpiece a more aesthetic and healthy appearance. Do this always, otherwise splinters and bad mood will become your eternal companions in life. Don't neglect this procedure. Sometimes sandpaper can work wonders and turn a hastily put together shelf into a work of art.
If in the future you are going to paint the shelf with varnish, then it would be good now, while it is in a disassembled state, to etch the workpiece on all sides with a stain, for example, highly diluted acid or potassium permanganate. It’s better to buy stain in the store - now they sell it everywhere. This will highlight the wood texture. Some “craftsmen” do it easier. Hold each part one by one over a lit gas burner. This makes the wood slightly darker and the pattern becomes clearer.
The main thing is not to overdo it. Otherwise, sensing the characteristic burning smell, caring neighbors may call the fire brigade.
See how you can make shelves with your own hands in the photos, which illustrate the whole process step by step:
Shelves for flowers
It is often seen when people decorate their homes with artificial flowers, but still nothing can replace the freshness of a natural beautiful plant. Many owners, trying to decorate the wall, let climbing plants grow along it, hang flowerpots from the ceiling or place them on shelves of their own design. The advantage of this approach is that it is possible to make something of your own, unique and fitting into the interior of the room. Depending on the type of flowers available and their quantity, a shelf is constructed.
Wooden shelf for flowers in the form of a honeycomb
Of course, you immediately want to make something voluminous and beautiful, which is quite natural, but first you can try your hand at making a simple but neat shelf.
Manufacturing stages
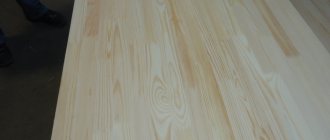
We will need a 120x25 mm board with a length of at least 130 cm. It will be more convenient to sand the board while it is intact.
Take a board of the appropriate size
After this, one edge needs to be cut so that the corner is straight, and markings must be applied every 20 cm clearly at an angle of 90°. A construction corner will help with this, but if you don’t have one, you can use any solid object whose corners are right, for example, ceramic tiles.
We make marks on the board every 20 cm
When cutting a part, you need to hold the hacksaw at an angle relative to it. If you hold the hacksaw straight, it will be difficult to make an even cut.
Now saw it according to our marks
To make a shelf we will need 6 pieces of 20 cm each.
We will need 6 identical planks
Each part must be sanded on all sides. The blade used should not be coarse-grained, otherwise the wood may be scratched.
Each of them needs to be sandedSince the screws will be screwed close to the edge of the board, in order to prevent it from splitting, you need to drill holes in these places with a thin drill.
In preparation for assembly, we will drill holes for screws
The entire assembly process consists of fastening the parts with self-tapping screws. If PVA glue is available, then the joints must first be smeared with it, and after allowing a minute for the glue to set, the parts must be fastened. When screwing in the screws, you do not need to use excessive force to prevent the board from splitting. It is enough that the head of the screw is flush with the board.
Assembling the shelf
Since our shelf is wall-mounted, we need to screw fasteners to it.
We screw the fastenings
Since the height of the shelves is small and the structure is not very durable, you can place climbing or low plants in small pots on it.
The shelf is ready and there are flowers on it
This product can be used not only for flowers. To prevent the shelf from getting dirty, it is best to open it with varnish.
Shelf in the shape of a honeycomb
The shelf, designed in the shape of a honeycomb, looks original. To make this option, you will need to cut the board at an angle of 60 degrees.
To make the intended design, you will need 6 planks of the same size for each hexagonal element.
Sections must be sanded. They are connected using wood glue, then the structure is reinforced with metal brackets.
Each hexagon is made separately, painted, and varnished. Then they are mounted on the wall, forming a module from them. This type of shelf looks very interesting.
What can you make a shelf from: choice of material
Before you start manufacturing, you need to decide what you can make the shelf out of. The choice of material is as important as the manufacturing process itself
Focus on soft wood such as spruce, birch, linden or poplar. They are easy to process at home
You can use chipboards and fibreboards, in other words - chipboard and fiberboard. True, they are quite heavy. In addition, their appearance leaves much to be desired. The surface has to be plywooded or covered with something. Then, this is not a very durable material. Furniture made from chipboard may become loose due to weak joints. For example, in places where hinges are attached. Plywood is not suitable for making load-bearing structures. It bends under the weight of objects and is deformed, so in its pure form it is more used for decorative purposes.
Despite the fact that you can make shelves with your own hands from scrap materials, you need to remember that only dry wood is suitable for processing. It is impossible to make shelves from raw material, since when it dries it becomes deformed, creating the most unexpected curved shapes.
Hanging
Not very numerous, but an original type. The most important thing is that it can be done easily: a few planks, four ropes or two belts and you can get to work.
Old leather straps can also become the basis for a suspension system
This is a complex system of blocks...and the shelves can be located at any level
Two planks, four ropes and half an hour of time are all that is needed to make this shelf
How to make a hanging shelf - graphic step-by-step instructions
Making a wooden ladder shelf
First, let's work with the simplest option. For work we will need:
- Wooden blanks.
- Screws, screwdriver.
- Stain, acrylic varnish.
- Brushes for working with varnish.
- Plane.
Step-by-step diagram-instructions for the master:
- Let's make the base for the stairs: this is an A-shaped blank.
- Between the two slats-legs you need to make slots for the shelves.
- We insert the shelves into the prepared slots and secure them with screws for additional strength.
- We install the shelves at such a distance from each other that flower pots can freely fit in the opening (taking into account the height of the plant).
- Each part must be processed before joining into a product. Using a plane, we get rid of uneven areas and possible snags. We cover the workpieces with stain and send them to dry. Next, you need to coat the product with several layers of transparent varnish.
- Wrap the legs of the ladder with felt so as not to scratch them later under the weight of the flower pots.
Place flowers on the shelves and admire the changes in the interior of your home.
Shelves on the wall
In any room there are places on the wall where you just need to hang something. After all, most modern furniture occupies only the lower part - sofas, tables, couches. The upper part remains empty and dissonance arises: the lower part of the room is overloaded and the upper part is half empty or completely empty. These voids on the walls are organically filled with shelves.
The whole system, and the most “dead” space is used - the corner
Structurally, most shelves consist of the actual shelves and lintels. But these components are combined into so many options that it is impossible to count. A simple design is good: you can make any shelves with your own hands. Moreover, these products may be the first self-made things. It's really simple.
How and what to attach it to
It’s not for nothing that we start with fasteners. The design of a wall shelf largely depends on the type of mounting. Or maybe it’s the other way around. It depends on what to dance from...
Traditional hinges
Traditional hinges for hanging shelves
There is a traditional way - on loops. It is suitable for wood and fiberboard, any other material that is thick enough to attach. Screwed onto the sides with self-tapping screws. Then the distance between the centers of the loop holes is measured and marked on the wall (make sure it is horizontal). At the marked points, holes are drilled for the dowel, the dowel is inserted and a dowel-nail with a small head is screwed into it, which fits into a loop or bracket (a pin slightly bent upward). Then a shelf is hung on them.
Popular articles Great-grandmother's cat
Not all materials can be drilled. For example, glass shelves. You definitely can't screw anything into them. Fastenings for glass shelves are special: they consist of two parts, between which glass is inserted. Often elastic pads are installed between the holders. The bottom mount usually has a small clamping screw to secure it in place.
Fasteners for glass shelves
The most popular mount for glass shelves is called “pelican” - for its unique shape. It looks good on its own and is available in different colors. The thickness of glass that it can hold is from 8 to 34 mm. You can insert not only glass into it, but also any other material of such thickness. It just looks stylish with glass.
It’s easy to make glass shelves on the wall with it: you buy a mount, order pieces of glass with processed edges of the required size and shape from a glass workshop (or cut them yourself, if you know how). All that remains is the assembly itself:
- Attach the pelicans to the wall. Two dowels each. The case is collapsible - the decorative trim is removed, and there are two holes in the mounting plate. One is higher in the body, the second is lower. We secured it and put the decorative trim in place.
- Glass was installed.
- Tightened the screw. All.
Glass shelf holder for wall
There are other forms of similar fasteners. The photo below shows a few of them.
Some mounting options for glass (and not only) shelves
Decorative brackets
Another type of fastening is brackets. They are reliable, some are decorative, so much so that they themselves are decorations.
Wall shelf brackets
Concealed installation - shelves without support
And the most amazing device for hidden installation. It makes it possible to hide the fasteners. A seat for the pin and the holder body is cut out at the end, and the shelf is simply put on it.
Hidden fasteners for shelves
As you can see, even a simple board or piece of glass on such mounts is not bad. But there is still a sea of all sorts of ideas.
Read about how you can update old furniture here.
Types of shelves in the house
Depending on the installation location, shelves can be wall-mounted, floor-mounted or hanging. If the floor shelf has a large height - from a meter and above, it is often called a rack. A few words about hanging ones: usually these are decorative structures that hang on a pipe or a specially driven bracket. This option is popular in rooms where heating pipes run under the ceiling: they just beg to have something hung on them. Shelves are hung on the pipe in the kitchen and bathroom: it’s convenient there.
These hanging kitchen shelves are convenient and functional. You can use the same pipe to make a story made by yourself.
They are made of wood, plywood, laminated chipboard, fiberboard, and there are glass shelves. The same materials are used as stands, but they are also made from metal, plastic and other absolutely incredible things - for example, pipes or bottles.
In living rooms, it is not so important what material the shelf is made of. It is important that its design is in the same style as the interior. Even functionality is not always important: some play a purely decorative role. If they have anything on them, it’s only one or two items. Their role is to give the interior of the home a special style and flavor.
The intimate atmosphere of this room is emphasized by cozy pillows and dark wood shelves.
A laconic style of apartment design and the same laconic shelves in a contrasting color. In this interior they are the main element
The free space above the sofa is organically filled with shelves to match the walls
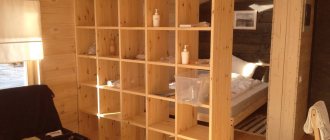
The shelf can serve as a divider for zones in the room
Light interior in light colors and the same shelves The shape and color of the shelves repeats the shape and color of the table drawers
If we talk about shelves in technical rooms - the kitchen and bathroom, in particular, then in addition to aesthetic considerations, practicality requirements are almost universally added. Even decorative shelves in the kitchen should be washed well. For bathroom shelves, the requirements are generally high: periodically there is very high humidity and materials are required that can withstand it without any harm. There aren't many of them. These are plastic and stainless steel. They also make bathroom shelves from MDF, but they can be used normally if there is good ventilation in the bathroom.
Design and sketch of the future product
The design features and appearance of the future product directly depend on its location in the house. If earlier shelving was more often used in utility or secondary rooms, now they have begun to fit widely into the interior of living rooms and children's rooms, offices and even bedrooms. The original, thoughtful design of the product can give the interior of the room a completely different style.
Racks vary in type: frame, beam, modular, cantilever and rope. Models with cantilever and bridge circuits are less common. Any of the selected options can be made at home. Having decided on the shape, we draw a sketch or use a photo of the rack taken from the Internet.
To design the product, you will need to measure the height of the room (the rack is most often made from floor to ceiling), and also determine the size of the shelves. The drawing will allow you to avoid mistakes and save material in the process of preparing product elements.
We select the depth of the rack and the width between the racks based on the size of the items for which it is intended. The maximum length of the shelves is 150cm, otherwise sagging is possible. If large loads are expected, then the pitch of the racks must be reduced to 50 cm. The sketch can be made directly on the wall near which our structure will stand. This will make it easier to determine the dimensions of the racks and shelves of the product.