Dresser decor using leftover ribbons, scraps of fabric and buttons
Patchwork is a special type of creativity in which a product is assembled from many multi-colored scraps. Historically, this is a cozy and beautiful textile that allows you to fill your home with very unusual and bright little things, made with your own hands.
But why not try to combine different decor trends. You will be puzzled not only by the harmonious combination of colors and patterns, but also by taking the risk of mixing styles, techniques, and textures. Let's say, try to create a single, harmonious composition from watercolors and threads. Use scraps of fabric and craquelure for an unconventional use.
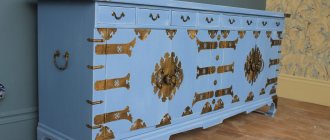
Coloring the legs
The first step is to paint the dresser's support frame and legs. Take red paint for example. Before you start painting, cover the perimeter of the frame with electrical tape or tape. This will allow you to paint more accurately.
The girl tried to cure the cat, in the end it became like the Pokemon Pikachu
There is an unusual holiday in Japan: how to celebrate Cat Day on February 22
Grandmother wrote letters to Yana, but did not send them. A few years later, my granddaughter found them
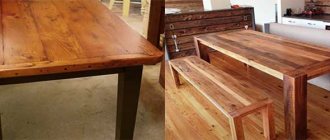
Decorating a chest of drawers with your own hands
Decorating a chest of drawers with your own hands means creating a unique designer item from an ordinary piece of furniture. It will dilute the usual surroundings with its brightness and transform the overall interior of the room. Let's look at several ways to decorate with your own hands.
Restoration and painting of the cabinet
Painting the remaining parts
Remove the handles from your dresser drawers. Paint them the same color as the legs - in our case, red.
Paint the top of the chest of drawers, as well as its side walls, white. The inside of the chest of drawers can be left unpainted. It is necessary to treat the inner surface only if it looks too unsightly - there are stains, severe abrasions, etc. In this case, the inside of the chest of drawers must be thoroughly sanded and then covered with stain, wood oil, varnish, etc. .
A huge column of ash, fiery lava, peals of thunder: Etna woke up (video)
The microwave has no place on the refrigerator
After the party, the girl decided to apologize to her neighbor: the answer was unexpected
Updating an old chest of drawers
Sometimes it is a pity to throw away shabby old but high-quality furniture. In this case, it can always be transformed.
Restoration
Restoration is a labor-intensive process that goes beyond the simple transformation of an interior item. But more often than not, you can’t do without it when working with old things. Before you begin restoring the chest of drawers, you should carefully inspect it for value. It is possible that it may turn out to be a handmade item made tens or hundreds of years ago. To do this, first of all, you should pay attention to the fittings: handles, legs, screws. If they are not the same, there are differences in the notches, then, most likely, they were made by hand and not by an industrial method.
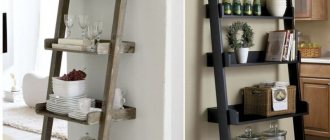
Beautiful decor of a chest of drawers in the form of a designer
If the decision to restore is made, the following things will be required:
- special glue for wooden surfaces;
- putty;
- several types of sandpaper;
- screwdrivers;
- gloves;
- respirator;
- toothpicks;
- old toothbrush, toothpaste;
- brushes;
- wood varnish.
Updating a chest of drawers involves several steps.
Cleaning and preparing the product
Cleaning the surface must be done carefully so as not to damage any decorative parts. To begin with, wipe the surface with soapy water; a toothbrush will come in handy for cleaning small parts. Furniture fittings can be removed if necessary.
Why use fabric
The easiest way to update old furniture, including chests of drawers, is, of course, to cover it with self-adhesive film. This material is inexpensive. At the same time, finishing furniture with film is a very easy and quick process.
Another advantage of self-adhesive material is the ability to choose absolutely any desired design. There are a huge number of films in various colors and prints in stores today.
However, self-adhesive films have one very serious drawback. This type of finish usually doesn't last very long. Over time, even with strict adherence to the gluing technology, the film begins to lag and tear. In fact, the use of such material is only a temporary option for furniture repair. Apartment owners usually plan to soon replace a piece of furniture that has lost its attractiveness.
Train, filming, home to her daughter: Asmus told how her working day went
Why we disliked the new girl, or Why openness and kindness are not always good
A guy and a girl chained themselves and want to live like this for 3 months
At the same time, much more serious repairs can be made using fabric. This material has almost all the advantages of film. For example, you can also choose fabric of absolutely any color. Like film, this material is inexpensive.
The only thing is that finishing a chest of drawers with fabric is somewhat more difficult than with film. But this design will last much longer in the future.
Technique options
The biggest advantage of working in this technique is the highly artistic result, even in the absence of an art education. This is achieved thanks to the main feature of decoupage - applying the finished image to the product. For these purposes, there are an incredible variety of options with a ready-made, impeccable design:
- decoupage cards;
- napkins;
- textile;
- wallpaper;
- stencils;
- photos;
- scrapbooking paper;
- postcards;
- magazine and newspaper clippings;
- pictures printed on regular office paper.
Scrapbooking paper
Decoupage cards
Stencils
Every year, decoupage is gaining more and more popularity, the selection of special cards is impressive with its images, and new devices, styles and effects are being added. Thanks to this development, this decoration technique will remain relevant and in demand for a long time.
You can make decoupage on absolutely everything, from your home t-shirt to the furniture in your home. The only thing that needs to be taken into account is that each specific type of decoupage has its own technique, style and, accordingly, devices.
| Name of the technique | Short description |
| Craquelure | Decorative cracking of the surface to create the effect of antiquity. |
| Decoupage with fabric | The easiest way to decorate large solid surfaces. |
| painting | The artistic painting technique is suitable for those who are familiar with the basics of fine art. No less interesting is painting using stencils. |
| Gilding | This technique involves working with the most delicate gold leaf. |
| Restoration | Transforming an old product (with chips, cracks and other defects) into a new one by masking them. |
| Aging | Adding wear and tear to an item to achieve that special charm of yesteryear. |
| Decoupage lace | In this technique, lace acts as a stencil. |
| Traditional decoupage | A more familiar technique of execution using paper pictures (decoupage napkins, special cards). |
Using napkins and cards
When planning to decorate a chest of drawers using decoupage cards, it is useful to know that they come in at least three types. The selected map will determine the technique for further work:
- map on high density rice paper. This is a dense card (more than 20g/m2) with an original, pronounced texture and a special arrangement of coarse rice fibers. Using PVA glue, the motif is glued to the product and coated with finishing varnish. When cutting out the motif, rather thick edges remain, which does not look very neat. The way out is to hide the edges by applying glue-based glitter along their contour, but this is not always appropriate. It is better to use a map without cutting out a point motif, but transferring the image holistically “joint to joint”;
- map on thin rice paper. Decoupage of a chest of drawers with rice card with a density of 5-15 g/m2 looks very neat and delicate. By working with such material you can achieve the most sophisticated work. The cut fragment is placed on a regular file with the reverse side facing out. The product itself is lubricated with glue, after which a file with an image is carefully applied to it, smoothly smoothing it out. Thanks to this method, you can avoid unaesthetic wrinkles and spreading of the motif. The paper is very thin, which causes some difficulties in working with it. Transfer the image through the file, do not use too much glue;
- decoupage card on plain paper. The most affordable at its price, but also more troublesome to use. Acrylic varnish is applied to the front side of the card. It is advisable to make 3 layers, with an hour between each. After the last layer has completely dried, the card should be placed in a container with water. When the paper gets wet, remove the card and carefully roll off the excess paper. Thus, only the image fixed with varnish will remain. The card is on thick office paper (80 g/m2), to thin out the motif, you will have to roll up the excess paper, this will take some time. While the paper is soaking, you can prepare the working surface of the chest of drawers to be decorated.
With decoupage napkins everything is much clearer. The most commonly used napkins are those with three layers. All you need to do is remove the extra two and cut out the fragment you like. The specifics of working with a napkin are the same as with a thin rice card.
To decoupage a chest of drawers in the traditional way, you must have:
- decoupage card or napkin;
- PVA glue or special glue for decoupage;
- acrylic finishing varnish;
- wide brush for applying varnish;
- watercolor paints for tinting;
- acrylic paints (for placing accents in the composition);
- thin round brush for drawing details (optional);
- sponge (sponge).
Depending on the type of card or napkin, we choose the method of applying it (all methods are described above). We transfer the motif to the already prepared surface of the chest of drawers. At this stage, you can shade the area around the image. To do this, you need to dilute the selected watercolor color with water and apply it with a sponge onto a primed chest of drawers painted with white acrylic. When the watercolor dries, you can bring the tinting to the desired result using a damp sponge (remove excess, shade, make the transition smoother).
To make the composition look more voluminous and clear, individual elements of the image should be painted with acrylic paint. This way you can get the effect of artistic painting.
When the work is completed, the chest of drawers must be coated with acrylic varnish in several layers. Each layer must dry well. You can use an acrylic finish in aerosol form, but this option is more suitable for working outdoors.
Choosing a theme for decoupage
The top layer of the napkin is applied to the surface of the chest of drawers
PVA glue is applied on top and gently smoothed with a brush.
All excess parts of the napkin are carefully removed
How to make your own chalk paint
I won’t reveal a secret if I say that slate (chalk) paint is now very often used to decorate furniture. It applies well, uniformly to the surface, and does not require much effort to paint. But the price for it is quite high. Therefore, we want to offer a recipe that will help you make your own chalk paint for decor.
Paint composition:
- 250 grams of latex or acrylic water-based paint.
- 2 tablespoons of regular plaster (can be taken from a children's kit). Plaster can be replaced with chalk.
- 1 tbsp. spoon of hot water.
Preparation:
- Take a glass jar, pour 1 spoon of hot water into it, then pour plaster into it and mix well.
- Immediately pour paint into this mixture (do not wait for the plaster to harden).
- Mix the resulting mass thoroughly. Chalk paint is ready. This paint can be used to paint a chest of drawers, a nightstand, etc.