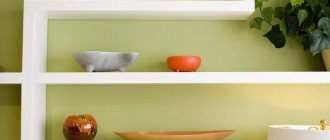
Built-in shelves in the bathroom look stylish and practical. Sometimes there is not enough money to purchase shelves and cabinets, or those presented in stores are not suitable for a particular bathroom. Then many people think of making their own shelves, which will become a worthy accessory for a given room, and will also be useful for convenient storage of household chemicals.
Built-in shelves in the bathroom look stylish and practical.
Pros of making your own shelves
It is not difficult to build almost any furniture with your own hands that will serve you well for many years. The shelf in this case is no exception. It is much easier to make than any other type of furniture.
Many people think of making their own shelves, which will become a worthy accessory for a given room.
Advantages of a homemade design.
- You create an option that suits you in all respects and is most suitable for decorating a bathroom wall.
- You have the opportunity to independently choose the material for production.
- You can choose the shelf covering, thickness, shape and much more.
- If you make a shelf with your own hands, then you really need to think through everything down to the smallest detail so that the product serves for a long time and does not lose its original appearance for a long time.
It’s not difficult to build almost any furniture with your own hands that will serve you well for many years.
Of course, to make a bathroom shelf with your own hands, you need to have a certain amount of knowledge that will allow you to make a truly reliable, convenient thing. You should understand what types of bathroom shelves there are.
You create an option that suits you in all respects and is most suitable for decorating a bathroom wall.
What are they needed for
It should be noted that the shelf in the bathroom plays an extremely important role. For example, it can provide security. From what? Glass jars and bottles that stand on the bathtub itself can fall and break. If you have a shelf, then all this can be prevented. Moreover, a shelf in the bathroom can save significant space. If you compare them with cabinets, they will not take up useful space. This is especially important in small baths.
Everyone needs
Corner, hanging and wall shelves significantly increase the space in the room. Another advantage of shelves in the bathroom is aesthetics. If you think through its design correctly, you can decorate the overall interior of the room. Let's see how to make a shelf yourself.
Types of products
According to the method of fastening, shelves are divided into 6 types.
| View | Application area |
| Removable. | They are mounted on the wall; if desired, they can be removed and moved to another location. An excellent option for future redevelopments. |
| Hanging | Also suitable for the wall in your bathroom. |
| Corner | Very practical, especially for narrow spaces. |
| Floor-standing | Such designs are suitable for spacious bathrooms. |
| Stationary shelves | They are usually attached without the possibility of easy dismantling. |
| Mounted | This is an option for free premises. It has the property of visually reducing space. |
It is possible to independently choose the material for production.
Shelves are also divided according to material:
- plastic;
- stainless steel;
- glass;
- tree;
- drywall.
If you make a shelf with your own hands, then you really need to think through everything down to the smallest detail so that the product serves for a long time and does not lose its original appearance for a long time.
Which type to choose is a purely individual decision. You just need to understand that the bathroom is a place where it is constantly damp, so the shelf should be made of a material that is resistant to constant moisture. A DIY bathroom shelf should be practical, convenient and durable. Of course, the appearance of the product is also important. It is preferable, of course, to make a shelf out of wood, since this material is resistant to any impact in any place.
Prepare a level, drill holes and insert prepared dowels.
To build a shelf for your bathroom with your own hands, you need to stock up on:
- level and tape measure;
- screws;
- hammer;
- a saw, if wood or metal is involved in the manufacture of the product;
- blanks from the desired material;
- fastenings, brackets;
- hooks, slats and holders for mounting to the wall;
- primer and varnish if the shelf is made of wood.
You should understand what types of bathroom shelves there are.
Of course, this list is not exhaustive, because depending on the type and shape of the structure, additional tools are needed. You should understand that it is better to make a simple shelf in the wall with your own hands from glass or any other material, so that the work does not take much time and effort. It is preferable to spend every effort to ensure that the product is of high quality and durable.
Of course, to make a bathroom shelf with your own hands, you need to have a certain amount of knowledge.
How to make a shelf with your own hands?
You can make shelves with your own hands in the following ways:
- purchase materials and then cut out design parts from them;
- buy ready-made shelf elements and then assemble them.
You can buy ready-made panels for assembling a shelf
We will look at the most optimal ways to create shelves with your own hands from various materials.
Glass shelf
A distinctive feature of glass shelves is their easy installation. Typically, such structures are mounted on special holders.
To make a shelf you will need the following:
- glass with a thickness of at least 4-5 millimeters;
- dowels;
- fasteners;
- installation tools.
Only durable glass may be used
Video - A simple way to make a glass shelf
Step-by-step instruction
Step 1. It is necessary to cut out the base of the structure according to the template. To do this, you will have to first measure the distance on the wall so that the shelf fits there without any problems.
It is necessary to cut out the base of the structure according to the template
Step 2. After which you will need to cut out the glass and carefully process its sharp edges. If you do not have the skills to work with this material, it is better to order parts from a specialist.
Sharp glass edges need to be processed
Step 3. It is necessary to mark the place where the shelf is attached to the wall. It is important to correctly determine the height of the structure. Usually the shelf is hung at a distance inaccessible to small children. In addition, it should be remembered that the structure is installed only in a horizontal position.
Determining the height of the structure
Step 4. The next step will be installing the fasteners. Typically, part of the holder is mounted into the wall, and the other is fixed to the shelf. All this work is carried out using dowels and a building level. For a small shelf you only need a couple of holders. While a large product will have to be secured to several such elements for greater reliability.
Installing fasteners using dowels
Step 5. The final step is to install the glass shelf on the holders. These are the simplest actions that do not require professionalism.
Installing a glass shelf
Plasterboard shelf
An equally simple but popular method is to make shelves from plasterboard. This material allows you to create products of various configurations.
Advantages of plasterboard shelves
To make the structure you will need the following materials and tools:
- profiles: carrier (PN) and guide (PP);
- dowels;
- slats;
- self-tapping screws;
- plasterboard panels;
- primer;
- set of tools for installation;
- emery cloth;
- brushes and spatulas.
Materials and tools for work
Step-by-step instruction.
Step 1. Based on preliminary markings, holes should be made in the wall where the dowels will be fixed. Their diameter should be 10-15 millimeters larger than the dowels. In this case, it is necessary to leave a distance of about 100-150 millimeters between them.
Holes for dowels
Step 2. Next, place dowels in the prepared holes and hammer them into the wall. Then you need to adjust the PP profile to size by attaching it to the wall according to the markings of the fasteners. Then the self-tapping screw with a washer should be inserted into the profile hole and secured tightly to the dowel itself. The same actions must be done with other fastening points. You can check the correctness of the profile fastening using a building level.
It is necessary to adjust the profile to size by attaching it to the wall
Step 3. The PP profile acts as a fastener and guides the entire structure. It is fixed to two walls at once, where an angle is formed, which is fixed with self-tapping screws. The PN profile will need to be pre-cut to obtain two longitudinal parts and four cross members (the length of the shelf will be 12 centimeters, and they are fixed every 4 centimeters).
The profile must be fixed on two walls
Step between profiles
Step 4. Longitudinal slats are placed in the PP profile. In this case, one of them is laid with the viewing side outward, and the other inward. Then they should be fixed in this position with self-tapping screws. It should be borne in mind that this design is not durable, so it is further reinforced.
Longitudinal slats in the profile
Step 5. Following from the edge, additional strips must be installed along the entire wall every 400 millimeters (they are held in place by fastening with self-tapping screws and dowels). Their dimensions will differ depending on the size of the shelf itself (the size must match). Then you will need to secure the lower points of the planks with the outer parts of the longitudinal ones. This can be done using a PN profile, the size of which is determined by calculations.
Attaching additional strips
Step 6. The ends of the PN profile must be connected to reinforcing slats and inserted under the front part of the longitudinal strip. Thus, the profile should be fixed at four points on all sides. Thanks to this fastening, the shelves will withstand even heavy loads.
Due to fastening, the profile can withstand large loads
Step 7. Then you will need to cut sheets of moisture-resistant drywall to the dimensions of the resulting frame. To cover the structure you will need to prepare 5 parts. First, fix the bottom one, and then form a common box. In addition, it is necessary to make shaped grooves under the fixing slats, and only then secure the drywall using self-tapping screws.
Formation of a common box
Step 8. Make the overlays on the sides in the same way. In order to secure them you will need to use 4 self-tapping screws. Finally, the top sheet of drywall is installed, after which the product takes on a normal appearance. Some craftsmen also cover the retaining strips with plasterboard or paint over them.
Fixing the side panels with self-tapping screws
Step 9. The finished structure requires further finishing. First of all, you will need to cover all the joints of the drywall.
Finishing the finished structure
Finishing a plasterboard shelf.
Step-by-step instructions for finishing a plasterboard shelf:
Step 1. The finished structure should be coated with several layers of primer.
Primer coating
Step 2. Carefully mask all joints. This must be done especially carefully, otherwise cracks may appear.
Masking joints
Step 3. You need to install perforated corners in the corners and then secure them with plaster. For various shaped structures, you can purchase special flexible arched corners (they bend along sections without any problems).
Perforated corner
Step 4. Then you need to putty the entire structure and leave it until completely dry. A day later, carefully seal the shelves on all sides again.
Putty construction
Step 5. After the last layer has dried, you need to go over the entire structure with sandpaper.
It is necessary to walk with sandpaper on the dry surface.
Step 6: Apply a coat of primer to the sanded shelves.
Shelves need to be primed
Step 7. Cover the shelves with decorative plaster, and then paint them in any color of your choice.
Decorative plaster
Corner shelf made of MDF
To make a corner shelf you will need to prepare the following:
- MDF sheets;
- electric jigsaw;
- screwdriver;
- set of tools;
- sandpaper;
- building level;
- screws;
- dowels;
- pencil;
- construction compass;
- putty knife;
- primer;
- paint.
Important! If wood is used instead of MDF to make the structure, then it must be pre-treated (dried and planed).
Table No. 3. Sequence of making a corner shelf.
| Illustration | Description |
| It is necessary to calculate and mark the structure on an MDF sheet. To do this, use a construction compass or a pencil with a rope. You will need to draw a circle according to the selected parameters, which will be divided into 4 parts. | |
| We cut MDF sheets using an electric jigsaw. This must be done very carefully, following exactly the markings, otherwise the shelf will be crooked. The edges of future shelves at this stage have irregularities that should be sanded with sandpaper. | |
| Next we have to assemble the entire corner structure. For such purposes, horizontal and vertical elements are used, and their end part must be rectangular. | |
| You should once again make sure that the geometry of the structure is correct using a level, and only then make holes for the fasteners. | |
| You will need to tighten the screws on the sides of the workpieces. Then connect all these parts, securing the bottom and side elements. The correctness of their location can be checked again using a building level. | |
| Finished shelves can be coated with moisture-resistant paint or covered with a special polymer film. | |
| Then all that remains is to make holes in the wall, secure the dowels and the shelf itself. |
Detailed diagram for making a corner shelf
Video - How to hang a corner shelf in the bathroom
Bathroom shelf made of wooden pallet
When choosing a wooden shelf option for your bathroom, you shouldn’t settle for typical box-shaped designs. Currently, there are a huge number of different design solutions. An unusual shelf, which has a decorative appearance, can even be made from a pallet.
To do this you will need the following:
- wooden pallet;
- fasteners;
- circular or hand saw;
- dye;
- brushes
Step-by-step instruction.
Step 1. It is necessary to disassemble the pallet into parts.
Wooden pallet
Step 2. Next, use a saw to cut the stand with dense blocks of wood. As a result, there will be a plank at each end.
Cutting off a piece with a saw
Step 3. Next, you will need to cut out any of the remaining blocks to use for installing the shelves.
Need to cut a block of wood
Step 4. You can use a single board from a pallet to make shelving, dividing it in half. The remaining part is used for the middle shelf.
Fastening shelves to boards
Step 5. Next, you need to attach the shelf to the wall without fastenings to see how it will look in the end.
Shelf on the wall
Step 6. Then you should paint the structure with moisture-resistant paint in several layers.
Moisture-resistant paint treatment
Step 7. After which the shelf should be screwed onto the support block.
Securing the shelf with screws
Step 8: Place various accessories on the shelf to test its strength.
It is necessary to check the strength of the shelf
Important! Any wooden shelf can be covered with stain and then several layers of varnish. This treatment will reliably protect the structure from moisture.
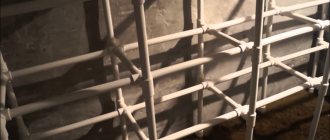
Pipe rack
This is a fairly simple design; to make it you will need to prepare:
- grinder;
- locksmith tools;
- pipes: 30, 26, 46.70 centimeters;
- cross pipes (20 centimeters);
- tees;
- knee;
- flanges;
- plywood sheet;
- paint.
Step-by-step instruction.
Step 1. First, you need to prepare the parts for future shelves, which are cut from plywood to size.
It is necessary to cut parts from plywood
Step 2. You need to make holes in the shelves for the pipes, and then carefully sand them and paint them.
Need to make holes for pipes
Step 3. Flanges should be installed at the ends of the pipes, then tees, and then a transverse pipe with an elbow.
Pipe fastenings
Step 4. Attach another part of the pipe on top, and then install the shelf. The remaining parts of the rack should be assembled in the same way, fixing the flanges to the upper ends.
Shelf installation
Step 5. The correct location of all structural elements can be checked using a level.
Level
Example of a finished design
The process of creating a shelf in the bathroom
Shelves in the bathroom should be located in such a place that they can be easily reached from almost any corner of the room. It is better, of course, if they are located near the bathtub, which will allow you to take the necessary bathing products without any difficulties. That is why you first need to figure out the location of the future shelf. There are a few more issues to be addressed next.
- Choose a suitable material, be it glass or drywall.
- Draw up a work plan so that everything is clear and consistent.
- Create a mount for the future shelf in advance.
First you need to figure out the location of the future shelf.
After this, the list of works depends on the type of material, if it is wood or MDF sheets, the scheme of actions is as follows:
- first you need to make marks along the edges of the slats using a simple construction pencil;
- then use special glue to place blocks on the marks left on the rail, which must strictly be the same size;
- in the center of each of the fastenings you should also make marks where neat holes are drilled;
- Next, the structure for the bathroom needs to be assembled (you will need screws for the holes);
- When the structure is assembled, proceed with installation on the wall;
- It is advisable to varnish the finished shelf so that it looks presentable.
This option is suitable for a small room with high humidity, which is essentially a bathroom.
Prepare a level, drill holes and insert prepared dowels. Mounts installed on the shelf will allow you to mount the structure on the wall.
As for the glass structure, it is much more practical.
The product is ready. This option is suitable for a small room with high humidity, which is essentially a bathroom.
Using a drill, the shelf must be mounted into the wall.
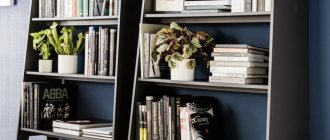
Flower shelves
Long gone are the days when the whatnot was the “highlight” of the living room and the hostesses of secular salons vying with each other to see whose was cooler. Nowadays, most of the shelves in everyday life are used to place indoor plants. Here the openwork of the whatnot works for functionality: using the whatnot, plants can be placed on a minimal floor area so that they do not shade each other and it is convenient for the owner to care for them. For the same purpose, special shelves for flowers are built, but they are, as a rule, stationary, attached to some kind of base, and the shelf is adjustable. However, the difference is very relative.
What kind of shelf for flowers should be depends on the role and significance of the latter in the interior. Most often, a few indoor plants are kept in the house, small and not very picky - to liven up the interior. But many amateur plant growers also collect large collections of sometimes rare exotic plants at home.
Shelves for indoor flowers
Shelves for purely decorative flowers are usually made cantilever, i.e. with a large offset of shelves rotated relative to each other around a vertical axis. The design is either onlay (pos. 1 in the figure), or rack-mounted, pos. 2
The former are simpler and cheaper; the latter are more openwork and less distracting from the plants
Shelves for collections of indoor plants are already made as ladders, pos. 3-5. The shelf is especially multifunctional - an extension ladder, pos. 3:
- In winter, it is stored without taking up much space in a pantry or closet, where you can put all sorts of little things in boxes.
- In spring – used as a rack or shelves for seedlings.
- In summer - installed in a suitable place for summer maintenance of indoor flowers in the open air.
- In autumn - suitable for drying crops from the garden before sorting and preparing for winter storage.
A drawing of an extension shelf-ladder for flowers is given on the left side of the next page. Fig., and on the right there are drawings of a greenhouse bookcase for the most whimsical people from the depths of tropical rainforests: orchids, gesneriaceae, etc. The substrate on which these plants grow is always slightly warmer than the surrounding air due to the abundance of rotting organic residues in it. It is impossible to lay a layer of red soil of more than 1 m at home for such sissies and populate it with tropical soil microflora/microfauna, but in the “basement” of this shelf an infrared heater of 20-50 W can be easily placed, heating the soil in the trays to the required degree. A pair of 15-25 W incandescent lamps are perfect for this purpose.
Drawings of shelves for flowers
There is also an interesting version of a flower shelf - a vertical bed of flower pots, see the inset at the top left on the next page. rice. Usually a shelf of pots is assembled by simply stringing them onto a pin with drainage holes: the bottom one is filled with soil, the top one is placed, filled, etc. However, firstly, the shelf for flowers from pots turns out to be suitable only for outdoor use. Secondly, physiologically optimal watering of the upper plants inevitably entails overwatering of the lower ones, and adding hydrogel to the soil does not always prevent it. Thirdly, only plants that grow together in nature can be grown in a simple flower bed, while dissimilar ones will suppress each other by secreting their roots into the soil.
Scheme of arranging a shelf for flowers from flower pots
Meanwhile, indoor gardeners have long known a version of a shelf for flowers from pots, which is devoid of these disadvantages; a diagram of its device is shown in Fig. The guide pin insulation is a heat-shrinkable tube (HERE); It is used for its intended purpose to insulate wire connections and is sold in electrical stores. Shrinks by heating with a construction hairdryer at low power or with a household hairdryer at full power. Spacer bushings are made from scraps of propylene water pipe. Fine screenings are added under the bottom pot to ensure general drainage.
Glass bathroom shelf: creation
The glass version, although fragile, is stylish and attractive. It is necessary to remember as you go along that the material should be approximately 5-6 mm thick. Then you need to cut out pieces of glass of the required size. It is better to treat the edges of the raw material so as not to get injured during installation and direct use. Taking into account the thickness of the glass, appropriate brackets are selected: with or without drilling.
It is advisable to install a decorative stop to prevent objects from falling.
Using a drill, the shelf must be mounted into the wall. You can use rubber pads for better results. It is advisable to install a decorative stop to prevent objects from falling.
It is better to use bolts, as they are more reliable.
Tabletop in vintage style
Such a shelf will be a godsend for the owner of a small bathroom. It can accommodate all the items that are necessary for daily personal hygiene. It does not take up much space, looks stylish and is very easy to use.
What will you need?
Tools you should prepare:
You will also need:
Size and number of components
The photo shows a shelf consisting of three tiers, but their number can be increased or decreased by one, focusing on your needs and the availability of consumables.
The recommended diameter of each subsequent circle should be 3 cm smaller than the previous one. This will ensure the stability and functionality of the structure.
Step-by-step production
There should not be any difficulties during the work process. It will take even an inexperienced craftsman no more than an hour to make a bookcase:
Making a corner shelf from wood: steps
If you decide to make a corner shelf for your bathroom, you need to follow these steps:
- It is necessary to prepare the details.
- Then on paper you should find the middle and draw a circle. Next, the paper is applied to the wood and a circle is cut out using a jigsaw.
- Proceed to start creating grooves in the rail. The raw material itself is applied to the corner, then the future boundaries of the structure are marked with a pencil. Then holes are made in the rail for the shelf.
- Then begin installation of the corner structure in the bathroom. To do this, you need to use mounting bolts or mounting adhesive. It is better to use bolts, as they are more reliable. If you use glue, it should dry well. Then install the structure into the attached grooves.
The main thing is to act strictly according to the plan so as not to miss any important step in installing a bathroom shelf yourself.
As you can see, making a corner option is not difficult. The main thing is to act strictly according to the plan so as not to miss any important step in installing a bathroom shelf yourself.
Shelves in the bathroom should be located in such a place that they can be easily reached from almost any corner of the room.
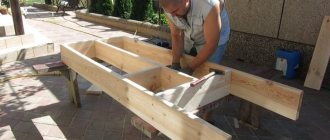
Manufacturing process: step-by-step instructions
Before you start constructing a wooden craft, you need to make sure that the drawings are correct and the parts fit together
This is very important if you plan to make a cabinet with doors or a back wall
After the materials have been selected and verified, you can begin the main work.
To make furniture you will need a little patience, raw materials from which the craft will be made and tools.
Step-by-step instruction
- Preparation of material.
The length of the boards must be selected based on the space where the rack will be located. The width of the craft should be rather large. A medium or large pot should be freely placed on it. To make the same distance between the shelves, you can put extra bars in the middle.
- We drill holes.
To make this craft you will need a regular drill with a large drill bit. You need to make two holes in each shelf. They should be located parallel to each other. In general, it turns out that there are two holes for each fragment. A thick rope should fit freely into the hole. If the holes are smaller, then there is a chance that the shelf will be fragile.
When making a craft with your own hands, you have the opportunity to independently choose the size, shade, design and location of the structure.
- We thread the rope
Almost everything is ready to construct the stand. All that remains is to thread a thick rope through the holes and hang the flower shelf. After the rope is inserted through all the holes, tie a strong knot at the bottom of the product. We make a loop from the top of the rope so that we can hang the shelf.
We install the structure.
After all the main work is done, you can begin installing the finished product. Since almost all the walls in houses are made of brick or concrete, we will need an electric drill for work.
To make a stand, you don't have to buy something from the store.
We make markings on the wall where it will be located. We drill holes for fasteners and install it. Firmly fix the product onto the fasteners. Now you can put pots with plants on it.
Construction of a plasterboard shelf
If you want to use a plasterboard shelf in your bathroom, it’s easy to create such a product yourself. To do this, you need to act in the following sequence:
- Apply CD and UD profiles. They are ideal for manufacturing, which must be fastened with self-tapping screws.
- Try making niches if you are installing plasterboard sheets in the bathroom for leveling.
- After covering with plasterboard, you can cover the surface with tiles. If desired, the design can be combined with glass. It must be mounted in pre-built niches. This option will look attractive.
It is preferable to spend every effort to ensure that the product is of high quality and durable.
In general, making a bathroom shelf with your own hands is not difficult if you decide on the material in advance and make a list of the necessary work. For this room it is better to use a wooden or glass option. The first one is durable and presentable, but to prevent it from deteriorating under the influence of moisture, it is necessary to treat the surface with varnish or a water-repellent agent.
In general, making a bathroom shelf with your own hands is not difficult if you decide on the material in advance and make a list of the necessary work.
As for the glass structure, it is much more practical. Its main advantages are resistance to moisture and chemicals. This material does not rot, does not become stained or coated, and the installation of the glass shelf is carried out without any problems. Of course, the choice of material depends purely on the preferences of the apartment owner, but the properties of different types of raw materials must be taken into account.
It is preferable, of course, to make a shelf out of wood, since this material is resistant to any impact in any place.
This material does not rot, does not become stained or coated, and the installation of the glass shelf is carried out without any problems.
Kinds
Nowadays, it is not difficult to choose a shelf for a bathtub: their abundance on the market will allow you to buy a model for every taste, budget and size. They come in a variety of shapes, materials and colors: from black to chrome and multi-colored. To make the choice easier, let's try to understand their types.
Construction type
Structurally, shelves can be very diverse: large, small, narrow, high, square, rectangular, etc.
- Shelves for towels can be in the form of metal mesh. Air circulation between the rods helps the fabric dry quickly.
- Solid models do not allow air to pass through; it is better to store dry towels on them.
- Cellular structures, in addition to functionality, have decorative properties. They look great on the wall with fluffy terry rolls in cells.
- Small niches in the wall for a shelf length of 40 to 50 cm are also equipped for towels.
- Metal wall screens come in a variety of non-standard shapes; they can hardly be called shelves, but they are an excellent choice for compact rooms. They take up little space and can be placed on narrow surfaces and on doors.
- Multifunctional models are equipped with hooks and other holders. Dry towels lie on the surface of the shelf, and wet towels hang on hooks.
- Multi-tiered structures consist of several shelves. They can have a standard geometric or shapeless, whimsical appearance.
- For wet towels, the best place is an electric heated towel rail. It is a curved pipe-shaped holder connected to an outlet.
Place and method of fastening
The wall is not the only place in the bathroom where you can place towels. The smaller the room, the more difficult it is to allocate space for a shelf. The structure is built into a niche, hung on the door or in the corner of the room, installed on the floor, mounted under the sink.
- The easiest way is to install a floor cabinet or rack, highlighting a shelf for towels. This option is suitable for large rooms.
- Corner structures are ergonomic, they are indispensable for small rooms. You will have to tinker a little with the fastening, but you can purchase lightweight versions with suction cups.
- Wall-mounted models are mounted above the bathtub, washing machine, or on any convenient section of the wall.
- A shelf built into the wall can be made of the same finishing materials as other items in the room, which will allow it to blend into the interior.
- To save space, small elegant shelves are mounted on the door. If there is a gap in the upper part, a model is selected that clings tightly to the door leaf. In this case, there is no need to damage the door with fasteners.
- Airy, lightweight structures on a telescopic tube, mounted between the bathtub and the ceiling, look good.
- Display models are a base on which small shelves, hooks, and baskets are placed. This non-standard towel holder looks beautiful and original.
- Rolled towels can be stored in baskets, boxes or bags. They don’t have to be stationary anywhere; it’s enough to occupy any empty space.
Material
When choosing a material for decorating a bathroom, you should take into account the high humidity of the room. This does not mean that you need to abandon wooden or metal products, it’s just that the latter must be chrome-plated, and wooden models are treated with special impregnations.
Chromed metal is the most popular material for the bathroom. All kinds of shelves, hangers, and soap dishes are made from it. Mesh shelves are suitable for any interior; they are elegant, allow air to pass through, and do not clutter up the room. In addition to chromium, other alloys can be used: silver, copper, gold plated.
- Plastic has long become commonplace in rooms with high humidity; like glass, it does not collect mold and is easy to clean. This lightweight material has a wide variety of colors, textures, shapes and the most affordable price. Not only shelves are made from plastic, but also larger furniture: racks, cabinets, chests of drawers. All of the above are suitable for storing towels. But “serious” interiors do not like this material because it is short-lived and looks cheap.
- Large rooms with good design can afford the presence of stone in the interior (marble, malachite, onyx). The shelves look rich and respectable, emphasizing the status of the owner. If necessary, you can use artificial stone.
Shelf decoration
If you made a shelf yourself, you should think about the decor, because the “naked” option will look poor. When decorating, you should adhere to these three rules:
- It is advisable to avoid openwork shelves in the form of floors in the bathroom. In a standard room, this look will not stand out well. If the bathroom is all original and unusual, perhaps this type will be appropriate to build. But it is better to choose classic products.
- You should not decorate the shelf with elaborate elements such as feathers, large flowers, etc. It is important that the design combines favorably with other elements of the room.
- If you want to use a shelf to accent your bathroom, make it original, but not too pretentious. Choose an unusual shape or use multiple materials during production.
A DIY bathroom shelf should be practical, convenient and durable.
You can use paint as decoration if the shelf is made of wood. If desired, apply an unusual design to the structures. If possible, you can put artificial flowers, a decorative mini-aquarium, scented candles and much more on the shelf. The main thing is to approach your work wisely so as not to overdo it with the decor. In general, it is very profitable to make shelves yourself; this gives you the opportunity to fantasize and bring to life the most original solutions.
For this room it is better to use a wooden or glass option.
Thus, the process of creating furniture with your own hands no longer seems difficult. It is advisable to practice. It would be good to make a shelf for the pantry or garage first, and only then move on to a more complex task.
Which type to choose is a purely individual decision.
Of course, the choice of material depends purely on the preferences of the apartment owner, but the properties of different types of raw materials must be taken into account.
Installation of a shelf under the bathroom
The open space under the bathtub does not decorate the bathroom. Especially if things are stored there that are on display for guests. Therefore, this space also needs decent design.
Typically, do-it-yourself shelves under the bathroom are limited to installing a screen. If the device has a purely cosmetic effect, it can be made solid. However, such a solution will complicate access to plumbing elements, which will complicate the replacement or repair of parts.
The choice often falls on a sliding structure, which consists of a profile mounted around the perimeter and sliding doors. In a more complex version, the screen can be supplemented with pull-out shelves.
Therefore, making simple bathroom shelf models is a feasible task even for a novice craftsman. And to successfully complete the work, it is important to take care of choosing a model that matches the purpose and conditions in the room, and to have the necessary set of materials on hand. And have enough skills to bring the project to successful completion.
Rack ladder
A rack with shelves that imitates a stepladder will ideally fit into the interior of a bathroom decorated in one of the popular styles. To make the design look even more interesting, it can be painted as a zebra pattern or decorated with drawings using the decoupage technique.
Tools and materials
Standard list of tools:
You will also need a few consumables:
Parts size
This rack is so easy to make that drawings and diagrams are not needed. Based on the specified dimensions of the parts, using a ruler and pencil, you should mark the contours of the shelves on a sheet of plywood. The length of each is 60 cm, and the width is different - 40 cm for the bottom, 10 cm for the top, 20 and 30 cm, respectively, for the middle ones.
After this, the sides for the shelves are prepared from the remaining plywood. Their recommended height is 3 cm, and the length will vary. All you need:
Legs for a shelf are cut from timber - 2 pcs. 165 cm and 2 pcs. 170 cm each.
In addition, a piece of timber 60 cm long is made for the upper cross member.
Assembly instructions
When all the parts are ready, you need to sand them and, if necessary, paint or varnish. Can be wrapped with self-adhesive film.
The assembly goes like this:
If glue is used during the assembly of painted parts, areas that will not be covered with it should be isolated with masking tape. This will help avoid leaks.