Features of self-design
First of all, to create a kitchen set project with your own hands, you need to take into account the total area of the room, the location of communications, openings and other individual features. It is recommended to make a simple kitchen plan on paper, indicating all dimensions. Based on it, a drawing of all the furniture is made, after which the method of installing equipment with exact dimensions is considered.
After the basic plan, it is important to select and calculate other important features of the headset:
- length, width and thickness of the tabletop;
- dimensions of lockers for the lower and upper tiers. The standard dimensions of the former are up to 90 cm, depth up to 50 cm. Wall cabinets are not so deep, the optimal value is 30–40 cm;
- the lower cabinets are covered with a tabletop, it will be 4–5 cm wider, and at the back there is a reserve of about 10 cm for communications;
- The width of the set is determined by the size of the room, the value ranges from 30–100 cm, standard 80–90 cm. Corner cabinets are about 60 cm.
After creating the drawing, you can decide whether a standard furniture model is suitable or whether a non-standard design needs to be made. The last option is created if the following elements are present in the kitchen:
- niche;
- protrusions;
- unusual position of communications, which does not make it possible to install conventional modular furniture;
- sockets that require easy access.
Just the individual desires of the home owners are also important.
Any niches or protrusions are played out using the depth of the cabinet; it will be larger or smaller. It is possible to cut a hole for sockets and mount them into the tabletop. When making a drawing, you must follow the basic rules:
- accurately indicate the location of communications, sockets and irregularities;
- arrange the equipment correctly, indicate whether it will be built-in;
- indicate on the drawing all standard kitchen sections;
- at the very end, highlight elements that will have an unusual shape or size.
To simplify the entire process, it is recommended to use ready-made sketches that indicate dimensions, a detailed description of each section, as well as the total area of the kitchen.
DIY cabinet assembly instructions
There are two types of kitchen cabinets and their assembly method differs.
The easiest way to purchase kitchen facades is ready-made. They come in completely different sizes, colors, textures, shapes.
Wall
Assembling the wall cabinet is very simple and will not cause difficulties even for beginners.
- Secure the side wall with the pin hole. This happens on the inside of the shelves, which are adjustable. The holes for the front frames are drilled.
- The rear support insert is fixed on top. The cabinet is hung on the wall and screwed.
- The back cannot be used for hanging. It is better to use nails or glue.
- The front frame is attached at the top and bottom flush with the rest of the parts.
- Installation of shelves and doors.
If your closet is wall-mounted, then you need to install the top wall.
Floor
The floor cabinet is also easy to assemble, but there are several nuances that are worth considering:
- The holes are being prepared. Cross-shaped fasteners are attached to the side boards. This can be done with self-tapping screws.
- If the cabinets are retractable, then rails are attached to the side walls.
- Wooden dowels are placed in all through holes. This is how the initial stage of fastening goes. It's better to do this with glue. The dowel is inserted into the first hole and the second is placed on the end, then the whole thing is compressed.
- Checking the evenness of the connection of parts.
- A hex screw is used to finally connect the two parts. For aesthetics, you can use a plastic plug.
- If the cabinet will stand on legs, then it's time to screw them on.
- The shelves and door are attached.
If the cabinet is floor-mounted, then there is no need to make an upper wall, provided that the countertop is placed there.
Kitchen sections
For the kitchen, furniture is made of several sections:
- upper tier - cabinets that are mounted to the wall, their dimensions and shape depend on the total area, the height ranges from 30–100 cm, and the depth depends on the size of the dish dryer. The optimal size is about 30 cm;
- lower tier - sizes are selected depending on the height of the hostess. The standard height of bedside tables is 85 cm. For non-standard sizes, it is optimal to use built-in appliances. The depth is at least 50 cm, most often 60 cm is taken;
- individual elements - fittings, kitchen hood, on which the width of the upper tier depends. The distance from the stove to the hood should be 70 cm.
The main guideline for the height of hanging furniture is the height of the window.
Creating a drawing of a corner kitchen
It is correct to start the drawing with floor cabinets, namely with a corner cabinet. Starting from this point, the remaining details are drawn:
- equipment or set into which it will be built;
- kitchen furniture with standard sizes;
- non-standard elements.
All parts of the drawing are transferred to the sheet after detailed measurements and calculations. All digital designations are written down on paper; this must be done without errors. The first point of the drawing is a corner cabinet; it can be simple or trapezoidal.
It is often used to install a sink; a washing machine, dishwasher or oven are placed on either side. Ready-made drawings with details will greatly simplify the work; all you need to do is make individual adjustments.
Working triangle rule
There are several ideas with which you can arrange all the structures, sink, stove, as well as appliances, so that they provide functionality and maximum convenience. Typically, many stores provide standard size cabinets for the kitchen. But if you arrange them correctly, and also use some ideas for storing kitchen utensils and food in cabinets, then even a small room will look much more advantageous and visually become wider. But it is worth observing some nuances, otherwise you will end up with a cluttered kitchen with a clutter of all kinds of furniture.
It is important when arranging a kitchen space, regardless of its design (loft, hi-tech, classic), to take into account the preferences of the hostess. First of all, special attention should be paid to the work area, because this is where a woman has to spend most of her time. Wardrobes should be hung taking into account the height of the owner, but do not forget about her preferences. The arrangement of modules should be harmonious and convenient.
It is worth highlighting several zones of the work triangle:
- The first and most important area is the working surface. This may include a gas stove, countertop, microwave oven;
- second kitchen area for long-term food storage - freezer, refrigerator;
- clean area - dishes and vegetables are washed in this area. A sink and dishwasher are installed in this area.
If we look at numerous drawings and photos, it becomes clear that the distance between zones should not be more than two arm lengths. From the refrigerator you have to go straight to the sink to rinse the food. After this, you go to the work surface to prepare the food. After finishing the work, you again have to go to the refrigerator to remove the remaining food or a cold dish. When cooking, you often have to go to cabinets where spices, seasonings and other necessary products are stored. For this reason, during installation, as well as when hanging furniture, it is worth calculating everything correctly so that each item is located nearby, but does not interfere with the functionality of this room.
Suspensions, racks and other upper structures should be in height and nearby so that the housewife always has everything at hand.
Dimensions and features of lockers
Any drawing of kitchen cabinets indicates important details that help calculate dimensions. According to the plan, cutting is created to determine future costs for materials. Accurate data simplifies the assembly phase. It is better to carry out the details in tabular form, indicating:
- all elements of cabinets, from small to large;
- quantity of each part;
- sizes taking into account the features of the kitchen.
A sample table looks like this:
The size of each part in mm is entered in the tabular part. Calculations should be made taking into account the thickness of the sheets, which means that the material for the facade must be decided in advance.
Components of a corner cabinet without drying:
The vertical part provides the required rigidity, and in the middle of the horizontal shelf a special recess is made for it. The remaining tables for the cabinet for the hood, dishes or sink are created in the same way.
In furniture for the hood, you need to make a hole for the ventilation pipe. Standard corrugations are produced with a diameter of 11–15 cm. The bottom shelf will rise according to the height of the equipment itself. Cabinets or cupboards are placed on horizontal facades, which are opened using lifts.
A set with a corner sink has a disadvantage - the space under it is not fully used, and access to the extreme points is complicated. Additionally, the drawings indicate drawers and fittings for them. Such parts should slide out easily, regardless of shape or weight.
For the retractable element, you need to buy guides; they are mounted on both sides, so the plan must indicate the correctly calculated width minus the double sum of the thickness of the mechanism and the sidewall. Tight closure is possible with a guide shortened from the depth of the entire cabinet by 5 millimeters or more.
To properly implement a corner kitchen, you need to understand the basic parameters of the furniture:
- height from the floor to the top surface - 180–250 cm; if there is a gas water heater, the set for it will be the highest point;
- depth of the lower cabinets - 45–50 cm;
- depth of upper cabinets - 30–40 cm;
- facade width - from 30–40 cm;
- The thickness of the countertop is 2–4 cm; it is better to use a thick cloth for kitchens, especially under the sink.
Designers advise creating a corner kitchen at your own discretion, since the list contains standard values, but they will not always be convenient.
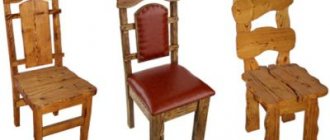
Kitchen cabinets in the interior - types and purpose
In post-Soviet times, a kitchen set was a standard set of furniture; today, the range of cabinets present on the furniture market offers a variety of stylistic and design solutions.
When choosing furniture, you should first of all be guided by the size of the room. The basic rule for choosing storage systems for a small kitchen is rational use of space. You should not overload the room with unnecessary pieces of furniture.
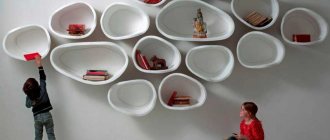
To make your kitchen look more attractive and interesting, use cabinets of different heights in your interior.
According to their purpose, kitchen cabinets can be divided into several main types:
- privates with regiments;
- storage systems for built-in equipment;
- drying cabinets.
Correct measurements
The quality of the headset and its location in the kitchen depend on the accuracy of the measurements. To do the job correctly, you need to measure the perimeter of the room:
- on baseboards;
- at the level of the working part in the area of 75–95 cm from the floor;
- according to the height of the owners.
Additionally, the height of the kitchen is checked. Readings are taken in different places, since the floor or ceiling may be crooked, which will affect the headset. Any distances to communications, sockets and openings must be measured from one corner.
When creating a drawing yourself or adjusting ready-made solutions, you will need to pay attention to the gap along the wall. It is necessary to provide a space reserve of about 5 cm when installing furniture and to avoid major alterations.
If there are crooked walls, the additional gap will help to move the cabinets, aligning everything on the level, and the rest will be covered with a furniture plinth. It is recommended to install all equipment with a distance of at least 40 cm from each other.
Creating a drawing for a corner or other kitchen yourself has a lot of advantages, the main advantage is saving money on the project. By spending a little time studying the theory and effort in drawing up a plan, you can make a beautiful kitchen with the most functional arrangement of the furniture.
Modern programs help you make sketches and drawings online. Among the most popular programs for designing kitchen units are:
- PRO-100 - convenient and easy to use, the interface is intuitive;
- KitchenDraw;
- K3-Furniture;
- Basis-Constructor-Furniture Maker;
- Woody.
The described editors help reduce the time of designing and drawing typeface lines. The main advantages of sketches made in specialized programs are getting the kitchen in 3D visualization. The user can choose a color scheme and play with the arrangement of cabinets. To get the job done, you just need to know the exact dimensions and features of a particular kitchen.
Installing a cabinet in the kitchen
We figured out how to make a kitchen cabinet with our own hands. What to do with the installation, how to start and how to finish.
Learning how to install kitchen cabinets may seem intimidating, but the techniques are actually very simple.
Kitchen cabinets can be installed in any order. Starting from the bottom to the top, and vice versa. The only thing that matters is the installation location. Work always starts from the corner, that is, from the side. If this is a set, then the evenness of the installation of the very first one determines the evenness of all other parts.
The main task is to find the best starting point and save all the levels.
The height to which the cabinets rise depends on the height of the future owners. The standard option is a little more than 40-45 centimeters from the tabletop, if it is a wall-mounted option.
For a more convenient and practical installation, you can mark lines on the wall, that is, outline the outline of the cabinet. A bubble or water level is useful for this.
You need to screw several wooden boxes to the wall in the correct sequence.
The installation task may seem daunting, but once you get the hang of it, anyone can do it easily. Care and manual dexterity will help place the cabinets on the same level, so that their side walls are vertical and the bottom walls are horizontal. With careful installation there should not be any difficulties.
You only need a few basic tools to get the job done.
For greater structural reliability, the cabinets can be additionally fastened together. There are two ways to do this. The first is the basic installation, fasteners. The second is first fastening with others, and then the main installation. Hanging cabinets alone is not easy, so it is better to ask someone for help.
The step-by-step photos provided show the key points on how to install kitchen cabinets in a simple and affordable way.
The cabinets can be fastened together with intersectional ties. They are available in different sizes, diameters, lengths and thicknesses. It is important to consider that for one wall you will need about 2 ties, or even more. They are placed close to the hinges, it can be lower or higher. The cabinets are placed on the same level and fastened together.
Making a kitchen cabinet with your own hands is not easy; only people who are diligent and understand the basics of design can cope with it.
If everyone can cut out the parts, then not many will be able to handle the installation. The main thing is to be careful and check every action for accuracy. This way, the chance to avoid mistakes increases and the end result will definitely please you.
Placement of equipment and sockets
Proper placement of household appliances is a very important stage. Basic rules must be followed:
- the refrigerator is placed further from the stove, otherwise its failure will accelerate;
- The stove and sink should be located away from each other, at a distance of at least 50 cm. Otherwise, when washing dishes or food, splashes may fall on the stove or sockets;
- the washing machine and dishwasher near the sink to simplify connection to the sewerage system and water supply;
- the built-in hood must be mounted in a cabinet above the stove;
- A dish drainer is installed above the sink
To eliminate the use of extension cords, you will need to plan the location of the outlets during the design. Any kitchen needs a large number of outlets to connect appliances to electricity, since various electrical appliances are used in almost all parts of the room. If the furniture is located at a corner, the installation of sockets should be carried out on different walls, in the apron or tabletop.
The presence of built-in appliances allows you to make hidden sockets behind cabinets or cabinets. Their height from the floor should not be more than 60 cm, and access is made easy and free. You need to cut holes in the walls of the headset for them, but the location should be from 1 meter to the equipment itself. This is due to safety precautions.
The hood in the kitchen is a stationary device, so access to the network is provided slightly higher than the furniture, about 5 cm is enough. It is imperative to take into account the location of the corrugation for ventilation, access is free, and the outlet should not have any obstacles. With a built-in hood, it is better to install an outlet inside the cabinet on the side wall.
For kitchens with an abundance of additional non-stationary appliances, you need to make at least 3 free sockets. They are mounted in accessible places, and an apron or countertop is best.
The lighting fixtures are connected above the headset. It is very convenient to install blocks with a retractable system. They are created inside cabinets. It is prohibited to install sockets:
- above the sink;
- above the hob;
- on the walls of cabinets with drawers;
- behind the built-in equipment.
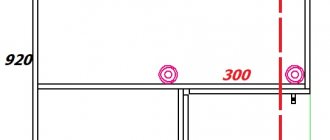
In the drawings, access to the network is indicated schematically, indicated in the form of two dots. All connection types are divided into groups: open, closed and with a switch.
When overhauling corner kitchens, almost no wiring projects are done. Many owners do not want to spend extra money on such work, but as a result, the wall decoration during installation, namely the apron, may deteriorate. You need to think about the placement of sockets in advance, taking into account the approximate or exact number of devices, and add 2-3 free sockets.
Height of apron and wall panel
The length of the apron is determined based on the size of the kitchen working area, because the apron is a covering that protects the walls from grease, steam and temperature changes. Based on these considerations, it is necessary to determine the finishing area.
Much more questions arise when calculating the height of the apron. What do you need to consider?
- Man's height . The height of the apron determines the level at which the wall cabinets will be located. For a short person, for example, it is important to install wall cabinets so that you can freely reach at least the bottom shelf.
The height of the kitchen apron can vary from 500 to 800 mm.
- Hob type . In a kitchen with a gas stove, the height of the apron under the hood can reach 800 mm: this is due to the need to place the hood higher. In a kitchen with an electric hob, this distance can start from 500 mm. The best option is always 600 mm.
- Design features . If the set does not have upper cabinets, then the empty wall can be completely covered with an apron.
Note! The apron should go under the countertop and under the wall cabinets. On the lower tier, closing the border of the apron is easy with the help of the adjustable legs of the cabinet.