Every person in his apartment has a couple of unnecessary items, the absence of which will not worsen the interior and its appearance. But there are also things that cannot be replaced by anything. Otherwise, functionality is lost and style is compromised.
The case concerns wall shelves, the manufacture of which is possible on your own. You just need to put in a little effort and use your imagination.
Shelves as an interior element
Among the variety of types of shelves, one of the designs that suits the image of home design is sure to fit.
When considering the shape of the shelf, do not forget that it should look open and appear weightless from the outside.
A similar effect can be achieved through the use of hidden fasteners. The materials you can use are glass, plastic or metal.
Wall shelves are convenient to make in a children's room. You will have the opportunity to decorate the room with colorful accessories. Wooden shelves are more suitable in the kitchen, and in the bathroom it is better to hang glass structures.
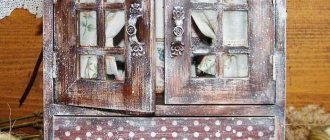
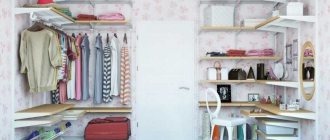
The photo shows types of DIY shelves that can be placed in the kitchen or bathroom.
Creating a shelf from plywood on the wall
This is an easy and inexpensive way to create functional decoration for any room.
The photo shows triangular-shaped shelves that look great in a nursery.
Materials and tools
To make it you will need:
- A piece of plywood 2 cm thick.
- Jigsaw.
- Wood glue.
- Sanding machine or sandpaper.
- Self-tapping screws.
- Primer.
- Simple mounting brackets.
The photo shows plywood being cut along pre-drawn lines.
The working process
If all the tools are at hand, let's start creating the shelf:
- Cut out three identical rectangles.
- We make the ends beveled.
- We clean the wood.
- Let's start assembling. To do this, glue the edges and fix the triangles with self-tapping screws.
- To hide the screws, we prime the fastening points and sand the product.
- We attach the finished product to the wall using corner brackets.
Suspended structure
If your apartment lacks a wall shelf, make one yourself. Such a lightweight design will become a modern element of the decor.
An easy option would be to make a designer shelf yourself, using belts and boards.
How to make a shelf with your own hands? To work you will need to stock up on the following set:
- two cut boards measuring 750x300 mm;
- 4 blanks of leather belts 75 cm long;
- dowels, long screws and self-tapping screws (4 pcs.);
- drill;
- knife;
- measuring level.
We prepare the belts. We select the side parts of the tape with a flat surface. If the ends of the tape are uneven, they must be trimmed with a knife.
We fold the belt into 2 parts, placing the ends on the table using a drill. We drill a small recess in them, leaving at least 2 cm from the edge.
We fix the belts. Using a level, we mark the areas where the shelf will be installed on the wall with our own hands. The gap between the first and second fasteners should be 60 cm.
Dowels are inserted into the openings made. We attach the finished straps to them and secure them with screws. At the end there are two large loops.
Shelf installation. The treated board is placed in the grooves of the loops and leveled in a horizontal position. The same structure is fixed under it in a similar way. This way you can make a multi-tiered module.
Material selection
Different materials can be used for hanging shelves, each of which has its own advantages and disadvantages. But most often wood, plastic, plywood, metal or tempered glass are used to make shelves. Let's consider each of these materials separately.
Tree
The most common material used to create various furniture. Wooden shelves fit perfectly into almost any interior. In addition, wood lends itself well to processing, and the finished product can be coated with different types of materials.
Furniture is most often made from wood
Plastic
A very durable, but at the same time lightweight material, used in almost all areas of production. The advantage of plastic is that its surface can be made in the form of natural stone or other equally beautiful materials.
Plastic
MDF
This material is often used to create furniture, due to the ease of processing and the ability to change thickness or color. MDF sheets are made in different styles, which allows you to imitate different types of wood.
MDF panels
Metal
Wall-mounted shelves made entirely of metal are quite rare; this material is mainly used to make the frame or side panels. As a rule, aluminum, chrome or even bronze are used to create shelves. Finished products will fit perfectly into a modern interior or more classic styles.
Metal is rarely used to make shelves
Glass
Another type of material used to create furniture is tempered glass. It is very different from ordinary glass, having increased strength. The finished products visually look light, thanks to which the room automatically becomes more spacious and stylish . Glass can also be combined with other materials, such as metal.
Tempered glass is used for furniture
On a note! When choosing a material to create a wall shelf, you need to rely only on your imagination. Old pipes, corners, TV cases, suitcases and other items can be used. Some craftsmen use trouser belts as fastening elements for the finished shelf.
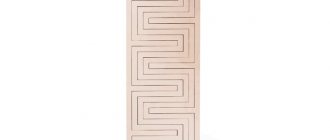
Making a bookshelf
How to make a book shelf with your own hands? As an example, let's look at a version of assembling a bookshelf that looks like a labyrinth. The assembly of the structure itself should be done after giving the sections different color shades.
- Do-it-yourself shoe racks: a review of the best ideas and a step-by-step description of how to build a shoe rack (85 photos and videos)
Do-it-yourself bag chair - a detailed master class on how to sew a properly comfortable chair (75 photos)
DIY chest - how to make a beautiful and stylish craft from a box, paper and wood (80 photos)
For strong fixation, construction adhesive for woodwork is used. Plus, the shelf is secured with Euro screws.
After the glue has dried, both sections of the shelves are leveled at the required location. Then you should mark the fastening area and make recesses for the dowels. Afterwards, the book structure is attached to the wall surface.
The book labyrinth is a real example of creative skill.
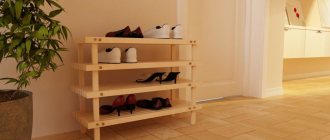
Shoe shelf
When a shoe storage room made of smooth boards is an ordinary piece of furniture for you, you can try to make an exclusive option.
So we make a shoe rack with our own hands as follows. The design details will need to be made using a jigsaw from sheet material.
DIY bread box - step-by-step master class on making and tips on how to decorate a wooden model (105 photos + video)DIY high chair - interesting drawings and projects on how to make a comfortable and functional high chair (120 photo ideas)
DIY built-in wardrobe: 115 photos of original ideas and video tips for building built-in wardrobe models
It is allowed to assemble the structure using self-tapping screws or bolts. Additionally, you can use an adhesive base.
A shoe rack standing on the floor is also made of wire. It will consist of lattice tiers.
Fastening the wire is possible using different methods. It can be boiled or intertwined.
Making a corner shelf
Next, we’ll look at how to make a corner shelf yourself. The manufacturing technology does not require maximum investment and a large set of tools. Basically, all the necessary equipment can be found at home. So let's get to work.
To ensure a presentable surface appearance of the shelf, you need to clean all its parts. For these purposes, sandpaper is used. When all the elements have a smooth surface, they can be coated with paint.
DIY corner cabinet: 80 photo ideas and video description of how and what to make a cabinet from. Main manufacturing stages and best design projectsDo-it-yourself wardrobe for the balcony - 80 photos of how to make a balcony wardrobe from various materials with your own hands
- Do-it-yourself wardrobe - a detailed description of how to make and assemble a wardrobe with your own hands at home (110 photos + video)
As for the markings, the stability of the shelf itself depends on it. Carefully calculate the height and area of attachment of the shelf structure. Apply the markings with a simple pencil.
The posts are secured to the wall surface with dowels. Special holes are made for them. Afterwards, you can begin attaching the racks, strictly observing the previously prepared markings.
To secure the shelf to existing racks, regular glue is initially used. The shelves are tightly fixed into the corner; for this reason, spacers are not required.
On the corner structure you can place things used in everyday life or flowers. It is not recommended to place heavy things on such a shelf, otherwise it will not hold up.
The structure is strengthened with metal elements in the lower part. Fastening is done using screws.
Types of shelves
Before you start assembling the shelf, you need to decide on its type. There are many design options that differ from each other in material, shape, and dimensions. Let's look at the most common of them:
- open;
- closed;
- corner;
- asymmetrical;
- hanging.
The first option is one of the simplest in terms of implementation. Open shelves are made without side walls and a back strip. Doors located at the front are also absent in such designs. Closed ones include all the necessary surfaces to create a rectangular hanging cabinet.
Corner shelves can be of two types. The first option is used for internal corners. Their second variety is models installed on external corners. The original solution is designs made asymmetrically. You can use them to decorate the interior of a room. When making such shelves, it is worth preserving their functionality.
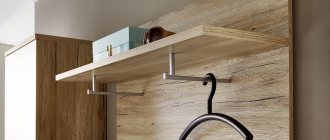
Note! Hanging models are suitable for interiors in which natural materials predominate (wood, stone, etc.). Hangers for them can be made from ropes, belts, thick fabric or any other available materials.
If you need to make regular shelves that have good functionality, then it is best to choose open or closed varieties. Asymmetrical models are quite difficult to assemble, especially if you do not have skills in this area.
Corner shelf in the bath
How to make a shelf in a bathhouse yourself so that it is not oversized and at the same time roomy. The appropriate placement in this situation is a corner one.
Despite its small size, the capacity can be increased by creating multiple floors. Their number depends on two factors - the height of the objects and convenient access to them.
A homemade shelf can be hung on hidden loops. If desired, you can use stronger fasteners. Since the corner structure is supported not by one wall, but by two, it is considered more durable than a wall shelf.
Here's what you need to get started:
- two embroideries and quilting hoops,
- light craft wood, for example balsa wood or linden,
- X-Acto knife,
- leather cord,
- glue gun and sticks,
- ruler,
- pencil,
- glass mat or other protective covering for the work surface,
- paints and brushes (optional).
Cork and linden wood for home decoration is inexpensive, so it can be found at your local craft store. The author chose 14-inch embroidery hoops.
You will need two rings, as each hoop is sold in several pieces. You will be using the inside of them without the included hardware.
You will also notice that the hoops may vary in their coloring. This natural color change is normal. If you want, try choosing hoops that match a single color.
In addition, it is advisable to choose them in a light shade palette that will match the tone of the wood used for the protruding shelf.
| Step 1: | Align your rings and position them as desired. |
You will create your unique and interesting home decor by stacking two interior hoops on top of each other. Check both parts for markings or other irregularities, then position them to minimize any possible imperfections. For example, there may be discoloration inside one hoop.
Perhaps such an element should be located behind the other ring, as a result it will become less noticeable. At this point, you can use a few dabs of hot glue to hold the structure together. This can also be done in step 4 (details below).
| Step 2: | Measure and cut a piece of wood. |
You will need this piece to be larger than the diameter of the hoop. You'll see why in a minute.
Measure the length and width of the required element, and use a pencil to mark the results on your bar. Now use the X-Acto knife to cut the wood.
Make sure you protect your work surface while creating a unique interior design item. If you have a glass panel, place it underneath your project. You don't want the knife to damage the table!
When you complete this step, you will have a piece of wood that can be positioned in the center of the round shelf.
| Step 3: | Insert a wooden plank into the center of the circular structure. |
Since this tab is slightly wider than the diameter of the hoop, it will stay in place with relative ease (the hoop will bend to accommodate it). At this stage the shelf is not very strong yet. Don't be discouraged if the rings are loose or you need to rebuild the plank within the structure. Everything will be formed soon!
| Step 4: | Use hot glue to secure your home decor. |
Yes, exactly this material. Remember that this is a shelf for small and airy items. The designer marked a line of hot glue at the junction of the two elements, and then allowed it to dry to firmly secure it in place.
You can see another picture of hot glue applied to the surface. If you are still able to move the rings, you can add some strokes between them, and then press them together firmly to make sure they are connected. You can also glue these pieces together during the first step.
| Step 5: | Painting the outer edge of the object. |
This action is optional. In fact, many of today's most popular round shelves have a natural wood look. However, in this case, the designer wanted to give it brightness and uniqueness.
In addition, the author liked the way the turquoise hue looked in combination with the rose gold trim of the faux leather straps. To apply the paint, he used a foam brush, paying close attention to not overloading it with material.
The brush must be kept parallel to the edge of the shelf while working, and light strokes must be used to ensure the layer is even and clear. As you can see, the master did not use masking tape to prevent unevenness, he simply worked extremely carefully.
You can bring a variety of decor ideas to life! For example, paint the structure in a monochrome shade, use two colors, or leave it untouched in its natural textured appearance.
| Step 6: | Attach leather straps to the shelf and hang it on the wall! |
As mentioned, the decorator used faux leather straps with a rose gold shimmer for his masterpiece, but you can use any other material or cord that you like.
The following photo is a snapshot of the finished product.
Method for making a shelf in a garage
For car enthusiasts, it will be useful to know how to make shelves in the garage with your own hands. All types of wall and hanging shelves have good capacity, so they will rid the room of clutter.
We begin work by cutting out the shelf of the necessary parameters from a plywood sheet.
Recesses for studs must be placed on the sides of the structure. Drilling must be done 5 cm from the edge, otherwise there is a risk of the shelf being destroyed under the mass of things.
Then we attach the shelf to the ceiling surface and use a pencil to duplicate the location of the holes on it. Due to this, the shelf will stand straight and you won’t have to worry about the deformation of the studs.
Then holes are made for the anchors. Dust contaminants must be removed from them. The anchors are firmly inserted into the concrete, then the nuts are screwed in.
And finally, the installation of the shelf is done. A nut is screwed onto the stud on top, followed by a washer. Finally, a shelf is placed on the lengths of studs.
Thus, shelves can be easily made with your own efforts. And it will cost much less. Depending on where the structure will be located, its sketch and shape are selected.
DIY photo of shelves
Read here - Do-it-yourself bar stool - drawings, photos, design choices and video instructions on how to make a beautiful chair yourself
Did you like the article?
0