The table in the gazebo is one of its most used parts. It must be smooth, durable and beautiful, otherwise you will not experience any pleasure from eating and ordinary “get-togethers”.
On the Internet I found more than ten ways to make a wooden table, using boards, bars and even old half-rotten scraps. However, it is the method proposed below that I consider the most interesting for making it yourself.
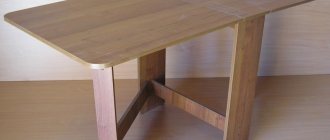
Ready table
Photos of other pieces of furniture for the gazebo can be seen in the article - Do-it-yourself furniture for the gazebo: photo ideas made of wood, rattan and other materials.
The proposed instructions use the most common available building material - board . It is quite possible that you have it on your site or you have access to a place where you can get it.
No complex design solutions are used as fastenings; ordinary galvanized self-tapping screws will be enough.
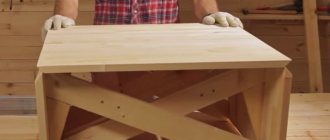
Assembling the table from prepared parts
The first stage is cutting and cutting out 2 pieces of the tabletop.
If necessary, finish the ends and cover the surface. At the inner end of each part, 2 holes (8-10 mm in diameter) are drilled for the dowels of the removable elements. Then a U-shaped box is made from the sidewalls, the corners of which are fastened from the inside with an aluminum corner. So that the box can move above the base, the reverse parts of the guides are fixed to the inside of the side parts of the body.
A tabletop is installed on top of the box. These elements are fastened together using aluminum corners.
Now you can proceed to installing the insert. The sliding mechanism, which is most often made of aluminum, is best secured with self-tapping screws, for convenience, turning the table over and placing it on the tabletop. The guides of this device are screwed to long frames, and the sliders are screwed to one of the 2 parts of the tabletop.
The design of the sliding table can be changed if instead of 4 supports you use 2 wide ones or even leave one massive leg with a cross or platform. Also, these elements can have different shapes, for example, they can be made from figured or chiseled ones.
Stump furniture
Many country house owners make tables from stumps. This is an ideal option for round small architectural forms. This round table for a gazebo, made with your own hands, involves the use of an oval or round tabletop.
Such a support requires the use of boards 2 cm thick. In this case, you should follow the rule: the larger the tabletop, the thicker the board.
A well-dried old stump must be varnished. This way you will emphasize the texture of natural material. If the stump was cut relatively recently, it should be thoroughly dried. To do this, it is better to place the wood in a warm and dry place. You can also leave the stump in a well-ventilated area, taking advantage of the sunny weather. The stump should dry for about two months.
Afterwards, the bark is carefully removed from the dry stump so as not to damage the wood structure. Unsightly parts and protruding rhizomes are cut off.
Now the surface of the stump should be leveled horizontally. The building level will help level the base for the future countertop. The surface of the wood is sanded.
Boards for the tabletop are glued or fastened using crossbars. The tabletop is attached to the stump. The surface of the table is covered with varnish or stain.
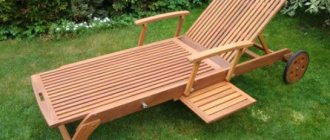
All weather table
The main difference between this product is its resistance to moisture, temperature fluctuations, and ultraviolet radiation. Such products do not fade or deteriorate from prolonged exposure to the street in any weather conditions. All-weather models can be either collapsible or traditional.
An example of an all-weather tennis table.
The listed materials have significant drawbacks - plastic has very little weight, which on the one hand is good, because the structure is very light and easy to move. On the other hand, a plastic tabletop does not provide optimal ball bounce. Melamine copes well with this task, but its cost may not be acceptable for everyone. But models with melamine countertops are not afraid of any weather conditions and can stand in the open air all year round.
Tip: to increase the rigidity of the structure, as well as the rebound of the ball, you can make the tabletop two-layer - for the bottom layer, use aluminum sheets, on top of which melamine or plastic is fixed.
Table
A table is an essential item in a gazebo. Of course, you can buy a plastic table, which is low cost, but it is much more pleasant to make this design yourself. You can make high quality furniture at an affordable price and in accordance with the design you like.
Material selection and drawing
Before making a table/chairs for the gazebo, you should purchase the appropriate building materials. The easiest way is to take a large log, cut it in half horizontally, process it with a plane and place it on the appropriate leg. But this solution may not be practical. Therefore, we suggest you build a table from boards and beams. The result is a strong and stable structure.
It is important to do all measurements and preparation of parts very carefully. It is better to make a table from expensive, high-quality wood. Before you start purchasing and cutting wooden elements, draw a drawing of the table on paper. Put dimensions on it, which will allow you to calculate the amount of material with maximum accuracy.
Making a table with a drawer
First make the tabletop. Alternatively, assemble it from boards or use a ready-made furniture panel. The optimal size of boards for making tabletops is 75×25 mm. To prevent the tabletop from loosening, attach several guide bars to it on the back side. The easiest way to secure them is with self-tapping screws.
If you position the guides diagonally, you will have the opportunity to make a drawer in the table. You can store various little things in it.
So, to make a box under the tabletop in the middle of the long edge of the table, fasten 2 beams with a cross-section of 50x50 mm. The distance between the bars should be 30 cm. Fix 2 strips on the inside of the bars. These will serve as drawer guides. It's time to make a box of the appropriate width, that is, equal to 30 cm. Stuff the same 2 strips on the sides of the box and strips corresponding to its width in the front and back. Place the drawer under the countertop.
If the table is mobile, then all you need to complete its construction is to install 4 durable legs. But, in cases where the table is built-in, a foundation must be installed in advance to install it. It can be concrete or brick. A simpler solution is to make stable, strong legs, dig them in and concrete them.
The table frame should be 15–30 cm smaller than the tabletop. This should be taken into account when installing the legs.
If massive beams were chosen as legs for the built-in table, then before installing them in the recesses, the wood should be treated with a special protective compound against rotting. Then install them, check verticality, fix and fill the solution. To make the table stable, you need to wait a few days until the concrete hardens.
The optimal height of the table is 75–80 cm. This means that the height of the legs depends on the thickness of the tabletop.
Before screwing the screws and installing the mounting corners, lubricate the fastening points with an adhesive, for example, PVA with fine sawdust.
Next you need to attach the tabletop to the legs. Sand the table and apply an antiseptic to it, and then a fire retardant. After the table has dried, you can open it with varnish or paint it. Apply paint in several layers. The structure is ready.
Model selection
The design and dimensions of tables made from profile pipes can be varied. Metal harmoniously combines with other materials: wood, glass, plastic, stone and others. The most popular designs today are the following:
- Table-desk with a compartment for storing books. It has a slightly inclined tabletop, which allows the student to sit in the correct position. The height of the working surface must correspond to the height of the child. So, for a first-grader with a height of 130 cm, the optimal parameters will be 50 cm.
- Table with a massive table top. Such models look quite brutal. The most popular are the standard rectangular options. Dimensions 120 x 70 cm will not take up much space and will accommodate 4 people.
- Lightweight design for the garden. The optimal tabletop size is 80 x 120 cm. Smaller tables will be less functional, larger tables will be too bulky.
- Workbench table. A working version that is used in workshops and garages. A suitable tabletop length is 220 cm, width 75 cm, height 85–90 cm.
- Table transformer. In this case, metal elements are used to create folding parts. The folding version can have a variety of dimensions: 150 x 90, 200 x 110, 320 x 110, 90 x 90, 120 x 120 cm.
- Small coffee table. The parameters depend on the shape of the tabletop. Standard dimensions are 80 x 80 cm, the height of the legs can be any.
- Bipedal. Such structures are placed against the wall, which serves as additional support. The optimal height is 87–90 cm; the size of the tabletop depends on the number of people. There should be at least 60 cm per seated person.
- In the form of a bar counter. The standard length parameters are 120 cm, width - 55 cm, height - 105 cm. These dimensions allow the models to fit organically into almost any room.
The design and dimensions of tables made of metal profiles must correspond to the style of the room or garden plot, as well as the purpose. A wide range of models allows you to choose the right model to solve various problems.
Table-desk
With a massive table top
For the dacha
WorkbenchTransformer
Magazine
Bipedal
Bar
Design selection
The design of the table (shape, size, decorative elements) primarily depends on the area and shape of the gazebo itself. The most common are rectangular or square tables with four legs or an X-shaped base. The dimensions of the tabletop should be such that there is enough free space in the gazebo, no more than 2/3 of the area of the garden gazebo. The height of the table usually varies from 75 to 85 cm, but you can install a lower (if you decorate the gazebo in an oriental style) or a high table (for buffets or bar stools).
In non-standard gazebos, tables with a round or multifaceted tabletop look good. Although their production is associated with greater difficulties than standard options. But at the same time, they are very comfortable and convenient for gatherings in small groups, as they allow guests to independently reach the necessary dishes.
What materials are used for country tables: pros and cons
In the process of making tables for summer cottages, the following is used:
- plastic elements that are connected with rivets, screws or glued with epoxy-based materials;
- steel sheets and profile trim; welding, bolts or rivets are used for assembly;
- wooden or plywood blanks, which are fastened with pins, wood glue or screws.
Lightweight plastic
Plastic tables are assembled from factory blanks processed in accordance with the required dimensions. The advantages of the material include resistance to rotting and precipitation.
But one should take into account the increased fragility of plastic at low temperatures (from +5°C) and flammability. Sheet plastic is rarely used for making homemade tables.
Plastic set for a summer house - table and chairs.
Iron sheets
The metal structure is assembled from steel angles connected by bolts or resistance welding. A tabletop made of sheet reinforced with profile scraps is mounted on top.
The table is heavy and durable. To prevent the product from sinking into the ground, support plates are welded to the legs. When installing the product outdoors, it is necessary to protect the surface with soil and impact-resistant enamel, otherwise traces of corrosion will appear on the metal.
Iron country table.
Wood
The most widespread are wooden tables made of solid wood, plywood sheets or chipboard. The material has a beautiful appearance, is easy to process and has a low specific gravity.
To reduce the rate of decay, wood is impregnated with compounds containing antibacterial additives. There are solutions that reduce the flammability of the material.
Wood table.
Kitchen furniture made from pallets
One varnished tray in the kitchen can serve only or mainly as a decorative element (see figure on the right), because natural wood fits perfectly into almost any kitchen interior. However, most often kitchen furniture made from pallets is made fully functional, here again the strength and durability of the material plays a role.
Technologically, the simplest are various kinds of hangers, shelves and minibars, pos. 1-4, 6 and 7 in Fig. below. Not much more complicated, but much more beautiful and suitable for zoning a living space, a bar counter made of pallets, pos. 5. The main thing here is how to tint the boards of the tabletop; we’ll figure this out later.
Kitchen furniture made from pallets
A rack made of pallets (item.) will not require special carpentry skills, but complete disassembly of the pallets will be required. How to simplify and make it easier, also see below. The resulting high-quality material will be enough for an amateur carpenter to make, for example, a kitchen cabinet with a wine cellar or a kitchen cabinet set. The “trick” here is that the material is waste: what if it didn’t work out right away, pallets are not a piece of furniture at 3,500 or more rubles per sq. m.
The situation is interesting with tables made of pallets, dining and cutting tables, pos. 10 and 11. Usually in tables the tabletop is heavily loaded, which places special demands on the quality of its manufacture. But a strong supporting structure made of pallets provides a reliable basis for any countertop (glass, stone, etc.) or stacked tabletop. The latter can be assembled with your own hands from boards and beams from disassembled pallets, see below.
Popular articles Hydrangea Magical Moonlight: description of the variety and cultivation characteristics
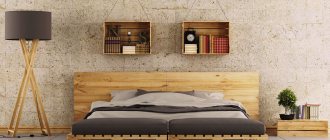
To the house and apartment
Furniture made from pallets has a unique appearance, so when designed for a home, it must match the style of the interior design, which is not always possible. For example, a bed made of pallets will fit perfectly into the now fashionable loft style, but with rustic styles there will most likely be an aesthetic inconsistency, even though the bed is wooden.
Video: bed made of pallets in loft style
However, aesthetically universal options for making furniture made from pallets are possible if the product is relatively small, does not dominate the setting compositionally, and is equipped with some details that create visual transitions from the visually rough “core” of pallets to the overall decor. As an example, we can cite a work table that fits into an apartment of almost any design, except for frankly pretentious styles (empire, baroque, shabby chic, etc.), see figure:
Desk made from pallets
The connecting links in this case are the legs of a geometrically correct shape, but painted in a contrasting color to the tabletop and the surrounding color. The utilitarian advantage of this table is the spacious niches in the tabletop, where you can stuff all the necessary rubbish. This table is also well suited for the kitchen: the dimensions of its tabletop (from 60x80 to 100x120 cm) are optimal for a table in a small kitchen.
The legs in this product are ready-made, a set for kitchen tables with a postforming tabletop, but they are not attached in the standard way. The standard fastening of metal detachable legs for tables is 3 pairs of screw-threaded socket for each. However, threaded sockets for such legs fit firmly only in laminated chipboard or dense fine-grained wood, and are easily broken out of soft coniferous wood. Therefore, the frames of the legs of this table are fastened with 6x80 self-tapping screws at the attachment points located on the timber and through M6x (40-45) bolts to the boards. Washers with a diameter of 30 mm or more are placed under the nuts of the bolts. Standard fastening pairs will be useful to a craftsman for something else.
Making a bench with a back
A rather unusual and beautiful version of a country bench made by yourself is a transforming bench. Compact and functional design: when folded it is a bench with a backrest, when unfolded it is a table and two benches. When disassembled, the transforming bench is designed for 6 people. It will not be possible to assemble such a bench quickly, but if you are patient, the result will be amazing.
Tools and materials
Materials:
- boards 30x80 mm (for reliability it is better to take hardwood);
- metal corners;
- self-tapping screws;
- liquid nails or special glue;
- bolts size M12;
- nuts, washers and nails.
Tools:
- hacksaw;
- screwdriver;
- drill;
- hammer;
- ruler;
- pencil;
- protractor;
- corner;
- roulette.
Assembly steps
First you need to draw all the necessary templates, and then cut the boards to size. When finished, there will be two benches; it is advisable to assemble the outer one first, and then the inner one. The height of the legs is 44 cm, the distance at which they are located: at the top – 25 cm, at the bottom – 40 cm. This is done for reliability and stability. The crossbar between the legs is located at a distance of 15 cm from the supporting surface; it should be located on the inside. The length of the seat is 138 cm. Before starting assembly, all parts must be sanded and chamfered. The design of the bench is quite simple, all fastenings are made with self-tapping screws and glue, and corners are added for reliability and rigid fixation.
The next step is assembling the inner bench. The height of the legs should be the same as that of the first bench, but here the crossbar is moved outward. The length of the top bar increases from 25 cm to 35 cm. A hole is drilled on the protruding part, 4 cm from the edge, where an M12 bolt will be installed; To hide the bolt head, this hole needs to be slightly enlarged. The seat length should be 144 cm.
Next you need to make brackets from two bars. They are connected in such a way that an angle of 100-105 degrees is obtained. One beam is the width of the tabletop, the second is the distance from the bench to the tabletop. A hole is drilled in the second block (which is responsible for the distance) where an M12 bolt will be installed. Now the finished brackets are connected to the inner bench. To prevent the joint from wearing out and the parts not touching each other, you need to install a washer. The head of the bolt is recessed into the drilled hole, and the same actions are performed on the opposite side.
Afterwards, the brackets are installed in a level, that is, in an unfolded position. Now you can connect the tabletop to the outer bench. This is done using two strips, 75.5 cm long. Holes are drilled at both ends at a distance of 4 cm from the edge. A limiter is needed on both slats so that in the future the tabletop does not move out and is securely fixed. It’s not difficult to make: a small piece of board needs to be cut at a certain angle (the desired degree of angle is selected by trial and error) and connected to the plank using self-tapping screws. The same thing is done on the second bar. One end of the plank is connected to the bracket (with the part responsible for the width of the table top) from the inside using an M12 bolt, the second end is also attached using a bolt to the outer corner of the outer bench. Washers are installed at the joints. The final stage is assembling the tabletop. Pre-prepared boards are screwed onto the brackets. The transforming bench is ready.
Step by step construction process
At the end there will be attached a video from the channel “ Through ZHPU ”, in which this method was described (the name they chose is amazing, you can’t say anything