Furniture made from chipboard can be found in every home or apartment. The reasons are significant: favorable low price and practicality. Like any other household item, it becomes outdated over time. Buying new furniture is often not possible. And updating chipboard furniture with your own hands and restoring its lost beauty is exactly what can be done without harming your wallet. Moreover, updating old pieces of furniture will only take about two to three hours.
Communities › DIY › Blog › First experience of gluing chipboard with HPL plastic
Good afternoon, dear ones.
This post is intended not so much to show what I can do, but to ask for advice, am I doing the right thing? Due to the nature of my work, I was faced with the need to manufacture a table covered on all edges with high-pressure plastic HPL (the same one that is used to cover tabletops).
I had a little, just a little bit of experience in this, a couple of years ago I tried to cover a coffee table, it turned out well, there’s no photo, so let’s forget about this experience.
So, we bought a sheet of black plastic, a bucket of KIILTO Kestopren glue, several brushes, rollers, and various sandpapers for the sander. I also photographed the tools to make it clearer.
First, as usual, I looked for information about the method of pasting; the technology is vaguely covered on the Internet, so I came up with a kind of collective image of what needs to be done.
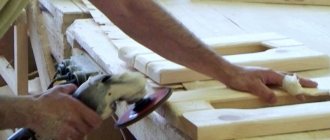
The first step is to prepare the surface. Ideally, use untreated chipboard, the glue sticks to it better, but it is what it is. I sanded the assembled structural elements with a machine until smooth, and tried to bring all the joints and ends into a plane. Then the process of cutting the plastic. We mark the necessary parts with a small margin. I haven’t found a more convenient method for cutting plastic other than with a grinder. It’s convenient, but our area is small, it’s a little inconvenient to do it alone.
Then apply glue to both prepared and degreased surfaces. At first I used a brush, but it does not allow me to apply the glue evenly, the stains dry immediately, and when I pass the brush again, pellets form, which is unacceptable. I decided to use something straight and not hairy. For example, a piece of HDF. Then I switched to a spatula altogether. So, we applied the glue and wait. The bucket says to wait from 15 to 45 minutes, I usually waited 20-25 minutes.
Then press both surfaces to be glued tightly. The grip is instantaneous, it will no longer be possible to move it, therefore, either the reserve is greater, or the positioning is more accurate.
Ideally, for such things you need a press, but I don’t have one, so where possible I use clamps. It is unknown how long it will take to wait under pressure; I waited less than an hour.
Then I remove the excess overhangs with a router, and the final finishing of the corners is done again with a grinder. The project is not completely ready yet, so the question is, am I doing everything right? If you have knowledge and skills in this matter, please enlighten me, I will be very grateful! Thanks to all!
see also
Comments 23
I use Abet laminati plastic and Wilsonart 800 or 801 glue. I apply the glue with a spray gun in 2 layers. According to the instructions for this glue (found in the public domain), the main thing is the pressing force of the parts being glued, and not the time. The first layer dries in about 10 minutes, the second becomes dry in 10 minutes or even less, but continues to set for some time,
10 minutes - plastic glued during this period of time, then even with a knife it is cut off with great difficulty. According to the instructions for the glue, the plastic can be milled immediately after gluing the parts and immediately proceed to the next stage of processing the part. The final processing is done with an angular cutter 15 - 25 ° and sandpaper 100
where can I get this kind of plastic?
2 points: as my friend says, “the sandpaper is in your pants, but this is sandpaper” - but these are minor things. The second point is that the glue does not need to be cured after gluing; the compression force is more important than time. If you tap the glue with a mallet, then this is quite enough, and by the sound it will be clear where it is glued and where you still need to knock.
You are doing everything right. But it is better to warm up the gluing areas to 80 degrees, the glue will activate. But screws for plastic are not good! In this case, you need to additionally glue the joined elements together. If the chipboard is rough, then use good PVA glue.
This plastic can be used for marker boards by the way))
It is better to process overhangs with a finger cutter with a bearing. We usually do this.
It is advisable to wait 24 hours before processing plastic overhangs. It happens that over time the plastic shrinks and gaps remain along the contour.
Take MDF thinking it will fit better and it is moisture resistant
There is no time to switch to MDF. It must be made from what is intended. Yes, and as today’s practice shows, everything sticks perfectly to chipboard))
I don’t know what kind of glue this is, I used kleiberite. Plastic can also be cut with a stationery knife, along the front side, it is not cut through and bends along the cut line, it breaks off clearly along the cut line if you get used to it. You can glue it without clamps, because the glue is contact. I just use a roller. When the plastic is applied to the surface to be glued, it is necessary to roll the entire surface with a roller, evenly, as if expelling air. Well, like wallpaper glue... For high-strength gluing, I do this: apply glue on both sides, wait until it dries completely, apply another layer, when the glue dries you can glue and roll, warming the surface with a hairdryer alternately, warm-roll, warm-roll. I process the edges (overhangs) with a triangular file, cut off the corner, and smoothly grind off the remaining edges, but I also use a router when there is a lot of work.
Thanks for the technology. I didn’t even think about the second layer, I’ll have to try it. The file is good, but I have a special machine for this. I process all overhangs quickly and accurately. I still have to glue the table top, size 1400x800, I'm saving it for the last minute until I get the technology working out, while I glue the short parts. So, as for the tabletop, it seems to me that rolling with a roller will not be enough, you either need to put something heavy on top and let it sit overnight. It seems to me that there will be tubercles along a large plane. Dispel my doubts))
What tubercles? Air bubbles? I remembered: when I didn’t have a roller at hand, I rubbed it in with a piece of board. 20 by 8 cm, wrapped it with a rag in one or two layers and with both hands vigorously rubbed it with the end of the piece of wood. The main thing is not to slap and smooth the whole piece in a chaotic manner when you paste it on. You need to let the air escape and therefore rub in with great force and gradually, layer by layer, strip by strip. When you rub half the table like this, you can see the difference. One half seems to be raised. The rag washes off very quickly and don’t smear it, otherwise you might end up with scratches. Lumps from the fact that there is a speck inside are treated. You need to hit this place with a hammer through a metal ruler and the speck will be pressed into the chipboard. If the surface is laminated, it won’t press in very much.
Thanks for the advice. Any experience is interesting.
You spread the glue with a piece of plastic. And everything is correct.
I cut all my hands with this damn plastic) Still, it’s more convenient to use a piece of fiberboard, even than with a scraper))
Aging furniture
Sometimes, to maintain a certain idea in the interior, it is necessary to age some items. You can make the above furniture decor with your own hands. For work you need to prepare the following materials and tools:
- water-based paints;
- craquelure varnish;
- stain;
- sandpaper;
- acrylic paints in bronze or copper shade;
- brushes
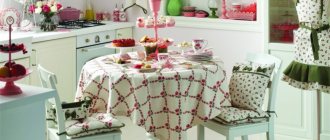
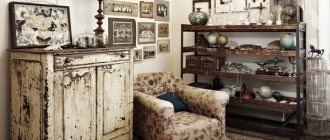
You can paste a picture of flowers on the table
Aging will add sophistication to furniture
To give interior items an aged look, there are several decorative methods. In any case, at the initial stage it will be necessary to carry out surface treatment. Let's look at the techniques in more detail:
- Using stain. This technique is more suitable for light-colored objects. It is applied in an even layer to the prepared surface, paying special attention to the edges, bends, and cracks. And then remove the coating in the center with a sponge soaked in water. After drying, you can rub in antique wax. Such decor will look unusual.
- Craquelure. This type of varnish gives the product a cracked appearance. To begin with, you will need two acrylic paints of the same color combination, but in different tones: darker and lighter. The first layer is applied with a rich shade, and the second (after complete drying) with a light shade. It is better to leave the furniture outdoors until completely dry. And then use sandpaper to clean small areas until the first layer appears. Then you can apply craquelure.
- Gold color. Furniture modified in this way looks gorgeous in any interior. Decorating is quite simple. You will need to paint the object with the desired color, and after drying, quickly apply gold paint with a sponge (unevenly) and varnish it.
Restoration of a TV stand
The shelf can be painted and used as a flower stand
Such a chest of drawers in the room will look unusual
See alsoUseful furniture for the home: banquette for the bedroom
Chipboard edge: how to process the ends yourself
After cutting the chipboard with your own hands, you will be faced with the need to process the visible ends of the future product. When compiling a list of parts, seeing the drawing in front of you, it is better to immediately mark the sides that will need to be covered with a special edge in order to hide the bare cut of the chipboard. The edge of chipboard can be different, let's look at the three most common options.
PVC edge is the best option for cladding the ends of chipboard
The term PVC (Polyvinyl chloride) is quite well known; it refers to a thermoplastic that is used in various ways in furniture production and decoration.
PVC furniture edge is a rigid tape of different thicknesses, from 0.5mm to 2mm, with a decorative coating applied in contrast or “to match the color” of the chipboard texture. An edge of this type is very resistant to mechanical damage and perfectly protects the ends of the chipboard from moisture penetration and chipping. But there is one important thing. It is impossible to glue a PVC edge to the end at home, without special tools, glue and skill.
Therefore, an excellent option would be to order edging of PVC parts immediately after cutting. The cost of the thinnest PVC tape with a thickness of 0.5 mm is almost equivalent to melamine tape (excluding gluing work). And the type of furniture and its durability characteristics will increase significantly. In addition, on visible ends (countertops, open shelves, facades) a PVC edge with a thickness of 1-2mm looks much more solid and beautiful. Don't forget to take its thickness into account when calculating the dimensions of the parts!
How to laminate chipboard with your own hands
Process
Laminating chipboard at home involves applying a special film to the surface.
ATTENTION! It is impossible to reproduce the perfect finishing of furniture at home. Factories immediately produce furniture made from laminated chipboard (chipboard), the quality of which will be better and the service life will be longer, with the remaining savings.
There are several ways to laminate furniture at home:
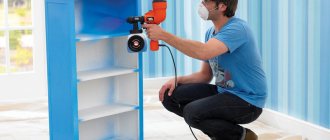
- — Application of self-adhesive film to the surface. Simply remove the layer of protective paper and carefully apply it to the furniture. After the film has stuck, remove air bubbles with a plastic spatula or cloth.
- — Gluing the film with glue. Universal adhesive is applied to the slab and left for a while, after which a film is applied to it. For high-quality gluing, it is recommended to roll it over and hold it under pressure.
BE CAREFUL! When applying the film, carefully measure the shape and surface area, because if you apply the laminate material crookedly, it will be impossible to reuse it - re-glue it.
Which laminating film should I choose?
For lamination of chipboards, several types of films have been developed, which differ in their properties, composition and cost:
- — Phenolic film. Its properties include increasing the wear resistance of materials in terms of mechanical damage, but also having a low moisture resistance.
- — PVC (Polyvinyl chloride). The functionality of this film is aimed at improving the water resistance of furniture.
- — Melamine film. Its properties include wear resistance and moisture resistance, however, the membrane contains formaldehyde resin, which can cause some damage to health when heated. This product should be used outdoors. Cooled material is not hazardous.
Preparation for lamination
Before applying film to furniture, you need to prepare it for the procedure:
1) First we sand the product. This can also be done with sandpaper - if it is not large in size, or, if it is large in size - with a grinder. Sand until the furniture walls are smooth.
2) Then it is recommended to putty the chipboard, dry it and go over it again with less sandpaper.
IMPORTANT! The smoother the surface, the more accurately the film will sit.
3) Next, the workpiece is treated with a wood primer and dried.
Wraparound overlay profile - an option for hiding chips and unevenness
If you purchased ready-made Leroy furniture panels or sawed chipboard yourself with a jigsaw, then most likely the quality of the cut is not very good. You can probably see chips along the edge, and the cut itself is not entirely even along the length, with a blocked horizon. If the parts are used to assemble a dressing room or wardrobe and the design itself is a combination of shelves and standing ones, then to hide the flaws you can use the so-called “hammered” edging (profile).
The wraparound overlay profile is a rigid or flexible U-shaped edging made of plastic or PVC, which fits tightly onto the edge of the chipboard.
With its edges, such an edging extends onto the front sides of the chipboard, enveloping it to a depth of 2-3mm. Thus, all chips and unevenness of the end become invisible.
Before “putting on” the U-shaped PVC profile, it is advisable to treat the ends of the chipboard with sealant and apply glue in spots for fastening strength.
Don't forget to take into account the thickness of the overlay edging when calculating! For example, in shelving structures it is better to deepen the shelves by 5 mm relative to the vertical sides.
The disadvantage of this option is that it is not suitable for processing the ends of facades, drawers and other elements.
Melamine chipboard edge: how to glue it with an iron at home
Melamine (or, as they also say, paper) edge for chipboard is a tape with a decorative coating on one side and glue on the other.
The process of gluing it to the end of a chipboard at home is extremely simple and understandable:
- We install the chipboard part vertically, with the processed end facing up.
- We apply the melamine edge evenly to it.
- Gently run the heated iron several times.
- After gluing, wait until it cools down and cut off the excess with a stationery or shoe knife.
- After cutting the edges, additionally sand with fine sandpaper.
It is better to first determine the optimal heating temperature of the iron experimentally, on a small piece of tape. If the temperature is insufficient, the glue will not melt completely; if it is too high, it will be “absorbed” into the chipboard, and the tape will also not stick well. You need to be careful with the selection of temperature and with dark melamine edges (wenge, black) - whitish spots may appear on the surface.
To make it easier to hold the chipboard workpiece in a vertical state, you can use clamps or construct a kind of “groove” from scraps into which the part can be inserted and fixed.
That's all the tricks for independently processing the ends of chipboard and gluing with melamine tape at home.
Source: delay-shkaf.ru
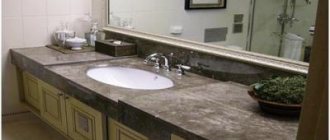
Restoration of faded and worn chipboard countertops
Often, during use, chipboard countertops and cabinet covers wear out.
A tabletop that has faded from abrasion without severe defects on the surface (deep scratches, cracks) can be restored as follows:
- Select the coloring agent according to its shade. It is best to use felt-tip pens - you can moisten a rag with them and rub in soft circular motions and walk across the tabletop until it acquires an even color. Then fix the tint with a fixing varnish.
- In some cases, it is enough to treat a chipboard tabletop with polishing mastic with pigment (available for sale for light and dark furniture) or polish for laminated furniture. After applying the product, the surface must be polished with special lint-free wipes.
Why do you need an edge?
Self-adhesive furniture edge - a narrow strip of melamine, polyvinyl chloride, ABS plastic or other material. It protects and decorates the cut area. When producing cheap furniture from laminated chipboard, edging is simply necessary, as it protects people from exposure to harmful formaldehyde. In addition, it gives strength and protects the material from moisture getting inside.
Types of edges
The most popular types of furniture edges are:
- Melamine edge with glue is the most budget-friendly, but not the highest quality type. It is afraid of moisture and can fall off over time (even without mechanical impact), easily crack and wear off at the corners. The only plus is the pre-applied layer of adhesive, so melamine edging remains a popular option at home.
When purchasing furniture, it is important to pay attention to the quality of finishing of the ends. It is better not to buy furniture treated with melamine, as it will not last long.
- Furniture edging made of PVC 2 and 0.4 mm is the best option. It is much more stable and durable. A thickness of 0.4 mm is usually used to process hidden places, and 2 mm is glued to the outer ends that will be visible. However, its application requires a special edge processing machine, so it is used only in production.
- The edge made of ABS plastic is a more environmentally friendly analogue of the previous option, which is less common on sale.
- Mortise T-profile - inserted into a milled groove at the end of the chipboard. It was popular in those days when a special machine for PVC edges was rare, and there were plenty of milling machines in the shops.
Mortise T-shaped edge Profile C18
- The C18 U-profile overlay is a good option because it can be used for chipboard at home. Usually the C18 U-profile is simply put on the end and glued to liquid nails. The downside is that the edges protrude a few millimeters, under which dirt gets clogged. On the other hand, this feature is very convenient if you cut chipboard with your own hands; large edges will hide uneven cuts and chips. This type is often used for homemade wardrobes.
Restoration of chipboard furniture: what you might need
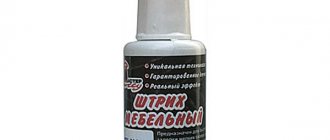
- Soft furniture wax (wax putty). Used to seal chips, scratches, cracks on wooden and laminated surfaces of cabinet furniture, interior doors, laminate and parquet. Provides moisture resistance to the restored surface.
- Hard furniture wax (melt putty). Requires melting before use (for example, using a lighter, soldering iron or gas torch). Application is similar to soft furniture wax. Recommended for restoration of chipboard surfaces with high intensity of use (countertops, shelves, floor coverings).
- Retouching agents - felt-tip pens or alcohol-based markers, valve and fiber. With their help, the texture of the material at the restoration site after waxing is completed to make it less noticeable. Ordinary felt-tip pens in shades that match the furniture, strokes, paints, even shoe polish and iodine will also work.
- Fixing varnishes, polishes (best in the form of sprays and aerosols) for surface treatment after restoration. For coating after restoration of defects, returning surfaces to their former shine, masking abrasions and minor scratches.
- Melamine edging with adhesive for replacement trim.
- Two-component epoxy composition, PVA, dowels (chops), wooden plugs for filling holes from torn hinges and other fasteners.
- Tools – plastic spatula, sandpaper, abrasive sanding sponge (fine), utility knife, hair dryer or iron, chisel, non-woven wipes and rags for finishing.
Chipboard edges
To ensure that your countertop or cabinet edging is beautiful and durable, the best way is to have it edged in-house. This is usually done in the same place where laminated chipboards are purchased and ordered.
Approximate prices for application (per 1 linear meter including material):
- PVC edge 2 mm – 40 rub.;
- PVC edging 0.4 mm – 25 rubles;
- edge for melamine chipboard – 25 rubles;
- You will have to pay additionally for processing curved sections.
The most popular PVC edge in Russia is Rehau; it has a wide selection of colors, so you can choose a color to match any chipboard. The width of the tape varies - from 15 to 45 mm.
To order this service for a store, you must first prepare a diagram of how to glue the PVC edge: in what places to apply it and what thickness. Those places that will not wear out can be covered with 0.4 mm PVC to save money (for example, the back and bottom edges). All visible areas are treated with 2 mm PVC. Where the joint will be attached to the joint with another part, no processing is needed.
The difference between PVC coating 0.4 and 2 mm
- On the internal inset shelf, only the front edge is treated with a layer of 2 mm.
- The top cover is on all sides (the back edge is 0.4 mm, the rest - 2 mm).
- The drawer front is processed on all sides with a thickness of 2 mm.
To simplify calculations, you can use special furniture programs; they create a project automatically. As a result, to assemble an average wardrobe, a PVC edge for chipboard will cost 1.5-2 thousand rubles. It won't be very cheap, but it will be of high quality, safe and durable.
Glue the edge yourself
For those who want to save money, there is a melamine edge with glue that is glued with an iron. This option is quite suitable for repairing old furniture - there is no need to carry several small boards to the workshop. To solve the question of how best to glue the edge to the tabletop, it is better not to be lazy and contact the manufacturer, or still use an overlay profile, since melamine will quickly deteriorate from moisture and abrasion.
An old Soviet iron or a hair dryer is best suited for gluing. The iron thermostat is set to approximately 2.5 position. In addition, you will need a rag, a knife, fine sandpaper and a stand for fixing the parts.
- The part is fixed and the edge is cut off with a margin of a few centimeters. Then it is applied and carefully heated with an iron, in sections of about 40 cm. When it heats up well, the glue for the edge will melt and it will sag a little.
- Immediately after this, you need to press the edge tape well with a rag. This is done quickly as it cools quickly.
- When you're done gluing, you need to trim off the excess. First, cut off the end parts, and then those that go along. The knife must be held at an angle. In this case, the movement of the knife is directed towards the part, and not outward. For convenient work you will need a sharp knife without burrs. When cutting off the excess, be careful not to cut off the corners.
- For final finishing, go over the corners with sandpaper. For the edge to last longer, it should not cling when touched.
You can also remove old edge tape using an iron. To do this, it is heated and pryed with a spatula or knife. In this video you can see how to glue a 2 mm edge at home:
Additionally, you need to cover the ends of the kitchen countertops with a special metal attachment with sealant to prevent moisture from getting inside, then the countertop will not swell (see the article on how to assemble a kitchen).
To achieve a really good result, it is still better to order factory edging. The overpayment will not be too large, but the durability will increase significantly. Now on sale you can find almost any color of tape to imitate wood or a plain version.
Source: remboo.ru
How to cover chipboard furniture with self-adhesive
Before covering furniture chipboard with self-adhesive film, the surfaces must be degreased with a rag soaked in vinegar and then cleaned. Measure the required amount of material taking into account its tightening. It’s better to take it with a reserve and then cut off the excess.
In order for the film to spread over the surface without problems, it is recommended to spray its adhesive side with water from a spray bottle. When moisturized, it will move well in the right direction.
The self-adhesive film is stretched and straightened on a piece of chipboard furniture, after which it is leveled from the center to the edge with a dry cloth. This technique will expel the air along with any remaining moisture.
For complete adhesion, you can use a warm iron. You need to act carefully with a rag so as not to “burn” the self-adhesive.
How to cover an old cabinet with self-adhesive film
Using self-adhesive film you can update the design of any furniture. The properties of the material imply its use for restoration purposes. They can replace cracked laminate and veneer, hide partially or completely damaged facades, completely cover an old cabinet (table) and give them a different look or improve their performance characteristics. The process of updating furniture using self-adhesive film is simple, but it requires some patience and knowledge of the sequence of how to cover an old cabinet with self-adhesive film and what tools will be needed.
Selection of self-adhesive film
To choose a self-adhesive film for decorating an old cabinet, you need to familiarize yourself with the properties and characteristics of this coating, pay attention to the structure, base material, type of surface, decorative design and purpose.
All films are based on polyester, propylene and polyvinyl chloride. Additionally, plasticizers, stabilizers, pigments, paper, natural and synthetic fabrics can be added.
Self-adhesive film consists of three main parts:
- The surface is made from paper, polymer film or metallized foil.
- Acrylic or rubber adhesive base.
- Protective backing made of siliconized paper. Retains the adhesive side of the film and peels off before gluing.
There are calendered films that can stretch under the influence of high temperatures and shrink during the cooling process. They are best used to cover cabinets with even, smooth fronts. If you need to decorate rough or corrugated facades with self-adhesive film, or hide existing protrusions, preference is given to injection molded materials.
The surface fabric differs in structure, it can be:
| Single layer: | All the constituent components, including resins, plasticizers, stabilizers and pigments, are mixed together and formed into a thin film by hot roll rolling or extrusion. |
| Double layer: | It is produced by applying polyvinyl chloride resin to a fabric or paper base. The result is a plastic material. Its technical characteristics are slightly lower than those of a single-layer one. |
If all quality characteristics affect durability and scope of application, then the appearance of the furniture depends on the type of surface. The following types are distinguished:
- Glossy film – has high reflectivity. It can be used to cover the façade in dark and small rooms.
- Matte – has a soft surface. The canvas is used in good lighting.
- Mirror.
- Transparent coating - excellent for treating glass elements in facades.
- Holographic material.
Applying paint
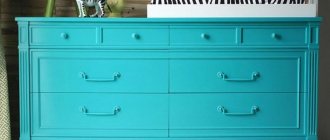
The main stage - coloring - is the most enjoyable process that even Tom Sawyer enjoyed. It's nice to watch how furniture is transformed.
If the structure is painted disassembled, the walls are laid horizontally so that the paint is distributed evenly, without drips. Furniture as a whole is painted more slowly, carefully monitoring the uniformity of the resulting layer.
First, they make the background, then let it dry for half an hour, after which they paint twice more, pausing for drying.
If you wish, you can play with color to enhance the decorative impression, for example by painting the tabletop in a light color and the side walls in dark tones. To enhance the effect, furniture is varnished, making from one to several coatings on different parts. With great desire and careful attention, the effect will exceed expectations.
Wardrobe pasting
The process of updating furniture using film is not difficult, but it requires patience and knowledge of how to cover a cabinet and what tools will be needed.
Required tools and materials
To start updating your cabinets, in addition to adhesive tape, you will need a number of available tools:
- ruler or tape measure;
- pencil or marker;
- scissors, stationery knife;
- silicone spatula or dry rag;
- spray bottle with soapy water;
- hairdryer
Preparation
Gluing a polished cabinet with self-adhesive film begins with preparing the surface. From the very beginning, all removable fittings are removed. For convenience, you can remove the doors from their hinges.
All furniture must be carefully inspected for protruding fasteners, chips and cracks in the coating, since all these defects will appear in the future. Self-tapping screws and bolts can be easily tightened with a screwdriver or wrench, but unevenness will be more difficult to deal with. You will have to level the surface with putty and then sand it with sandpaper.
After leveling, begin cleaning and degreasing using any detergent and ethyl alcohol.
If the cabinet is made of wood, MDF or chipboard without additional coating, you can apply a thin layer of furniture primer and let it dry to enhance adhesion.
Source: vseme.ru
Method 1: Painting the kitchen with chalk paint
Do you want to update your kitchen set beyond recognition with your own hands? The best way to do this is to repaint the facades with chalk (mineral) paint. Why chalk?
- The fact is that this type of paint has a thicker consistency and increased adhesive properties, due to which it fits perfectly on any surface - even on laminated chipboard/MDF. Moreover, chalk paints eliminate the need for tedious sanding and sometimes even without primer.
Chalk paints are also good because they give the painted surface a texture similar to that obtained when painting a wooden surface. Therefore, even the most ordinary kitchen with film facades will look much more noble after such an “update”.
- In Russia and the CIS countries, you can buy chalk paints from designer Daria Geiler, foreign manufacturer Annie Sloan, Kazakh Vernenskaya Manufactory, etc. You can also make chalk paints yourself using recipes that are easy to find on the Internet.
Here are some photo examples of kitchens before and after restoration.
Photo of a kitchen with film facades before and after painting with Daria Geiler paint. Here the author of the alteration restored the peeling film on the facade near the stove, and then painted the furniture without removing or sanding the film
Old kitchen with veneer cabinets before and after painting with Annie Sloan paint. By the way, in this kitchen even the tiled floor was painted with chalk paint, and the patterns on it were painted using a homemade stencil
Inspired? Then it's time for a master class.
To paint the kitchen you will need:
- Primer (special for chalk paints or alkyd if the furniture was painted with oil stain);
- Chalk paints (preferably with a 10% margin);
- Matte moisture-resistant varnish (acrylic or polyurethane).
- Material consumption is calculated following the manufacturers' recommendations. It is especially important to correctly calculate paint consumption. If there is not enough of it, you will have to repaint the remaining areas with paint from another batch, which, due to the nature of production, will be slightly different in tone.
- Which varnish is better - polyurethane or acrylic? To ensure that the kitchen coating can withstand extreme loads, it is safer to use polyurethane varnish. However, if you rarely cook and do not have pets, acrylic varnish is perfect, especially since it dries faster, does not have a strong odor and is cheaper.
- Brushes: two synthetic brushes for primer and varnish, as well as one natural or synthetic brush about 4 cm wide (a natural brush gives a more pronounced texture);
- Degreaser, such as white spirit;
- Sandpaper with a grain of 100–180 microns;
- Ladder;
- Film and masking tape (to protect non-paintable parts);
- Screwdriver;
- Gloves.
How to paint a kitchen set:
Step 1. Preparation
First you need to remove the handles from the facades. The floor, walls, splashback, countertop, glass inserts, fittings and other surfaces that you do not want to paint should be covered with film and masking tape. Next, clean all parts from grease (preferably with a degreaser), stains and dust.
- Do the facades need to be removed? It is not necessary to do this, but it is more convenient to paint this way.
Step 2: Primer and/or sanding
It is not necessary to sand the old paintwork, film or lamination, but it is necessary to treat it with a primer in 2 layers. In this case, each layer of primer must be allowed to dry, and then the primed surfaces must be sanded to even out the coating and enhance paint adhesion.
- However, if the lamination has a strong gloss, then it is advisable to remove its top shiny layer with fine-grained sandpaper - this will make the coating even stronger.
- If you are not too picky about the result (for example, if the kitchen is temporary, very old or got for free), then you can do without a primer. All you need to do is: wash the facades from grease, then paint them in 2-3 layers and finally cover them with 1 layer of varnish.
- Do you want to achieve the most even and durable coating? Then it’s worth sanding the surfaces after each layer of primer, paint and varnish (except for the finishing layers).
- Before starting work, test the paint on any object.
- If you want to save money, paint only the fronts and visible parts of the frame, and the interior walls and shelves of the cabinets can be painted cheaper or left unchanged.
Step 3. Coloring
Once the primer is dry, begin applying 2-3 coats of paint, allowing each layer to dry completely (one coat of chalk paint only takes about 30 minutes to dry).
- It may take 5-6 coats to cover a dark finish with white paint.
Nuances of decoration in various techniques
Furniture decor can be used on all parts of the product or its fragments. There are many techniques for decorating various designs:
- decoupage;
- wallpapering;
- painting with glisal or acrylic paints;
- aging;
- craquelure;
- use of stencils;
- fabric pads.
Before decorating, you need to prepare the necessary materials. You need to work in compliance with safety rules.
Decoupage
Decorating furniture using decoupage involves the use of drawings, photographs or other images that are applied to the surface in a special way. The master does not need to spend a lot of money to get an exclusive product. The image can be applied to any surface. The following tools and materials are required for decoupage:
- magazines;
- newspapers;
- multi-colored napkins;
- PVA glue and brushes for applying it;
- scissors;
- colorless varnish.
The work is carried out in stages:
- The surface of the furniture is cleaned of old finishes.
- The base is sanded, after which an acrylic primer is applied to it.
- When the canvas dries, it is coated with glue, and decorative napkins or pictures from magazines are laid out on top and straightened.
- The excess fixing solution is removed and the furniture is allowed to dry, after which the surface is covered with a layer of colorless varnish.
If the base is made of glass, then decorative napkins need to be glued on the reverse side.
Today you can find ready-made kits for decoupage, but you can also make do with improvised means. All the work can be completed in one day.
Features of using stickers on furniture, choice of materials and themes
Wallpapering
Furniture decor in the form of wallpaper is not very popular, although now there are a lot of materials with different patterns and textures. More often this method is used to decorate cabinets. To complete the work, you will need a minimum of materials - 1 roll or old pieces left over after repairs are enough. To decorate furniture with wallpaper, you will also need wallpaper glue, sandpaper and clear varnish.
If you plan to use the product intensively, you should choose a material that can be washed. If the canvas is paper-based, then it must be protected with a layer of transparent varnish. You can decorate the entire surface or some element. If there are defects, a furniture plug is used to eliminate them.
When the product is prepared, you can proceed directly to work:
- Try on the wallpaper and decide on the size of the canvas - it should match the similar parameters of the surface being treated. It is also necessary to leave 5-7 cm on each side of the material for reserve.
- Next, cover the workpiece and the surface of the furniture with a thin layer of glue. You need to wait about 5 minutes for the material to become saturated with the fixing agent.
- Place the sheet on the surface of the furniture and smooth it using a roller from the middle to the edges.
- Now you need to wait until the wallpaper is dry, then remove excess material and sand the edges.
- The final touch is to coat the furniture with 2 layers of varnish.
Painting with glisal or acrylic paints
The technique of decorating furniture using glitz is considered in demand. This is a translucent, shiny paint that can be applied to any substrate. It is characterized by the following properties:
- has no smell;
- provides a smooth layer;
- its color can be changed.
The work is carried out like this:
- The surface is cleaned of dirt and dust and degreased.
- Then a primer is applied (depending on the type of material, the number of layers varies from 2 to 5).
- Glizal is pre-diluted with water, observing the proportions specified in the instructions.
You can draw for 30 minutes after preparing the mixture, then it loses its properties and hardens. Acrylic paint is often used to decorate furniture with your own hands. Moreover, you can use not just one color to apply a monochromatic coating, but several (to create a pattern). The material for work is completely safe. The pigment shades are rich and varied. This decoration technique involves the following steps:
- Clean the surface of the furniture and level it.
- Apply one layer of paint, which will act as a background.
- After it dries, paint the base. To do this, it is allowed to use templates, which are then carefully removed.
- To ensure a glossy effect and also protect the surface, a transparent varnish is applied to it.
Review of furniture LED lamps, methods of placing devices
Furniture decorative moldings will help to further decorate the product. It is recommended to glue them along the edges of the object. In addition, they can be used to create various designs.
Aging
For decoration, it is allowed to use overlay decor for furniture. But if you want to decorate objects in a retro style, then the use of aging techniques is encouraged. Before starting work, the surface should be sanded, but it is not necessary to completely remove the paint in certain areas. The master will need stain, antique wax, gold paint, paint brushes, a spatula, sponges for cleaning the surface, and a scraper.
If the base is wooden, then you need to remove the old finish from it and degrease it. After this, apply stain to the surface and leave for 6–8 hours so that everything has time to dry. If there are particles of a substance on the tree that have not been absorbed, they should be removed. After this, you can rub in antique wax. Use “gold” paint for applying monograms or finishing accessories. Lastly, coat the base with colorless varnish.
Prepare furniture
Add color to paint
To create abrasions you will need steel wool. Rub the painted surface with steel wool.
Wipe away dark stains with a damp cloth until the desired effect is achieved.
Wipe the surface with a dry cloth
Ready
Craquelure
You can decorate any piece of furniture by using decorative overlays or stickers, which do not need to be varnished. But to give the product a special charm, you should use the craquelure technique. This is a method of artificially aging objects, allowing you to create a network of tiny cracks on the surface of the furniture. Wood, metal or plastic materials are suitable for processing. The technology provides for the following actions:
- Treat the base with a metallic color primer.
- Apply craquelure varnish after the base layer has dried.
- Use matte paint.
- To achieve the effect of cracks, a brush with artificial bristles is passed over the surface while the finish has not yet hardened (you need to work carefully so as not to spoil the design).
To prepare craquelure varnish, use egg white or PVA glue. If “cracks” appear due to the interaction of the second and third layers, then in this case the use of a brush is not necessary.
Apply paint
Wait until completely dry
Apply PVA glue to a small area with a sponge.
Apply a layer of light paint to the wet PVA
Do the same on the next segment
Fill the entire surface in this way
Cover the dried cracked surface with two layers of acrylic varnish.
Stencils
Using stencils for furniture decoration allows you to get original items if you want to paint them, but don’t have the artistic skills. Thick paper, thin plywood, and film are used to make templates. If you don’t want to draw yourself, you can use self-adhesive elements with an ornament on them. This technique involves the following steps:
- First, the surface of the base is leveled and polished.
- A main layer of paint is applied to it, which serves as a background.
- Then a stencil is attached to the product and painted with different shades.
- As soon as the pigment sets, the template is carefully separated from the surface, and the product is dried.
- At the final stage, the base is varnished.
For work, it is better to choose paint with a thick consistency. Apply it with a brush or roller. As for the theme of the images, it all depends on the style of the room. To complete the appearance of items, decorative molding is used. Most often it can be seen on cabinets, bedside tables and beds. No less popular are polyurethane profiles or decorative tape.
Updating the interior with recessed furniture lamps
Fabric pads
Silicone decorative plaster is well suited for decorating wooden or plastic products. But if you need to restore upholstered furniture, then fabric upholstery will come in handy. Fasten it using a construction stapler. You can use this decoration technique on tables, chairs, cabinets, and chests of drawers.
The work can be divided into several stages:
- Preparation. The surface should not contain old finishes. To do this, it is cleaned and degreased. The fittings are first removed.
- Laying the material. For decoration, plain furniture fabrics or multi-colored fragments are used. A piece of material is first soaked in PVA glue. The duration of the procedure is 40 minutes. Then the fabric is applied to the surface of the product. Additionally, decorative buttons and lace are used.
- Consolidation. To preserve the original appearance of the headset, it is covered with a layer of colorless varnish.
Excess parts of the fabric need to be trimmed and the edges secured to make the facing neat.
Clean the countertop surface and apply stain
Glue the fabric with PVA glue and dry
Apply a second layer of glue
Apply acrylic varnish, seal the edges well
Ready product