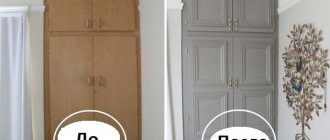
Decorating old furniture in decoupage style is a great way to return your favorite stool to a presentable appearance
Decorating in the decoupage style has become very popular. The technique is a process that allows you to decorate any surface in a relatively short time and for little money. Often, old pieces of furniture that have retained functionality but have lost their appearance are chosen as decoration items. Decoupage stools are a popular way to give old things new life.
Decoupage stools: master class for beginners
The decoupage technique was known back in the 17th century. Then, as now, paper or fabric were used as materials for decoration. Today, three-layer napkins are a popular material for decoupage.
Before you start decorating the furniture, you need to do some preparatory work and put its surface in order.
You can purchase special napkins or cards for decoupage in specialized stores, art stores and online stores.
Over time, stools in the kitchen become unusable. Many people do not like to part with old furniture - it can be convenient to use. Such furniture can be brought back to life. To do this, you need to decide on the materials and style in which the restoration will be carried out. Even a novice craftswoman can make decoupage. But first you need to familiarize yourself with the step-by-step actions.
Master class on decoupage of a wooden stool:
- Clean the surface of the stool from old varnish and paint.
- Sand the surface of the furniture with sandpaper.
- Seal cracks, if any. To do this, you should use putty, which can be bought at any hardware store.
- Cover the stool with acrylic paint - the color should not be too dark.
- Cut out selected images from napkins. Separate the top layer from the two bottom ones. Stick to the surface of the stool.
- Cover the stool with decoupage varnish.
The pasted image can be outlined. One of the options for additional decor could be coating the stool with craquelure varnish. The choice of decor style depends on the overall design of the room in which the furniture will be located.
Actions for furniture restoration: sequence
Of course, as is the case with the necessary tools and materials, the sequence of actions may be different, but there is a mandatory order of work that is worth considering if this is your first time dealing with furniture.
Video - Painting wood with an antique effect
Table No. 1. Correct sequence of restoration work
Stage Description Disassembling furniture and fittings It will be much easier to work with furniture if you first disassemble it into individual elements. Usually they remove the hinged doors, drawers, take out the shelves, and if possible, unscrew the frame parts. The adhesive frame should not be disassembled unless you are sure that you can then connect the parts properly. You also need to remove all the fittings - handles, hinges, locks. Before disassembling the furniture, take photographs showing the fastening points - this will make it easier to assemble. It is better to put the fittings that you plan to put in place into boxes or bags and sign them. Removing paint or other top coating Depending on the piece of furniture that you are going to restore, you can use one of three ways to remove the old coating: – sandpaper; – construction hair dryer; – varnish remover. Methods can be combined - the main thing is to achieve a flat, smooth surface. At this stage, be sure to use protective equipment against dust, varnish residues, and chemical compounds - wear a mask or respirator, goggles, and gloves. Elimination of various damages Using specialized compounds and products (putty, furniture wax, grout) you need to mask all defects - cracks, differences or unevenness, scratches and chips. The choice of material depends on the amount of damage. So, it is better to fill deep cracks with wax, putty on large worn areas, and rub over scratches and chips. Preparing for the finishing coat Before applying the finishing coat to the furniture, you need to level all surfaces again - remove excess grout, matte. For this, the most delicate sandpaper is usually used, after which the surface is polished with a rag. If you plan to use furniture primer, it should be applied as the last step. Applying a finishing coat If you want to preserve the structure of the wood, use tinted or colorless products - you can take varnish, stain, oil or wax. In another case, paint (it is better to take water-based) or furniture enamel will come in handy
Please note - if you have chosen a bright but light paint, it is better to first paint the furniture white; then a different shade will fit better against such a background. Installing the fittings The very last step is installing the fittings. You can return old elements to their rightful place, or replace them with new ones.
New pens can change a familiar thing beyond recognition
Quick do-it-yourself decoupage of stools
The decoupage technique is quite easy. Of course, it requires careful execution at all stages of decoration. But you can make decoupage in just a few hours. The main thing is to decide in advance on the style and appearance of the images.
One of the nice things about this technique is that you don’t have to spend too much - after all, decoupage can be made from available materials
Every housewife can decorate a stool on her own. To do this, it is not necessary to have a specialized decoupage kit.
You can make decoupage using available materials. For example, instead of three-layer napkins, you can use simple photo paper. Images for decoration can be found on the Internet and then printed on a printer. It is important to note that printing is best done on a laser printer - the image will be of higher quality.
Quick decoupage from paper:
- Clean the surface of the stool from old coating and dirt.
- Putty the surface, make it as smooth as possible.
- Prime the stool several times.
- Create a background using acrylic paint.
- Prepare printouts of the image.
- Layer the paper sheet.
- Paste the image on the stool. Smooth out using a brush or roller.
- Cover the stool with varnish.
The decor of the stool can be made in different styles: vintage, Viennese, Provence, maritime, etc. It's interesting to select pictures yourself. On the Internet you can find many images that will allow you to realize the most original ideas.
Benefits of working independently
By updating an old chair and making it modern, you benefit in two ways:
- You have the opportunity to change the image of the furniture to whatever you want. At the same time, adjust it to the main shades of the interior. And you don’t need to look for similar furniture in stores at all.
- Save time and money. Furniture restoration is often carried out using improvised means. Even the costs you incur for purchasing consumables are only 20-30% of the cost of a new chair.
Interesting: Restoring old furniture in a modern way
Important: before you begin decorative restoration of wooden chairs, be sure to check all fasteners. Tighten loose bolts or replace them with new ones. If there are cracks, chips, or debris, they need to be sealed decoratively. To do this, use special carpenter's wax. It fills voids in the wood, hardens and looks like an integral part of the chair.
Vintage decoupage on a stool
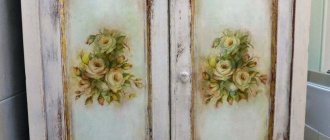
Vintage style stools can be used to decorate a dining room, kitchen or veranda. Old stools or new furniture, for example, purchased from Ikea, are suitable for decoupage. Vintage style involves transferring images from a napkin to the surface of a wooden or plastic chair.
Cracks, scratches, chips - all these moments are characteristic of the now fashionable vintage style in the interior, so your decorated stool will look very impressive
If you are decorating a wooden stool, the first step is to clean it, putty and prime it.
It is better to select a picture for decoupage in advance. You should take into account the style of the room in which the furniture will be located. To make the decor look harmonious, decoupage the stools can be made with wallpaper, the same as on the walls.
How to make vintage decoupage:
- Prepare the surface of the stool.
- Preparation of pictures. Separate the top layer of the image from the two bottom ones.
- Paste the images in the chosen order. Smooth out and remove bubbles.
- Coat the stool with varnish.
You should take into account the quality of the material used to make decoupage. If the decoupage paper is too thick, it should be peeled off. You can skip this step, but then the thick paper will stand out, which sometimes gives the impression of a not very carefully done job. An image that is too protruding can be lightly sanded with sandpaper and then varnished.
Selection of upholstery material and filling
Before reupholstering a chair, you will have to study some information about what exactly to use when restoring a chair or armchair. Please note that you can use not only the materials listed in this paragraph. We have described the most common, synthetic, inexpensive, with acceptable characteristics. If desired or necessary, you can use natural analogues - copra in mats or rolls, batting, dried sea grass, horsehair, burlap and other materials that are exotic today and once traditional.
Most common materials
What materials are needed to reupholster a chair?
When restoring a chair or armchair, foam rubber or polyurethane foam (PPU) is used for the soft part. We are talking about foamed polyurethane foam, not sheet. There is also furniture latex. It and polyurethane foam differ from foam rubber to the touch. They are more like rubber (latex is generally like rubber); when stretched/compressed, they tend to return to their previous shape.
To be soft enough, the density of these materials should be 30-35 kg/m³. Foam rubber and polyurethane foam are sold in large sheets - the minimum size is 1*2 meters. So that's enough for more than one chair. Latex is usually available in some standard sizes, but is most often made to order.
Different thickness, density, rigidity, different manufacturing technologies
What is better to use for upholstering chairs - foam rubber, latex or polyurethane foam (PPU)? If we talk about quality and durability, then latex or polyurethane foam is better. They will last up to ten years or more without signs of wear, they absorb better and wear out less. The best of this pair is latex, but it is much more expensive than even polyurethane foam, not to mention foam rubber. Therefore, if you are on a limited budget, choose foam rubber. If durability is important - polyurethane foam or latex.
Now on the thickness of these materials. For the back, a thickness of 3-5 cm of foam rubber/PPU/latex is sufficient, depending on the degree of desired softness/hardness, but for the seat it is better to use materials with a thickness of 7-8 cm or more. If the base is solid - made of plywood, without springs or tapes - a thickness of 10 cm is needed. Otherwise the base will be felt.
The three most common materials are foam rubber, polyurethane foam and latex.
A padding polyester is laid on top of the foam rubber. Its thickness is small - 1 cm in a free state or so. It’s easier to navigate by density: 150-200 g/m². This layer is needed so that the foam/PPU/latex rubs less. This way, restored upholstered furniture will last longer.
If you want the chair or armchair you have reupholstered to last longer, another layer of spunbond is stretched over the padding polyester - this is a non-woven material made from a polymer melt using a spunbond method. Spunbond costs very little, but significantly extends the life of the seat. This layer is found in expensive furniture and increases durability (foam rubber/sintepon does not rub) and comfort of use (upholstery fabric does not fidget). A possible disadvantage is the accumulation of static electricity. But this is observed only when natural wool or silk is used in upholstery.
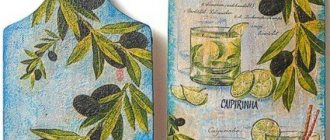
Simple decoupage of an old stool
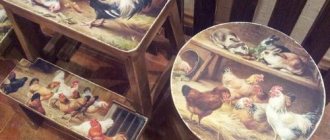
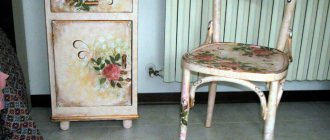
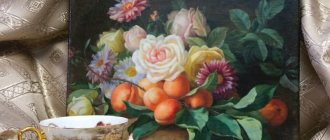
If the room is decorated in Provence style, the stool can be decoupaged in the appropriate style. To do this, you need to decide on the color of acrylic paint that will be used to create the background, and also find suitable images on napkins or print them on photo paper. The design can be simple natural motifs or patterns. If there is a staircase in the room, then you can choose a similar color for the stool - then the staircase will harmoniously combine with the stools.
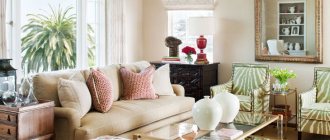
The simplicity and comfort of the French Provence style can be created by decorating several interior items in decoupage at the same time
It is important to note that decoupage in the Provence style should not be done in too dark colors - it should be airy and light.
The set of decorating tools does not differ from the standard one. The materials you can use are fabric, three-layer napkins, paper, newspapers or decoupage cards. Based on the ease of work, it is better to work with napkins or newspapers.
Decorating a stool with napkins:
- Clean the surface of the stool and sand it with sandpaper.
- Level the surface of the product with putty.
- Apply the main background using a brush and acrylic paints.
- Cut out the selected images, separate the top layer and stick it on the stool.
- Cover the surface of the stool with decoupage varnish.
Provence style is simple and natural. You should not make bright decor. Stools look beautiful if you choose a light tone and minimalist images to decorate them.
Processing and assembly of parts
To properly restore a chair, it must be carefully inspected. All parts must be sanded. Glue and tighten any large cracks found using clamps. Glue smaller ones and secure with paper tape. Excess holes and chips on parts should be filled with a slurry of glue and small sawdust. You can continue work only after the glue has completely dried.
To make it easier to work with sandpaper, it needs to be cut into narrow strips and glued to wooden blocks 20-40 mm wide and 300-350 mm long. Paper should be used in different grain sizes. The surface after treatment should be flat and smooth. A grinding machine will help make the job easier and significantly reduce processing time.
Be sure to check all connections. If the legs of a chair are inserted directly into the seat and over time they begin to sit loosely in their sockets, then to strengthen it it is enough to wedge them. A cut is made at the ends of the upper narrowed parts of the legs and a wedge is driven into it. Thanks to this technique, the diameter of the end will become larger and it will fit more tightly into the socket, which must first be coated with glue.
It will be more difficult to restore chairs with crossbars between the legs and drawers under the seat. In such structures, a tongue-and-groove connection and sizing are used to fasten parts. When the seam weakens, you need to drill a hole with a small diameter from the inside and drop a few drops of glue into it with a syringe. When a tenon is weakened, it must be strengthened with thin wedges. Matches or wood chips dipped in glue are suitable for this purpose. They need to be hammered into the nest together with the thorn.
If the chair is very loose, then in addition to gluing the joints, you need to strengthen the structure with wooden blocks. They should be attached with screws to the frames, which are used to connect the internal corners of the frame. The bars and drawers must be perfectly adjusted to each other. Even the smallest gap between them will cause the entire structure to skew.
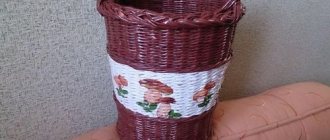
Newspaper decoupage stool
Decoupage with newspapers is a simple and cheap way to give a product new life. Everyone has old newspapers in their house. They will give the product a special charm.
Decorating furniture with old newspapers is the most economical and at the same time extraordinary type of decoupage
It is important to pay attention to the fact that before gluing newspapers, they must be soaked in warm water for one minute.
The technology of decoupage with newspapers is almost no different from covering the surface with napkins. For ease of use, newspapers can be cut or torn into pieces. The tools for the job remain the same.
Tools:
- Sandpaper;
- Putty;
- Brush;
- Acrylic paints;
- Glue;
- Varnish.
Decoration must be done carefully. It is important to ensure that newspapers do not roll and lie flat. A regular construction roller will help smooth them out.
Repair instructions for fixing legs
The main problem is loss of stability. This can happen due to loose legs or cracks in them. Both problems can be easily fixed at home.
You can make a stool from a log of wood.
How to secure legs with a nut or bolt
The first reason for loose legs is a damaged thread on a stud or fastening strip. This is easy to determine by sight. If the thread of the bar is damaged, you need to unscrew the pin 1 cm, insert it into the bar and secure it with a new nut.
Advice. For work, pliers are used. To avoid damaging the thread, place a piece of leather between the pin and the tool. If it is impossible to unscrew it with pliers, then you need to step back a few mm from the end part of the stud, apply edges under the open-end wrench, then unscrew the stud.
Another way:
- unscrew the pin;
- insert the damaged end into the leg;
- twist.
The chair is made with carved legs or a back, and the seat is reinforced so that it can be used for its intended purpose for a long time.
You can replace the old stud with an 80 mm bolt. To do this you will need an open-end wrench. If you plan to replace the seat, then it is worth replacing the fastenings with new 12 mm screws. Before installation, it is advisable to drill holes at the mounting points. Their length must match the length of the screw. Use a drill with a diameter half the diameter of the fasteners.
Features of repairing a cracked leg
The best material for repairing cracks is epoxy resin. It remains viscous for a long time, so you don’t have to rush.
A cracked leg can be replaced.
Resin is poured into the threaded hole or cracked area. Since the material is viscous, you may need to spread it with a screwdriver or a wooden stick.
You can replace the stool's upholstery.
If a threaded hole is being repaired, the stud is also coated with resin. The product dries within 24 hours.
Creative furniture decor solutions
- To give an old stool a vintage touch, you can paint it pink, blue or cream. Gold or silver paint is useful for painting. On top of everything, apply craquelure varnish to the entire area. The antique effect is created by small cracks from the varnish.
- An old stool will be saved by upholstery made of multi-colored straps. Intertwine them according to the “basket” principle and secure them at the bottom with self-tapping screws.
- Let your kids get creative with acrylic paints. Cover the result with varnish. You will not only receive designer furniture, but also possibly a future family heirloom.
Now you know how to restore an old chair, turning it into an exclusive thing for mere pennies. If you have other modernization ideas and restoration experience, share with readers in the comments.
Painting stool legs
If you need to paint the legs of a stool, as in my case, then it is best to do this work without unscrewing the legs from the fastenings. In this case, there will be no need to hold the legs while painting and hang them to dry. To protect the seat of the stool from paint, you can cover it with newspaper, having previously cut holes in it for the legs. If the newspaper is torn in places, these areas can be closed by sealing them with masking tape or a piece of newspaper using glue.
It is best to paint the legs using a roller with waterproof paint. Then the surface of the legs is smooth and without smudges. If you don't have a roller, you can use a brush. When the paint is completely dry, the stool is ready for use.
After restoration with my own hands, the stool changed beyond recognition and became a decoration of the kitchen room.
Transforming a stool: from old to antique
This post will talk about transforming an old stool... into an antique one. It seems like the same thing, but not quite 
Those who do decoupage will understand me, normal people will twirl their finger at their temples... But to normal people this stool has already been presented to judgement, called a beautiful restoration of an old thing, and then they decided that they really saw a tree, until I disappointed them... But first things first. First, I’ll present the product face to face so that it’s clear what I’m talking about. The stool is not huge, but it still requires changing several angles. First, seat up. This is a product with a face, so to speak.
Then a sidelong glance, although it is impossible to grasp the immensity, you can try... for the general impression.
The legs and sides are larger, decorated with a stencil - so they are decorated on all sides.
But this is what it looked like initially... quiet horror.
Those who are interested in this marvelous metamorphosis will need: - primer (I have GF-021); — acrylic paint for radiators (compatible with the above primer, read the label carefully. This is a guarantee that everything will be done as it should); — natural sienna and natural umber paints (I have Ladoga, in tubes); — round brush bristles No. 10; — brush No. 2, squirrel; - a napkin that you like; - stencil; - sandpaper; - PVA glue; - candle; - sponge; - degreasing agent. Few? But that's enough for us.
So what do we have? Old stool. It is actually made of wood, but all this beauty was buried under several layers of oil and nitro paints. In order to start decorating, you need to get rid of them. Initially, my beautiful dreams were to remove all the paint, stain the wood, and varnish it. The oil paint came off easily in layers, succumbing to brute force and sandpaper. Nitro - not at all. It was as if she had eaten into the tree. The stool has acquired a spotty appearance - almost all of it is nitro paint, with pieces of wood. There is no way to clean this up. So it became clear - if I want a wooden stool, then I will need to imitate wood... on a tree that is out of reach.
I didn't specifically photograph the interior surface, but the entire stool is made entirely from the outside and inside. Otherwise, it’s no longer a craft, but a fake...
So. We arm ourselves with sandpaper of varying degrees of grain and bring the surface as smooth as possible. This is the most labor-intensive and unpleasant stage. Prepare in advance that it will take a lot of time and effort. Wear gloves - you need to take care of your hands. Better yet, attract someone stronger
But all the paint will have to be removed. Otherwise, you can lose all your work - the paint will creep, swell... A nightmare! Do we really need him :)
When all the paint is removed, wipe the stool with a rag, removing particles of wood and paint, and degrease (I use paper handkerchiefs and nail polish remover with acetone).
We cover with two layers of primer, maintaining the time of each layer according to the instructions. Then - two layers of acrylic paint for radiators. Again we wait the time according to the instructions. Even if the paint dries quickly, believe me, there is no need to rush. There's no point in risking possible negative consequences like yellow stains on a napkin, right?
We glue the selected napkin... more precisely, its top layer onto PVA glue diluted 1:1 with water.
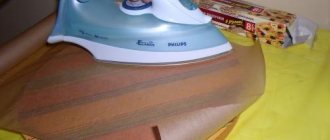
I do this using the file method, I think there are enough master classes on this topic without me. One note - I prefer to spray the napkin on the inside with hairspray and iron it, thereby increasing its elasticity. These particular napkins fit perfectly and without dancing with tambourines, but habit is second nature... I tear off the edges of the napkin slightly, but you don’t have to do this - we’ll still give it the look we want!
We dilute a small amount of sienna and umber with white paint to create a faint shade, and cover the entire stool. There is no need for precision here. Let the brush move freely!
Let's dry it. Then along the edges of the stool, along the ledges, we lightly walk with a candle.
Squeeze sienna and umber from the tube onto a plastic plate. For three parts umber you will need one part sienna. We don’t stir everything at once, but with a dry brush (round, bristles No. 10) take a little of both paints, and in one layer, but tightly, cover the surface of the stool. Try not to brush over the same place several times; the brush should move widely and freely. Then the bristles will leave marks characteristic of the fibers of real wood.
First, I advise you to cover the jumpers horizontally. And then, until the paint is dry, the legs are vertical. Then the paint that gets on the legs from a horizontal stroke will be instantly directed in the desired, vertical direction. Practice first on the inside of the stool so as not to pinch your hand in your hand. If you squeeze it, it might turn out to be dirt. But we need wood and, preferably, oak! Dry paint dries quickly, after about half an hour you can turn the stool over and start working on the other side.
Sitting is the critical part. You need to decide whether you will “tear” the napkin, and if so, how much. Or keep it whole? It's also beautiful. I thought it would be organic to put more “wood” around the edges and even show it a little in the middle of the napkin. Like, the seat is worn out! Make thinner “breakthrough” strokes with brush No. 2.
When the paint has dried, take fine sandpaper and sand those parts where we previously touched it with a candle. We sand easily, without fanaticism. The paint will come off on its own, giving the stool the look of old, worn wood.
We arm ourselves with brush No. 2. Mix a little sienna with white and highlight, highlighting the edges of the torn napkin. And then, using one umber, we make shadows in a circle. You can use short strokes to add tearing. This creates the impression of depth. The napkin is simultaneously visually and implanted into the tree and remains on top of it, forming a single whole.
But here it’s easier to see once - I take a close-up shot. Light - on top of a napkin. Dark is below.
The seat is ready, but the legs look a little gloomy. This can be easily fixed with a stencil, white paint and a sponge. We press the stencil tightly against our new wooden surface (you can attach it with masking tape) and smack it with a sponge that has been dipped in white paint. The sponge must be dry.
You can give the stencil design additional volume. To do this, some people first make a drawing through a stencil in one color, then move it and repeat the same pattern again with a different color. I'm too lazy for that. We put brush No. 2 into the sienna and thinly make “shadows” along the edge of the picture. Let's imagine that the sun is shining from the top left - accordingly, the shadows will be on the bottom right. Or whatever you want :)
Finish: yacht varnish. I sand every two layers, but no more than five layers in total. As practice shows, this is enough.
That's all.
Have fun creating!
Crochet covers for round stool
Products made from multi-colored acrylic yarn
Plain seats made of knitted yarn
Crochet seats for a square stool