The nuances of fastening shelves
As the main support for the shelf, you can choose an anchor bolt, thanks to which you can securely fasten the piece of furniture.
Its dimensions are as follows:
diameter up to 12 mm, length – 180 mm.
There should be a thread on one end of the anchor bolt to screw the anchor into a wooden surface, and on the other end to screw it into a metal sleeve.
In order to attach the shelf to the wall correctly, it is important to follow the recommendations of experts
As a base for the shelf, you can take a piece of board from a window sill with artificial turf.
The dimensions are as follows:
thickness – 25 mm, width – up to 200 mm.
There are only two options for mounting:
classic, hidden.
A hidden option for fastening shelves is needed in cases where decorative elements are absolutely incompatible with protruding fasteners. Attaching shelves in this version is just as easy as in the traditional one.
Depending on the type of fastening of the shelf, the options for its installation and types of fasteners vary
When working with anchor bolts, a clear sequence of actions should be followed
A shelf with hidden fasteners looks neater
Bracket material
From an operational point of view, a metal shelf bracket is an ideal choice. When choosing it, you can find strict, laconic models in the spirit of minimalism or elaborate forged supports. The latter will fit perfectly into fusion, gothic or rococo style. Although forging is becoming less and less common in interiors due to its high cost, a shelf with ornate supports will become the highlight of a living room or hallway.
For classic room design, plaster holders are recommended. They can be standard white or gold plated. Ceramic figurines, porcelain sets and elegant vases look harmonious on such shelves. There is no need to worry about the load-bearing capacity of the stucco molding: it is all reinforced with metal fittings.
For connoisseurs of country, shabby chic or Provence style, wooden brackets are suitable. The winning option is intentionally aged wood with a rough natural texture or painted to match the interior.
VIDEO: Attaching the shelf to the wall
5
Bathroom shelf on tiles
Often, not only bathrooms, but also the kitchen are finished with tiles. In both places, shelves are not just part of the interior, but a necessity. The difficulty of hanging lies in the difficulty of drilling the tile itself; the work is done so as not to spoil the appearance of the cladding.
It is important to purchase a high-quality tool - a drill operating at different speeds, starting at low speeds and gradually increasing them.
Stages of work carried out:
1. Determine where pipes, air ducts, and wiring run in the room.2. Mark the extreme and then intermediate fastening points, draw a horizontal line using a building level.3. The easiest way to drill is in tile joints. If the tiles were initially laid correctly, you don’t need to use a level. If it is impossible to hang a shelf by making fasteners between the tiles, carefully drill the tiles. The hole is made in the middle (± 1–2 cm) of the tile. Drilling around the edges will cause cracks.4. To prevent the drill from slipping, seal the hole marked with a marker with ordinary tape in a cross pattern.5. Drill at low speeds, stopping often so that the drill does not overheat.6. Having drilled through the tile, replace the drill with a hammer drill and continue working, but this time drilling a hole directly in the wall. The drill on the hammer drill is chosen to be slightly smaller than the drill bit on the drill (so as not to touch the tiles).7. A dowel is inserted into the hole, the screws are tightened, and the shelf is hung.
How to install shelves with hidden mounts
This method appeared relatively recently and is used only for shelves made of thick and durable materials: natural wood, OSB boards, plywood, etc. The shelf is hung on metal pins fixed to the wall. You need to have a wood drill and a pobedit-tipped drill for drilling holes in the wall. Hanging is only possible on brick or concrete walls. Even hollow bricks create difficulties; in such cases, it is necessary to use chemical compounds to fix the elements in the voids. It is not recommended to fix it to foam concrete walls, and it is prohibited to fix it to plasterboard walls.
Step 1: Prepare your tools. You will need a hammer, open-end or adjustable wrench, drill with hammer drill mode and measuring tools.
You will need very few tools
Step 2. Mark the location of the holes on the shelf. In our example, the wall of the shelf is thick, glued together from two laminated OSB boards. Due to this, the strength and thickness of the product have significantly increased; a hidden fastener Ø 12 mm can be used. How to correctly mark drilling locations?
Draw perpendicular lines at the end of the shelf
Mark drilling points on the lines
Step 3. Choose a place to fix the shelf on the wall, always take into account the existing interior of the room and the characteristics of the objects placed on it. If these are flowers, then you need to monitor the lighting; for books, the amount of light does not matter. Using a pencil, very carefully place dots on the wall along the edges of the shelf. You can draw thin lines, but then when drilling holes, you need to lift the shelf a little and cover the marks.
Determine shelf location
Step 4. Place a level against the wall and find a horizontal position. Transfer the location of the mounting holes to the wall.
Using a level, mark drilling locations for fasteners
Important. Check the position several times, then correcting mistakes is very difficult.
If the actual location of the hole is very different from the required one, you will have to drill it again. At the same time, it is not so easy to properly seal an old hole; an experienced builder will always see a defect.
Step 5. Drill two holes in the shelf for the fastening rods. First find out their length, make the holes a little deeper. Be sure to keep the drill in a strictly vertical position. If it goes slightly at an angle, then it will be impossible to insert long rods into the bar. The greater the depth, the more the hole deviates to the side, and the rods are made of steel; they cannot be bent. This is a very unpleasant situation; you will need to move the holes in the wall and shelf, and start all the work over again.
Holes are drilled in the shelf strictly at right angles to the surface.
Step 6: Drill holes in the wall. The algorithm of work is the same.
Drilling holes in the wall
Practical advice. To reduce the amount of dust, you can use a household vacuum cleaner. Remove the nozzle and place the pipe as close as possible to the hole to be drilled. Turn on the drill only when the vacuum cleaner is running. It is inconvenient to hold a drill and a pipe at the same time on your own; you need to use the services of an assistant.
Step 7. Insert the fastener into the holes and tighten it tightly; if the elements do not fit in completely, then hammer into the end. When screwed, the plastic parts increase in diameter and provide a secure fit. You need to use keys; it is impossible to create the necessary torque with your hands.
Screwing rods into the wall
Step 8. Place the shelf on the pegs and check its position using a bubble level. If it is in a horizontal position - great, if not - correct the defect. The task is long, nervous and thankless. There are several practical tips on how to fix a marriage with minimal loss of time and nerve cells.
Secure the shelf and check its horizontalness
The situation can only be corrected by drilling new holes - in the wall or shelf
The final decision depends on the geometric appearance and size of the shelf, but most often it is necessary to drill new holes and shift the distance between them. Arrange them in such a way that the old ones are covered by the back elements of the shelf.
Hidden installation is considered more labor-intensive, but the shelves look much more impressive. The main thing is to do everything with the utmost care so that no marks remain on the wall.
Wooden shelf with hidden fastening
Hidden fastening has two significant disadvantages: low strength and the likelihood of the shelf being pulled out by children or awkward movements. The first problem can be solved simply - increase the number of rods. And the second requires the use of special hanging technology. Which one?
Shelves on the wall
In any room there are places on the wall where you just need to hang something. After all, most modern furniture occupies only the lower part - sofas, tables, couches. The upper part remains empty and dissonance arises: the lower part of the room is overloaded and the upper part is half empty or completely empty. These voids on the walls are organically filled with shelves.
We recommend: How to make a heated towel rail with your own hands or move it to another wall?
The whole system, and the most “dead” space is used - the corner
Structurally, most shelves consist of the actual shelves and lintels. But these components are combined into so many options that it is impossible to count. A simple design is good: you can make any shelves with your own hands. Moreover, these products may be the first self-made things. It's really simple.
How and what to attach it to
It’s not for nothing that we start with fasteners. The design of a wall shelf largely depends on the type of mounting. Or maybe it’s the other way around. It depends on what to dance from...
Traditional hinges
Traditional hinges for hanging shelves
There is a traditional way - on loops. It is suitable for wood and fiberboard, any other material that is thick enough to attach. Screwed onto the sides with self-tapping screws. Then the distance between the centers of the loop holes is measured and marked on the wall (make sure it is horizontal). At the marked points, holes are drilled for the dowel, the dowel is inserted and a dowel-nail with a small head is screwed into it, which fits into a loop or bracket (a pin slightly bent upward). Then a shelf is hung on them.
Not all materials can be drilled. For example, glass shelves. You definitely can't screw anything into them. Fastenings for glass shelves are special: they consist of two parts, between which glass is inserted. Often elastic pads are installed between the holders. The bottom mount usually has a small clamping screw to secure it in place.
Fasteners for glass shelves
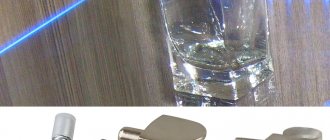
The most popular mount for glass shelves is called “pelican” - for its unique shape. It looks good on its own and is available in different colors. The thickness of glass that it can hold is from 8 to 34 mm. You can insert not only glass into it, but also any other material of such thickness. It just looks stylish with glass.
It’s easy to make glass shelves on the wall with it: you buy a mount, order pieces of glass with processed edges of the required size and shape from a glass workshop (or cut them yourself, if you know how). All that remains is the assembly itself:
Attach the pelicans to the wall. Two dowels each. The case is collapsible - the decorative trim is removed, and there are two holes in the mounting plate. One is higher in the body, the second is lower. We secured it and put the decorative trim in place. Glass was installed. Tightened the screw. All.
Glass shelf holder for wall
There are other forms of similar fasteners. The photo below shows a few of them.
Some mounting options for glass (and not only) shelves
Decorative brackets
Another type of fastening is brackets. They are reliable, some are decorative, so much so that they themselves are decorations.
Wall shelf brackets
Concealed installation - shelves without support
And the most amazing device for hidden installation. It makes it possible to hide the fasteners. A seat for the pin and the holder body is cut out at the end, and the shelf is simply put on it.
Hidden fasteners for shelves
As you can see, even a simple board or piece of glass on such mounts is not bad. But there is still a sea of all sorts of ideas.
Read about how you can update old furniture here.
How to choose fasteners: options for different shelves
Fasteners are selected, first of all, taking into account the required load-bearing capacity. This indicator depends on the material and condition of the wall, the total weight of the shelf and the objects installed on it. The material of the shelf is also important - its weight and compatibility with the fastening according to the design style depend on it.
Wooden
Concealed installation is especially suitable for hanging wooden shelves. Another good option is if the room is decorated in a classic style with furniture made of natural wood (or its imitation), then decorative forged mensolo holders, painted to look like aged copper or bronze, are placed under the shelves.
Glass
Special decorative holders are suitable for glass shelves. Their peculiarity is that since screws cannot be screwed into glass, it is simply clamped between two planes.
A popular mounting option for glass shelves is pelican-type mansol holders or those made on the same principle. They consist of two parts, which are placed above each other at a short distance. The glass is inserted into this gap and tightened with a screw located on one of the holder parts.
Another type of fastening for glass shelves is horizontal slats made of aluminum profiles. The principle of fixing glass in them is the same - a clamp between the upper and lower parts of the holder.
You can install LED lighting in the profile, but in this case you need sandblasted glass.
Corner
Shelves installed in the corner are secured in the same ways as regular ones. When choosing holders, you just need to take into account that they are located at an angle relative to each other. Brackets with a long horizontal part under a small board may intersect. Therefore, the options are suitable: slats or the same “pelicans” and their analogues. When choosing this type of fastening, it is worth remembering that they cannot withstand heavy loads.
Metal
For metal shelves, there are special fastening systems - frames made of horizontal and vertical guide rails, to which the brackets are fixed. Permissible load:
- simple bracket - 60 kg;
- with bottom booster – up to 120 kg;
- with a reinforcement at the bottom and a stiffener at the top - up to 180 kg.
Simple or reinforced corners are also suitable for small metal shelves - load from 10 to 100 kg (depending on the type of fastening).
Plastic
Plastic shelves are most often hung in the bathroom. If the walls are tiled, then you need to take into account that the fewer holes you drill in it, the better. Any fastenings are suitable - plastic shelves usually carry little load.
Fixation with dowels
Before starting work using fasteners, you need to know exactly how many products will be needed for this work, determine their dimensions and material. Please study the article Consumption of self-tapping screws per 1 m2 of drywall
If the sheets of material are attached directly to the wall, then the method of fixing the shelf to drywall will be slightly different. Here we will have to use dowel nails.
We select the size of the dowel based on the dimensions of the protrusion and the expected mass of things that we plan to place on it. The larger both parameters are, the longer the dowel - the nail will have to be used.
Taking a concrete drill and a drill, we make holes in the wall. We insert the dowels there and screw the screws into them. After that, all that remains is to secure the shelf to the load-bearing wall through plasterboard, hanging it on the installed fasteners.
Advice! If you use small dowels, you need to keep in mind that most of them should be in the wall, not in the sheet. Otherwise, the fasteners can easily break out from the installation site.
Fastening glass shelves
This is a separate type of furniture, has its own differences and requires completely different fasteners. The main disadvantage of glass is fragility. Fastening elements must provide reliable fixation and at the same time minimize the forces on the glass. We will not consider the design differences of glass shelves; they do not have any effect on the fastening technology; it is recommended to use the same fasteners for all.
The design of glass shelves does not affect the choice of fixtures
The fasteners must meet the general requirements - eliminate point loads. The glass is inserted into special horizontal slots in the brackets, the clamp is made with small bolts. The bolts themselves have sharp ends; with slight pressure the glass cracks. To prevent such phenomena, special elements are used.
There are plastic inserts inside the holders that protect the glass from damage.
The metal plate takes the main load
The fastener is fixed to the wall under a level; the technology is no different from that described above. Plastic spacers are placed on the end of the glass, in this position the shelf is carefully inserted into the bracket installed on the wall.
Shelf holders are screwed to the wall with self-tapping screws
Important. During installation, the tightening bolts must be loosened. Unscrew them until the end is level with the plane of the fastener.
First, unscrew the tightening bolts on the brackets
Next, you need to lift the shelf up a little; a gap will appear at the bottom. This is where the metal plates are inserted and the bolts rest on them. While tightening, they lift the plate up and it presses against the plastic inserts. And they, in turn, clamp down on the glass shelf.
The holders are screwed to the wall, the glass is inserted and the fasteners are clamped.
This mount, by the way, has one unique advantage - you can change the position of the shelf, move it slightly left/right. To do this, you just need to loosen the clamping screws a little, install the shelf in a new place and tighten them again.
Video - Do-it-yourself fastening for shelves to the wall
Shelves on the walls are always needed at bar counters. They are used not only as one of the furniture attributes for glasses, tea or coffee. These are important elements of the decor of the bar area, emphasizing the individuality and design. You must be able to professionally and reliably hang them on interior partitions made of various building materials. How to make a bar stool with your own hands so that it fits harmoniously into an existing style? There is an excellent article on our website with detailed recommendations.
Source
Store shelf mounts
A shelf that you bought at a hardware store can be very difficult to attach to the wall. Be sure to read the instructions that came with it. Most likely, it will contain all the necessary recommendations on how to screw the product to the wall.
Next you need to understand what type of fastening the shelf has. Usually, complete with a shelf and instructions, it also includes elements that are used to fasten the product. It is also necessary to select brackets, thanks to which the shelf will be secured.
Pelican mount is most often used for glass shelves
Bracket options may vary:
fastenings that do not extend beyond the shelves; flat brackets with pear-shaped holes at the end.
To fasten a shelf from a store to the wall, first carry out the careful measurements given above.
Steps to attach the shelf to the wall:
We recommend: DIY dressing room: photos of designs and project drawings
Based on the possible dimensions of the shelf, you will need to decide on the place where the fastening will be made. Choose the right place so that other furniture in the room does not interfere. Using a building level, you need to control the position of the product. Nests are first created in the walls so that after this procedure you can safely attach the shelves. These nests are made with a puncher or drill, and then dowels are driven into the resulting holes. After this, the shelf is fastened to the wall. The final stage is screwing the elements for fastening into the holes.
Types of fastenings
To attach the shelf to the wall, you can use:
- exposed (visible) fasteners;
- hidden fasteners that are invisible to the average person.
Exposed Fasteners
Open fasteners include:
- brackets of various configurations and sizes. It is recommended to use such a shelf fixing element only if it fully matches the design of the room;
Shelf holders of different types
- metal corners. The devices are the simplest, most common and reliable fastening elements. Can be installed in rooms with any finish;
Corners for fixing shelves
- loops. They are also a common option. Easy to install and reliable;
Open loops for hanging shelves
- holders. Used advantageously as fastenings for glass shelves. Can be of different shapes, colors and different sizes.
Holders for shelves made of glass
Hidden fasteners
Fixation with hidden fastening is carried out using:
- hidden loops. A special structure is installed inside the shelf, which rests on a bolt screwed into the wall. From the front side, neither the hinge's retaining hole nor the bolt are visible;
Fixing the shelf with hidden hinges
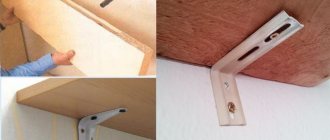
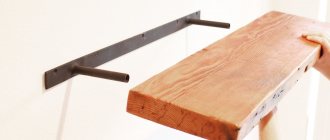
- metal rods that are attached to the wall and “recessed” inside the shelf.
Using metal rods to secure the shelf
How to Attach Shelf Mounts to the Wall: Step-by-Step Guide
The standard method of attaching wall shelves is using brackets. The procedure for installing them:
Mark the mounting locations for the brackets on the underside of the shelf. Check with a ruler (level) that the markings are correct. Screw the horizontal parts of the brackets to the shelf with self-tapping screws. At first, do not insert the screws all the way - you need to check the correctness of their position. After making sure that the fasteners are installed level, screw in the screws until they stop. Attach the shelf with brackets to the wall. Drill the first hole with a drill. Select the drill to match the wall material, the diameter to match the size of the dowels or anchors. Insert the dowel. Place the shelf and screw in the first screw not all the way. Mark the remaining holes. Check the markings with a level. Move the shelf, secured with one screw, to the side. Drill holes according to the markings and insert dowels. Do not screw in the remaining screws completely. Check that the shelf is positioned correctly. If the fasteners are installed level, then tighten the screws completely.
Small shelves (not made of glass) may not be attached to the holders, but simply placed on their horizontal parts.
How to attach a holder without visible fastening
When installing hidden fasteners, the accuracy of marking is of particular importance. Features of various methods of hidden installation:
On the rods. The mounting plate located at the end of the rod is screwed horizontally to the wall using self-tapping screws and dowels. The shelf is “put on” on the protruding parts of the rods fixed in the wall. On the plates. They are screwed with self-tapping screws to the back of the shelf. To do this, recesses are made with a milling cutter or the back wall is installed so that it is “recessed” relative to the sidewalls by a few millimeters. Then there will be no gap between the product and the wall after installation. On hidden hinges. For them, grooves are cut out at the end of the shelf using a router so that the loop is flush with the edge. The fasteners are screwed in with self-tapping screws and the finished product is hung on screws in dowels pre-installed in the wall.
Do-it-yourself glass shelf fastening: features
When hanging glass shelves, pelicans and mensolo holders of a similar design are installed in the usual way using self-tapping screws.
The mounting holes on these fasteners are located on parts covered with decorative overlays. Before installation, these pads are removed and the holders are not fully drilled into the wall. After making sure that the position is correct, tighten the screws and put on the covers.
Fasteners for hanging shelves on a plasterboard wall
The best option for reliable fastening of shelves to gypsum plasterboard walls is to install additional horizontal profiles or embedded wooden blocks at their level during the installation of the frame. In this case, the self-tapping screws will be screwed into metal or wood, which will create a durable structure. If the wall is already covered with plasterboard and there is no way to make changes, then the way out is to use special dowels: umbrella, butterfly, Molly, Driva, Legs, Knauf Hartmut.
Hidden fastening of shelves in the closet
If the side of the cabinet remains visible and you want to maintain the integrity of the coating, then you can use hidden, invisible fasteners to install shelves.
Furniture dowels
The most affordable, but no longer as popular as before, is a furniture dowel. It can be made of solid wood and plastic. For better grip, the side surfaces of the dowels are made ribbed.
Why do furniture makers dislike fastening to dowels? Fasteners of this type are quite specific and require gluing. This means that additional clamps (clamps) are needed to fix the position and glue. And, of course, allotted time for the glue to dry. All this slows down the build.
Eccentric coupler
More modern hidden fasteners for shelves and tabletops are an eccentric (minifix) and a conical tie. This type of fastening requires a certain skill for installation and therefore a novice master may get a little stuck. You will have to drill several holes of different diameters for the sleeve and the dowel itself. Moreover, all of them must be performed strictly in the center relative to each other; moving left/right/sideways is unacceptable.
There are many varieties of eccentric couplers, but the principle is always the same. There is a dowel with a head and a sleeve that clings to the head. The sleeve can be rotated (as on minifixes and conical couplers), inserted and snapped into place.
The advantages of the eccentric are obvious - the possibility of quick dismantling, the permissibility of repeated assembly and disassembly, and “invisibility”. Only the upper part of the sleeve is visible, which is located on the inside of the side of the cabinet and can also be hidden with a self-adhesive plug.
This type of hidden shelf fastening can also include rafix, which is a kind of symbiosis of an eccentric and a shelf holder with fixation.
Making a simple wooden shelf
DIY wall mounted bookshelf
Wood is the most convenient material to work with. Wooden shelves come in simple, complex shapes, open and closed, vertical, horizontal and corner. Taking the basic option as a basis, you can assemble a shelf from several modules and give it the most incredible look. In order for the product to serve for a long time, you should choose the right wood: the boards must be perfectly flat, completely dry, without cracks, voids or traces of mold.
Wood for shelves
During the assembly process you will need:
hacksaw; drill; building level; pencil and ruler; boards 16 mm thick; stain; wood varnish; sander; screws, brackets, dowels.
The example used is a simple rectangular shelf 250mm wide, 300mm high and 1100mm long.
Wall shelf diagram
Step 1. Marking
The boards are laid flat on the table and the measurements are transferred from the drawing. The height of the side walls should be 268 mm, since they will be located between the top and bottom: wall height + board thickness x 2 = 300 mm.
Step 2. Cutting the boards
Sawing boards
If the markings exactly match the diagram, you can start cutting. It is best to use a jigsaw for this, then the cuts will be perfectly smooth and neat. You should end up with 2 long pieces and 2 short ones.
Step 3. Processing of blanks
Sanding the board
Before starting assembly, each workpiece must be sanded, stained and varnished. If you plan to simply paint the shelf, the blanks are treated with an antiseptic primer - this increases their service life and makes the paint apply more smoothly.
Step 4. Assembling the product
Assembling the shelf
The bottom board is laid flat on a flat surface. From the ends of the workpiece, retreat 8 mm and draw 2 straight lines parallel to the cuts. Now on these lines you need to mark two points at a distance of 5 cm from the edge, and drill holes there for the screws. The same is done with the top blank. When all the holes are ready, install the side blanks on the bottom board and tighten the screws. Place a second board on top and also fix the side walls with self-tapping screws.
Assembling the shelf
We recommend: Grounding a bathtub in an apartment - how to do it and why is it necessary?
Brackets are attached to the ends of the side walls, holes are drilled in the wall for dowels, self-tapping screws are inserted and tightened so that they protrude by about 5 mm. The dowels must be positioned strictly horizontally, so before drilling, mark a line using a level. Now all that remains is to attach the brackets to the fasteners and hang the shelf. If desired, the back wall of the product can be filled with a piece of plywood, and glass can be inserted in front.
Shelf
Bookshelf
To make such a simple shelf more original, you can replace one side wall with a stump of a thick branch. To do this, choose an even branch with a diameter of about 7-8 cm with smooth, clean bark, saw off a piece 28 cm long, and cut off all the side shoots. The chock is treated with a primer, dried and varnished. There is no need to remove the bark. After the varnish has dried, the workpiece is inserted between the upper and lower boards and screwed tightly with self-tapping screws.
To make such a simple shelf more original, you can replace one side wall with a stump of a thick branch
Based on this drawing, you can make various variations of wall shelves. For example, reduce the length to 400 mm and make 3-4 blocks at once. Then install them on top of each other in a checkerboard pattern and secure them together using metal plates. Or simply mount them on the wall separately, placing them at a short distance from each other.
How to hang shelves
Preparing parts
The best option is to immediately include parts for the shelf in the list when ordering the cutting of components for assembling a kitchen, wardrobe, children's room or any other furniture. If this moment is missed, you will have to act on your own.
Cut with a jigsaw
Almost every seasoned furniture maker, at the beginning of his career, tried to replace a format-cutting machine with a jigsaw. At first it turned out so-so, but with each damaged part the hand became stronger and the quality improved. For an amateur craftsman, a jigsaw is an ideal option, but first you need to “practice on cats.”
It will take some time to get used to the instrument. To do this, it is recommended to cut out several small parts from unnecessary chipboard scraps. After training, you can begin the main cutting:
For cutting with a jigsaw, it is advisable to choose so-called progressive files. Their teeth on a tapering blade are sharpened using Japanese technology, which ensures the thinnest cut and clean sawing without chipping on the laminate.
Required Tools
The tools you will need are: a level, a drill, or better yet a hammer drill, a screwdriver, dowels, self-tapping screws, a jigsaw, wood glue, a fastening set, a set of drills, a pencil, a hammer, and a wrench for anchor bolts.
If you use metal rods, you need to remember that the diameter of the fastening element should be 10-12.
Upon completion of all stages of work, we attach the shelf.
2
Product materials and tools used
It is important to initially prepare all materials and tools. Different mounting methods and materials from which the shelves are made will require different parts and tools. But it is possible to create a general overview of what is required. Materials for construction:
plasterboard - such shelves look good and are attached to any surface; wood - a popular and durable material; chipboard/chipboard - high wear resistance and moisture resistance, tolerates temperature changes well; glass - a stylish design material, perfectly suits many interior styles; plastic - lightweight, publicly available, inexpensive, the industry makes an endless number of variations of wall shelves from plastic; metal - shelves made of such material are rarely used, only when decorating a designer interior; to work with metal you may need a welding machine.
Almost all the tools used for installation can be found by any home craftsman. Namely:
construction level; complete set of fasteners; hammer drill (for working with reinforced concrete), impact drill; screwdriver; jigsaw; plastic dowels; drills; hammer; marker or pencil; wrench for working with various types of anchors.
Depending on the complexity of the fastening, a cement solution is additionally used for strength.
To the nursery
While the child is very small, I want functional shelves, but with children's drawings. But where can you get these? Do it yourself. Any shelf of the configuration you like can be covered with non-woven wallpaper or thick wrapping paper (glued with PVA). After drying, coat twice with water-based varnish. Such shelves can be washed, but what’s most interesting is that the shelf can change with the child. You tear off the old decor, glue on the new one. The idea is simple, it works perfectly.
Here's what can happen
For children, the shelves are not very different in design. If we talk about floor or shelving, then they must be strong, taking into account the fact that older children will definitely want to climb on them. Therefore, often even those shelves that stand on the floor are additionally attached to the wall: so that they do not collapse and crush young climbers. Based on these considerations, they are not made tall: even if they fall, it’s not scary.
The shelves in the children's room also differ in color - they are brighter, can be made in the form of letters, and boxes for toys can be installed in them: this makes it easier to keep them in order. In general, functionality and security must be combined.
System with drawers - cleaning will be quick
Children grow, designs and colors change
A combination of open and closed shelves - convenient for preschoolers
The fairytale town will appeal to both boys and girls
Read about developing a children's room design here.