Main features of restoring an old chair
The process of restoring damaged furniture is not a partial restoration of parts or replacement of upholstery, it is giving a new look to an old chair, an opportunity to refresh the interior. Rework is carried out when the legs are wobbly, the upholstery is worn out, springs are sticking out, or the structure is loose.
The peculiarity of the restoration process is that it is quite difficult to do it yourself, so this matter is entrusted to professionals.
You can partially remake and restore upholstered furniture yourself:
- dismantle the upholstery;
- make a constriction;
- legs are repaired or replaced.
You can restore the chair completely or partially repair it.
It’s worth trying to restore furniture with your own hands if you have enough experience in furniture repair or if you don’t have enough money for quality material.
Advantages of restoration at home:
- cost savings;
- the value of the interior item increases;
- the interior is refreshed.
Restoration of frame parts
The concept of “restoration” includes not only reupholstery, but also restoration of the wooden parts of the chair. Over time, decorative parts (armrests, turned elements, curly chair legs) become unusable, that is, they become dull, the varnish surface wears off, and small cracks appear on the furniture frame.
What can be done in this case?
To solve this problem we will need:
- Sandpaper,
- Scraper,
- Blade from a stationery knife.
- Varnish, stain.
Every part needs to be sanded. You need to start with coarse grains, gradually moving to smaller ones.
Sanding should only be done in the direction of the grain. If you make movements against the grain, the varnish will definitely show transverse lines.
Many master restorers use a drill with special sanding drums to remove old varnish. They come in different widths and lengths and are very convenient for sanding hard-to-reach places.
- After the parts have been sanded, carefully remove the dust with a damp cloth or foam sponge.
- Apply nitro varnish with a soft brush until completely dry.
- After the varnish has dried, you can run your hand over the surface and feel how the pile rises. Using the finest sandpaper, we carefully “knock down” the raised fibers, that is, we make the surface smooth.
- Then you can apply a stain (alcohol, water or white spirit based) and only then cover it with any commercially available varnish.
Required materials and tools
You can use a standard set of tools, and a set of brushes and paints for a painter. Unavailable tools are purchased according to the recommendations of the master, so as not to damage the parts during work. Pure wood furniture is sensitive to floors and can dry out.
First you need to select a set of tools and materials or ask a specialist to select the necessary
Required materials and tools:
- chisel, spatula;
- hammer, screwdriver;
- stationery knife, wood glue;
- set of brushes, roller;
- acrylic paints, water-repellent varnish;
- sanding machine, foam rubber;
- stapler, sandpaper, new springs;
- screwdriver, awl, large needles with silk threads.
Preparation for restoration of a classic chair with wooden armrests
If you need to repair an old chair, then work should begin by removing the upholstery using a utility knife. The resulting fabric fragments will be used in the future as patterns for new upholstery. When choosing materials for restoring a product, you need to pay attention to the quality and density of the fabric: material that is not strong enough will fall apart during use.
At the first stage of work, it is necessary to disassemble the chair into its component parts: seat, back, armrests, legs. First, free the furniture from upholstery and old filling, and then unscrew the bolts with a screwdriver. Wooden elements must be carefully inspected; if there are cracks, chips or other defects on the wood, they are eliminated with wood glue or putty.
If the damage cannot be removed using these methods, the relevant parts are replaced. New elements that match the shape and size of the old parts can be cut from the boards. After this, the wooden parts are impregnated with an antifungal agent and dried thoroughly.
The finished elements are sanded with sandpaper or a grinding machine. The grain size is determined by the texture of the wood being processed - the coarser the fibers, the larger the sandpaper grain should be. The work is considered complete when the surface of the material becomes smooth.
After this, the parts need to be wiped with a dry cloth (to remove dust) and covered with stain, which will take about 7 hours to absorb. At the next stage, the parts are coated with a thin layer of varnish and dried for three days.
Original ideas on how to update an old Soviet chair
After sheathing, and before it:
After sheathing and before it
Another update option:
Another update option
Complete office chair renovation
A master can update the chair more efficiently, but it is possible to restore it yourself. It is necessary to choose high-quality upholstery material. Restore the appearance of furniture to match the interior of the room. Then there will be no need to purchase new furniture.
Assembly
After all parts of the chair are tightened, you can begin assembling it. This process takes place in several stages:
- The seat and backrest are connected.
- Legs are attached to the structure.
- The plywood from the back and bottom is installed in place. Plywood can be sheathed. It is worth remembering that sometimes staples are not enough to secure plywood parts. Therefore, it would be advisable to use a hammer.
- Finally, it is recommended to check the quality of the fasteners.
Reupholstering a chair-bed is a process that you can do yourself. It is necessary to prepare tools, upholstery material and foam rubber, and then proceed according to the instructions. If done correctly, an old recliner will get a new lease of life.
How to restore an old chair
- Scissors.
- Paint brushes.
- Polishing machine. If you don’t have one, then you can get by with simple sandpaper.
- Putty knife.
- Electric drill and drill bit.
- Face mask.
- Copy paper.
- Power saw.
- Paper.
- Pencil.
- First you need to get rid of those parts of the stool that cannot be restored. For example, use a jigsaw to remove slats and loose pieces on the backrest.
- Now places a thick sheet of plywood on the seat. Using a pencil, we mark the intersection with the vertices of the back, since the sheet can be very large. Using carbon paper, transfer the pattern onto the workpiece. To easily cut out patterns, drill holes in the plywood.
- A sheet of plywood must be secured between boards or on a workbench. Using a power saw, make the shape of the back of the stool. Place the finished part in place. Using a pencil, mark the places where the screws should be placed to hold the wooden planks and plywood. Using a drill, make holes narrower than the screws themselves. Insert the screws and seal the holes with putty.
- Give it time to dry. After which everything needs to be leveled. Sandpaper is used for this.
- If you need to paint a chair, you first need to apply a layer of acrylic primer to the surface. Wait until it dries. When processing, special attention must be paid to the back of the product, since all edges and lines must be processed carefully. Now you can paint. After the paint has dried, the chair is varnished.
Seat trim
There are times when restoration of the stool seat is necessary. To do this you will need the following materials and tools:
- Stapler for furniture.
- Staples.
- Screwdriver.
- Foam rubber 5 cm thick or 2 pieces of fabric 2–3 cm thick.
- Thick fabric for seat upholstery and backing fabric.
- We take out the seat and upholstery. We don't throw away the base.
- Turn the chair over and remove the fastenings that hold the seat in place.
- We remove the factory brackets and take out the frame with the spring. There will be filler on it, or rather, the remains of it. We remove all this.
- Cut out a rectangle. The upholstery should extend beyond the edges of the seat by 6–8 cm.
- We place a backing made of thick fabric on the springs. It needs to be fixed with a stapler to a wooden frame.
- We put the filler. Acceptable thickness is 4–5 cm.
- Making upholstery for a chair. It is best to perform this action together. For upholstery, linen, leather or textile materials are used.
DIY restoration of old chairs
The process of restoring an old lacquered stool is slightly different. First of all you need to prepare:
To restore a wooden stool, it is necessary to remove the old covering. To do this, treat the surface with acetone. Thereby removing the old coating in the form of varnish.
Using a brush, coat the stool with new varnish. Leave it for a while. After this you can use the chair again.
Some tips (master class):
- To cover small cracks, you can use homemade putty. To make putty you need to take flour and PVA glue. The mixture should be very thick and resemble plasticine.
- To freshen up a wooden stool, you can use stain. It has different shades. Be sure to seal the stain with varnish. Otherwise, you won't wash your clothes.
Disassembling the chair
Before you start working, you need to disassemble the old chair and see what's inside.
As a rule, it is a wooden frame, foam rubber on the back and seat. It is held in place by rubber or textile slings.
Also included in the components are legs and armrests (polished or fabric-look). The back wall of the chair is secured with plywood. That's probably all.
After parsing:
- We determine what needs to be replaced. We carefully knock out all the tenon parts with a rubber hammer so as not to damage the edges and preserve the polish.
- Using a scalpel or a knife with a thin tip, we clean the grooves so that there are no glue residues inside.
- We coat the tenon parts with PVA glue, and then wrap the bandage directly onto the tenon.
- We carefully hammer everything into place and wait a day for it to dry completely.
Restoration: patchwork technique
It is worth noting that there is no need to use elastic materials. Choose simple things without complex patterns. Use old upholstery as a template.
If you are restoring chairs for the first time, then you need to choose square or rectangular elements for upholstery.
Cut the required number of flaps and distribute them over the surface of the seat. The flaps may vary in width. This will create a “mosaic” effect. Sew a ribbon from pieces of fabric. To do this, you can use a machine or do everything by hand. Collect the resulting strips into a single canvas. Try the template on the seat. Cut off any excess. Secure the upholstery.
What you can do on your own
Most often, the following types of work are performed at home:
- Padding . This option is necessary if the old upholstery has worn out and requires replacement. The old fabric is removed and a new one is stretched in its place, and this may be a different color option, which will immediately change the appearance of the chair.
- Replacing the filler . If the chair is dented and the soft armrests have become hard, this is a sure sign that it is time to replace the filling. Most often, this type of work is carried out in conjunction with replacing the upholstery, so that you do not have to disassemble the chair twice.
The filler can be purchased at furniture stores; it can even be in the shape of an armrest or other element
- Upholstery structure. This option involves placing fabric even in places where there used to be wood. For example, if wooden armrests have worn out over time and it is impossible to restore an attractive appearance, then it is easier to cover them with fabric and lay foam rubber, turning hard elements into soft ones.
- Frame repair. This includes all work to restore and strengthen the structure, replace failed elements and strengthen loose connections. Sometimes it is necessary to completely change individual elements due to their poor condition, and sometimes it is enough to carry out minor repairs.
Decoupage technique for the design of an old chair
This technique will help turn monotonous stools into original and beautiful objects that will decorate the main interior of the house. To create a design you will need napkins, fabric with a pattern, you can use leather appliqués. If you can get to the store, you can buy special cards for such equipment.
After you sand the chair, you need to seal all the cracks with putty and cover everything with water-based emulsion. Cut out the picture, apply glue and attach the drawing. Gradually you need to move from the center to the edges , thereby smoothing out the pattern. Let the surface dry and then varnish it.
Restoring an old chair with your own hands is not that difficult. The main thing is to do everything step by step. An old product can look like new if you pay attention to its design. You can paint it, make different upholstery, sew covers, or use different design techniques. Then the chair will not only perform its functions, but will also become an addition to the interior of the room.
Don't rush to throw away old things. They can be useful for restoring an old stool. We've looked at different options for stool designs that anyone can make.
Work order
Before you begin restoring a chair with your own hands, you need to carefully inspect it in order to know in advance what actions need to be performed and in what order. During the inspection, it is necessary to evaluate the condition of the upholstery, the wooden structure that serves as the frame, as well as the lifting mechanisms, if the chair is folding and the seat is equipped with them. The upholstery is usually replaced with new ones, and loose wooden parts are strengthened with glue. And it happens that the mechanisms are worn out and the chair cushion does not rise; what to do about this problem will depend on the specific situation. Worn metal parts are unlikely to be repaired, and replacing mechanisms with new ones can be unreasonably expensive. Alternatively, you can abandon them altogether and, sacrificing functionality, fix the pillow motionless. If you determine the scope of work in advance and carefully consider how to repair the chair, you can end up with truly comfortable upholstered furniture.
Disassembly and preparation
Any disassembly of chairs and upholstered furniture should begin with dismantling the upholstery. All actions must be performed extremely carefully, trying not to damage the integrity of the fabric.
It is very convenient to use elements of the antique covering as patterns for future patterns of new covering, which will save a lot of time and labor when repairing a chair with your own hands.
If the restored model is equipped with armrests and decorative parts, they are also dismantled. But in some cases, you will first need to remove the seat and back cushions, if they are provided for in the design.
The base may need to be repaired. Often, metal springs, which were standardly installed inside in Soviet furniture, are unsuitable for further use, having broken completely or sagged over time and lost their former elasticity and rigidity. In this case, the wooden frame can be covered with jute tape. Step by step everything looks like this:
- first, the product is stretched in one direction, for example, from left to right, and then in another, perpendicular - from bottom to top;
- tapes of opposite directions need to be intertwined with each other, and their ends secured to the frame with a stapler.
As a result, instead of a cushion from old spring mechanisms, you will get a durable fabric base for the new seat.
When inspecting a wooden frame, you need to pay attention to the strength of the parts and their connections to each other. Some units may need to be disassembled to re-glue the joints. If you are restoring a chair with wooden arms and legs, you will need to decide whether the finish needs to be changed.
Disassembling the chair
Wrapping with jute ribbon
Design update
Quite serious repairs will be required if the frame is loose or, even worse, some elements have burst lengthwise - this happens due to long-term storage of furniture in unheated rooms, where temperature and humidity values change several times a year. Having disassembled the components, you need to inspect the parts to assess the possibility of their further use. Typically, connections between wooden structural elements are made tightly tongue-and-groove. If the chair has been unstuck for a long time, the surfaces could wear out when rocking. In this case, the gaps between the parts have increased, and the connections in the assembly have become more mobile than during the original assembly. Simple gluing in this case will give a short-term result - soon the structure will become loose again, so you will need to get rid of the gaps by inserting wooden planks of the appropriate sizes.
All parts of the units, including new inserts, must be thoroughly coated with glue during assembly.
Broken frame elements must be glued together. If the part has split lengthwise into two parts, this is not difficult to do - you need to clean the surfaces from dust and, after spreading it with glue, compress it tightly while the latter dries or polymerizes. To ensure high pressure, you can use clamps or wrapping with a rubber band. If the burst element does not come apart, the glue can be pressed into the crack using a medical syringe with a thick needle, after opening the crack with a flat screwdriver.
If a long part breaks across, the adhesive joint at the fracture site will be weak. In this case, you can try to repair it using two overhead strips of suitable length, glued lengthwise. If this is impossible to do due to the design of the chair, you will have to replace the broken element. In most cases, the frame parts are straight slats and bars - it will not be difficult to plan them yourself.
Glue the broken elements together
Increase joint surfaces to restore structural integrity
Soft part update
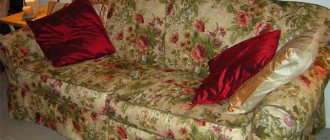
The seat cushion and backrest are usually covered in the same material. When choosing it, the interior features of the room in which the furniture will be located are taken into account. For a living room or hallway, the seat and back are usually restored with artificial or natural leather or jacquard - such upholstery will give the chair an expressive appearance. For rooms where there is an increased risk of contamination, flock is more often used.
Before the reupholstery itself, you will need to perform a number of preparatory steps. If the old springs on the seat were not removed, it will be enough to replace the soft lining under the covering material; batting folded in several layers is quite suitable. It should not be laid directly on the spring block; first you need to make a gasket from a durable material, for example, burlap.
If the springs are replaced with a jute strip, as described above, it is also necessary to cover this “weaving” with canvas or burlap, and cut a piece of foam rubber on top to the size of the pillow. If the thickness of the sheets is insufficient, it is worth making the liner multilayer. The foam rubber is covered with sheets of batting and secured to the frame using a furniture stapler.
To find out the amount of material needed to restore the chair, the patterns (old covering) are laid out as compactly as possible, but not closer than 3-5 cm from each other.
When using foam inserts, the volume of the seat may increase, and more material will be required for the upholstery - in this case, when laying out the patterns, you also need to take into account the amount of allowance.
To make patterns for upholstery parts, a piece of new material must be laid out exactly on a flat surface, with all the patterns placed on top of it. Next, all future details are outlined with chalk and then cut out. It is recommended to overcast the edges with a sewing machine to prevent them from unraveling.
You need to pull the material onto the pillows carefully, avoiding the formation of folds. To do this, first it is “baited” in the corners of the frame with a stapler. If the pillow is round, you can mentally draw two lines through the center, imagine the intersection point and secure the fabric at it. Next, between the fixed points, the edges of the upholstery are fixed with a slight tension. If necessary, you can remove the staples with which the material was originally “baited” using pliers. And then, tightening the fabric, fasten it again.
The material on the underside of the seat and the back of the backrest is hemmed with thread or tacked with furniture nails with decorative heads. You can secure the fabric with a stapler and cover the staples with textile decorative tape.
Cut the seat and back from foam rubber
Cut corners
Sew new filler to the old layer of foam rubber
Upholster the seat with new material
Secure the upholstery using a staple gun
Updating wooden elements
It happens that do-it-yourself restoration of a chair is not limited to replacing the upholstery and pillow filling. Furniture often includes antique carved armrests, back frames, ornate legs - you can preserve and emphasize all this beauty by updating the appearance of the elements:
- First you need to remove the old paintwork from all wooden surfaces. If the parts are flat, this can be done by using a grinding machine (belt or vibrating). If they are of complex shape, and even with threads, you will have to clean off the coating manually using fine sandpaper. Alternatively, you can use special compositions for removing paint and varnish coatings.
- Having gotten rid of the old layer, you need to inspect the surfaces for chips and cracks, and if necessary, putty them with a special compound or rub them with a mixture of wood glue and fine sawdust obtained during grinding.
- After puttingtying the chair, another sanding will be needed.
- You can decorate wooden furniture elements with various paints, after priming the surface with special compounds and sanding it with fine (P100-P120) sandpaper.
- Paint and varnish coatings are applied in several layers. Their quantity, as well as the drying time, are usually recommended by the manufacturer.
A beautiful wood finish is obtained by using at least 3 layers of furniture varnish. There is no need to prime the surface before applying it. After the first layer has dried, the surface is sanded.
To preserve the natural texture and color of wood, you can not cover wooden products with paints and varnishes, but use stains.
Sand parts, remove varnish
Cover with stain and wait for it to dry completely
Treat with furniture varnish
Connect all the parts
Assembly of the structure
When the restoration of the chair is completed, the furniture is assembled in the reverse order of its disassembly. Cushions and armrests are installed on the frame and secured using the method used before dismantling. It is better to replace old screws, if fastening was carried out with their help, with new ones. Lastly, decorative elements are installed.
An old chair, repaired with your own hands in accordance with the instructions given above, will certainly become a decoration in the house and a source of pride for the owner.
Restored chair
How to restore an old chair with your own hands
In my coral room, everything has been in its place for a long time: the furniture is painted, there is a shelf for decoration above the bed, and instead of a bicycle there is a cozy reading corner. And only the old chair was an eyesore for me. Finally I got around to restoring it: painting and reupholstering the seat.
I'm telling you how I did it and sharing the process. Perhaps this story will inspire some of you to update your furniture.
A few years ago I read a blog post on A Beautiful Mess about a dining room remodel. I remembered the mismatched chairs that they put together, painted with bright yellow paint, and due to the same color, the chairs began to look very harmonious and original. Since then, those yellow chairs have never left my mind.
Please note that I am not a restorer and the process I am describing should not be used for restoring antique pre-revolutionary chairs. In this case, it is better to contact a professional. But if you have old Soviet chairs lying around that you don’t want to throw away, then you can update them and give them a new life.
To restore a chair with your own hands you will need:
- can of semi-matte paint Tikurilla Pesto 30 (0.9 l);
- sandpaper;
- newspapers for surface protection;
- set of three brushes;
- solvent;
- seat fabric;
- construction stapler;
- hammer;
- glue gun
How to clean at home?
Sometimes you can update an office chair without such an operation as replacing the upholstery, simply by removing the greasy gloss that has appeared over time, as well as greasy stains. How to clean the upholstery of a computer chair, even if it stinks, for example, because beer or soup was spilled on it? This is not difficult to do. Apply the soap solution to the surface with a sponge and then remove it using circular movements. Some dirt can be removed using a regular vacuum cleaner - by moistening the brush in a saline solution and wrapping it, for example, in gauze, you just need to vacuum the chair.
Household dust stains can be easily cleaned with a vinegar solution (2 tablespoons per liter of water).
Paint a chair
An important question is what paint to paint the chair. It’s very simple: I came to the store and asked the consultant to advise what paint would be suitable for painting a wooden chair. They recommended semi-matte Tikurilla Pesto 30 to me. I chose the color from palettes in the store and the consultant mixed me the right jar of paint.
I painted the chair three times in total. When you apply paint for the first time, you want to exclaim “Whoa?” The paint is applied in a thin layer, the dark wood shines through it, and the brush leaves grooves in the paint. The main thing here is patience.
Between each coat I waited a day for the paint to dry completely.
How to re-string: step-by-step guide
One of the ways to restore an old leather chair is to reupholster it. This process is quite lengthy and labor-intensive. First of all, new fabric is purchased.
Upholstery can be done with leather or other popular materials. Some experts also recommend purchasing substances for padding (foam rubber, batting). To simplify the reupholstering operation, you also need to have a stapler, nails, hammer, etc.
The algorithm for solving this problem can be described in several successive steps:
The first stage involves removing the fabric from the bottom of the chair. In simple models, this part is fixed only from the bottom
But there are complex models, so it is important to initially free this part and then proceed with the remaining operations.
After this, the fabric is completely removed from the surface of the structure. It is important to do this sequentially to avoid any damage to the elements. Please note that each element of the chair is covered with one piece of fabric. Therefore, it must be released sequentially, layer by layer. You should not tear these elements, since they will then need to be used as blanks for cutting.
The next step is to dismantle the old foam upholstery. To remove it, you should carefully unbend it and remove all the metal staples with which it was secured.
Also try not to tear the material, which will later be used as blanks when replacing foam rubber.
Cut out the material. This operation involves the formation of new upholstery elements. To do this, use old pieces of fabric that were attached to the armrests, backrest and seat. The size of the new elements should be slightly larger than the old ones. This is due to the fact that it is not always possible to predict how accurately the fabric will fit. Therefore, it is better to take it with a reserve.
This step involves fixing the foam. Previously prepared pieces are sequentially placed on a specific part of the chair. If the foam protrudes in certain places, then it should be cut off. This way the appearance of each element is formed. Then a padding polyester is placed on top of the foam rubber. After this, both substances are fixed to the frame using a stapler. It is important to attach them so that they follow the contours of individual parts of the structure.
The process is completed by attaching the fabric. This operation is very similar to the previous one. But it is important to place the pieces correctly on the surface. Before fixing, carefully align the fabric and tension it. Initially, the middle part of the workpiece is nailed with staples. This is necessary in order to avoid distortions. Then each of the corners is sequentially stretched and secured using a stapler.
Select fabric for upholstering the chair seat
Ohhh! The choice of fabric was almost the most difficult moment in this whole story. I went to the Internet to ask Google what it could tell me about fabric stores in St. Petersburg. What I found was a sad sadness. The sites are in the style of the early 2000s and the photos of the assortment are such that I was amazed. Driving around the city looking for fabric, not being sure that I would find what I needed, somehow didn’t make me smile at all.
And then I remembered my favorite fabric store, Myata Fabric, with beautiful modern prints. Now the guys are launching their own fabric production and will soon open a relaunched website, and I was lucky to grab one of the last pieces from the old collection. And I don’t regret for a second that I had to wait until the fabric reached me by mail from Yekaterinburg. It was definitely worth the wait.
Principles of repair
How to reupholster a chair and what are the stages of this process?
First you need to disassemble the chair and get rid of the old upholstery. When carrying out repairs, we perform a number of simple steps:
- Remove the back of the chair by turning the screw at the back and disconnect the armrests. Remove the back panel.
When choosing fabric, it is important to purchase as much of it as you need for upholstery - to do this, measure the chair and add to the resulting figures another 5-7 centimeters necessary for upholstery.
Cut the fabric for the seat
Several years ago the seat was already reupholstered, but the cat sharpened its nails on the old fabric and it became unsightly. At the same time, the seat itself was completely normal, so I did not change the fabric and foam inside, but simply decided to wrap the seat with new fabric.
I laid the seat on the fabric and cut it around the perimeter with an allowance of 4-5 cm.
Recovery process
First, the back is restored. Here it plays the role of a headboard. To work, you will need a furniture stapler and staples for it. Experts recommend stocking up on 6 mm and 10 mm staples.
The first to be inspected are the tightening belts. If they are loose, they need to be tightened a little. To do this, one end of the belt must be disconnected from the headboard and tightened. Then secure it with a stapler. The staples must be driven in in any order. If they are placed in one row, the plywood may crack or delaminate.
If the belts are damaged, they can be replaced with new ones.
If necessary, in addition to the belts, you can also replace the soft gasket. To do this, the headboard is placed on a softener. A few centimeters are measured for bending. Next, you need to outline the back with a felt-tip pen and cut out the resulting part. Glue it to the old fabric on the chair and trim off the excess.
Secure the fabric with a staple gun
First, I secured the fabric with a stapler on four sides so that the fabric would not fidget and then separately walked around the perimeter. First on the sides of the seat and only lastly on the corners. During the process, I made sure that the fabric was well stretched, but not too tight.
Perhaps it was my simple staple gun, or maybe it was the plywood seat, but the staples did not go all the way into the seat, so I tapped them all with a hammer to secure them properly.
Frequent breakdowns and their elimination
First, it’s worth analyzing the progress of the general restoration of the old chair. Start by removing the fabric located on the bottom of the seat. To do this, remove the nuts. The next step is to open the backdrop made of plywood or fiberboard. Once it is open, you can remove the nuts holding the armrests in place. Then the bolts securing the back and seat are removed. These parts of the chair are disassembled into separate parts. Then you need to do something with the upholstery.
In any case, a lot of debris and dirt accumulates under the upholstery over the years of use. When it is removed, all this rubbish needs to be removed. Additionally, old frame brackets are removed. Before restoration, all wooden parts are inspected so as not to miss the slightest breakage or crack. All defects are glued with wood glue and fixed with 1.6 cm staples.
New components are made from furniture panels. Parts must be sanded. First, the varnish is removed with a drill attachment, and then all layers are removed with a sanding device so that the original color of the wood is exposed.
Blanks cut from wooden panels are treated with stain. It will be absorbed in about 5-6 hours. After this, you can already apply furniture varnish.
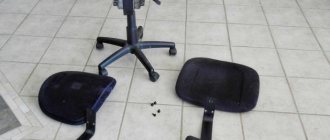
Rollers falling out
If such a problem arises, repairing the chairs with your own hands will not be any noticeable work. The chair is turned over and the problematic rollers are pulled out. Then the casings that cover the cross part of the structure are dismantled. There are plugs at its ends. If they are cracked, you can pull them out with a screwdriver.
The problem is that few people sell “penny” plugs separately. Almost everywhere they sell more profitable ready-made crosspieces assembled. Therefore, before you go shopping, it is very good to check by phone whether such parts are available in the store. Official descriptions on a number of sites are misleading.
Gas lift malfunction
There is no need to look for step-by-step instructions for repairing or replacing gas lifts. You can repair them at home in just a few steps. True, then the structure will be rigidly fixed in one position. But for normal use this is usually enough.
This is done like this:
- remove the cross with gas lift;
- maneuvering the pedal, raise it as high as possible;
- put a device on the rod that will prevent unauthorized descent (rubber hose, polypropylene tube or a set of washers or metal rings).
The inability to lift the chair by pressing the lever is often associated with damage to the gas lift valve. Problems also occur due to damage to the control handle. It can also be assumed that the fixation of the fastening mechanism was initially erroneous.
Crosspiece failures
The chair may also stop working properly due to the crosspiece. What exactly to do in a particular case is determined by the design of such a part. Plastic crosspieces break most often in the first six months of operation. Even if high-quality plastic is used, which is quite rare, intense loads still do their job.
For plastic products, the cause of failure is usually poor casting quality. For metal ones, wear of the material or weakening of welding seams.
Those who are not ready and cannot perform them themselves should turn to professionals. Plastic crosspieces cannot be repaired and must be completely replaced.
The back does not spring
This problem occurs in a variety of cases, including when using a chair-bed. Basically, the lack of a spring effect is due to a violation of the integrity of metal parts. Sometimes it's all about deformation of the working springs. It is impossible to restore all these parts. They are being replaced completely.
Other
Quite often complaints are related to the fact that the chair creaks. Eliminating such a defect is not too difficult. The causes of the squeak may be:
- assembly errors;
- breakdowns of individual parts;
- weak tightening of bolts;
- violation of the pumping mechanisms.
If the cause of the noise cannot be found for a long time, you need to examine the backrest. It is likely that there are problems with its internal fastenings. The bolts are either replaced or tightened (depending on their condition). If extraneous sounds are heard from below, then this is already a gas lift defect. You can also fix it, but it will be a little more difficult. Sometimes there are complaints about the chair: it falls down. And attempts to use the levers of the lifting mechanism lead to nothing. In this case, there are also problems with the gas lift.
Attach the seat to the chair
Depending on what fasteners you originally used, use them to secure the seat to the base of the chair. I attached the seat with a glue gun, since my chair is used more for decorative purposes - it stands in a corner, I put a blanket, clothes on it, and put a bag on it. If you plan to use the chair to its fullest extent, then it is better to take care of a more serious fastening.
This is what happened in the end!
There was an old, shabby chair that I felt sorry for and wanted to throw in the trash, but what came out was a bright and cheerful yellow chair with a modern print on the fabric that fits perfectly into the interior. Paint and a brush can work wonders.
Consolidation
Reupholstering a chair-bed begins with securing the material to the side of the backrest. The staples are located at a distance of approximately 10 cm from one another. It is advisable to start from the middle.
When you finish one side, move to the other. Stretch the fabric and secure it in the same way. It is important to avoid wrinkles. Excess fabric is trimmed. The corners are formed. They are also secured with a stapler. Holes are cut for self-tapping screws or bolts.
The seats are reupholstered in the same way. For a chair-bed, it consists of two parts.
Re-upholstery: step-by-step instructions
Before reassembling and reupholstering, the external wooden elements should be renewed. To do this, remove the old paintwork using a wire brush or coarse sandpaper. Then clean these parts with fine-grained sandpaper and coat with varnish or paint of your choice.
Secure the new case with staples
Once again, try all the parts on the furniture using pins: if everything fits, you can start covering it. We begin the process from the place where we finished disassembling the chair. We fasten one end of the part to the frame using staples, starting from the center, leaving a distance of 10 centimeters at the edges. Having secured it, we stretch the fabric from the front side and check for the absence of folds. If everything is in order, we tighten it and fasten the remaining sides. Let's check the appearance again. If everything is in order, we attach the edges of the upholstery to the frame.
Secure the inner part of the seat with staples
Using the same principle, we fasten all the elements of the chair, observing the reverse order of disassembly. As a result, the fabric will completely wrap around the entire chair, and all the edges will be folded.
We make holes in the case for attaching the legs and screw the legs
Completely reupholstering furniture can take a lot of time, but the most important thing in this process is not to rush anywhere
It is important to note that different chairs have their own characteristics, so you will have to figure out many of the details yourself. The final result will definitely repay all the reupholstery efforts and will delight you for a long time
The finished chair after reupholstery with your own hands
Advantages and disadvantages
Hand-made reupholstery of home and office furniture has many advantages:
- significant budget savings - it’s easier to buy a couple of meters of textiles and a piece of foam rubber than a whole new chair;
- creative process - independently remaking even the simplest, nondescript chair will help you feel like a real master;
- the possibility of updating the interior - a freshly redesigned chair will be designed exactly as its owner intended;
- A quality restored product will last for many years.
There are also several negative points:
- the product will be very different from the store one - this matters if you want to create a specific model, but the skills are not yet enough;
- the labor-intensive process - if the chair is badly damaged, not only the fabric is replaced, but also the “filling” - foam rubber, springs, while completely disassembling it;
- For work you will need some tools that are not available in every home;
- You will need to organize a workspace, which will then have to be thoroughly cleaned, since the restoration process is quite dusty.
How to repair it yourself?
Chairs today have different designs, on which the algorithm for repair work depends. If this is an ordinary wooden product, then repairing it is quite simple. It is necessary to identify the problem, which is often poor-quality fasteners or a violation of the structure of the material. This can be corrected by replacing the wooden element (backrest elements, frame base, etc.) with a new one or simply tightening the bolt.
More difficult to repair are shell chairs, which often have fabric outer upholstery. To get to the breakdown, you first need to dismantle the fabric. The process of repairing such chairs is much more complicated, so it is not always possible at home.
Office chairs are mechanisms that consist of several parts. There are many reasons why this design loses its characteristics:
Rollers falling out. Often this can only be corrected by replacing the crosspiece or these moving elements
It is important to first check the cause of the breakdown (broken hole, missing retaining ring on the roller, etc.).
Gas lift malfunction. There are also several reasons for this, including improper fastening of the piastrum or malfunction of the control lever mechanism
Therefore, you should check these attributes first.
Breakage of the cross. The functionality of this element can only be restored by replacing it with a new one.
The back does not spring. The main cause of this problem is the violation of the integrity of the metal parts inside. Sometimes the spring mechanism also fails. Operation can only be restored by replacing parts with new ones.
Choosing fabric for upholstery
When choosing a material for upholstering an old chair, you need to take into account the basic requirements for the fabric:
- strength;
- density;
- practicality and cleanability (it is desirable that the fabric has a water-repellent impregnation).
To ensure that a restored chair retains its attractive appearance for a long time, when choosing the right material, the conditions in which the furniture will be used are also taken into account:
- If pets live in the apartment, it is recommended to use flock for upholstery - this wear-resistant material is not covered with snags.
- Chenille or matting are suitable for a chair in a children's room. Dense and pleasant to the touch fabrics are easy to clean and abrasion resistant.
- In the living room, furniture covered with jacquard, leather, tapestry or nubuck will look impressive.
- In a house where people smoke, it is best to buy chenille for upholstery - it does not absorb odors.
Tapestry
Leather
Jacquard
Nubuck
Gozhka
Flock
Chenille