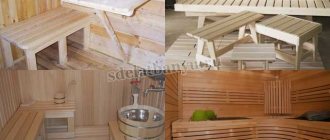
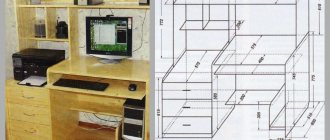
table for a sewing machine and overlocker
If your sewing machine is stored in a closet and you have to take it out every time, sit at the dining table or desk, or even worse, bend over to sew on a coffee table, then this article is for you. Here we show and tell you how to make a sewing table with your own hands without much expense and with minimal experience.
Every housewife and happy owner of a sewing machine dreams of her own corner for needlework. But something is always missing - space in the apartment or money for a new sewing table. These problems can be solved; here, various budget options for small apartments are presented. All tables are made with their own hands and are far from professional craftsmen. So, put your doubts aside - choose the appropriate option and get to work.
Warranty repair
We value your time, so our company’s specialists will carry out high-quality repairs of your equipment in the shortest possible time (if spare parts used during repairs are in stock); will advise you on further operation and intricacies of operation of this or that equipment.
Please note that warranty repairs only apply to equipment purchased from our company. Our company does not bear warranty obligations for defects caused by improper storage and operation of sewing equipment.
You can obtain additional information about the work of the service center from our employees by phone +7.
If you have any questions, you can contact our consultants directly from the site via chat. We will try to answer questions and help you choose equipment.
Manufacturing materials
When constantly using furniture for sewing, the material from which it is assembled is not least important. Getting to know the characteristics of wood, chipboard, MDF will help you make the right choice:
- The wooden table is durable and highly wear-resistant. The noble surface texture will organically fit into the interior of any style. The peculiarity of such a product for machine sewing is that the design can be improved independently (add modules, shelves). Disadvantage: high cost, significant weight.
- MDF is lightweight, easy to process, and affordable. You can assemble a table of the desired design yourself from components (tabletops, side racks, metal fittings) ordered from a furniture company. Craftswomen appreciate comfortable and lightweight mobile furniture mounted on wheels. The disadvantage of MDF is its sensitivity to moisture and elevated temperatures (it is not recommended to work with steam or a hot iron on such a coating).
- Chipboard is a budget option. The advantages of the products are a large selection of models, light weight. The disadvantages of the material are sensitivity to moisture and high temperature. A folding table made of chipboard has a limited service life.
A variety of tables made from pallets, popular models and decor options
The table top is the most important part of the cutting table. All needlewomen know that working comfortably with fabric and scissors is possible only on a smooth surface. But you also need to take into account that thin fabrics (chiffon, silk, organza) will easily slide off it, so the surface should be a little rough. As an option, the table is covered with a piece of linoleum.
With intensive work, the surface of the furniture quickly wears out. Therefore, a professional cutting table is sometimes covered with a countertop made of artificial stone.
Wood
From chipboard
From MDF
How to make it yourself
Many furniture companies offer cutting services for chipboard and MDF panels. Therefore, many people prefer to assemble their own furniture from prepared elements. In this case, you can create a table “for yourself” - of a certain size, with a drawer for fabrics, shelves for accessories, magazines. For production you will need furniture fittings (wheels, drawer guides, hinges), a table top, side panels, shelves of the required size. Stages of work:
- Assembling the body of the structure - using self-tapping screws, connect the tabletop, side and supporting panels. The back wall is nailed to the side supports using nails and a hammer.
- The wheels are screwed to the cabinet (using self-tapping screws).
- According to the drawing, shelves and drawer guides are fixed inside the table.
- The final stage is to attach the doors to the cabinet and screw the handles to the door panels. Drawers are inserted.
Decorating an aquarium table in different styles, basic shapes and sizes
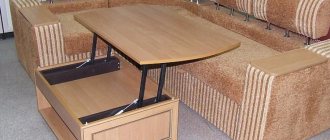
When drawing up a drawing, you need to take into account the wishes of the needlewoman and the area of the room. When assembling a table for cutting, it is recommended to add a lower shelf for rolls of fabric and drawers for cutting tools (scissors, knives). For a sewing machine that has a significant weight, it is advisable to build a special lifting mechanism into the table.
Ready-made drawings of various models with detailed dimensions can be found on specialized online resources.
If you clearly decide on the type of hobby or how to make money from handicrafts, it will not be difficult to organize a comfortable workplace. Initially, you can use a simple budget model of a sewing table. And if necessary, it’s easy to assemble a table with your own hands that satisfies all the whims of the craftswoman.
Table drawing, height is indicated with wheels
Assembly diagram of the main cabinet
Assembly diagram of a cabinet with drawers
This is what the finished design looks like
Assembled table with installed machine
Peculiarities
The advantages of a sewing table include:
comfort and convenience when working . The competent design of the product will prevent swelling of the legs during work and will relieve stress from the neck and spine;- easy and simple workplace transformation . Almost all models of sewing tables have interesting designs. During operation, they easily unfold, and when assembled they represent an ordinary cabinet, suitable for the overall interior of the room;
- mobility . If you equip the sewing table with wheels, it can be moved to the place you need. For example, while sewing, the product can be placed by the window, where there is a lot of daylight, and then hidden in a secluded corner of the room;
- capacity . Almost all models have good capacity. Some tables are designed not only to accommodate a sewing machine, but also to accommodate a small overlocker, which every seamstress needs.
Attention : for small apartments it is better to opt for corner or folding models. They are distinguished by ergonomics, stylish design and ease of use.
Also suitable for small apartments is a book model . This table has two sections that rest on supports. Inside the cabinet there will be a compartment for the machine and many shelves for storing tools, fabrics, and patterns.
Before you start making your own sewing table, you should think it through carefully. Decide in advance on:
- manufacturing materials . It can be: natural solid wood, chipboard, MDF, plywood;
- product dimensions . It is especially worth paying attention to the dimensions of the working surface for cutting. If you make patterns while standing, the height of the product should be 85 cm;
- availability of accessories . All seamstresses love it when there is space on the work surface for: accessories, threads, fabric.
How to make a sewing station out of a closet
Often in our homes there are old unnecessary wardrobes and racks from Soviet times, inherited from our grandmothers or parents. This cabinet can be used to make a good table for a sewing machine, since the material used in Soviet furniture is quite durable.
An old, unwanted closet can be turned into a great sewing space. However, to comply with modern interior styles, furniture film or self-adhesive wallpaper must be glued to furniture panels.
Remove the cabinet shelves, unscrew the doors and one of the sides. Lay the cabinet on its side, with the remaining side facing up - this will be the countertop. From the doors and tabletop, make shelves of the required size, an additional surface (can be in the form of a corner table or a folding one).
Making a table for needlework
It all started with a new sewing machine. Although, it probably just served as a catalyst.
I moved the old machine around the apartment, set it up in the kitchen, or asked my husband to bring a folding table from there. The decision about the need for a permanent place for needlework matured gradually and resulted in the idea of a folding table.
The area for cutting and working should be larger than a regular table. But it shouldn’t take up a lot of space—that means it should fold up. My husband and I came up with a “super design”, which as a result, after purchasing the parts, turned into this, simpler one. Nothing unusual or new, but it turned out to be very convenient to use and quite compact.
I filmed some moments in the process on my phone, recently I came across the pictures and decided to share the idea - maybe someone will need it.
The materials for the table cost 3,600 rubles - it’s unlikely that you can buy one ready-made for that price.
At the end of the article there are a few more photos of the finished table from different angles.
unfolded
folded
For the tabletop, we used 18 mm thick furniture board - this is enough not to sag under the weight of the machine. Laminated chipboard parts were used as legs under the tabletop for the same reason - so that the folding part of the table was stable when working on a typewriter or when cutting. The legs were made on wheels - this makes it easier to lay out the table and does not damage the floor.
The overall dimensions of the table turned out to be sufficient for work - a working area of 128 * 60 cm and an additional tabletop of 70 * 60 cm. The standard height is 70 cm. The table surface was sufficient to place a narrow cabinet on top in the corner. Gradually a shelf appeared above the table, and 2 cabinets under the table. Now everything is nearby, no need to collect the necessary tools and materials throughout the apartment.
Materials:
furniture board 200*60 cm - 1 piece - (main tabletop and folding part)
furniture piece laminated chipboard 80*60 cm - 4 pieces - (2 for the side parts, 2 for the legs for the folding part)
furniture piece laminated chipboard 120*30 cm - 1 piece (for the back of the table, for general rigidity)
metal corners - 8-10 pieces
furniture hinges - 7 pieces (3 pieces for an additional tabletop, 2 pieces for the legs under it)
swivel wheel without brake, 50mm - 2 pieces (on the legs under the folding tabletop)
acrylic furniture varnish - 0.5 l (for covering the tabletop)
Tools
drill, screwdriver, jigsaw, sander
The necessary conditions are direct hands, work skills and desire. Then everything else can be varied
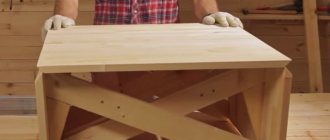
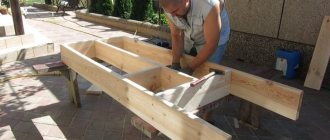
We prepare parts according to dimensions.
We connect the side parts of the table with the backdrop using metal corners.
We attach the tabletop in the same way.
We get the following construction.
Now we attach the folding part to the tabletop with 3 hinges.
We make cutouts in the legs that will be under this additional part and screw in the wheels. After this, we also attach them to the hinges to each other and to the side of the table. My folding part will be on the right, but you can make it mirrored on the left.
In the last photo, the corners of the table have already been rounded and sanded so that the fabric does not cling to the edges. A small block was secured under the edge of the tabletop as a stopper for the legs, so that the structure would not accidentally roll out beyond the tabletop.
The last stage is sanding the surface, slightly rounding the upper corner of the tabletop.
For painting, I chose furniture varnish, white matte translucent, the texture of the wood is visible through it, it is more convenient to work on a light surface.
Several working variations.
I usually cut at the very beginning, so the machine is still in its place, the unfolded part is enough for me to lay out the fabric.
When working, I place the machine on the opening part. There is free space for legs under the tabletop, making it comfortable to sit.
The shelf above the table suddenly acquired an additional railing for cutting tools.
A narrow bedside table is convenient for storing boxes with supplies of thread, zippers, an iron in a case and other small items.
Under the table there are 2 cabinets with fabrics. I also placed a roll of synthetic padding there - when folded, half of it is covered by a folded tabletop and legs on hinges and wheels. On the left, I placed the metal corner on two self-tapping screws on the side of the table.
A handle was made on the table leg, which when unfolded is on the right side, to make it easy to roll out. Later they added magnets for attaching a basket for scraps of fabric and thread - when working, it’s convenient to have such a trash can under your right hand, and it doesn’t take up space on the table.
Gradually acquired all the little things. The basic design of the table has passed the test of work and time - no shortcomings have been revealed. The table turned out to be stable, comfortable and compact.
Now it’s pleasant and convenient to work! And some at first also rested comfortably on new clothes.
I wish everyone joy and pleasure at work!