When the process of making a cabinet yourself is described, most often not much attention is paid to the operation of hanging doors. Installing furniture hinges on kitchen doors is sometimes only mentioned, since it is considered a routine operation. Indeed, installing hinges is not particularly difficult, but only for those who already have relevant experience. For beginners, it is better to first become familiar with the necessary sequence of actions. Today, hardware stores and building materials hypermarkets offer a lot of furniture fittings of various designs, including hinges. When undertaking a kitchen furniture renovation, it is important to understand the design features and calculate your abilities.
Types of furniture hinges
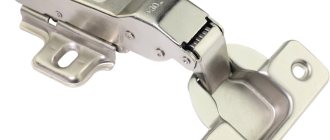
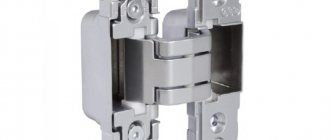
In general, cabinet hinges are very diverse, but in practice, samples that are quite similar in appearance are most often used. More expensive models have a closer and a quick-release mechanism. You can verify this by examining almost any finished cabinet.
This is what the most used furniture door hinge looks like
An ordinary door hinge, but even it allows you to adjust the pressure and tilt.
The popularity of this design is explained by the ease of its adjustment. Even if a mistake is made and the cabinet door hinges are attached a little unevenly, there is a chance to correct this situation through convenient and simple adjustment.
Furniture hinge with closer and quick-release mechanism
As you can see, such a hinge has a slightly more complex design than those hinges that were once used to hang the doors of Soviet cabinets. This means that such a hinge has a more complex and functional mechanism with a closer and quick release.
Variety of models and designs
It is important to take into account that there are different models of door hinges and they differ significantly in opening, size and mechanism.
Typically, when assembling cabinets with hinged doors, overhead four-hinged hinges (frogs) are used. The design differs in its high reliability and versatility. They provide a door opening range from 90 to 165 degrees.
Corner furniture hinges are often used to assemble corner cabinets. Their task is to attach the facade to the frame at the required angle - usually in the range from 30 to 175 degrees.
So-called inverse hinges are used in cases where the sash, when opened, must form an angle of 180 degrees with the side wall.
Additional door opening mechanisms TIP-ON are also sold, which help to open the doors by pressing without using handles.
Door opening mechanism with various designs
How to replace furniture hinges on an old cabinet
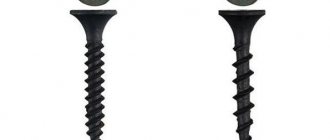
When replacing furniture hinges, it is advisable to replace the installation screws with thicker ones (for example, take 4x16 or 3.5x16 versus 3x16). This will ensure the strength of the fastening in the same holes.
If you need to replace furniture hinges on an old cabinet because they were torn out from the sides or the facade itself, it is necessary to carry out preliminary restoration work. You can read more about this in the article on how to repair a cabinet with your own hands.
How to install furniture hinges
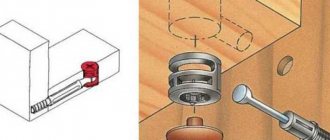
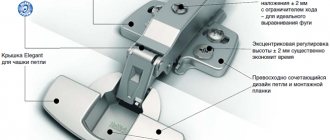
The bowl deserves the most attention in the hinge design. From the picture it is clear that it should literally be inserted into the surface. To do this, you need a hole (roughly speaking, an unfinished, not through hole), and a very respectable diameter. It is impossible to make such a hole with a regular drill; you will have to use a special cutter with a standard diameter of 35 mm, but there are other 25-32 mm mounting holes.
Forstner drill with height adjustment
There are different types of drill cutters
The illustration shows two cutters, a standard one and a slightly modified one. It's useful to have both. It is better to start cutting a hole with a regular cutter, but then it will be best to change it to a modified one. The reason is that a standard cutter has a protruding tooth. Beginners may inadvertently drill a through hole with a cutter instead of a hole, and the tooth on the cutter greatly contributes to this.
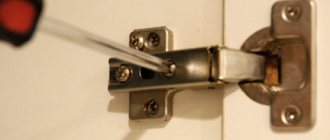
The hinges must be installed so as to support the door securely and without distortion. Therefore, when attaching furniture hinges, it is important to mark the surfaces of the cabinet and door as accurately as possible, marking the places for cutting holes for hinge bowls and for screwing in self-tapping screws.
In ordinary wall cabinets, the door is secured with two hinges. In more solid models with a high, massive door, you will need to install at least three hinges. All of them should ideally be exactly on the same axis. In this case, the lower loop is mounted at a height of at least 7-12 centimeters.
Kitchen furniture hinge installation drawing
The distance from the top edge of the cabinet to the top hinge is most often seven centimeters. The vertical axis on which all the loops should be is drawn at a distance of a little over two centimeters from the edge.
When drilling a hole, it is important to consider the depth of the hole; for this it is better to use a cutter with a limit.
The geometry of corner cabinets forces furniture makers to use special hinges to hang doors on such cabinets. However, understanding how to hang a door on a corner cabinet is quite simple. In itself, attaching such hinges is not difficult, but you will immediately need to take into account the fact that the corner hinges extend slightly into the interior space when closing the cabinet. Taking this into account, you will have to slightly reduce the depth of the shelves, because otherwise the corner cabinet doors simply cannot be closed.
How many furniture hinges should I install on one façade?
There are generally accepted standards for installing four-hinge furniture hinges. Thanks to them, you can easily replace one canopy with another, and also choose any manufacturer based on price, quality and additional equipment.
When choosing how many furniture hinges to install on one door, they are guided by three criteria: the height of the facade, its width and weight. Moreover, the height is decisive in determining the amount of fittings.
Leading manufacturers of furniture components conduct a lot of tests and develop more accurate standards for their own products. For example, recommendations for choosing the number of hinges for installation on one façade from Blum are shown in the catalog as follows.
- It is not recommended to design the cabinet façade wider than 600mm. The number of hinges for installing the door on the frame depends on the weight and height.
- To ensure maximum stability and stability when opening and closing, it is recommended that the awnings be installed as far apart as possible.
- To facilitate marking, the following standard is used: the outer hinges are installed at a distance of 100 mm from the edge of the body and 98 mm from the edge of the facade itself (with 2 mm gaps between the facades).
- The approximate distance between cabinet hinges is 500mm. So, on a cabinet with a height of more than 1000 mm, there is a reason to secure the door with three hinges.
How to Adjust Kitchen Hinges on Cabinet Doors
Now let's look at what malfunctions may require adjusting the hinges on the kitchen door. When closed, one door is higher than the other. It is necessary to raise or lower one of the doors to the level of the second.
To do this, loosen the two screws on the hinge of the problematic door to adjust the height, align it, focusing on the second door, and tighten the screws back. If the gap between closed doors is too large or uneven (widening or narrowing downwards). Using the nearest hinge screw, move the doors towards each other (or vice versa, if there is no gap at all and the doors cling to each other). In this case, the adjustment of the lower hinge is responsible for the lower side of the door, and the upper one – for the upper side.
Furniture hinges and methods of fixing them
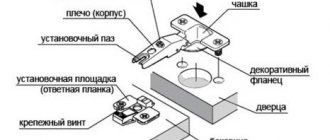
First, I propose to define the terminology. We will hang our door on a standard furniture four-hinged hinge with structural elements:
Determining where the cup is on the loop is easy. This element has the shape of a recess with “ears” for fastening.
The cup is located in a blind hole with a diameter of 35 mm on the door . The hole is made at the factory, and I do not recommend trying to drill it with improvised means without special equipment and a cutter of the required diameter.
This requires a certain precision, which cannot be achieved in artisanal conditions.
The hinge arm is a lever permanently connected to the cup through hinges. Attached from the inside to the side wall of the cabinet using a striker plate.
The strike plate is directly fixed on the surface of the stand. Has two screws for subsequent adjustment of the facade after installation.
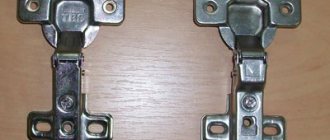
Furniture hinge in open state
Furniture hinge closed
Before hanging the door, you need to attach the cup with the shoulder to the door and the strike plate to the stand.
What types of hinges are there for kitchen cabinets?
Among the entire range of designs
There are only 2 types.
- Hinged (piano and card). These were the very first to appear; they were used back in the last century, but are practically not used in modern headsets. But when assembling antique retro or vintage furniture, they may just be needed.
- Four-jointed. Their design differs from previous conventional ones in that they can be adjusted in several places, ensuring free opening/closing of doors.
Four-hinged design device
Hinges according to door position and fastening method
The semi-overlay allows only partially covering the body of the furniture set. It has a slight bend that creates a gap between the sashes, which allows you to open two adjacent sashes at the same time. Used in intersectional fastenings of kitchen furniture, for example in a three- or two-door cabinet;
- overhead (external) are a hinge mechanism that allows the doors to open 900, actually 105 degrees.
They are most often used for fastening doors in kitchen units. They allow the doors of cabinets and sections to be tightly closed, covering the body on both sides, and serve for a long time without breakdowns;
They have a large bend, which helps to move the inset door outside the body when opening. Rarely used for attaching heavy doors to chipboard cabinets. They allow you to sort of recess the doors when closed behind the cabinet body;
- adit (straight)
are designed for attaching the front part to the sidewall of false panels.
Often used in corner sink cabinets.
Corner
For installation in corner floor and wall cabinets, hinges are needed that allow the doors to be opened at different angles.
Hinges depending on the opening angle and purpose in the table:
in sloping end cabinets
Carousel (inverse) loops deserve special attention
. Thanks to their design, they allow doors to open up to 180 degrees.
They are not used so often in corner cabinets.
For cabinets with vertical opening
These are mezzanine loops. Their main element is a spring, they are installed on the doors of hanging cabinets with a vertical opening.
For glass doors
Depending on the material on which they are installed, we can separately distinguish those that are mounted on glass surfaces. Their main difference is the presence of a special decorative lining that masks the loop. True, at home it is quite difficult to drill a hole for them.
Hinges for glass doors are also divided according to the opening method, angle, etc.
Hinges can be equipped with additional elements - closers. Closers can be built-in or come separately as a set.
With door closer
How many hinges do you need to buy to securely install the door?
To install hinges on doors yourself, first of all, you need to determine the required number of devices. It depends on the dimensions and weight of the door being hung, as well as the material from which it is made.
How many pieces do you need to buy depending on the weight and height of the facade?
In order for the hinges to fully cope with their assigned task - to ensure the free opening/closing of doors without creaking or moving, they must be installed correctly. Usually, instructions are always attached to the product.
The video will also help you understand the installation principle:
The work of assembling furniture is considered completed as soon as the hinges on the cabinet door are installed, because the front side is very important. People always pay attention to it when entering a room, so a self-respecting owner will not allow any flaws in the installation. A millimeter of inaccuracy in the calculations - and the entire effect of the new furniture is down the drain. No matter how insignificant and simple the work may seem, it is an illusion. To carry it out efficiently, you need to be a master. The aesthetic perception of finished cabinet doors is only 50 percent of success. It is important that they are installed correctly: the period of operation of the cabinet without repair depends on the balance of the doors.
Installation stages
Installation of hinges on facades is carried out in 4 stages:
- first create markup;
- then make holes using a drill;
- then installation is carried out, as well as assembly of parts of the fittings;
- At the last stage, the doors are installed.
How you can arrange furniture in a room of 18 meters, photos of the best options.
The most important and difficult stage is considered to be adjusting the position of the door relative to the furniture body. If the work is done incorrectly, the sash will quickly sag and the cabinet (or any other product) will fail.
Creating markup
To install furniture hinges correctly, you must initially make even markings that correspond to the parameters of the hardware plate. Otherwise, there will be problems with opening and closing doors. The marking of furniture hinges is done as follows:
- The distance between the canopies should be at least 50 cm. At this stage, the number of hinges required is determined.
- Start marking the center of the canopy holes. At the same time, they retreat from the edge of the door by 2–2.5 cm.
- Marks are applied taking into account the width of the door. At the intersection points, holes are made with self-tapping screws. At this stage it is worth using a template for marking furniture hinges.
Despite the fact that templates for furniture hinges are made of durable materials, they must be handled very carefully. It is strictly forbidden to drill through them, otherwise the service life will be reduced. To determine the number of loops needed, it is worth studying the recommendations presented in the table.
| Door weight, kg | Facade height, mm | Recommended number of loops |
| 4-5 | up to 500 | 2 |
| 6-9 | 500-1000 | 2 |
| 10-13 | 1000-1500 | 3 |
| 14-18 | 1500-2000 | 4 |
| 19-22 | 2000-2500 | 5 |
It’s easy to make a template for inserting furniture hinges yourself.
Hole preparation
The next step will be preparing the holes. To make the notches correctly, you need to accurately follow the markings already made. To carry out this operation, a drill with a special drill and a milling cutter are used. The holes are made like this:
- First you need to lay the door on a flat surface.
- Fix a cutter for furniture hinges of a suitable diameter in a drill. The depth of the hole should not exceed 1.25 cm.
- During the drilling process, the drill must be positioned strictly perpendicular to the surface of the door.
- During the process of forming the hole, you need to carefully ensure that the cutter or drill does not drill through the door.
How to correctly arrange furniture in a small room, advice from designers
When the main holes for the screws are ready, you can move on to the next stage. Inserting canopies in accordance with the markings and formed recesses is much easier and of better quality.
To avoid damaging the decorative surface of the furniture, you should use a cutter. If drilling is carried out only with drills, then chips may form at the edges of the holes.
Hinge Attachment
The hinges are attached in the following sequence:
- The part of the loop that will be directly attached to the facade is placed in the bowl.
- The hinges are carefully positioned in the recesses to ensure optimal placement.
- Using a construction angle and a level, achieve an even position of the loop in the cup.
- If you need to correct the hole to lay the canopy evenly under the level, use a furniture cutter to install the hinges.
- Using a screwdriver, screw the screws into the holes on the hinge itself.
After fixing the screws, you need to check the strength of the canopy. It is recommended to try to loosen the hinge in the cup and move it relative to the surface of the facade. If no changes are observed, then the fittings are secured well.
Hanging the door
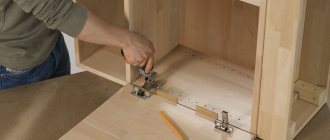
The most difficult stage in this work is the installation of the door. To simplify the task, if possible, it is worth laying the furniture body so that the doors are attached to the hinges in a horizontal position. Algorithm for installing doors:
- In the inside of the furniture body it is necessary to make the same markings as on the door. To install the hinges, you also need a furniture bit.
- Next, secure the platform to secure the canopy using self-tapping screws.
- Connect the two parts of the canopy.
- Finally, adjust the position of the fittings relative to the door and furniture body. This can be done using a screwdriver and a level.
The procedure for making an additive machine for furniture with your own hands
Hanging the door is not the final stage of work. Even after the initial adjustment, additional measures must be taken to align the position of all components.
Materials and tools
You need to start assembling furniture with a selection of materials and tools that will be needed for the job. It is necessary to take into account the structure of the materials, because there are different types of wooden surfaces. They will require different fastening devices and fastening methods. The main methods of fixation are the lower and upper positions. For massive sashes over a meter long with heavy weight, add another hinge in the middle. For installation of doors over nine kilograms. The maximum number of loops for a product weighing 20 kg will be 5 pieces.
Assembly of furniture does not require complex mechanisms. The necessary set of tools consists of simple, familiar things. To install the fasteners on the door, the following tools are required:
Before installing the hinges, you need to select the material for the job. The main material is the fastening device. There are many types of hinges on the hardware market, they may differ:
They are selected based on the types of material, dimensions, and type of furniture. Separate fastening devices are used for furniture that meets certain design styles. For ordinary cabinet doors, standard semi-overlay and overhead fasteners are used.
When choosing fastening devices, it is better to give preference to industrial certified products. This will extend the life of the furniture. The selection of hinges should be comprehensive, taking into account all the materials necessary for fastening:
- fastening devices for large cabinets perform the functions of opening the doors. According to technical characteristics, these are mechanical parts;
- The materials from which the doors are made are of no small importance; one of the significant indicators is their thickness;
- The material of the hinges is also taken into account: they are made from alloys that are resistant to deformation and corrosion.
Overhead fasteners with four hinges have one fastening principle:
- the cups lying at the base of the fastening device are connected to the panel;
- The inserts are placed in the bases and secured to the side of the body.
The service life of these mechanisms exceeds permissible standards due to the reliability of the connections. To better understand the process of attaching a hinge to a cabinet, you need to have a good understanding of the types of fastening devices. Universal hinges on four hinges have a good margin of safety:
- the range of their opening angle when mounted on cabinet doors ranges from 90 to 165o;
- they can be adjusted in three different planes;
- The fastening device consists of two elements:
- the slats will be installed on the side wall of the furniture;
- the hinges will be screwed to the cabinet doors.
Types of fastening loops
Various hinges are used in cabinet assembly. The most common fastening devices are those with four hinges. In everyday life they are called frogs. These mounts fit all cabinets with doors:
They are divided into subtypes, depending on how they will be installed. The products have a wide range of applications and are used for all types of cabinets.
Before installing the fastening device, you need to take into account the features of the doors:
- for corner cabinets or cabinets of any configuration, choose hinges that will be fastened at an angle of 45° during installation;
- for a cabinet in which the doors are installed on the internal walls of the furniture without closing it, you need to choose an internal hinge;
- for cabinets in which both doors overlap a common side wall, you need to embed a semi-overlay hinge;
- the door designed to cover the sides of the niche is secured with overhead hinges;
- In addition to hinges consisting of 4 hinges, in furniture assembly practice they use fastening devices consisting of 2 parts that are connected by an axis;
- in order to be able to open the doors at an angle of 180°, you need to secure the device with inverse hinges;
- piano hinges with a simple mechanism are used for kitchen cabinets. They consist of steel or brass strips connected with wire. This type of fastening elements can only be installed in kitchen cabinets, since for other furniture this fastening will be fragile.
When choosing furniture fittings, it is important to remember that when installing hinges with four hinges, they are mounted to the side walls of the cabinet with self-tapping screws measuring 4x16 mm. In this case, the cup mount should have a diameter of 26 mm, and the holes will have the same diameter.
Preparation for installation
A process such as installing hinges on a cabinet involves several stages of work. First you need to determine what tools you will need. For installation you will need to prepare:
- pencil;
- level;
- roulette;
- screwdriver (screwdriver);
- drill;
- hammer;
- fasteners;
- self-tapping screws measuring 4x16 mm.
Installing furniture hinges: what you need
How to mark up
Before installing furniture hinges, markings are carried out and blanks are made for the subsequent stages of work: drilling and installation of the fastening device. To mark, it is important to know the number of hinges on the door. The answer to this question follows from the weight and size of the cabinets. To support heavy, oversized cabinets, you need 3 or more hinges. Lightweight wall cabinets will support two fastenings. Taking into account the recommendations given in the table will allow you not to worry about the strength of the fasteners.
| 45 | in trapezoidal kitchen cabinets, both single and double doors |
| 120-135 | for connecting two facades that come off like an accordion |
| counterclockwise opening hinges | used in rare cases when necessary |
| Item no. | Door size | Door weight | Number of loops |
| 1. | 200-250 cm | 20 kg | 5 |
| 2. | 200 cm | 20 kg | 4 |
| 3. | 100-150 cm | 15 kg | 3 |
| 4. | 100 cm | 9 kg | 2 |
You need to mark using a level, pencil and tape measure. Compliance with the following order of work will help make accurate calculations:
- fastening devices will be mounted 20-22 mm from the edge;
- the distance of the hinges from the ends of the door should be 70-120 mm;
- If you need to install more than two fasteners, first mark the outermost points, then evenly mark the remaining ones.
Hanging the facade
When the marking and installation of the furniture hinge is completed, the most difficult stage begins - attaching the door being installed to the cabinet body. Door hanging stroke:
- mark the installation sites for the mounting pads for the hinges;
- attaching a platform for securing hinges that are installed on the facade;
- hang the door to the side of the cabinet;
- connecting two hinge parts;
- adjusting the cabinet door relative to the cabinet using a screwdriver.
Hanging the door is best done on a flat surface. In this case, the side of the cabinet to which the canopy bar is attached should be located in a horizontal position. This creates a certain convenience when trying on and screwing the facade to the sidewall. After screwing it to the body, you can place the cabinet in a vertical position and make adjustments relative to the body.
Drilling
Having completed the marking, drilling is performed. When assembling furniture yourself, rely on the following recommendations:
- holes for the hinge bowl are drilled along the marking lines on the doors;
- the fastening device is placed in a niche and leveled to 180°;
- mark the installation points of the loops;
- drill the holes that are needed to attach the fastening device to the door;
- the door is aligned where it will be attached. Notes are made on the closet;
- holes are prepared;
- holes are drilled for the strike plate.
Installation of fastening loops
When installing a fastening device, it is important to know how to position it correctly; this determines the service life of the cabinet. We recommend placing the fasteners in one line so that the load on the hinges is even. If this requirement is not met, the hinges will not withstand their service life. All joints marked with an awl or sharp nail must be clearly visible. For these purposes, work surfaces are wiped. All work must be done thoroughly: excessive fuss can cause marriage.
Before fastening, a thorough check of all parameters of the location of shelves and cabinet doors is carried out. The ideal option is to draw up an installation sketch. If all elements are ready, you can begin installation:
- the doors need to be fitted to the sides of the cabinet at the markings;
- fix the door in a level place. Insert into the cups into the drilled holes and connect to the door. Errors must not be allowed: all elements must be connected exactly in size so that the door opens without effort;
- the strike plate can be attached vertically;
- When using fastening devices, they must be mounted “blind”; they should not have errors. It is better to do the fastening with an assistant;
- Having installed the hinges on the door, try them on the cabinet. They must match exactly. Points are marked on both sides. Correct connections will make the doors operate without problems;
- finish the job by checking connections.
There is no need to worry if the doors do not move easily when you first open them. The door leaves will develop over time, and after completion of work, the hinges are lubricated with machine oil and wiped with a soft absorbent cloth.
The nuances of installing furniture hinges on a glass cabinet door
Similar to chipboard furniture hinges with a 26mm bowl, special furniture hinges for glass doors are installed. Using the adjusting screws, you can align the facades in the “left-right” position up to 5mm, “top-bottom” up to 2mm and “closer-further” from the frame up to 2.5mm.
| A plastic bowl with a seal is inserted into the pre-drilled hole, and the hinge arm is snapped into it. |
| The strike plate is installed to the desired depth with an internal glass facade and to a depth of 37mm with an overhead hinge for a cabinet. |
| Next, to install the hinge on the glass cabinet door, you need to thread it through the striker plate and secure it with adjusting screws. |
The canopy adjustment for the glass door is made in the same way as for all four-hinge hinges. After alignment, a special plug (metal or plastic) is placed on the outside of the bowl mechanism.
Since glass with drilling is quite fragile, it is recommended to install additional dampers (closers) to soften the impact of the door on the body. You can implement a push-opening system by installing a magnetic pusher with applied metal handles on the top or bottom edge of the glass door.
Types of adjustment of fastening devices
What is adjustment and why is it needed? This is the elimination of a problem that arose during the installation of fasteners. Before carrying out it, it is necessary to carry out diagnostics in order to detect the problem. Having established the cause, you should slightly loosen the fastening bolt or tighten it more. Adjustments must be made whenever the doors begin to sag. This procedure has three varieties:
- depth adjustment is needed in rooms with uneven floors; it is necessary to loosen the fasteners or tighten the screw. A regular screwdriver will do just fine for this job;
- horizontal adjustment is required, especially if the floor is uneven, to eliminate the gap formed between the cabinet and the door;
- Vertical adjustment is needed to hang the doors at the desired level. The procedure is systematic: you need to adjust the position of the cabinet doors so that they do not sag.
The nuances of installation on glass sashes
The type of fastening devices specially produced for glass sashes differs from previous devices. On the glass doors you will need to hang special hinges that have a magnificent design and can be adjusted in three different planes. The device includes:
- an o-ring that needs to be screwed to the glass;
- decorative trim (it needs to be screwed to the side walls);
- fastening loop;
- a plug that closes the loop on the front side.
A simple option for glass doors can be hinge hinges, which include 2 parts: a plastic seal and a hinge. It is attached to the hole under the hinge and on the glass.
Installation on glass doors must be carried out taking into account the characteristics of the material. It differs from other types of fastening and has its own characteristics:
- make markings for installing fasteners;
- Drill holes in the cabinet frame with a drill;
- using self-tapping screws, insert a loop into the niche;
- Using clamps, connect the fasteners to glass or mirror;
- to protect the surface from damage, install rubber gaskets between the glass and the mount;
- Finally, tighten the fastener.
It is better not to drill the glass to prevent accidental chips and damage. This is fraught with the loss of doors.
Installing wide hinges is advisable on cabinet doors made of chipboard, since this is a loose material that will begin to crumble over time. To keep the mechanisms in working order, they need to be lubricated with machine oil from time to time to protect them from dryness and corrosion. In cases of door sagging due to the cabinet being in a damp room with uneven floors, it is necessary to adjust the fastening mechanisms.
Installing a fastening device on a cabinet door is a responsible job, but it can be done with your own hands. All its stages are doable. You need to pay special attention to the markings so that the product is pleasing to the eye and serves for a long time without failures or breakdowns.