DIY stepladder - master class
Step 1: Connecting the Racks
For the legs of the staircase, that is, its four supports, we will need 4 square or rectangular pipes (the latter option is more desirable). Their length should be the same. At one end of each we make through perforation with an identical indent from the end for all workpieces. Next, we simply connect the supports in pairs with long bolts with a short threaded thread at the end. Such fasteners will allow the supports to move freely in relation to each other, as if on a hinge.
Material for making stepladders
Step 2: Marking
We lay the folded pairs of supports in parallel and begin to measure equal sections from the bottom of the outer legs, making markings for future crossbars or steps. You can use any material for them: the same profile, reinforcement, corner. It is highly advisable to check the markings using a protractor so that the steps are strictly at 90° to the supports.
Measuring straight angles
The calculation of the stairs must be as accurate as possible so that there are no distortions.
Step 3: Welding the steps
We connect the welding machine to the mains, if you have an electric one, and insert the electrode into the holder; if the unit is carbide, then we refuel it and adjust the burner. It is better to start making a stepladder with your own hands with installation by spot welding. First, it is better to fasten the upper and lower crossbars, while checking the distance between the supports.
We fasten the crossbar
Then the intermediate elements are installed and fixed with points, according to the previously made markings. When the structure is assembled, we make sure that the parts are connected correctly and make welds.
We fix the steps by welding
Step 4: Installation of the crossbars of the second section
The second two supports also need to be connected to each other so that they do not move separately. Therefore, we turn the structure over, take 2-3 more pieces of the same material that was used for the crossbars or steps, and weld them onto the internal secondary racks at the top, bottom and in the middle.
We weld the internal secondary struts
For strength, you can add another piece diagonally between the crossbars. We attach a cable between the sections with enough slack to move the supports apart to the distance required for the stability of the structure.
Step 5: Welding on the base crossbars
At this point, the manufacture of the stepladder could be completed if it is used only for the home. However, in an area where there is little hard surface, such as asphalt or tiles, the supports will easily fall into the ground, especially after rain. To avoid this, we take two more profile trims and weld them from below onto the ends of the legs, connecting the outer and inner stair legs in pairs.
Making the ends of the legs
However, there is one inconvenience in using a rectangular pipe - it can become clogged with earth. Therefore, in order not to do extra work by welding the ends of the profile, it is better to use a corner, especially if this particular material was used on the steps. The stepladder is ready.
Ready stepladder
Homemade stepladders of complex design
Universal stepladders and transformers were mentioned above. Making them yourself is much more difficult, however, if you still have such a desire, it is better not to use a steel profile for this purpose. For universal-type structures, the optimal material is aluminum, and small transformers that turn into interior items are more conveniently made from thin duralumin tubes. The connection is bolted, possibly with anchors rather than ordinary nuts, in order to avoid self-unscrewing.
In fact, even that stepladder, the manufacturing description of which was given earlier, can be made universal, that is, turning into an attachment. If the safety cable is made removable, one section in relation to the other can rotate 270°, that is, a position is possible when all the supports are in the same plane. If you unfold the ladder and weld powerful bolts on the outer sides of its legs in the knee area, so that the latch is on one section and the receiving bracket is on the other, you will get a reliable fixation. All that remains is, if necessary, to rotate one section 180°, click the bolts, and you will have a long extension ladder in your hands.
Types of stairs that can be made from profile pipes
Profile pipe is the most durable material for creating frames for buildings of any type, including stairs.
From the profiles the following are performed:
- A flight of stairs is a structure of two beams located at the same level, on which steps are installed. Beams or stringers support the steps from below. The staircase can be single-level or two-level, when it consists of two rows in one flight.
- Spiral staircases consist of one stringer, around which steps are attached, secured on the other side with railings. The complex design is steep and not very convenient, which few people can decide to do on their own.
- Bolts - stairs, the steps of which are attached to a solid wall with bolts or bolts. In this case, only one stringer beam from the profile is used.
- A stepladder is an attached mobile ladder for performing certain tasks: performing any actions at a certain height. Such a ladder should be stable and, preferably, light, so that it can be easily moved to the right place without exerting extra effort.
Types of stepladders
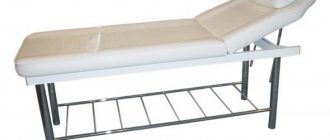
The stepladder can be one-sided, or it can be made of two parts. Stability in the first case is achieved simply by the wall, which serves as a support.
In the second case, the stepladder does not need support; both parts are installed at a certain angle of inclination and fastened together with a canopy that holds both parts. In addition, for fixation, the ladder can be secured with an additional belt, which prevents the parts from changing the angle of inclination, i.e. moving apart. Both parts can be the same, or one of them can be made simply as a support, without steps.
The first type is the simplest ladder, consisting of two parallel supports, between which rungs are attached. This device is lightweight, although it is quite durable and quite simple to make. A double-sided stepladder is not much more complicated, so making such a structure with your own hands does not seem difficult.
Dimensions and drawings for folding stepladder
A do-it-yourself wooden stepladder should be made safe and convenient for ascent and descent.
Optimal criteria for placing crossbars:
How to choose the right steps for a shelving stepladder
If you decide to make your own wooden stepladder in the form of a cabinet, folding chair or a more complex transformer, then choose a design with stringers. This is the name given to the wide load-bearing sidewalls of stairs. They work well as a base with a low center of gravity. The depth of the top step should be at least 10 cm if you intend to place the cabinet close to the wall during work. That is why the stringers and supports of stepladders are made to protrude slightly beyond the rear edge of the top step. A stepladder rack made of lighter timber may lose strength when the width increases to 1 meter at the bottom.
Stepladder height according to drawings and in reality
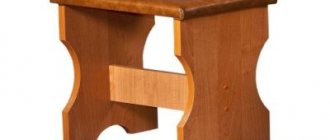
DIY step stool
In this example, we will show how a small number of boards can make an excellent stepladder-chair. We chose a folding model due to its increased functionality and simplicity of the device.
The stepladder stool consists of the following parts:
- seat;
- support post;
- ladder;
- connecting strips.
The most convenient and reliable design is one with the following dimensions:
- the distance between the strings of the stairs is 48 cm;
- the maximum distance between the bowstring and the support post is 60 cm;
- seat height - 60 cm;
- seat dimensions - 30x50 cm.
For comfortable use of the ladder, two or three steps are enough, located at a distance of 15-20 cm from each other. From the floor to the bottom step and from the top to the seat, the distance is also 15-20 cm.
Seat
We will need 5 cross slats and 2 base slats. First you need to treat the surface so that the wood becomes perfectly smooth. Then the slats are fastened together. At a distance of 5 cm from the edge, lines are drawn on both sides, and a groove is made using a cutter, the width of which is slightly less than the thickness of the base slats. Next, the transverse bars are fixed to the base slats. For structural strength, the joint is glued. The finished seat is shown in the picture below.
Support part
To make the supporting part, we need 5 slats, two of which are guides, two provide horizontal connections, and the fifth rail serves to increase the strength of the structure by connecting the guides at an angle.
All connections are made using dowels. To do this, holes are drilled at the ends of the slats, the diameter of which is slightly smaller than the diameter of the dowel. Matching holes are also made in the rack-racks. To ensure the strength of the stool-ladder, the joints are glued. The end result was the back of the stepladder.
When installing the support post, you should remember that the distance between the guide rails must be such that the seat support rails can be secured between them.
Making stairs
Please note that the flight of stairs will be fixed at an angle, and the steps must be positioned strictly horizontally, so the grooves for the steps should be made at an angle. To determine the angle, it is recommended to assemble the structure without steps and without connecting rails on a flat surface
Set the distance between the string and the support post to 60 cm and, by adjusting the angle of inclination of the structure, ensure that the seat is positioned strictly horizontally.
If necessary, reduce the length of the bowstrings and support posts so that the seat height is 60 cm. Now the structure must be secured using connecting rails and the lower ends of the bowstrings and support posts must be cut at the desired angle. Next, mark the position of the steps and make recesses using a router. If you attach both strings to each other, as shown in the photo, you will clearly see the symmetry of the grooves for the steps.
The width of the steps is 44 cm, and the depth is 15 cm. The grooves for fastening the steps should have a width slightly smaller than the thickness of the step. Fastening is done using glue and self-tapping screws.
Installation of stairs
To assemble a step stool you need to connect all the parts together. Final installation is carried out in the following sequence:
- the ladder strings and support post guides are attached to the seat. The upper ends of all slats must be rounded, otherwise they will cling to the seat when folding the structure;
- the slats for connecting the ladder and the support post are fixed at one end on the bowstrings, between the seat and the upper step, the other ends are fixed in the middle of the support posts.
The finished stool-ladder is coated with three layers of varnish. It is recommended to cover the steps and seat with a large number of layers
It is important to know what varnish to cover the stairs with, the durability of the product will depend on this
In order for the staircase chair to serve you faithfully for many years, it is recommended to periodically update the protective coating during operation. If there is no need for the ladder at the moment, it can be folded and hidden in a dry, warm place. Try not to leave the product outside, especially in damp and cold weather, which has a detrimental effect on the structure of the wood and will lead to premature damage to the stairs.
Why do you need a transformable staircase?
The transformable folding ladder has expanded functionality, which makes it ideal for repairs of any complexity, household and special work. Thanks to universal designs, repairs can be done on your own, without purchasing expensive professional equipment such as scaffolding.
Where are they used?
Folding stairs are widely used in both domestic and public places to facilitate access to storage areas for various goods.
A universal ladder is most effective in any conditions, since the functionality allows you to adjust the height, slope and shape of the ladder.
Such stairs are widely used in the following functional areas:
- Finishing of ceilings and facades, installation of roofing and drainage systems.
- Installation of lamps, chandeliers, partial or complete replacement of electrical wiring.
- Work in the garden, crowning trees, harvesting.
- Access to attic and upper shelves.
Making a stepladder from timber
Prices for various types of timber
timber
To make the most primitive one-sided stepladder, you will need bars with a cross-section of 6x4 centimeters:
- 2 meters long - 4 pieces (support posts);
- 59 centimeters long - 2 pieces;
- 54.5 centimeters – 1 piece;
- 50 centimeters – 1 piece;
- 45.5 centimeters – 1 piece;
- 41 centimeters - 3 pieces;
- metal fasteners with loops – 2 pieces.
Step-by-step instruction
Step 1. Identical markings are applied to the two support posts to which the steps will be attached. The distance between the steps will be 40 centimeters, the lowest step will be located 10 centimeters from the bottom edge of the support.
Marking
Step 2. According to the applied markings, you need to select grooves one and a half centimeters deep in the long beams, and cut “spikes” of the same size at the edges of the steps (the photo below shows what we are talking about).
Inserting steps into grooves
Step 3. The support posts need to be put up with their grooves, aligned with each other and begin assembling the main part of the stepladder. There should be a distance of 40 centimeters between the upper ends of the bars, and 60 centimeters between the lower ends. Step bars must be inserted into the prepared grooves and hammered in with nails or secured with self-tapping screws.
For greater reliability, the steps can be “grabbed” with a couple of bolts or nails
Prices for the range of drills
Drill
Step 4. Next, the second half of the stepladder is assembled - both parts are connected between the Z-shaped support. The support beams can be connected to the main beams using wooden choppers coated with wood glue.
Support on the side of the stepladder where there are no steps
Step 5. You need to put rubber pads on all four legs of the stepladder or firmly glue pieces of thick elastic - this way you can prevent the ladder from accidentally sliding on smooth surfaces.
You can purchase special pads for furniture
Step 6. The support with steps and the support with the crossbar must be connected, and then metal locks with hinges must be screwed to the upper ends so that a drop-down structure is obtained.
Before tightening the fasteners tightly, try on both halves of the ladder
Step 7. The finished structure can be coated with a transparent varnish or impregnation that protects it from moisture. This way you can wash the ladder with a wet cloth, or you can work on it outside even in rainy weather.
If desired, the stepladder can be painted with oil paint
Prices for oil
Oil paint for exterior use
Errors when making stepladders
Assembling a wooden stepladder is a simple and intuitive job. Depending on what functions the finished product should perform, you can focus on its size, appearance, and configuration. If work needs to be done quickly, for example in a garden plot, in just half an hour you can put together a temporary stepladder from two long boards and shorter crossbars - steps.
However, if you want a stepladder that will last for many years, it is better to give preference to metal models. For the same reason, wooden stepladders are very difficult to find on sale. But if a wooden structure suits your idea, make it yourself.
Features of aluminum structures
Stairs made from an anodized aluminum frame are considered by professionals to be an ideal option for homesteading. A special layer reliably protects the structure from corrosion and significantly increases the service life of this product. To ensure safety, a corrugated surface is made on the steps, and the staircase supports are equipped with anti-slip rubber fragments.
The main advantages of stepladders - transformers:
- strength;
- multifunctionality;
- compactness;
- safety
If the steps become loose during operation or you simply want to strengthen the structure, you can install corners under the steps on both sides and place them on 4 self-tapping screws, 2 in the step and 2 in the supporting structure.
Finishing touches
After making sure that the parts are made accurately and, if necessary, adjusting them with your own hands, the stepladder is disassembled and coated with a protective agent. The ladder can then be completely assembled. First, dowels are made from wood, 70 mm long and 8 mm in diameter. You can make them by planing them from a fragment of a board with a plane. For fastening, holes with a diameter of 7 mm are made in the racks and crossbars.
The finished dowels are greased with PVA glue and hammered into the holes. The remaining parts can be sawed off. Iron corners are attached to the top of the stepladder with self-tapping screws, and the plates are fixed to the upper stop.
To make the screws fit into the wood more easily, you must first prepare the holes with an awl.
Despite the relatively large weight of this structure, thanks to its trapezoidal shape, the homemade staircase is comfortable and stable. You can make other types of stepladders with your own hands. Share your own recommendations for making a stepladder by leaving a comment.
Source
DIY folding stepladder chair
The folding model is made somewhat more complex than the previous version, but it has a more sophisticated look and, if necessary, can be transformed into a regular chair.
Figured elements are cut out according to patterns. The edges are processed using sandpaper. The moving part is connected to the fixed part using piano hinges. With certain skills and patience, you can make a similar design with your own hands.
Another alternative could be a design consisting of a stool and a movable module, which is hidden under the seat when folded. The module consists of two stages and is pulled out using guides, according to the same principle as drawers. The details of this staircase are shown in Figure 10.
The ladder chair consists of the following elements:
- 4 legs 10×72.5 cm;
- 2 upper legs 3.8×18 cm;
- 2 lower legs 10×42 cm;
- 2 upper drawers 12.5x34.5 cm;
- 1 lower drawer 10.5×34.5 cm;
- top step 27x25 cm.
All parts have a thickness of 19 mm. To make the side trims you will need 2 sheets of plywood 3 mm thick with dimensions 17x25 cm.
The retractable module consists of the following elements:
- 2 medium legs 10 cm wide and 47 cm long and two small legs 10 cm wide and 21.5 cm long;
- 2 step rails 10 cm wide and 40 cm long;
- 2 front step drawers 9 cm wide and 22 cm long;
- 1 rear step frame 10.5 cm wide and 30 cm long;
- 2 steps 18 cm wide and 29.8 cm long.
All parts have a thickness of 19 mm.
To make a ladder chair you will also need:
- guides - 2 sets, each 31 cm long;
- fasteners: dowels, dowels, screws;
- sandpaper;
- glue, putty, paint or furniture varnish.
You also need to stock up on tools: a hacksaw, a jigsaw, a plane, a drill, a grinder and clamps.
First, legs are cut out from pre-polished blanks 10 cm wide, as shown in the drawing below.
Then the legs and plywood overlays are cut out.
Next, depending on the chosen type of fastening, you need to select grooves for the dowels or drill holes for the dowels and connect the middle legs. The junction is cut at a slight angle. The corners of the legs are rounded, which will help prevent them from chipping.
The drawers are cut out, and their upper ends must be beveled at an angle of 80°. All steps are also cut out, after which their edges are slightly rounded. On the bottom step it is necessary to make corner cuts of 3.8 by 3.8 cm, as shown in Figure 10.
When all the parts are ready, the step stool is assembled with your own hands using dowels and screws without the use of glue. This is necessary to identify and correct possible flaws. Assembly is carried out in the following order:
- large legs are connected to the upper legs using screws;
- the upper drawers and lower drawers are attached and the upper step is mounted;
- The middle legs are assembled in pairs, the legs are attached to the outer side of each pair. The resulting nodes are connected by drawers;
- small legs are attached with screws to the legs and connected by a drawer. We strengthen the remaining 2 steps.
If all steps are performed correctly, you should have two parts of the stool. Now you need to install them the way they will be connected, and attach a guide to the outside of the movable legs, and its rear ends should be located at the same level as the rear edges of the legs. The entire process of attaching the retractable mechanism is shown in the figure.
To avoid distortion, we install the front edges of the moving steps in one line, after which they are completely pulled out into the groove of the prongs and the free parts of the guides are secured.
We check how well all the moving parts of the stool work and make adjustments if necessary. When everything is finally adjusted, the stool is disassembled and reassembled using wood glue.
The finished product is covered with transparent putty. After it dries, apply 3 layers of varnish. The plywood overlays are painted, after which the functional and aesthetic ladder stool is completely ready for use.
Where to begin
In order to make such a chair with your own hands, you need basic knowledge and ability to work with tools and wood. And you don’t need to start with practical work. If you have such talent, you can create the plans for your own transformable staircase chairs.
If not, then you can use those that can be found in abundance on the Internet or in magazines on home improvement or apartment improvement. The created drawings will help you organize all the necessary work step by step, select the right material and avoid fairly common mistakes. What kind of drawings can there be? Here are some of the most popular:
A stationary stool - a ladder - is the simplest and easiest option to implement. It can be made with a minimum supply of knowledge and tools. And even if it is somewhat large, there is no doubt about its functionality. This design consists of an ordinary stool, which is supplemented with several functional details. A drawing of this elementary design can be found on the Internet and you can see what the final design should be. To make it you will need the following parts:
- Legs in the amount of four pieces of different lengths in pairs;
- Planks installed across;
- Wide board for making a seat;
- Boards for making steps;
- Both bolts and ordinary nails can be used as fasteners.
The short legs should rest on the floor at an angle of 90°C, and the long legs should stand at an angle of 70°C. The long legs are fastened together by three boards. It is they who will subsequently act as steps in the created ladder. The steps can be glued into specially cut recesses, but if there are doubts about strength and reliability, you can additionally use nails.
The short legs are also attached with transverse strips, and the seat itself is attached to the top. If you fasten the planks with bolts or hinges, you can make the structure fold.
Step stool
Stepladders, like any other folding structures, have one undeniable advantage - they are convenient to store. When folded, the device can be placed in a closet or even simply hidden behind the interior door.
The stepladder chair is compact and easy to install.
But still, storing traditional stepladders requires some space. But modifications that fold into a stool or chair can be so compact that they do not take up any space at all. But their height is also small. Creating a stepladder chair with your own hands from wood is not particularly difficult. You will need boards 45 mm thick and bars 35x45 mm. Fasteners include screws or nails, as well as wooden pins.
To completely save space, such a stepladder can be transformed into a chair.
The compact design will require careful attention to the manufacture of parts and assembly. The drawings contain dimensions that must be observed. Otherwise, folding and unfolding the step stool may become difficult or even impossible.
Step stool chair drawing.
The design parts should not interfere with each other when moving. The two lower steps, similar to a small chair, rotate on pins. When folded, they fit inside the stool. It is possible to provide additional fasteners - a lock that secures the structure in the unfolded state.
Stepladder chair in harmonious condition.
Making a wooden stepladder chair. https://www.youtube.com/watch?v=TKzwnDsXsu4
Multifunctional option
It happens that a stepladder, being an absolutely useful device, spends most of its “life” idle. But you can build a stepladder with your own hands, the scope of which will be much wider than usual. A table, an easel, a gazebo and a bed are what can be created using the design described below.
The stepladder table will serve both for eating and for housework.
So, to make supports, take one and a half meter boards, 60 mm thick, 180 mm wide. The steps are also made from boards. You need to select grooves in the supports for attaching the steps. The support is equipped with a crossbar; additional holes are drilled to allow it to be rearranged. A special feature of this design is the hinged connection. The edges of the support boards are sawed off at the required angles, and the support boards are screwed to the upper ends. The lower edges of these boards are connected by a piano loop. With this design, the stepladder does not need additional devices to protect its supports from moving apart. The piano hinge with support boards is guaranteed to hold the unfolded stepladder in the working position. The staircase drawing also contains schematic drawings of structures obtained on its basis.
Drawing of a stepladder table.
Work on the manufacture of wooden stairs
We take a plane in our hands and process all the boards. Next, we cut the racks to lengths of 2.77 and 3 meters. Those bars that are shorter are used to make steps. You will need eight of them of different lengths (0.46 m; 0.49 m; 0.52 m; 0.54 m; 0.57 m; 0.6 m; 0.63 m; 0.66 m). Plus, you need to prepare two crossbars for them, from which you can later make the stepladder stops.
We mark a groove of 2.5x3.5 centimeters for steps 0.2 meters from the top, the next ones every 0.33 meters from the previous one. We also make marks on those bars that will go to the stops, 2.5 and 83 centimeters from the top edge. Then we take a chisel and a hammer and carefully make windows in the intended parts.
On the long and short bars, we make markings for inserting tenons 6 cm long. Using a hacksaw, we make cuts across the cut, retreating from the edge 6 cm. After that, we cut along the lines until they connect with the first ones. Then we place the outer crossbars in their nests and hammer in the nails. Just don’t be zealous – let the hats peek out. We also number all the steps from the end.
We insert two fixing strips into the sockets on the stops. We cut out tenons on the steps, pull out nails from the first and last ones, and then assemble the stepladder from wood. To ensure that the tenons fit into the grooves as tightly as possible, we tap them with a mallet.
Gluing and assembly
After all these procedures, you need to disassemble the ladder and begin priming and painting. We make small holes with a diameter of 7 mm in the stop and racks. You will need special dowels, which we make from boards and round them using a plane or knife, achieving a diameter of 0.8 and a length of 7 cm. We coat them with PVA glue and insert them into the holes.
Using self-tapping screws, metal corners are attached to the top of the wooden ladder, and the iron plates are screwed onto the upper part of the stop. If you don’t have a screwdriver and have to work with a screwdriver, then first make a hole in the board with an awl. You can also use a drill with a 1mm drill bit and then easily screw in the screw.
What are the advantages of a wooden stepladder?
- Firstly, by starting to make such a staircase with your own hands, you save on purchasing a ready-made one in the store.
- Secondly, you are unlikely to find a wooden stepladder for sale; you won’t even find a similar photo in catalogues.
Today, the market has been conquered by aluminum products, which are very lightweight. But, despite the fact that the resulting structure has a lot of weight, it benefits from stability.
You can use a ladder both in your garden and in your home when wallpapering walls. And if it is treated and painted, it is unlikely to deteriorate in the next 10-15 years. By spending a maximum of one day building a stepladder, you will provide yourself with an important and necessary item in your home and household.
Preparing to make a stepladder
A folding stepladder may be needed for various purposes. If you are assembling a ladder for use in a garage, some utility room or for a large house, then its dimensions should not be small. It is worth considering that a person must not only reach the top point he needs, but also be able to freely do the work. Accordingly, the first thing you need to do is calculate the height of the future structure.
The optimal height for a regular household stepladder is about 1.5 – 1.7 meters. Taking into account the average height of ceilings in houses and apartments, an adult will be able to reach the very top, even standing on the penultimate step.
Don’t forget to add the average height of a person to the height of the stepladder
If you plan to reach higher from a stepladder - for example, to the tops of fruit trees or the roof of a private house, then the recommended height of the ladder should be from 2.5 to 3.5 meters. It is not advisable to make a longer stepladder - the product will turn out to be bulky, and the excess consumption of materials will cost a pretty penny.
Examples of the height of stepladders and the number of steps in them
Another important parameter that needs to be calculated is the tread. A tread is the width of one step. For ordinary stairs used in an apartment, the tread can be made within 25-30 centimeters. If the stepladder will be used for repairs, or for harvesting or regularly lifting and lowering loads, it is better to increase the tread to 30-35 centimeters. Please note that a stepladder needs steps not so much to climb them, but to perform some actions at height, so the support should be as wide as possible.
Mini stepladder with comfortable steps
As for the length of the steps, it changes for a stepladder - the higher the step, the shorter it is. The classic design is assembled according to the principle of a truncated pyramid. We recommend making the longest steps about 55 centimeters in length, and the top ones – 35 centimeters. Such parameters will be enough to make it convenient to both climb and descend the stairs.
The last nuance is the number of steps. You can decide this yourself so that you can feel comfortable using the stepladder. Typically, a distance of about 20-25 centimeters is maintained between steps. You should take into account the overall height of the stepladder and the angle at which its “legs” will move apart—the steepness. If the whole number of steps does not fit, then the interval between the penultimate step and the working platform must be reduced.
The final product should be comfortable, first of all, for its owner
How to assemble a large stepladder
In order to make a staircase from a board with your own hands, you need to prepare the following tools:
The materials you will need are a 50x30 mm block. Both the racks and the steps of the stairs will be made from it. The total length of the beam should be about 13-14 m. Specialized companies usually sell lumber in standard lengths of 6 or 12 m.
Therefore, most likely, you will have to purchase three bars of 6 m. But the remains will certainly come in handy later on the farm. Sometimes wooden stepladders are assembled not from timber, but from 25x80 mm boards. In this case, you will also have to purchase three pieces.
In addition to lumber, to assemble a wooden stepladder with your own hands, you will need to buy various kinds of additional elements (bolts, knitting needles, corners, hinges, glue, etc.). Before starting work, the timber or board should be thoroughly treated with an antiseptic.
Stepladder sketch
Before you start assembling, of course, you need to develop a drawing of the future folding staircase. It should be taken into account that it should be narrower at the top and wider at the bottom. This will give the structure stability.
You can also not bother with developing a circuit and find a ready-made one on the Internet. Or use the drawing presented in the figure below. Next, a description of the assembly of just such a ladder will be given.
How to make bowstrings and steps
Do-it-yourself wooden stepladder stands are made as follows:
- Four strings 150 mm long are cut from the timber. Two of them will support the steps, two will go to the supporting part of the stepladder.
- Grooves 2 cm deep and 2.5 cm high are made in two bowstrings across the entire width of the beam. The middle of the first groove from the top should be located at a distance of 12.5 cm from the top of the bowstring. The next ones - in increments of 29 cm.
- In two racks intended for support, three of the same grooves are made for jumpers. One is placed at the height of the first future step of the stepladder, the second - at the level of the last and the third - in the middle.
Those ends of the racks, which will subsequently be located on top, should be rounded, removing sharp corners. The lower edges should be cut at such an angle that the stepladder is stable when unfolded, and then covered with rubber. This operation can be carried out immediately, or after assembling the stairs.
The steps of the stepladder are cut according to the drawing. That is, in our case, their length will be 37, 42, 47, 52, 57 and 50 cm. In each of the steps you need to make spikes on both sides 2.5 cm thick and 2 cm long.
Assembly of the working part
At the next stage, the steps are inserted into the grooves of the racks. The tenons can be pre-coated with wood glue. The grooves in the bowstrings must be made in such a way that the tenons of the steps fit into them as tightly as possible. Otherwise, the stepladder may become loose later.
The spikes of the steps are driven into the grooves of the racks using a hammer. After all the steps are installed in place, they are secured with bolts from the end through the bowstring.
If the stepladder is assembled not from timber, but from boards, you need to act a little differently. In this case, it will not be possible to make grooves. The thickness of the board is simply not enough for this. On such stepladders, the easiest way is to attach the steps to steel corners with long shelves screwed to the bowstrings.
To make the folding ladder as reliable and durable as possible, the strings of the working part can be additionally fastened with knitting needles. In this case, holes are drilled under the grooves. After installing the steps, spokes are inserted into them and tightened on both sides with bolts.
Assembling a stepladder
After the supporting and working parts have been assembled, they need to be connected to each other. This operation is performed using hinges or brackets. At the final stage, a restraining chain is attached at the bottom of the stepladder. It will not allow the supporting and working parts to diverge too widely.
How to choose material?
There are a great variety of wood options suitable for making stepladders. When making a choice, you need to take into account not only the functional features of the future product (height, how much weight it should withstand, number of steps), but also the moment of storage. If a portable ladder will be in the apartment all the time, and there is no way to hide it, it is advisable to give the stepladder a decorative look. It is advisable to make the “apartment” staircase so that it fits into the overall interior of the room - for example, make a stepladder in the form of a transformable chair or one that can be used as a stand for flower pots.
In this case, you need to choose a type of wood that has a beautiful texture and matches the rest of the furniture, doors or other design elements. The finished product can also be varnished, wood oil or stain, and painted in the desired shade.
Stepladder on which indoor flowers are located
If the stepladder is hidden from prying eyes, the external features of the tree are not important. Much more attention should be paid to its “working” qualities - hardness, resistance to cracking and rotting. Pine is considered the most durable, long-lasting, and at the same time inexpensive tree, and a stepladder made of pine boards will serve faithfully for several years, even if used in a dacha or local area.
When purchasing material for a future stepladder, you need to understand that this structure must withstand the weight of an adult, as well as some cargo: tools, containers of paint, and the like. Therefore, the wood should be dense, moderately dry, and not have chips and, especially, cracks.
You should not skimp on material for a stepladder - a product made from low-quality wood will probably break
Table No. 1. Characteristics of popular lumber
| Wood | Description |
| Pine | The most common lumber, which is very convenient to process. Pine is resinous, so it is not afraid of moisture and does not rot for a long time. The soft structure of such wood accepts and absorbs various varnishes, stains or impregnations well. |
| Spruce | Light and durable, spruce wood is good because it very tenaciously “holds” all kinds of fastening materials - bolts, screws, nails. Spruce is less resinous than pine, but has a larger number of knots. This type of wood is well suited for making stepladders. |
| Oak | Wood that is traditionally used to make luxury furniture - the shade and texture of oak looks luxurious and attracts the eye. A well-made oak staircase can retain its functionality for decades, but such wood is too expensive to make a stepladder from. |
| Birch | The density and strength of birch lumber is average, and the finished product will have the same indicators - over time, a birch ladder can become rotten, if the air is too dry, it can crack, and wormholes also appear in the birch. But, at the same time, the material lends itself well to processing, is perfectly polished and absorbs paints and varnishes. |
| Cedar | This is a fairly expensive material, but heavy, dense and reliable. At the same time, cedar lends itself well to carpentry, and products made from such wood can be used for a long time in unfavorable street conditions, and nothing will happen to them. |
| Aspen | This is a soft and pliable wood with a uniform structure, in which there are practically no knots. However, aspen lumber is considered porous, which makes it difficult to make small parts. An aspen staircase is easy to saw and assemble, but it will not last too long. |
| Linden | Linden materials are very popular among many carpenters, because this wood practically does not undergo final shrinkage, which means it does not crack or warp. At the same time, the structure of linden wood is dense and viscous, so the finished products do not rot or get wet. |
| Larch | This wood is so dense in structure that building materials made from it even sink in water. At the same time, larch practically does not rot, and wood-boring beetles do not grow in it. The downside is that larch is not easy to process, but for making a rough and massive stepladder, such a tree is perfect. |
Important point! Particular attention should be paid to the degree of drying of the wood. If the wood is not dry enough, or, on the contrary, is too dry, nothing can be made from such material, much less a staircase. After a certain time, such pieces of wood will “lead” and using such a stepladder will be extremely risky.
Purchased boards should sit at room temperature for several days.
Operating rules
Finished wood products need to be treated with an antiseptic to protect them from moisture.
The finished staircase looks neat, but this appearance does not last long if the product is not impregnated with protective compounds or painted. Bacteria penetrate the wood fibers and rotting begins.
Wood pre-treatment rules:
- the first layer of impregnation is applied and left to dry for a couple of hours;
- soak a second time and also wait 2 hours;
- use varnish to get a beautiful look and shine. The product can be used after 2 days.
If ladders are transported in cars, they are secured in such a way as to prevent them from moving around the body and not to damage the outer layer of paint. Before use, after a break, check the functionality of the structural components and visually inspect for the appearance of cracks or chips.
Place the ladder on a flat, vertical and reliable surface; both upper ends must have a stop.
Processing of the finished structure
A stepladder, made by hand from wood, needs processing. Wood is a material that is quite sensitive to many environmental factors. To prevent the processes of deterioration and rotting, the product must be coated with an antiseptic composition. Stain is perfect for these purposes. It is better to process the parts before starting installation.
At the final stage, the finished staircase is processed again. This time, drying oil is used. After the layer has dried, paint or varnish is applied.
A wooden stepladder, made by yourself or purchased in a store, will help make home life more comfortable and also decorate the interior.
Tools and materials
To make a portable ladder, the first step is to choose a building material. Considering the conditions of its operation, it must have a high degree of wear resistance.
For these purposes, mainly coniferous wood is used, which combines strength and low cost. However, professionals advise spending money once, but buying high-quality oak or maple beams. Their service life is much longer than coniferous ones.
To work you will also need a small set of tools and materials:
- saw;
- self-tapping screws;
- screwdriver;
- roulette;
- antiseptic;
- wood glue;
- rubber shoes for support.
Video of making a step stool with your own hands
Nice thermal panel theme! Quickly warm and reliable! There are also thermal panels made of ceramic concrete that made the office simply cool.
I built a house from aerated concrete and am going to cover the outside with thermal panels. Who has already installed them? How are the results? Or it may be easier and cheaper to make a wet facade, although it is not.
Thanks for the detailed instructions! I have an old washing machine lying around at my dacha. It will be necessary to use the motor from it to create an emery machine. Unity
This style reminded me very much of the film The Great Gatsby, in which the interiors of houses and apartments in the 1930s were decorated very luxuriously and pompously. Of course, this was a prerogative.
Types of stepladders
Stepladders are made from various materials, including wood
When making stepladders use:
- tree;
- metal (iron, steel);
- aluminum alloys.
Wooden construction is considered the simplest, but not very practical. Under the influence of climatic conditions, wood loses its appearance and properties, which does not have the best effect on the product.
Metal stepladders are strong and durable. They are inconvenient to use because they weigh a lot and take up a lot of space due to their size.
Aluminum products are the best option. They are reliable, small-sized and lightweight.
- a simple stepladder made of timber;
- step-chair;
- multifunctional transformable staircase.
A simple stepladder made of timber
To make an ordinary garden staircase, you will need 4 beams 2 m long with a cross-section of 60x40 mm for support posts, as well as about 14 meters of timber with a cross-section of 60x30 mm for steps and crossbars.
1 – support pillars; 2 – steps; 3 – crossbars and jib; 4 – limiter.
Steps and crossbars must be of the following dimensions:
- 59 cm (2 units);
- 54.5 cm;
- 50 cm;
- 45.5 cm;
- 41 cm (3 units).
Marks should be placed on the two support bars in the places where the steps will be attached. The lowest mark is located 10 cm from the edge. The interval between the remaining marks is 40 cm. Then, taking into account the markings, five grooves with a depth of 1.5 cm are made.
Having completed the preparatory work, we proceed to assembling the main part of the structure. To do this, we place the support posts with the grooves up and align them so that the distance between the upper edges is 40 cm, and between the lower edges - 60 cm. The steps are inserted into the grooves and fixed with self-tapping screws. An additional crossbar is attached to the reverse side.
In order for the ladder to stand, it is necessary to make a support. Since it does not have steps, the support posts are connected to each other by two crossbars: upper and lower. The design is additionally equipped with a jib
When making a support, it is important to maintain a distance of 30 cm between the upper ends of the stand
The final stage is connecting the two parts. In relation to the main part, the support is placed so that its upper edges are between the last step and the additional crossbar.
This design does not require fasteners from above. And the lower ends of the ladder can easily be moved to the required distance.
Step stool
This type of staircase is very compact and does not require much storage space. Thanks to its attractive appearance, it can easily be considered an element of the interior of your apartment.
Option with reclining backrest. General view and drawings.
When assembling the structure, you need to be extremely careful and observe all the dimensions indicated in the drawing. In properly assembled structures, parts move freely and do not interfere with each other.
The wooden ladder stool can be equipped with an additional locking fastener that secures the device in the desired position.
Multifunctional transformable staircase
A design that, with a slight movement of the hand, turns from a stepladder into a table for eating, a gazebo, or a bed. This versatility will make life in the country much easier.
Transformable staircase diagram
To make support posts for stepladders, take boards 1.5 m long, 6 cm thick, 18 cm wide. The grooves for the steps are selected in them. The support is supplemented with a crossbar, which can be rearranged into specially drilled additional holes.
A distinctive feature of the folding design is the hinged connections. The edges of the supports are cut down at the desired angle. Thrust boards are attached to the top ends, and the bottom edges are connected with a piano loop.
The transformer can be used by adults and children. So, kids use it as a stand for drawing. To secure paper sheets, the design includes a plywood shield.
A stepladder can easily be turned into a table by installing a plywood panel for the table top. You can also make a gazebo or ironing board out of it.
Material for making shelves and racks
There is nothing better than wood, even the most ordinary pine. It is usually used for the manufacture of load-bearing frames and facade cladding. Any substitutes cannot compare with wood in terms of warmth of tactile sensations and natural beauty of texture. You don’t even have to paint it, just match the color of the interior with varnish or stain to highlight the design.
Along with natural ones, sawn timber from waste – chipboards or laminate – are widely used. Their advantage is that the industry produces many different colors and textures of such materials that imitate stone, valuable types of wood, and they are much cheaper in price.
There are several types of shelf material
Plywood is also used in the manufacture of furniture - a composite multilayer material characterized by durability and low price. You can make a supporting frame from it by painting it in the desired color or using PVC film with an imitation texture. In some cases, when the structure must be particularly rigid (for example, for a wardrobe), it is allowed to include metal elements in it. It is not recommended to make a bookshelf under the stairs completely from metal for 6 or more books; it is better to include in the design individual elements made of chromed steel and glass, creating a stylization for one of the modern design trends.
The finishing touch in the manufacture of the stairs should be finishing: painting, varnishing, pasting with decorative film or paneling. It is produced at the very end, when the operation of all components and mechanisms is checked and the assembly is completed. This gives the structure its final look, after which you can safely begin operation using a convenient multifunctional staircase.
Source