What do we need
To sew a chair cushion with your own hands you will need:
- textile;
- filler;
- rubber;
- buttons;
- tailor's scissors (especially for fabric);
- wire cutters for cutting threads;
- sewing machine;
- measuring tape;
- pins;
- marker, pencil or fabric chalk.
Materials for the pillow
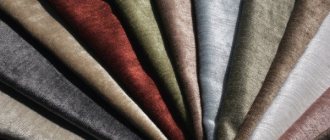
To sew a product that will last a long time, choose durable fabrics, for example, satin, flock, cotton, rep. For chairs that will be located outdoors or in a cold room, wear-resistant felt is suitable. You need to prepare the fabric so that it is slightly larger than the size of the chair seat. But we will determine this later.
Choose the color of the fabric so that it matches the design of the room. If the pillow should serve for convenience and not attract attention, choose calm, monochromatic shades.
But often removable pillows on stools are used to dilute the interior and add zest to it. In this case, choose the color and material carefully.
Fabric with an unusual pattern or bright colors will do, it just depends on your taste.
Don't forget to find threads that match the fabric of your choice.
There are various fillings for chair cushions, the following are usually used:
- Sintepon. The material is hygroscopic and hypoallergenic.
- Holofiber. This is a hypoallergenic, wear-resistant material that does not absorb odors and has thermoregulating properties.
- Latex. Durable and deformation-resistant material. For stuffing pillows, so-called latex crumbs are used.
More decorative elements will be needed. But it is better to avoid rhinestones, beads and stones, as they are impractical when using a seat. You can sew buttons onto the product. They will not only decorate the product, but will also prevent the filler from forming lumps. Prepare the most ordinary buttons, because they will need to be covered with fabric, and there is no point in expensive and beautiful ones.
Pattern
Making a pattern is very simple. To calculate the size of the fabric, measure the diameter of the chair for which you are going to sew a pillow.
When you fill it, the size will decrease slightly, so the material needs to be calculated with a margin. For the volume of the product you need to add 2.5 cm on each side of the diameter of the chair.
Thus, if the diameter of the stool is 35 cm, add 5 cm to it, it turns out that you need a square of fabric with sides of 40 cm.
Fold the cut square in half, and then in half again. In our case, the length of the sides of the folded square is 20 cm. You should also get a side length equal to half the diameter.
Now take a measuring tape and a marker (or pencil, chalk). Your radius will need to be laid out over the entire quarter of the square (for us it is 20 cm). Measure the length of your radius on the tape and attach it to the lower right corner of the fabric diagonally to the left, make a mark.
That is, the diagonal from the mark to the lower right corner should be equal to your radius. Then turn the measuring tape to the sides, like a compass, and make several more such marks throughout the quarter.
Connect the marks into a single line, a quarter circle should form.
Take scissors and cut the fabric along the resulting line. Cut the material, you should get an even circle. Do the same with another piece of fabric, since for one pad we need two identical circles.
Sewing process
The pillow needs something to hold it on the chair. An ordinary rubber band will help us with this. Its length should be equal to the diameter of the stool, in our case - 35 cm. Take one of the previously cut circles of fabric and attach an elastic band to its edge, secure it with a pin. We do this on the front part of the material. Pull the elastic a little and secure it on the opposite side.
Place the second circle face down. Connect the two circles with pins. Then they need to be stitched, but leave a 10 cm hole. This is needed so that the product can be stuffed with filler.
Operate your sewing machine slowly so that if wrinkles appear, you can smooth them out. Then you will get an even line.
Turn the pillow inside out and straighten it out. On one side we have an elastic band, on the other we will sew buttons. Fill the product with filler through the hole left. Distribute it well inside. If you need a voluminous seat, then fill it more tightly. But for chairs, as a rule, flat versions are made.
Now you need to sew up the hole. Tuck the seam allowances inward and secure with a pin. Next, you can sew the stitch on a sewing machine or sew it by hand. The last option will be more accurate.
Take a needle and thread that matches the color. Insert the needle from the edge of the hole so that you can hide the knot inside. Next, move like a snake: first grab 1-2 mm from one side of the fabric, and then from the other. Once the hole is sewn shut, remove the pin and distribute the filler evenly once again.
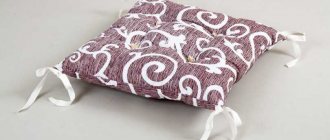
The handmade pillow is ready. All that remains is to sew on the buttons.
Buttons
Choose the number of buttons yourself. It could be one large one in the center or three or four small buttons.
The buttons need to be trimmed: this way they will look more beautiful and become comfortable when using the pillow. Let's look at the simplest way to do this:
- Cut a circle from the fabric whose diameter is 2 times larger than the button.
- Take a thread and a needle and place a circle over the button. Insert the needle from the wrong side of the fabric (you need to step back 1–2 mm from the edge).
- Grab the opposite edge of the fabric from the front side. The button should be inside.
- Do the same with the remaining two sides.
- Now you need to connect the formed corners. Hook them with a needle along the edges on opposite sides and sew.
- The button for the pillow is ready. Sew the rest of the buttons in the same way.
On the pillow, mark with a marker the points where the finished buttons will be sewn. Distribute them so that they are an equal distance from the edge and from each other. Take your thread and needle again and push it through the inside of the button.
Next, in the marked place, pierce the pillow right through with a needle. From the reverse side, bring the needle back to the front part and tighten the thread so that the button goes inside and creates a beautiful volume.
Then pick up the button and again bring the needle to the back of the pillow, tie a neat knot there. Do the same with the other buttons.
Now is the time to try on the finished pillow. To ensure that the product holds well, hook the elastic band through the two legs of the stool.
This work will not take much time, but you will make the chairs soft, comfortable and beautiful with your own hands.
Source: https://bespoked.ru/blog/sshit-krugluyu-podushku-na-stul/
Patchwork
An original seat cushion can be created using the patchwork technique. The lightest elements are squares and triangles. This technique is very simple and a beginner can easily handle it. You can use a variety of color options and combinations, while creating unique patterns.
Now let's start sewing a seat from scraps, we will need:
- Several pieces of cotton printed fabric in different colors;
- Roller knife and cutting mat;
- Sintepon;
- Six buttons with a diameter of 28 millimeters;
- Six buttons with a diameter of six to ten millimeters;
- Ruler, scissors;
- Needle and thread;
- Sewing machine.
On a note! If you don’t have a specialized roller knife, you can use scissors when cutting.
Completing of the work:
- We cut out the details.
We select fabrics that match each other.
The sides of the seat consist of 24 squares. Based on this, we need 48 squares. For fabrics from this example it turned out: fabric with flowers - 24 pcs., green with leaves - 6 pcs., white with leaves - 6 pcs., pink with polka dots - 6 pcs., pink with leaves - 6 pcs.
We make squares with sides of nine centimeters.
- Sewing a pillow.
We lay out the squares on the table in the same way as they will be located in the finished product.
Then we sew the squares together.
If everything is done correctly, the back side will turn out very neat.
We sew the squares for the second side of the seat in the same way.
Then we cut out strips whose lengths will be equal to the length of the sides of a rectangle sewn from squares, and the width will be six centimeters.
We sew these strips to each side of one rectangle, with a seam allowance of six millimeters.
Please note that due to the seams, the strips turned out to be slightly longer than the rectangles; these will be seam allowances.
We sew stripes along the lines, as shown in the image below. We do this with all corners.
Now we sew the second side. Don't forget to leave a small hole so that you can turn the product inside out and stuff it with padding polyester. Then we sew it up with a hidden seam.
Then all that remains is to sew on the buttons and at the same time tighten the seat a little with them.
Patchwork is a fashionable technique for creating various decorative elements, characterized by simplicity and originality. Crafts and serious products using the patchwork technique are created not only from fabric, but also from tiles or wallpaper. First of all, of course, they use sewing and textiles. Anyone can create unique patterns from bright colors and geometric shapes with their own hands. The sizes and purposes of products for the home can be very different, but, in any case, handicrafts will provide comfort and beauty to the home interior.
The patchwork technique is based on the mosaic principle; the essence of the pattern is to compose a picture from small details. An important plus is that there are no costs for purchasing material, since everything that is needed for work can be found in the attic or closet. What can you make from such a set with your own hands? Things in the patchwork style are stylish curtains, bedspreads for a sofa or bed, napkins for the table, blankets, rugs, seats, cosmetic bags, wallets, crafts... You can swing at furniture (ottoman, sofa or designer chair). Patchwork will decorate the headboard of the bed. The patchwork technique is perfect for making covers for sofas, armchairs and chairs, decoration (cup, teapot, original tablecloth for the table), rooms (colorful panels). Other ideas for the home will be suggested by the photo.
Homemade handicrafts and crafts using the patchwork technique allow you to beautifully and simply create original interior elements, breathe new life into old things, filling your home with bright colors and a sense of celebration. The patchwork technique involves 2 methods and different patterns. Applique - fragments of multi-colored scraps sewn onto a base of plain fabric, sewn into a specific composition. Decorative stitching can be contrasting or matching. Or many pieces are put together into a certain product like a puzzle.
DIY chair seats - 59 photos of seat decorations
All those products that are made independently are unique and quite colorful. They will decorate any interior, add a touch of individuality, and help in decorating the room.
One of these elements is chair seats. They do an excellent job of decorating furniture and adding to the creation of a cozy, homely atmosphere.
- The scope of application of such pillows is different; they will harmoniously fit into any room or design.
Accessories
Such covers are used to decorate furniture and make it more attractive in appearance. They are also needed from a practical point of view, because they are a protective barrier against various types of damage.
With their help, the chair becomes more comfortable and softer in its design. The appearance of such a product changes dramatically for the better.
If necessary, you can not attach the accessory, but use sewn or knitted pillows. If you want to remove them, or replace them with newer ones, then you can easily do this.
What are patchwork pillowcases
Today, the most common product among patchwork designs are patchwork pillows. And needlewomen give particular preference to sewing decorative pillowcases.
Before you start sewing, you should apply the finished patchwork design to the fabric. After this, the pillowcase pattern must be transferred to the canvas, folded right side inward. Be sure to leave allowances for fastening.
In order for the pillowcase to fit perfectly into the interior, it is important to choose the right style in which it should be made. It won't be a problem with so many great ideas out there and it won't take much time.
By starting to create such pillowcases, even a beginner can quickly learn patchwork sewing and, over time, acquire good skills in the production of other patchwork products.
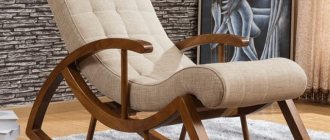
DIY chair cushions from different materials
25.05.2017
Stools and chairs with seats are found in almost every home, in the bedroom, kitchen and other rooms. In many designs, the backrests are hard and sometimes uncomfortable. A DIY chair cushion will be the best solution for convenience and comfortable sitting. A decorative element - DIY chair cushions will attract the attention of guests at home, making them want to use them.
But if you don't yet know how to sew a chair cushion, check out this simple tutorial. Removable pillows serve not only as a means of convenience, but as a decorative decoration and easily fit into the design of the room.
Today there are many known ways to make chair cushions, including they can be sewn, crocheted to suit every taste and choice of housewives. There are also various fastenings for finished products, including simple fabric ties, rubber bands, and Velcro, which depends on the desired effect.
Recommendations for making a chair cushion
In order for the chair seats to meet future expectations, it is important to take into account the recommendations of the masters, and you can attend a master class:
- Before starting work, decide on the choice of fabric. Soft covers for a stool, made by yourself, will be functional and at the same time beautiful. In this case, you should choose a material or thread for crocheting that is wear-resistant, resistant to friction, and paint fading;
- decide on the color of the material, which is important for creating a unified decorative composition. Sewing products can be combined with other textile elements in the interior, in particular, sofa upholstery and curtains. Fabrics with unusual patterns and various decors will give the product a certain style. This technique of sewing pillows, such as patchwork, deserves attention, creating a vintage style. For garden stools and chairs, for example, you can decorate them with crocheted cushions.
It is important to consider the functionality of the element when choosing fabrics, style, decoration methods and accessories. Decorative stones, beads and other decorative details will not be practical for everyday use of the pillow.
1st stage 2nd stage 3rd stage 4th stage Round cushion for chair
Simple sewing method
To sew your own pillow with your own hands, we offer a short step-by-step guide:
- Choose a cotton fabric of your choice based on color and match it with threads to match, filling made of foam rubber or other materials, and accessories for fastening (buttons, zippers, Velcro).
- Take the dimensions of the seat of the structure, cut out the foam rubber, and cover it with a simple fabric for the blank.
- Draw patterns of two parts on paper with and without a one-piece strip. The pattern is constructed taking into account seam allowances so that foam rubber does not have to be placed in the middle. We transfer the constructed part to the fabric.
- We cut out blanks from the fabric, and then sew them around the perimeter using a sewing machine, which can be seen in the photo.
- For a seat with a back, sew fasteners, Velcro and zippers separately as desired.
To know how to make the right cushions for stools or chairs, you need to correctly measure the seats and select functional materials.
1. Make a pattern 2. On the fabric we cut out 2 parts for the future pillow, do not forget about the seam allowances. Next, we apply the pattern to the soft foam rubber and cut out the plate of the desired shape 3. Using a machine, we sew together 2 parts of the pillow. We turn the cover inside out on three sides, place the foam inside 4. Carefully sew up the fourth side by hand 5. All that remains is to attach the ties to the 2 corners of the pillow A simple chair cushion
We make volumetric seats for chairs:
Stage 1 Stage 2 Stage 3 Stage 4 Stage 5 Stage 6 Volumetric seats for chairs
Currently, there are a huge number of ideas for sewing and knitting chair cushions with your own hands. Author's, designer sets, which we sew with pleasure and soul, will definitely transform the room, fill it with comfort, warmth, and will be incomparable with factory products.
Crochet pillows - brief description
The original cushion seat is perfectly created by craftswomen who know how to knit or crochet. Regardless of which instructions you like, such products are always original and pleasant. Experts recommend a simple description of crochet covers for garden chairs, armchairs, and stools.
Take, for example, the remains of yarn and a hook No. 4, or No. 4.5 mm. In the photo you can see how individual strips are knitted with a double crochet and connected into a single composition. They can be knitted in different colors, but the quantity depends on the size of the structure.
To decorate and elevate a standard-sized chair, it took 22 strips, 11 of which are assembled into a single fabric and tied around the edge, after which we connect other strips with air lifting loops, knitting subsequent rows with double crochets.
It is recommended to knit with a tight knit so that the fabric does not move around on the seat.
Or this option:
Square knitted pillow for a chair This is the kind of pillow you should get. Cape “Granny Square” Scheme of a granny square
For craftswomen who are better off knitting than crocheting, you can also create seat fabrics in original patterns. If desired, you can create a whole set of pillows and seats for every taste and in various colors with your own hands. Chair cushions can lift your spirits and be as useful as possible when used.
Source: https://infomebli.ru/kuhnya/stulya/podushki-na-sidenija-svoimi-rukami.html
Knitted products
Knitted items evoke feelings of warmth and softness, and chair covers create a special charm and attractiveness.
Option one
We will need any threads, of any composition and different colors. We will do the knitting with crochet.
The diagram below will help you visually suggest how to knit:
For knitting we will use the “popcorn” pattern. Since stools are often square, when creating them we will knit two elements from one arch in the corners. We collect eight air loops with a chain and close them into a ring with a connecting column. In the 1st row we make three air lifting loops, then we knit four double crochets from the ring. After this, we form a cone and remove the hook from the working loop. We insert it into the third lifting loop, then again into the working one. In order to assemble a series of columns into a cone, we pull the working thread through the 1st loop.
Related article: List of fabric composition abbreviations in alphabetical order (table)
We knit four chain stitches and five double crochets from the ring. We pass the hook through the top of the 1st column, and then into the working loop through the top of the 1st column. We do this twice. We finish the row by knitting four chain stitches, connecting column into the 1st cone. We knit the second row. We make three air lifting loops. We knit two cones from the arches, making four air loops between them, and three air loops on the sides of the square. The first cone will consist of instep stitches and four double crochets, and all other cones will consist of five double crochets.
In the third row we knit two cones from the corner arches, and between them there are four air loops. On the sides of the square we make three air loops, then cones from the arch and three air loops. Finish the row with a connecting column at the top of the 1st cone. We knit all the next rows in exactly the same way, not forgetting to knit two cones from the corner arches. And on the sides of the square you need to knit 1 cone from the arch every three air loops.
We select and combine colors depending on the colors used in the interior. The cover will look more harmonious and brighter if you use the brightest yarn in the center, and then gradually move to dark tones towards the edges. To change the color, you need to knit the row to the end, cut and fasten the thread, then attach a thread of a different shade.
After the square reaches the size of a stool, we knit two more rows of cones without increasing the corners. When making the last row, we knit the cones through two air loops. This will make the edges of the cover narrower.
All that remains is to put the cover on the stool and fix the corners along the bottom of the seat.
Related article: DIY fabric paintings on the wall: diagrams and master class with photos
Option two
An original chair cover can also be knitted; let’s look at this method in detail using the example of the cover shown in the photo below.
The size of the chair for which knitting is performed is shown in the picture below.
In this version, knitting is made from natural wool; you can also use acrylic threads with wool or cotton.
How to sew pillows on chairs: 4 master classes - Master classes on BurdaStyle.ru
These pillows are made from vinyl. You can also use artificial leather, thick cotton, linen, or upholstery fabric for such pillows - a material that holds its shape quite well. The design of the cushions is as simple as possible: they are square and suitable for chairs with a seat of the same shape. Here the role of the filler is played by a pillow of a suitable shape; you can take padding polyester or holofiber.
You will need:
- - vinyl or other material that holds its shape well;
- - square pillow;
- - braid for ties;
- - pencil, chalk or fabric marker;
- - scissors;
- - tailor's pins;
- - sewing machine and thread.
Step 1
Place the pillow on the material laid out on the work surface and determine the size of the parts: the pillowcase should fit the pillow quite tightly (the fit allowance is 1-1.5 cm). Add seam allowances and cut out two identical pieces.
Step 2
Cut two pieces of ribbon for the ties, each 30-40 cm long. Place the pillow pieces with the right sides facing inward. Mark the places where the pillow will be tied to the legs of the chair or the slats of the backrest. Fold each piece of braid in half and place it between the pieces at the marked points so that the fold protrudes 1 cm. Pin the ties.
Step 3
If you want the outer edges of the pillow to be rounded, mark these lines. Sew a stitch around the entire perimeter, leaving an opening for turning inside out. Trim off excess material at rounded corners and cut out corners (see photo). Turn the pillowcase inside out, place the pillow inside, and sew up the remaining hole.
Photo and source: abeautifulmess.com
Simple fabric pillows with buttons
For such pillows, you can take a thinner material than for the previous project. The buttons on the pillow not only serve a decorative role, but also hold the filling in place, helping the pillow maintain its shape.
You will need:
- - fabric for pillow;
- - braid, ribbons or fabric for ties;
- — 4 large buttons (in this case on the stem) + fabric for covering;
- — material for stuffing (sintepon, holofiber, synthetic padding);
- - ruler;
- - pencil, chalk or fabric marker;
- - scissors;
- - a long needle for hand sewing and strong thread;
- - sewing machine and thread.
Step 1
Measure the seat of the chair, add 2.5-3 cm on each side + seam allowances. Mark 2 identical pillow pieces on the fabric and cut them out.
Step 2
If necessary, round the corners on one side.
Step 3
If you are sewing ties from fabric, cut out two strips of 50x5 cm. Fold them in half lengthwise and sew them, and then turn them out, helping with a stick. If the ties are made of braid, cut 2 pieces of braid to the required length. Treat short ends.
Step 4
Measure the distance at which you need to sew the ties, fold them in half (or cut them in two) and sew them to the front side of one of the parts at the marked points.
Step 5
Place the pillow pieces right sides together so that the sewn ties are between the pieces, and sew the pieces around the perimeter, leaving an opening for turning inside out. Cut off sharp corners by retreating 2 mm.
Step 6
Turn the pillow inside out, stuff it with stuffing and sew up the hole.
Step 7
Cover the buttons with fabric.
Step 8
On one side of the pillow, mark 4 points for sewing on buttons.
Step 9
First, secure the place where the buttons are sewn with thread, and then sew on the buttons. Ready.
Photo and source: diycandy.com
Cushion + soft backrest for a chair of complex shape
This master class in the selection is to show how to make a pillow and a soft back for a chair or hard chair with a slightly more complex shape than a square or trapezoid.
You will need:
- - fabric for pillows;
- - foam rubber;
- — sheet synthetic winterizer;
- — 2 zippers;
- - braid for ties;
- — marker for templates;
- - breadboard knife;
- - pencil for paper;
- - chalk, pencil or fabric marker;
- - scissors;
- - a large needle for hand sewing and thick threads;
- - sewing machine and thread.
Step 1
Make pillow and back templates from cardboard.
Step 2
Using the foam templates, cut out 1 piece each for the pillow and backrest.
Step 3
Cut out parts from padding polyester using ready-made foam rubber parts as a template. Please note: you need to add allowances. To calculate their width, divide the thickness of your foam sheet by 2 and add 2 cm (for example: the thickness of the foam is 4 cm, which means we add 4/2+2=4 cm on each side). For the pillow and for the back, cut out 2 identical parts from padding polyester.
Step 4
Place the foam piece between the padding polyester parts and hand-sew the padding polyester over the edge.
Step 5
Cut out the fabric using cardboard templates. Add sufficient allowances (focus on the thickness of the foam rubber and the thickness of the padding polyester, do not forget the seam allowances). Cut out the details: 2 identical for the pillow and back.
Step 6
If you want the covers to be removable, sew in zippers. One of the simplest ways to sew a zipper into a pillowcase is here.
Step 7
Sew the covers around the perimeter, turn them inside out and place the filling inside.
Step 8
Mark the places for the ties. Cut 2 pieces of braid to the required length (about 40-50 cm), trim the ends and sew them to the pillows by hand (see photo). Ready!
Photo and source: diydecormom.com
Chair cushions with anti-slip backing
If you need to sew cushions on chairs of a design that does not allow you to tie the soft seats to the legs or backrest bars, you can use an anti-slip carpet coating. It is better to sew a simple pillow and take materials that hold their shape well (see master class 1).
You will need:
- - material for pillows;
- - foam rubber;
- — sheet synthetic winterizer;
- - anti-slip tape or backing for carpets;
- - breadboard knife;
- - scissors;
- - pencil or fabric marker;
- - sewing machine and thread.
Step 1
Make a pattern and cut out a piece of foam rubber according to it.
Step 2
Wrap the foam rubber with padding polyester as described in steps 3 and 4 of Master Class 3.
Step 3
Cut out the fabric pieces and sew the cover as described in steps 5, 6 and 7 of Master Class 3.
Cosmetic bag and wallet in patchwork style
An ancient type of needlework - patchwork - is at the peak of popularity today. It is fascinating, first of all, for its variability, like, for example, a wallet or a cosmetic bag - crafts in the Japanese style with origami elements.
To make it yourself you need to prepare:
- Two types of main fabric;
- Washable fabric for lining;
- Zipper – 34 cm;
- Zipper hanger;
- Non-woven fabric;
- Threads – contrasting or matching.
Pre-treatment of the material: to avoid deformation, the patchwork fabric must be washed and ironed.
When everything you need is at hand, you can start sewing the product:
- Let's prepare templates: a circle Ø 16.5 cm, a circle Ø 14 cm and a square with a side of 10 cm. The smaller circle and square must be cut out of plastic or hard cardboard.
- We cut out the blanks: circle 16.5 - 19 parts from one main fabric. Square - 19 parts from another main fabric and 19 parts from non-woven fabric.
- We assemble the patchwork according to the diagram in the photo. Gather a large circle, stitch finely, with an allowance of 3 mm along the edge. Leave the tails of the thread long so that the template can be pulled together.
- We place a small cardboard circle in the center of a large one, basted from the inside out. Pull evenly, tightening the ends of the basting. Iron it, maintaining the shape of the part. After cutting the basting, carefully remove the template and iron the part.
- Place a square piece in the center of the circle, on the wrong side, and iron the protruding edges of the circle onto the square.
- We connect a square of another main fabric with non-woven fabric, put it into the workpiece and iron it. We secure the product with stitches, retreating 2 mm from the edge.
- Use the blanks to assemble a cosmetic bag or wallet.
- From the fabric for the lining, cut out a rectangle 42x52 cm. Fold it in half, sew the side seams with an allowance of 1 cm. The result is a piece 40x26 cm. Along the bottom edge, measure 7 cm from each edge and form folds, sew.
- Fold your cosmetic bag or wallet inside out. Fold the top 1 cm flush with the front side, secure with pins and baste.
- We sew the zipper by hand, securing the two parts of the cosmetic bag, the end of the zipper (4 cm) should hang down.
- Sew a handle for the zipper (2 parts), turn it inside out and cut off the corner.
- Iron, tucking the edge inward. Insert the free end of the zipper and sew it up.
Using the same principle, you can make not only a patchwork cosmetic bag or wallet with your own hands, but also a handbag, a phone case, and various crafts in the style of Japanese patchwork.