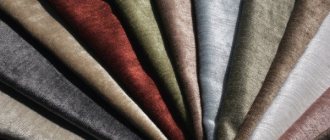
Current breeds
It is clear that any array will do for making crafts. However, joiners and carpenters warn that poplar, common in the city, is an energy vampire and a quickly drying tree. Hardwoods like oak, walnut and maple are best used for making complex items. But conifers are just right for thematic creativity due to the following features:
- Release of a pleasant aroma;
- Rot resistance;
- Ease of machining.
However, in addition to pine, spruce and larch, you can try soft linden or light birch. However, it is unlikely that if someone wants to make wood crafts for their home, they will want to understand the origin of dead wood.
Hanger
Any boy over 10 years of age can make this product. The process must be supervised by an adult. Making a hanger is quite simple, and it will not only decorate the hallway for a long time, but also be useful.
To create a fake you need to prepare:
- 3 boards 10*70 cm;
- 2 boards 15*40 cm;
- 2 metal corners;
- 3 hooks;
- screwdriver;
- self-tapping screws;
- paint or varnish.
DIY crafts from boards: an example of a simple hanger made of three boards. Drawing of a hanger made from boards.
The hanger execution algorithm is the following sequence of actions:
- Carefully paint or varnish the boards on all sides.
- Take 3 boards, lay them out on a flat surface so that there is a gap of 5 cm between them. Place one of the boards measuring 15*40 cm on top of them. Use a screwdriver and self-tapping screws to secure the structure.
- Screw metal corners onto the sides of the horizontal board. Attach a free board to them.
- Screw 3 hooks under the top of the hanger with a screwdriver.
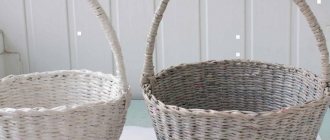
Branches, logs, circles
The size and shape of the craft matter. The fact is that these indicators influence the choice of consumables:
- Medium and small branches - suitable for making frames, vases, lampshades and shades;
- Logs - perfectly folded into large structures for decorating a country landscape;
- Circles - serve as the basis for internal cutting with subsequent filling of finished holes.
If working with branches welcomes the use of pruning shears, a small hand saw, an awl and a hammer, then it is very difficult to do DIY wood crafts for the garden without an electric jigsaw and an ax.
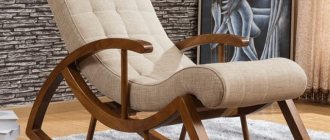
How to make garden furniture
Even if you don't have the same artistic talent, to avoid spending money on garden furniture, try making it yourself. Sometimes it really is as simple as shelling pears and does not require any drawings or diagrams. Ordinary boards and bent metal legs – that’s your coffee table. For such projects, you can also take small bars that are laid in a checkerboard pattern.
Logs folded in a certain order - here you have chairs and a table.
Dry wood will make an original hanger. In extreme cases, a log with “hooks” made from branches will do. Remove the bark, treat with antiseptics, and paint it the color you want. When you're done with your project, remember to "plant" the tree on a sturdy stake with a heavy base.
Frame of branches
The smaller the workpiece, the easier it is to make. On the other hand, the level of difficulty is influenced by originality. The frame of branches is proof of this. Its creation occurs in stages:
- First, four branches with a diameter of about 10 mm are cut or sawn;
- Next, the branches are adjusted to the dimensions of the future frame;
- The next step is to attach the sticks to each other so that their edges protrude outward (felt rope is used to wrap the sticks crosswise);
- Next, a paper, fabric or leather base with an image is attached to the frame.
The plot is secured using glue or staples. The frame remains to be supplemented with a rope for hanging.
Frame
Frame: Mix it up Marci / YouTube
A minimalistic frame made from natural materials will look stylish. No glass is required for this craft.
What you will need
How to do
Take four branches and glue them together to form a rectangle. If some of them seem too long, use your hands to break them down to the desired size.
Frame: Mix it up Marci / YouTube
Apply a drop of glue to one of the corners of the workpiece.
Frame: Mix it up Marci / YouTube
Wrap twine around the joint of the branches. Throw the end of the rope to the corner that is opposite diagonally. Secure it with glue. Cut off the excess.
Frame: Mix it up Marci / YouTube
Wrap the second corner with thread too. When finished, secure the end of the twine with glue so that the workpiece does not fall apart.
Frame: Mix it up Marci / YouTube
Do the same with the other two corners of the frame. As a result, the ropes will intersect in the center of the structure.
Frame: Mix it up Marci / YouTube
Frame: Mix it up Marci / YouTube
Prepare a photograph. If necessary, trim it.
Frame: Mix it up Marci / YouTube
Place the image so that its middle is at the intersection of the ropes. Secure the card with tape at the back.
Frame: Mix it up Marci / YouTube
Details are in the video:
What other options are there?
For this frame you will need cardboard and a lot of thin branches:
Here's how to turn driftwood into a stylish photo holder:
Vase of branches
Flexible and thin wood gives any product chaotic patterns. Therefore, craftsmen often make original vases from branches. The latter can be made in different ways:
- Winding branches of equal length around the pipe, followed by fastening the bottom to the walls of the vessel;
- Weaving different branches together until you get a complete vase.
The easiest way is to weave a vase from willow vines. On the other hand, armed with a glue gun, you can fix the branches to each other in different places so that simple DIY wood crafts do not break under the load.
We create simple and amazing wood decor with our own hands
People have been decorating their homes with their own hands since ancient times. At first, craftsmen used the gifts of nature for this, then they learned to make things from metal, and in the era of the development of the chemical industry, many synthetic materials appeared, which are successfully used in modern design.
Of course, it is stupid to refuse the conveniences that have appeared with the development of industry and new technologies in the production of furniture and decorative items, but I really want to revive the house, create a special atmosphere of comfort and peace in any room with the help of natural materials! And the best material for this at all times has been and remains His Majesty wood.
Real masters create magnificent carved panels, exclusive solid wood furniture, and amazing paintings in the marquetry style. To implement the most daring ideas in the interior, you need skill, artistic taste, special tools, knowledge and skills. But anyone can make simple decorations with their own hands.
Lampshade made of branches
Artificial shades place a large load on the lamp. Another thing is a lampshade made of branches. Having prepared 50-100 branches 40-70 mm long, you can start making it:
- First, the balloon is inflated;
- Next, the ball is trimmed with branches by gluing the latter to each other;
- The next stage is releasing air from the balloon;
- Next, all that remains is to build a lamp into the round lampshade and hang it from the ceiling.
But first, it is better to make easy wood crafts for beginners, including a small table lamp with a lamp and a battery.
Wooden flowers
Stages of work:
- Use pruning shears to cut off several small branches of birch and apple trees (you can also use other tree species). The diameter of the branches should be about 0.5 cm.
- Use a knife to trim the branches and sharpen them like pencils.
- Roses made of wood. To create “petals” from shavings, a sharpener is used to sharpen the branch, like a pencil. The dimensions of the flower are determined during the manufacturing process.
- Coloring. Many people like unpainted roses, but if necessary, they can be given different colors using watercolors. To begin with, it is worth experimenting with painting on waste shavings, since after applying paint the color of the product can change significantly.
- Trunk of a flower. Green paper should be crumpled up to form a ball with a diameter of approximately 3.5 cm. Wrap it with thread of the same green color. Make a hole in it with scissors. Pour some glue into the hole, coat the tip of the cinnamon stick with glue, and then insert the stick into the hole.
- Assembly. Next, the roses are glued to the ball, and the gaps between them are masked using colored threads or sisal.
- Flower pot. The most affordable option is a plastic cup. Wooden pots or a regular cup are also used. The pot is wrapped in colored paper, which is fixed with glue and then with linen thread.
- The final stage
- The entire structure in the pot is fixed with plaster or clay. Their surface can be painted or covered with moss.
In addition to wooden ones, crafts made from tree leaves are no less popular for DIY projects.
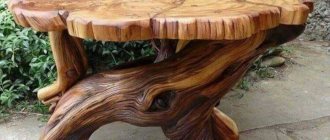
Log structures
The logs are very strong and massive. They are useful for assembling cars, motorcycles with sidecars, benches and other structures on which you can sit in the yard or garden.
Logs are often sawn into many round pieces to decorate walls and create decorative pendants. The latter become beautiful thanks to:
- Painting;
- Burning;
- Gluing rhinestones.
By stacking round timber with each other, you can get a romantic heart or a huge star. This decor is appropriate for walls.
Note!
- Crafts for February 23: master class on creating interesting DIY crafts for Defender of the Fatherland Day
DIY crafts for February 14th step by step: a master class for beginners, with a description of how to make a craft for St. Valentine's Day. Valentina (140 photos)
Crafts made from jute: 100 photos of beautiful options. Easy instructions with photos and descriptions on how to make a craft with your own hands
DIY wooden interior
Here's some wooden wallpaper made from cross-cut logs. Cut blanks from thick branches of dry trees. Attach them to the wall using liquid nails. Open with varnish. The original eco-decor is ready!
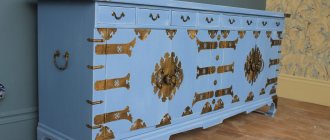
One craftsman decorated a chest of drawers with bark rings - it looks original and fabulous!
And this is a family of wardrobes for a walk - the decor is unusual, and it’s suitable for storing all sorts of little things.
Don’t throw away the legs from old furniture, maybe someday you’ll use them to make a new centipede coffee table. Funny and original.
And these three multi-legged tables were created by Korean designer Chul An Kwak. The idea for two of them was inspired by galloping horses, and the third was a gift from a working excavator.
Two old chairs can “give birth” to a new bench. Place them opposite and cover them with boards so that the beautiful backs of the chairs serve as bench arms.
Circle decor
Circles are the same round timber, but with a larger diameter. Accordingly, you can create different patterns in them, as demonstrated by individual photos of DIY wood crafts.
But before you start cutting, you need to arm yourself with an electric jigsaw, drill and imagination. Creative thought will help create a plot. A drill will be needed to drill holes that will serve as the basis for cutting in the jigsaw. The latter directly creates plot patterns.
home furnishings
Complex paintings made of wood are aerobatics. Wood's best friend is epoxy resin. Although you will need a lot of it, it is worth it.
Create an unusual pattern from small logs and fill it with resin. An interesting option would be to install a small colored light bulb inside before the resin hardens. You will be surprised when you see the result. Products combined with epoxy resin get a classy look and attract attention.
It is very easy to make toys for the New Year's holiday from wood. Saw various figures and glue photographs to them.
All this will add creativity to a cozy environment. Real craftsmen have bookends, try it, maybe you have talent too?
Decorative circle for watches
The finished circle with a diameter of 100-200 mm can be used as a dial. All that remains is to purchase a themed kit, which includes:
- Numbers;
- Arrows;
- Mechanism with battery compartment.
However, this set can be removed from worn-out wall clocks, which are always in abundance at the flea market.
Kitchenware
There are a large number of crafts that can be made for the kitchen. The most functional of them is the kitchen board.
To create it you will need the following tools and materials:
- board;
- sandpaper;
- electric jigsaw;
- pencil;
- burner.
Next, you need to perform the following algorithm of actions:
- Use an electric jigsaw to give the board the required size. Carefully sand all edges with sandpaper.
- Use a pencil to mark the future drawing. If necessary, you can use a stencil.
- Use a burner to process the drawing.
A stand for various small items will look unusual in the kitchen interior. Such a product will add a touch of eco-style or emphasize it.
Photos of wood crafts
Toolbox
You can create order in your area using the same boards. Other building materials and household utensils can be easily hidden from prying eyes if you construct wooden boxes from timber. No special technique required. The work is carried out according to the scheme: sketch, measurements, execution of the frame and cover. This design will not stand out from the overall interior, while it will hide some objects from neighbors.
Unusual and useful ways to use table salt at home and in the garden
What else can be made from leftover wood?
There are many ideas on where to use the remaining building materials. You can use the examples above or come up with your own. I would like to supplement the article with some more thoughts that will be useful in the household. The timber makes excellent swings for children, benches, arches and flower pots, a booth and feeder for animals, interesting hedges and fences.
Wooden elements will only add warmth, beauty and originality to your yard.