Types of key holder
There is no strict classification in this household item. Most often, key holders are divided into different types based on location:
- Pocket ones are carried in pockets and bags;
- Wall-mounted ones are attached to the wall.
There are options that combine a key holder and a shelf or bedside table. Such items can be open or closed, but keep in mind that constantly opening and closing doors will quickly get boring.
Depending on the material, the key holder can be made from:
- Trees;
- Plywood;
- Metal;
- Plastic;
- Glass.
It can be simple or exquisitely complex. The simplest options are made from wood, presented in all its many varieties.
From improvised means
To store keys, you don’t have to build a whole house; improvised means are enough, and in this section we will show you which ones.
Related article: Crochet double crochet on an air loop: diagrams with photos and videos
The first option for storing keys is a simple wooden board. Nail ordinary twigs and twigs to it (you can use a board on which small twigs grow). Just sand it well and varnish it. The most important thing is that the tree is not dry, and that the branches can withstand the weight of your keychain.
The second option is boletus mushroom - this is an ordinary dried mushroom. As a rule, they are very strong and durable. Don't forget about kitchen utensils, as bent spoons and forks make excellent key holders.
Key holder made from boards
The most ordinary board will become an excellent habitat for keys. The material is perfect for creating little things in any style:
- In a minimalist style, it can be left in its natural form or painted to match the color of the walls or furniture.
- For natural-rustic styles, a regular unpainted tree or a key holder painted with rural motifs is suitable.
- Decoupage will create a feeling of antique design.
- For loft and country, boards with a rather rough finish are used, emphasizing the texture of the wood.
In principle, even an old cutting board can become an unusual key holder. It is pre-polished and decorated in the chosen way.
It could be:
- Burning;
- Thread;
- Application;
- Drawing.
Additional attractiveness will be created by funny pom-poms, floral arrangements made of artificial flowers and other decorative elements.
You can attach such a key holder to the wall using regular or hidden fasteners. This is what the master has enough imagination and skill for.
How to do it yourself?
Before starting work, it remains to remember the basic rules that guide all masters:
- You should not be disturbed during the process. Ask your family to give you a couple of quiet hours, close the door and avoid distractions.
- The work place should be well lit. Doing something with your hands in the light of a dim light bulb is not only harmful to the eyes, but also simply inconvenient.
- Everything should be in its place. This is important when you are working with sharp objects. When you finish cutting plywood or metal sheets, you should put the jigsaw or knife in a visible place, where you won’t lose it. Otherwise you might get hurt.
- The work must have a sketch. You can neglect this rule only with those key holders where there is nothing to mark - for example, if you are making a key holder from a branch with natural knots. But if your design is somewhat more complex, you should have an idea of what it should look like in the end.
- Measurements must be accurate. This is especially important if you have little material, which means it’s a shame to spoil it. Work with a ruler, measure twice to be sure. Don't do it by eye.
Pedantry is the main condition of any work. If you glue it, then carefully smooth it out and wait until it dries. If you drill, do it slowly and evenly. If you process it with sandpaper, do it gently, gradually.
You won't be able to make a good key holder in a hurry. But at a measured pace, trying to do everything efficiently, it will work out.
In the form of a key
The simplest: cardboard key holder
Cardboard is the simplest material from which you can make a key holder. You will need:
- sheets of thick cardboard - regular gray, can be found around the house, or you can buy a set;
- a suitable drawing on photo paper - you can print it in any stationery store, and choose it according to your taste by searching on the Internet;
- decorative screws with beautiful heads, an awl;
- a piece of wire, brushes, varnish, glue, sponge.
You can always keep at hand what is most often lost
The instructions for performing the work are simple:
- cut out the desired shape from four sheets of cardboard - a circle, a square, a heart, it all depends on your imagination;
- use an awl to pierce two holes in the upper part of one blank figure - for a loop;
- insert the wire into the holes, twist it so that it does not fall out;
- Glue the remaining pieces to the side where the twisted wire remains;
- On the front part, mark the holes for the screws and pierce them with an awl.
At this point, the key holder itself is prepared. The rest is essentially decoration:
- place the photo face down, wet the sponge, wet the top layer, and then roll it up, pressing lightly;
- dry the photo, coat it with glue using a brush and stick it on the workpiece;
- coat everything together with varnish to achieve greater strength;
- insert screws.
Can be placed on the front door
The result is a simple key holder. It is not very durable, it is afraid of moisture, it can tear if you pull it hard, but it is easy to make, the materials cost almost nothing and the result looks decent. Especially if you like bright lacquered designs, and you have a simple renovation in the hallway, without designer frills.
Advice This key holder is a good gift for older relatives. Grandparents will be delighted to receive a little thing with a photo of the faces of their beloved relatives and at the same time useful in the household.
Ideal eco-style: made from a branch
A branch used as a key holder is fresh, original and fits perfectly into eco-style. You can find it in the nearest park (you may have to spend several days), and it won’t be difficult to apply for it. You will need :
- dry branch - a wet tree will quickly begin to rot and lose its appearance;
- stain, jigsaw, drill, sandpaper, hooks (you can buy special ones in the store, you can use thick nails).
The main advantage of such a key holder is its uniqueness. There are simply no two identical branches.
The instructions are simple:
- saw off excess knots from the branch, give it an even and smooth look;
- remove the bark using sandpaper - either completely or only the damaged parts;
- Make holes for hangers and keys with a drill (if there are no knots suitable for them on the branch);
- cover the result with stain - it will make the wood darker, brighter, and in addition, help remove bacteria from it - and leave to dry for an hour;
- coat the dried branch with varnish - simple without bark, with bark first diluted with water one to one, and after drying clean;
- insert the hooks and, if desired, go over the branch with a dry brush with acrylic paint, which will give it the desired shade.
Serves as wall decoration
If desired, you can place a varnished design above the branch that will complement it. You can hang beads, feathers and decorative keys on bright threads from it. You can carve anything on wood - from a few letters to a simple design.
Tip: Before you pick up a branch, make sure it is of good quality. The wood must be dense and dry. There should be no traces of rot or parasites on it.
For connoisseurs of strong drinks from corks
It’s good to make a key holder from corks together with children, since this process is most similar to trying to assemble a mosaic without a picture that shows the end result.
Option from traffic jams
You will need:
- photo frame - you can glue it yourself, or you can buy it;
- about twenty wine bottle corks;
- PVA glue - not a pencil, but in a jar;
- nails with beautiful heads or hooks.
What follows requires only skill:
- take a cork, coat the sides and ends with glue, insert it inside the photo frame so that it fits against the frame from the inside;
- take the next cork, spread it with glue, and attach it to the first one.
This key holder can be made using magnets
The process is close to meditation: you need to fold the corks so that they perfectly fill the space of the frame. The resulting result should be left to dry overnight, and then varnished and hooks for keys inserted into soft cork wood.
The advantage of such a key holder is its uniqueness. Just as no two branches are alike, no two photo frames are equally filled with corks. To make the design chic, you can paint the corks in different colors, burn them, or cut out letters on them.
A simpler option, more suitable for eco-style, is to find a thin stick and hang corks from it using bright threads. Drive a hook into each plug and hang the key on it.
Can also be used for bags and letters
Tip A simple option with traffic jams will look appropriate only in a minimalist interior or in a hallway that is full of fun accessories. It has no place in strict styles - the same classics and hi-tech.
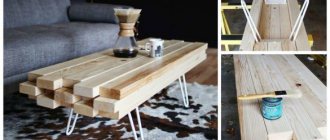
Classic beauty: made from sawn wood
Despite the impressiveness of the result, the process of making such a key holder is no more difficult than working with a tree branch. The only problem you may encounter is the difficulty of finding pine cuts when living in the city. But you can either find a fallen tree branch and cut off a piece from it, or turn to village relatives.
You will need:
- a round cut of a tree - a circle two to three centimeters thick, cut from the end of a log, and it is best if it is pine;
- stain, sandpaper of different grain sizes, varnish;
- wide brush, hooks, drill, screwdriver;
- printout of an image that has previously been flipped as a mirror image.
This shelf will fit perfectly in the hallway
It all comes together simply:
- sand with sandpaper - first medium grain, then fine, and exclusively along the fibers, otherwise unsightly scratches will form;
- moisten with water so that the wood swells slightly, leave to dry;
- cover with stain (preferably water-based, since it hardens longer and all mistakes can be corrected in the process) three times to get a beautiful bright color;
- coat the prepared printout with varnish, then cover the front side of the back with it, press the printout to it, carefully smooth it out so that there are no bubbles;
- after the print has dried (this will take two to three hours), moisten it with warm water, slowly remove it until the design appears - clean off the remaining white;
- On the back side of the key holder, use a drill to drill holes for the hook on which it will hang, and on the front side - holes for the hooks on which the keys will hang.
Small hooks decorated with letters
The drawing can be anything, the main thing is that it is black and white - the colors can be conveyed using varnish, but they will not be as bright as on the original. You can do without it altogether, then the hallway will be decorated with the noble texture of processed wood.
Advice A wooden cut goes well with a classic interior. A good solution would also be to choose its shade so that it matches the color of the furniture. As a last resort, you can go over it with a dry brush and acrylic paint to get the desired color.
Suitable for outerwear, keys and various small items
Quality for decades - made of metal
Working with metal is difficult, especially if you have never done it before. But if you start with a key holder made of ordinary wire, it will become clear that perseverance will overcome any difficulties. You will need:
- thick wire - several millimeters in diameter;
- sharp scissors - best for metal, but regular wire cutters will do;
- pliers, hammer.
The manufacturing process is simple:
- find an interesting contour drawing on the Internet - for starters, something simple, like an intricate spiral, square, circle, stylized cat;
- try to repeat the pattern using wire - you should bend it by holding one end in pliers and fixing the other with your free hand;
- sharp corners can be obtained by pressing them with the head of a hammer; smooth lines can be simply curled with pliers;
- When the figurine is ready, you need to attach hooks made of the same wire to its lower part, and attach a thin wire to the back, on which you can hang the entire structure.
Easy to do it yourself
An interesting variation of this same idea is the use of a hanger. It does not need to be bent with pliers or hit with a hammer. It’s enough just to hang hooks on its lower part, and decorate the main part with anything, from old clock gears to banal flowers made of colored paper.
A more complex way to make a metal key holder is to use a thin sheet of metal, which can either be found in remodel scraps or purchased at a hobby store.
You will need:
- thin metal sheet;
- sharp scissors, nail, sketch drawing, hand drill, hooks;
- a product that will make the metal airtight and protect it from rust.
Simple and tasteful
The design cannot be anything - only the kind that can be cut out of metal. Silhouettes of animals, fish, plants, castles are best suited. Any fairly simple forms. You can show your imagination and come up with an abstract figure.
It will remain longer:
- cut out a silhouette from a sheet with a pattern;
- attach the silhouette to a metal sheet, circle it with the tip of a nail;
- carefully cut along the contour, making sure that no unsightly jagged edges remain;
- use a hammer to bend any sharp edges that may arise during the process;
- use a drill to drill holes for the hooks;
- coat the resulting base with a sealing agent and let dry;
- Insert the hooks into the holes and secure the mount at the back.
Non-standard option in the form of an inscription
It is better if the metal sheet is black, this will make it more stylish. You can, however, use shiny, polished options, but they tend to fade over time, losing all their chic appearance.
Advice Do not use metal that is too thick, it will be difficult to cut. In addition, the nail on which it will hang may not withstand the weight.
Key holder made from saw cuts
A funny and unusual key holder can be created from small or large tree cuts.
- To do this, the saw cuts are placed on the wall, and ordinary hooks or decorative nails are attached to them.
- The unusualness will be created by several cuts arranged in the form of a sun, a tree, or an original frame for a mirror.
The manufacturing process does not change from changing the shape.
Slots instead of magnets
If you have a wide enough block and a saw, you can make an original key holder that requires no hooks or magnets. Even a school-age child can handle this. And our step-by-step guide to making a key holder with your own hands will help you.
Take a finished wooden block. Imagine that you are going to saw off a piece of wood. But do not go all the way to the end, leaving about 1 cm. Saw the same cut several times to widen it a little.
Using sandpaper, sand the cut until it is smooth and the wood doesn't snag. Several such cuts are needed, depending on the number of keys. In accordance with the strict geometry of the block, it is better to make cuts at the same distance, symmetrically retreating from the edge.
Fasten the finished block to the wall, turning the cuts towards you. All you have to do is make sure that your keys have key fobs on a string. The keychain will remain on top of the block, like on a shelf, and the rope will slip into the cut.
Keychains in the form of small soft toys or fur balls will line up on the shelf when the whole family gathers at home and will look very cute.
Plywood key holder
Pieces of plywood will also help to make an original key holder.
- To do this, plywood can be used as a flat surface or you can create original animals, create a three-dimensional flower or a ship, a car or a vase.
- The advantage of this option will be the already fully prepared surface, which will only have to be slightly sanded on the cuts.
Model in decoupage decor style
This version of the work is distinguished by elegant shapes and bright colors. For work we will need to prepare:
- Plywood base blank.
- Permanent glue.
- Scissors.
- Acrylic paint.
- Sponge.
- Four-layer napkins with a selected pattern.
Step-by-step diagram-instructions for the master:
- Using a sponge, cover the workpiece with acrylic paint. Using foam rubber rather than a brush allows you to create roughness on the future key holder. The picture will look much more natural, which is what the chosen decor style implies.
- Let the product dry.
- If necessary, cover the workpiece with additional layers of paint.
- To apply the design, we use only one, the most superficial layer of the illustrated napkin. To do this, heat the product with an iron and separate the desired layer of paper.
- Glue the napkin onto the plywood. We use glue, which we apply only along the edges and along thin threads from the periphery to the center.
- On top we coat the product with transparent varnish in 6-7 layers.
- Form hooks in the selected places, after which we varnish the product again.
We hang our model in a prominent place and never lose the keys!
Key holder shelf
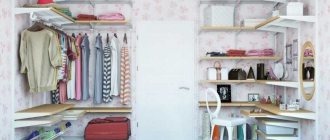
For those who want to get two pleasures at once, you can install a shelf or even a lockable drawer where you can put things you need in the hallway or cute figures.
- You can make a similar furniture set from wooden boards or use a ready-made frame from the store. Inside, you can provide additional shelves for useful little things or leave a large space for larger items.
- Hooks can be placed on the side wall of the structure or inside the cabinet.
- If you attach a door to the shelf, you will get a wonderful closed cabinet that will allow you to keep your hallway tidy. Such an item will also come in handy when there are curious children in the family who want to get into the most unnecessary places.
- The original shelf can be made in the most unusual shape. In addition to the usual quadrangles, triangular, oval, and round objects are used.
Housekeeper "Royal Cats" as an example
Base
The idea of creating something original can lead you to a dead end. Some people simply do not have the talent of imagination, but have a strong desire to learn how to make beautiful things. Well, prepare a small arsenal of materials and go. Here we will make a key holder based on a wooden cutting board blank. Its appearance is quite interesting in its shape.
You may not have the opportunity to buy such a board, so you don’t need to focus on this particular form, but buy a similar one. The base for the key holder was not chosen by chance; an almost ready-made blank for it is sold in any hardware store. At the very top of it there is a ready-made hole, through which it should be attached to the wall.
Preparing for painting
In order to give the product a high-quality look, a wall-mounted key holder simply must be painted.
But before proceeding to the stage of fixing applications, it is necessary to perform a number of preparatory actions:
- Sand the base and edges of the workpiece;
- Apply primer to the base;
- Paint the board with paint and apply a thin layer of varnish to it.
As a rule, you need to sand the workpiece with very fine-grit sandpaper. A few movements in both directions are enough to make the workpiece smooth on the plane. Perform approximately the same actions with the edges along the entire perimeter of the workpiece. By removing small burrs, you will avoid splinters in the future. Then wipe the board with a damp cloth. The primer is needed for strong adhesion of the paint to the base of the board. It is not at all necessary to buy a ready-made mixture; for such an area you can prepare a primer yourself using acrylic paints, putties and PVA glue. The mixture turns out wonderful and is easy to apply to the surface with a brush. We complete this stage by applying varnish, it is necessary for the convenience of straightening the napkin pictures. In our case, these will be handsome cats dressed in royal robes.
We glue napkins
Napkins (stickers) are available in a large number of images at any bookstore or newsstand. The gluing procedure combines several actions: fitting, peeling off the base, positioning, gluing and smoothing out the waves.
Let's try on the napkins; they should not extend beyond the edges of the workpiece. As a rule, napkins have a protective layer; it needs to be removed, as shown in the photo below. It is very important to understand what kind of background you need, since the pictures can be different, but we need uniform figures.
We will glue paper napkins using PVA glue in two passes, first coating both surfaces. It is advisable to immediately make a pattern, that is, cut out your characters from paper and stick them on the board like an applique. All that remains is to smooth out the air bubbles, but these are minor things.
It is advisable to sand the areas of the applications where the glue has appeared with sandpaper, to completely smooth the surface on which a finishing layer of transparent varnish will be applied. Speaking of varnish. Choose only acrylic varnish, it adheres better and dries quickly, for example, Titian.
Decorating the background and painting the outline of the key holder
Using the retouching technique, we fill the background around your characters with the desired paint, for us it is blue enamel. For greater effect, the edges of the board can be decorated separately, for example, with gilding. Many key holders use decorative elements made from plywood or thick cardboard. Use gold leaf to give them the same color.
Particularly difficult is painting decorative elements. The technique involves the following steps. Take a brush (or a toothbrush) and paint all the parts several times by spraying paint on a separate sheet of paper. After drying and varnishing, the decor is glued with glue.
Cardboard key holder
Instead of wood, you can use regular thick cardboard. It is easier to process, and the short service life of the product will be compensated by the low cost of the material.
The manufacturing technology is not much different from wooden models. But it’s still better not to hang heavy keys on such a model. To increase the endurance of key holders, they use several cardboard blanks at once, gluing them together.
A cardboard key holder will be a wonderful gift from the youngest family members. Even little ones can do it.
Frame key holder
The most ordinary picture frame will become an almost ready-made element, allowing you to store all the keys in an easily accessible place.
- Nails and hooks can be nailed either to the inner surface or directly to the frame.
- In the second option, paintings by home artists (they can be changed periodically), embroidery or puzzles are placed on the free field.
- A mosaic of wine corks will be a nice decoration.
- Unusual hooks
- You can use regular table forks as interesting hooks. They are bent so that it is convenient to hang keys and fixed on a board or cardboard.
Even furniture handles can become original hooks.
Lego
You can use LEGO parts as keychains by drilling a hole in them for a ring on which a bunch of keys will hang. Mount a LEGO plaque on the wall and let each family member choose a different color for their keys.
When you get home, you simply attach the construction set piece to the board. And the free space can be used to create mosaics or inscriptions. This way you can change the design of the key holder as often as you want.
Note!
Macrame: diagrams, interesting projects and detailed descriptions of making crafts
- Crochet amigurumi - examples of how to make a beautiful toy with your own hands (75 photos)
- Coffee topiary: step-by-step master class on how to make a small decorative tree from coffee beans
Key holders without hooks
The traditional model can be made into a more original design if you use ordinary magnets. They are pre-attached to the bottom of the shelf.
The larger the magnet strip, the easier it will be to hang keys on it. Clothing accessories are placed on the top of the shelf or the surface is used to arrange decorative items.
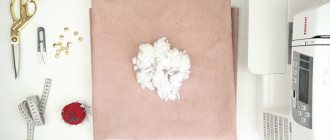
Pocket key holder
Small portable key holders are most often made of leather or thick fabric and are a kind of covers. Inside the pocket key holder there are special loops on which the keys are attached.
Loops are most often made from durable cord or a strip of leather. As the photo of a homemade key holder shows, such items can easily fit into ladies' handbags or men's pockets. Firstly, they protect the linings, and, secondly, they allow you to store keys in one place without wasting time looking for them.
All of these options can be easily made with your own hands, and it is better to purchase glass or metal items in stores. But such ready-made key holders can be beautifully transformed with your own hands, turning them into original decorative items.
Key house
Cute key holders in Provence style can be made in the form of a wall cabinet. If you have the tools and minimal skills, you can make it even without male help. To do this, we will need four narrow boards for the walls of the cabinet (the same size if we want to make it square, or two pairs of shorter ones and two pairs of longer ones for a rectangular one) and two wide boards for the back wall and door. For fastenings you will need self-tapping screws and hinged hinges.
After all the parts are cut to the required size, the boards need to be sanded first with coarse sandpaper and then with fine sandpaper until smooth. After this, we proceed to decorative processing of the wood. If we want to leave the natural structure of the wood, then we can cover the boards with stain, which will give the wood a noble shade, or burn the boards with a gas burner - this will reveal the texture of the wood, making it brighter. Final processing consists of covering all parts with several layers of varnish.
Note!
- Do-it-yourself illuminated mirror - step-by-step master class on how to make it yourself, photos of types of lighting
DIY flower stand - TOP 100 photos of stand options, detailed instructions, diagrams and drawings from the masters
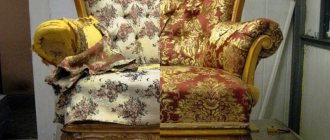
- Do-it-yourself furniture restoration: restoration methods, step-by-step master class, necessary tools and materials
When all the parts are ready, we begin assembly. On the reverse side, through the back wall, we attach the side walls with long self-tapping screws. Using small self-tapping screws, we attach the hinges to the cabinet door. We screw several hooks inside the “house”.
If we want to decorate a shelf using the decoupage technique, we can find interesting options by looking at similar photos of hand-made key holders. These key holders look very cute and feminine. Depending on the chosen theme, the key holder can be decorated in a gentle shabby chic style, or in the noble style of old England or romantic French Provence. If you use newspaper clippings or photographs of the city, you will get an interesting accessory in the industrial style. And if you already have some experience in the decoupage technique, you can print out a family photo and decorate it with a “house for keys.”
Sooner or later, any interior details become boring, the eye gets used to them and stops noticing them. But handmade products always evoke warm emotions, because they are made with love.