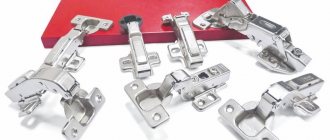
Nuances of adjustment and installation
Installing furniture hinges with your own hands is not particularly difficult not only for an experienced, but also for a novice craftsman. The nuances depend on the variety. The installation process is also called adding furniture hinges.
You will need the following tools:
- electric drill, screwdriver;
- Forstner drill (if the structure is secured not only with screws, but also involves recessing into the door material);
- pencil for marking;
- roulette;
- square;
- screwdriver;
- awl;
- fasteners.
It is important to take the markup responsibly. The slightest mistake at this stage will lead to distortion of the structure, and accordingly, it will have to be redone
A conductor can help with marking - this is a kind of template for placing furniture hinges. All necessary measurements and marks are carried out using a tape measure, a square, or a simple pencil.
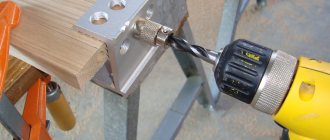
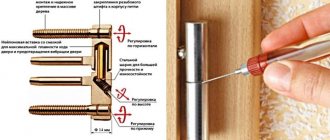
If the selected model requires recessing, you cannot do without a special drill for furniture hinges (end mill or Forstner). It allows you to make an even round recess of the desired diameter
When drilling, it is important to take into account the thickness of the material and use only a sharp cutter.
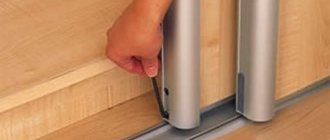
After preparing the hole, insert a loop into it and adjust if necessary. Also use an awl to mark the places where the screws will be screwed in and screw them in. Then hang the door, check the location, and secure it.
When the installation of the doors is completed, their functionality must be checked and adjusted if necessary. The sash is checked in three directions: vertically, horizontally and in depth. There should be no gaps exceeding technical ones, as well as distortions. Adjustment is made by tightening or loosening the fasteners with a screwdriver.
When purchasing furniture that does not require assembly, you should definitely check how the hinges are attached. Sometimes installing them yourself is much easier than adjusting already installed ones. The main thing is to choose the right type of fittings.
Installing a hinge on the door
Loops must be placed in the made recesses. Then adjust their placement in relation to the facade. All canopies must fit snugly to the facade. And if their position is not corrected, the door will very quickly begin to tilt. After aligning the hinges, you need to use a pen or regular pencil to mark the points for securing the screws.
READ Holemaking Drilling Countersinking Reaming
Next you need to attach the door with self-tapping screws or a Euroscrew to the piece of furniture itself. Namely, a cabinet or bedside table. The method of action in this case is as follows:
- Mark the points for installing loop pads;
- Attach platforms for mounting the installed hinges;
- Attach the door to the side of the cabinet;
- Connect the loop;
- Adjust the doors using a regular screwdriver.
It is better to hang doors on a smooth surface. The side of the cabinet where the hinge strip is attached must always lie horizontally. This will make fitting and connecting the door more comfortable. The door can be adjusted in a vertical position.
What types and modifications exist?
Today, many companies are engaged in the production of Forstner drills, each with its own approach. The former are committed to improving the quality of the products they provide, for which they are constantly upgrading alloys so that the work is completely uncompromising. The latter focus on the traditions of the original source and try to maintain absolute accuracy in preserving the parameters of the instrument configuration.
Manufacturers have also gone far in terms of size. Despite the fact that the most popular drills are those with a diameter of 30 to 40 mm, you can often find both 10 mm and 60 mm products on sale.
You should also pay attention to the accompanying documentation, which precisely indicates the recommended speed of a particular product.
As mentioned above, today the Forstner drill is available in several versions on the market:
- Forstner drill with toothed rims. Each product has special cutters on the entire cutting rim that resemble teeth in shape. Such drills have a lot of advantages, but what stands out is that they practically do not heat up. This is ensured by the fact that the teeth themselves have virtually no contact with the wood. It is for this reason that all products with a diameter greater than 2.5 cm are usually manufactured with these teeth. The disadvantages include the relatively short design (about 100 mm). For this reason, it is often necessary to use specially designed extension cords. Another drawback is that drilling sometimes ends in failure when working at an angle or at the edges of the surface of materials.
- Drill equipped with carbide cutters. Such drills provide for the construction of cutters exclusively from carbide materials. In fact, such drills are analogues of the original version of Benjamin Forstner. They are expensive, are not sold in all stores and are very often subject to counterfeiting. Among the disadvantages, which by the way are present, it should be noted that the original version is subject to vibration and disruption from the surface. This happens because the circumference of the lateral incisors is very small.
Kinds
If we consider the functional purpose of overhead loops, there are several varieties.
- Furniture. They are used in the production and assembly of furniture structures. They allow facades to open at 45, 90 or 110 degrees. The element is mounted on cabinets in which the doors are placed inside the furniture body.
- Door. They are used when installing interior or entrance doors. Such fittings provide maximum protection against unwanted entry into an enclosed space from the outside.
- Gates. These internal hinges are attached to garage doors, gates, and other structures for similar purposes.
In addition to their purpose, internal loops can differ for a number of reasons.
- Closer. Outdated, as well as modern cheap models, as a rule, do not include a door closer in the kit, which significantly reduces their technical and operational parameters. Solutions with closers greatly reduce noise during use, ensure smooth closing and generally increase the ease of use of the device.
- Manufacturer. Even if you are initially going to purchase budget furniture, you should not install fittings from the cheap segment on it - such products will not last long. Among the main leaders in the production of inset hinges are Blum, Hettich, and Boyard.
Regardless of the variety, any of these products have their advantages and disadvantages. Positive qualities include the following:
- when the door is closed, such hinges are invisible;
- there is no access to the hinges from the outside of the doors;
- the fittings reliably protect against the effects of precipitation, with the exception of hinges mounted on gates and wickets.
The disadvantages include the following:
- limited opening angle;
- complexity of installation;
- high price.
How to install a furniture hinge
Correct placement of doors on furniture ensures long service life and ease of use. At times it may happen that the doors are slanted or do not open well. At such moments, the mood deteriorates sharply. That is why it is worth paying even closer attention to the correct installation and the design of furniture hinges. The installation must be carried out in accordance with the rules, because the entire subsequent implementation depends on the properties of the installation.
READ Which Drill To Choose For Drilling
In modern times, there are a huge number of varieties of furniture hinges, each of which is popular with customers in its own way. So, for example, in more modern cabinets a four-hinged type of hinge is used. In Europe, such loops are called “hidden”.
Tips for choosing
The selection of suitable hinge options should be made taking into account the design features of the product
It is necessary to take into account the functional purpose of interior items, as well as the following factors:
- the material from which the furniture is made;
- intensity of use.
When choosing hidden accessories for a furniture set, you need to focus on its dimensions and be sure to clarify what weight load the elements can withstand. Thus, lightweight doors are most often installed in kitchen cabinets and bedside tables, which is why the fittings in them are often small
How to make a hole for hinges in chipboard: installation of a furniture hinge
A situation often arises when it is necessary to install a furniture hinge into a chipboard board, for example, when installing a chipboard door. This task involves drilling a hole for a hinge in the chipboard. In this article we will look at what you can use to prepare such a hole and how to install a loop in it.
So, in our case, when making a cabinet from chipboard, a mistake was made - the groove for the hinge was drilled too low, as a result, after installing the hinge in the prepared place, the internal horizontal door cannot open completely. As a result, it is necessary to move the groove slightly upward to eliminate this drawback.
Error in choosing the location for the groove for the hinge
Return to content
Tools and materials
During the installation of furniture hinges for chipboard, we will need the following tools:
1. Forstner drill with a diameter corresponding to the loop (in our case 35 mm). The drill is a cutter for making a groove for hinges. These drills sometimes come with stops (designed for chipboard thicknesses of 16, 22, 25 mm), which allow you not to worry about how deep you should go;
2. drill;
3. screwdriver.
The materials we need are the hinge itself and the screws for fastening it.
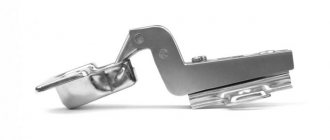
Internal furniture hinge for flush mounting, right angle
Screws
Return to content
Step 1: How to make a hole for a hinge in chipboard?
First, place a Forstner drill on the drill.
If you have a drill without a stop, then take a test piece of chipboard and drill a groove for the hinge in several steps, each time trying on how far the hinge goes. The essence of this action is to decide how much you need to deepen the drill so as not to drill a through hole and so that the entire loop fits into the groove.
Test drilling
Trying on a loop
Now that we've got the hang of it, it's time to tackle the door itself. First, let's mark the center of the hole. This is where we will install the center of the drill.
Marking the hole for the hinge
If you have a hinge torn out of a chipboard and you don’t know what to do, then the easiest option to repair the torn hinge is to move the hinge, i.e. drill a new hole, since often the places where the hinge is attached with screws turn into dust and no longer hold the door properly. The remaining old hole can be filled or sealed.
So let's start drilling.
Drilling a groove for a hinge
Return to content
Step 2: installing a hinge on a chipboard door
The grooves are prepared, all that remains is to insert the hinges into them and screw them in with screws.
Door hinge installation
Thus, we moved the hinge higher, the inner cabinet door now opens easily.
Installed loop
Return to content
Video
The video below clearly shows how to make a hole for hinges in chipboard.
Tools and materials
During the installation of furniture hinges for chipboard, we will need the following tools:
1. Forstner drill with a diameter corresponding to the loop (in our case 35 mm). The drill is a cutter for making a groove for hinges. These drills sometimes come with stops (designed for chipboard thicknesses of 16, 22, 25 mm), which allow you not to worry about how deep you should go;
The materials we need are the hinge itself and the screws for fastening it.
Internal furniture hinge for flush mounting, right angle
Installation of various types of hinges
Methods for installing hinges for gates, doors and furniture facades are somewhat different from each other. Let's look at each method in more detail.
Furniture hinge installation
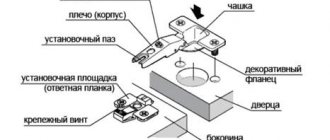
Installation of internal hinges on furniture facades is carried out according to the general scheme shown in the figure.
Layout and installation diagram of the main elements of the loop
During the installation process, it is recommended to proceed as follows:
- The first stage is to apply markings at the locations of the loops. Since a furniture hinge consists of two main elements (a cup and a striker plate, which are respectively installed on the front and frame of the cabinet), markings must be made on both surfaces;
In order to avoid making numerous measurements and calculating the location of the loop components, you can use a template during installation.
- the next stage is drilling holes for the hinge cup and fasteners. To perform the operation, a drill with various attachments and drills of suitable diameter is used;
- installation of the main part of the loop, equipped with a cup;
Attaching a furniture hinge to the facade
- installation of a strike plate;
- The final stage is adjusting the loop, which can be done in three directions.
Aligning the door relative to the furniture body
Installing a door hinge
To install internal hinges for doors, you need:
- Mark the area where the hinges will be installed on the side of the door leaf and the door frame. For convenience and speed of marking, you can use specialized templates;
Determining where to install hinges
The optimal place to install the hinge is considered to be an area located at a distance of 15-20 cm from the upper and lower edges of the door leaf and frame.
- In the door leaf, using a milling machine (in the absence of a device with a hammer and chisel), a piece of wood is removed to make a recess. If the installation is carried out on a metal door, then the hinge is located between the door leaf and the casing;
Preparing holes for mounting a door hinge
- holes for the mounting bolts are drilled with a drill;
- the loop is fixed and, if necessary, adjusted.
Screws for adjusting the door inner hinge
Additionally, you can watch a video about the correct installation of internal hinges on an interior door.
Installing a hinge on a gate
To install internal hinges on a gate or gate with your own hands, you will need a welding machine, since the connection between the hinge and the metal surface of the gate (wicket, support posts, etc.) is considered unreliable.
Installation when using welding is carried out in the following way:
- places for installing loops are selected. The number and dimensions of the hinge are calculated based on the weight and overall dimensions of the gate. If it is necessary to install two loops, then they are located at the top and bottom at a distance of 15-20 cm. The third and subsequent loops are mounted evenly in the space between the two outer ones;
For a door weighing no more than 30 kg, installation of additional hinges is not required.
- after determining the location, it is necessary to apply preliminary markings;
- the area in which the welds will be located is cleaned of dirt and rust. To do this, you can use a simple metal brush or a special attachment for a drill;
- steel internal hinges consist of two parts connected to each other by a pin. First of all, the part of the hinge intended for installation on the gate or wicket is welded. The weld seam must be located along the entire length of contact between the hinge and the gate facade;
Recommended type of weld to be used
- the correct opening of the gate leaf (gate door) is checked. Defects are eliminated by hitting the loop with a hammer;
All loops must be on the same line and in the same plane.
- the second part of the loop is welded onto the support post or metal gate frame (depending on where the loop is installed);
- two parts of the loop are connected by simply hanging one part on the pin of the other component;
- Weld seams are leveled and cleaned before further processing.
The choice of hinges for installation is made based on its purpose, since furniture, door and gate hinges differ significantly from each other. Installation of various types of hinges is done with your own hands if you have the simplest tools and acquired knowledge.
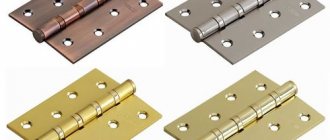
Types of loops
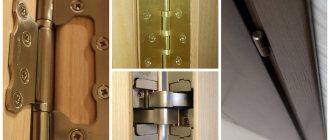
Installation of furniture hinges directly depends on their type. In practice, you can most often find the following types of loops, which have their own characteristics and advantages:
- Invoices. They are highly widespread, especially in the design of hinged bedside tables, cabinets, drawers and other pieces of furniture. When opening, the movable part of the overhead hinge rotates 90 degrees. They have wide adjustment possibilities due to the presence of many adjusting bolts.
- Semi-overhead. The fastening of such a hinge is provided on the inside of the furniture body; it is often used for cabinets and bedside tables with three or more fronts.
- Internal. Somewhat similar in design to the semi-overlay, but differs in a characteristic hump that sticks out when open.
Of course, you can find other types of furniture hinges, for example, gallery or piano hinges, which are used in certain pieces of furniture. Their installation will also differ from cases with standard hinges, the features of which are listed above. You can choose any hinges depending on the model of your furniture and personal preferences.
Semi-overlay hinges for furniture
Advantages and disadvantages
Furniture hinges require precision during installation, so the ability to make exactly the recess that is needed is the main advantage of a Forstner drill. This provides a special stop that prevents penetration into the hole beyond a fixed length. The drill is limited by teeth that do not allow it to deviate from the specified location. The hole turns out perfectly clean, thanks to which the loop cup fits very tightly.
A universal drill with interchangeable attachments is suitable for installing furniture hinges.
At home, you can’t do without a special hand-held power tool.
The only drawback of a Forstner drill when working with solid wood can be its low quality, which is typical for non-factory production. Therefore, it is necessary to choose a product from an official supplier and obtain a guarantee.
Furniture hinges require precision during installation, so it is possible to make exactly such a recess.
Depending on the type of panel, the cutter can become very hot, burning the edges and the material removed from the recess. Therefore, when working with such a base, it is recommended to take breaks to cool the drill, doing 3-4 approaches. This usually happens with MDF panels. When working with laminated chipboard and chipboard, hard alloy elements allow you to make holes for hinges quickly and without much effort.
The drill is limited by teeth that do not allow it to deviate from the specified location.
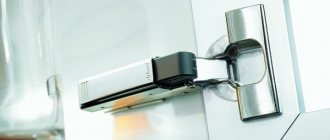
Screw-in hinges
Specific models equipped not with ordinary wings, but with threaded pins. The hinges are fixed by screwing the pins inside the door frame and leaf. As a rule, such models are used on interior doors with overlapping. The products can be adjusted in terms of pressure, vertically and horizontally.
Screw-in hinge
Products with two or three pins are standardly used. If the doors are very heavy, four-pin models can be used. It is recommended to use screw-in products together with overlay caps so that the hinges do not spoil the appearance of the doors. These caps are available in a large assortment, so you can easily choose products that match the color of the door leaf.
Screw-in hinge installation diagram
A common problem with these types of hinges is the noise they make when opening and closing doors. To correct this drawback, choose models equipped with a special plastic insert that reduces noise levels.
Advice. It is not advisable to use screw-in hinges for installing interior doors made of fragile materials, for example, low-grade plastic or soft wood, since their pins can seriously deform such panels.
Loop insertion order
1. Mark the furniture door based on the recommended distances between the hinges.
2. Using the stopper against the end, place the template on the door and secure it with a clamp.
3. Place the router in the work area, lower the tool body until the cutter touches the surface of the workpiece and clamp the locking lever.
4. Lower the depth gauge to the position support.
5. Count 11.5 mm on the scale and set the stopper position.
6. Tighten the routing depth adjuster lock.
7. Adjust the parameter using a micrometer screw.
8. Release the locking lever.
9. Rotate the positioning support to set the depth of the first pass.
10. Start the router, press the body and fix the position. Smoothly moving the tool along the surface to be processed, cut out the material, starting from the circle and moving to the center.
11. Once you have completed the passage, release the latch. Rotate the support to the next position and repeat the process until the recess is completely exhausted.
Advice. If there is no sawdust removal system, it is recommended to clean the work area with a vacuum cleaner after each pass to avoid milling defects.
12. A neat seat is ready.
13. Insert a loop into the recess, align and mark the location of the screws.
14. Drill for screws, limiting the drilling depth.
15. Screw the hinges with countersunk screws.
After inserting the hinges, proceed to the door hanger, for which mark the location of the mating parts. In our example, the markings for the screws are 37 mm from the end of the chipboard. For other modifications of the fittings, determine the size locally: having assembled the hinge and positioning the front adjustment screw in the middle, lean the door against the side with a gap of 2 mm and place marks through the oblong holes. Complete the work with adjustment operations.
Adjustment screws: 1 - height; 2 - in depth; 3 - in width.
In a similar way, it is easy to calculate and make templates both for installing cup hinges of other sizes and for cutting other holes.
The furniture hinge has a cup on one side that cuts into the door mass. The standard cup diameter is 35 mm. To install the hinge yourself, you need to get a forstner drill and do the following:
Place the door against the cabinet body and mark with a pencil where it joins the shelves. Measure in several places at right angles from the edge of the door 22 mm. Connect the points into one line. Mark the centers of the recesses at a distance of 10 cm from the top and bottom of the door slab. If the points coincide horizontally with the shelves inside the cabinet, move them vertically. With the slab on the floor or workbench, carefully use a forstner drill bit (ø 35 mm) to make recesses
This must be done very carefully so that the drill does not come out. The best option is to purchase a drill with a stop; it will stop at the desired depth. As you drill, insert the cup of the hinge into the groove until, when you press on the transverse bars with holes, they swing
When working with a limiter, this is not necessary. Lower the hinge cups into the openings so that the line of the slats' holes is strictly parallel to the side edge of the door. Secure the hinges with screws. Lean the door against the body so that the hinge arms are against the cabinet wall. Screw the fasteners through the holes in the second half of the hinge. Two hinges are installed on the doors of wall and floor cabinets. In the case of installing a door leaf of a pencil case with a height of more than a meter, three hinges are installed.
When installing double-leaf hinges, you need to determine the thickness of the plates. Usually this size does not exceed 2 - 3 mm. Having determined the attachment points on the end surface of the side pillars of the door frame, attach the hinge halves to the wood and trace the outline of the plate with a pencil.
Detachable hinges can be left or right. Their correct location should be as follows: the plates with the pin are mounted in the cabinet opening with the axis up. The door hinge plates are installed with the sockets facing down.
At the end of the door where the hinge is installed, mark the thickness and length of the plate. Carefully remove excess wood with a chisel. If you own a hand router, then the recesses for the hinges can be made easily and quickly.
Having placed the plate at the installation site, use a pencil to outline the holes for the screws. Having removed the loop, use a drill with a thin drill to make shallow holes (5 mm) at the marking points. Using a screwdriver, you can easily secure the hinges with self-tapping screws on the doors and cabinet body.
Installation process
Correct marking is the key to success
Marking for furniture hinges is one of the main installation steps, which determines the ease of use of furniture and the service life of the entire structure. For this reason, it is important to correctly apply the markings along which the hinges will subsequently be installed. To do this, follow these steps:
- Determine the exact number of furniture hinges per door, taking the dimensions and weight of the door as the main indicators. So, for small doors, two hinges are enough, while massive and large doors must be equipped with at least three hinges.
- Place the hinges at a distance of 60 to 120 mm from the top and bottom edges of the sash. If there are more than two loops, place the remaining ones evenly between the two outermost ones.
- At the center of each loop, make a notch using a pencil.
Marked area for milling on the cabinet door
Drilling holes for hinges
You've probably noticed more than once that furniture hinges are installed not on the surface of the door, but in special recesses. You will also have to make a hole for the furniture hinges in order to install them correctly. For this, a drill with a cutter is used. The procedure is as follows:
- Prepare a sharp bit, place it on the drill and place it in the marked place.
- Drill a hole to fit the hinge dimensions approximately 12-14 mm deep.
- Repeat this step for all other places on the sash marked for hinges.
Hole for hinge cut with a milling cutter
Putting the hinges in place
After preparing the holes, you can begin directly installing furniture hinges with your own hands. To do this correctly, follow the instructions below:
- Insert the hinge into the recess, making sure that it lies on the same axis with the end of the door.
- Using a drill and a drill, make holes for attaching the hinge with screws.
- Secure the door hinge with screws, checking that it is in the correct position.
- Repeat these steps for all other furniture hinges.
In order to fix the hinges on the door as evenly as possible, you can use special templates that help to correctly mark the places for drilling holes. If you trust your eye, you can do without the help of such templates.
Dependence of door dimensions and required number of hinges
Types of drills for furniture hinges
To install hinges, drills of different diameters are used. The nozzle is selected depending on the size of the furniture hinge bowl.
Choose quality drill bits.
Forstner drill
This tool is used to create a blind hole. It consists of a head with 2-4 sharp tips and another tip for centering.
We decided to install the hinges locally so as not to end up on the shelf in the closet.
It is installed in the intended middle of the hole. Attach the drill to a screwdriver or drill.
To install the cabinet you need a drill and other tools.
The head can have a diameter of 26, 35, 40 mm. Typically the hole is made to a depth of 9 mm.
Other
Other drills are also available in several diameters: 26, 35, 40 mm. 35 mm cutters are considered the most popular, since such hinges are in greatest demand.
A drill will help make a hole to the required depth.
Manufacturers also offer drills for non-standard hinges and special attachments for professional milling machines.
There are special screws that should be used to fasten the hinges.
What it is
Special drills make it possible to quickly and efficiently install ready-made furniture hinges. With their help, holes are cut with a certain depth and diameter. In this case, excess material is virtually completely removed during the drilling process.
When the hinges are installed in ready-made and machined holes, the fastening is as tight and reliable as possible. In this matter, the main thing is to correctly select the diameter of the drill used. You should start from the diameter of the bowl of the furniture hinge itself. It can have dimensional characteristics of 22mm, 26mm, 35mm and more. It is the diameter of the bowl and, accordingly, the diameter of the drill used for installation that is taken into account. You can buy it in almost any store, including Leroy Merlin.
The hinge drill belongs to the category of special milling type drills. They are used to make holes in wood and plastic products. That is, they can work on wood, chipboard, MDF, plywood, chipboard, plastic, etc.
Understanding the Forstner drill
Cutting tools with a depth limiter, used to create blind holes of the required diameter for installing furniture hinges, received their official name. This is a Forstner drill.
The product is made from a metal head on which there are 2 or 4 pointed tips. In the center there is another tip necessary for centering and marking the center of the future hole. The cutting element is located on the axis. The axis itself can be fixed directly in a conventional drill, on a screwdriver or on a special machine. Typically, a special drill makes a hole for furniture hinges to a depth of 9 mm. But this parameter can also change. Head dimensions (diameter) vary depending on specific tasks and fittings. Most often these are 26 mm, 35 mm and 40 mm.
As we have already said, the cutter is selected based on the size of the fittings used.
It is also worth touching on the topic of the size of the cutter itself, as well as the dependence on the size of the fittings used.
Marking, adding and adjusting furniture hinges on cabinet doors in examples
There are a large number of types of furniture hinges on the modern furniture fittings market.
In modern furniture production, four-hinged modifications are most often used, which are improved hinges from the times of the USSR. Of course, today's hinges are much more reliable and better quality than their predecessors. Today, the choice of components for making furniture is quite extensive. Let's figure out what types of hinges are used by furniture makers today in the manufacture of furniture.
The most commonly used hinges are overhead hinges, which are used mainly for attaching facades (doors) to the furniture body. There are also semi-overlay hinges, internal, corner, with closers, spring, etc.
Today we will look at installing an overhead type furniture hinge. I would like to note that the installation of all other types of canopies will be similar.
First, you need to figure out what parts the loop consists of. First of all, this is the mounting strip and the mechanism itself. The fastener bar should be mounted to the inside of the case, the loop should be mounted on the facade in a special hole, which must be made blind, twelve to thirteen millimeters deep.
The diameter of the hole depends on the type of loop, and can be twenty-six or thirty-five millimeters.
Canopies with a bowl of twenty-six millimeters are used extremely rarely.
Furniture makers use them only in cases where it is necessary to attach the facade to a module in which a washing machine is placed (non-built-in). This is explained by the fact that the gap for attaching the hinge in this case is very small, and it is not possible to attach a standard canopy.