Today we invite you to add a simple but cute table to your collection of paper furniture and home items. The assembly diagram for such a craft can be easily mastered by a beginner in origami, and even by a child. In addition, today we have selected for you both a diagram (for those who fold origami only this way) and a video master class (for those who better see it once).
To work you will need one square sheet of paper. With color - decide for yourself, because it depends on whether your origami table will be in harmony with other paper objects. Assembly will only take about 5-10 minutes. And if you are ready, we can start right now.
To begin with, we present a printed assembly diagram, which consists of two stages. The first is the basic form of a catamaran, and then we will show how it can be transformed into an origami table. After you complete all the folds, you just need to bend the legs so that the paper table takes on its finished form.
And now the promised video master class, in which all stages of assembly will be shown simply, in detail, and therefore as accessible as possible. Happy building!
KARTOGRAPF Treasure hunting, old maps are exactly what you need if you crave adventure and the thrill of new sensations. Here you will find something to keep yourself busy, and in what direction to direct the energy that is raging and rushing out, because searching for treasures is a very interesting adventure, which you probably last enjoyed as a child. And now you can experience it live!
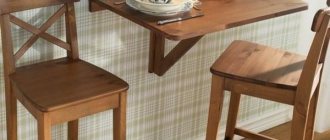
There is probably no girl in the world who would not dream of having a toy house for dolls with furniture. A real set, of course, won’t fit in it, but it’s easy to make paper figures yourself. Our detailed master class will help with this, after studying which you can easily assemble origami furniture.
To work, we will need a square sheet of paper (white or colored). When choosing a size, be guided by the required dimensions of the future chair.
Scheme:
To learn how to make an origami chair, we suggest using a video tutorial. Follow MK's step-by-step instructions and the entire manufacturing process will take you no more than 10 minutes.
Video: Master classes on creating an origami chair
Origami bed
The bed is the main piece of home interior, we will try to make this thing from paper. The assembly process is simple, so both children and adults can master folding skills. To work, you will need a square sheet of medium density (20*20 cm). If desired, take other sizes.
Template diagram:
Step by step description:
- Fold the sheet in half, in different directions (crosswise) and mark the center.
- We bend the side edges towards the center, 1/3.
- Then fold it again to form a rectangle.
- We lower the side parts to the fold line and open the pockets, turning the corners along the contours.
- We bend the corners away from ourselves - we make legs.
- We get a wonderful bed.
Video: MK for creating an origami bed
If difficulties arise during the folding process or some points are unclear to you, then look at the hint from an experienced craftsman.
Origami sofa
It's hard to imagine a living room without a sofa. For a guest, this is a great place to sit down, and for the owner, it’s a great place to lie down and relax after work. Let's make a sofa out of paper using the origami technique, as in the photo: Diagram:
Step-by-step instruction:
- Fold the sheet in half (twice) and unfold it. Get a cross-shaped fold.
- Fold 1/6 of the page along the dotted line (see photo).
- We wrap the sheet along the fold opposite this strip.
- We wrap the side parts of the resulting rectangle, 1/3 on each side.
- Bend the corners forward (in the places indicated by the white arrow). We do not touch the back side of the sheet.
- Fold the opened white rectangles in half.
- Raise the part of the craft marked with a dotted line.
- Bend half of the raised part down.
- Bend the sides forward.
- Pull the front part (back) forward.
- We get a paper sofa.
Video: Lesson on how to form an origami sofa
Schemes for folding furniture using origami technique
During their life, almost every person has experienced a move or carried out repairs on their own, after which a lot of thick cardboard was left behind. A large amount of paper material should not be thrown away immediately; practical applications can be found for it. In this article we will look at how to make a paper table with your own hands.
Drawings and diagrams
Thematic materials:
Chaga - how to treat it, folk recipes The mysterious death of the “Dragon” in the rays of glory and in full bloom: what caused the death of the idol of millions, whom the world knew under the name Bruce Lee? Healthy breakfasts for schoolchildren - ideas for simple recipes What a schoolchild should eat for breakfast Auschwitz concentration camp: experiments on women Christmas of Christ: history, what date, church service, traditions Orthodox customs for Christmas Bad habits and their impact on human health How and where exotic plants grow fruits (36 photos) What are the benefits of a morning jog?
103583
If you notice an error, select a piece of text and press Ctrl+Enter
Cardboard furniture - is the idea worth your time?
An alternative to ordinary furniture is a self-made cardboard table. Which we very often throw away, without thinking that this material can be used to create an extraordinary product. In order for the piece of furniture to be durable and not bend under the weight of the thing placed on it, for this it is necessary to properly process the cardboard. We’ll tell you exactly how below in the text.
Paper furniture has a lot of positive advantages:
- Stylish design. You can design any table for your apartment based on your preference and taste.
- Economical. When manufacturing such a piece of furniture, the costs are minimal, because they only go towards purchasing the necessary tools.
- Mobility. When you move, you won't have to go through the whole nightmare of packing your things. Easily foldable furniture does not cause any hassle.
- Ergonomics. There is no need to walk around the expanses of stores in search of a suitable piece of furniture that would fit perfectly into the interior and would be very comfortable.
- Safety. Cardboard furniture does not contain any harmful elements. And since you make it yourself, you can easily check all the components.
- Environmentally friendly. If a piece of furniture has lost its attractiveness and former appearance, or for some reason you want to change the design, you can simply disassemble it and throw it away, since cardboard material is not capable of harming the environment.
- Strength. Proper processing of cardboard allows you to extend the life of the manufactured piece of furniture.
Important! Despite many advantages, cardboard structures have one unpleasant drawback. Prolonged exposure to a damp environment causes significant damage, and the furniture becomes unusable in the future. Therefore, you should always remove the paper structure from the street.
Design options
Cardboard makes good household items. With the help of this raw material it is easy to diversify the interior of your home; it is used to make your own dollhouse, tables and chairs for children. In addition, on the floor of the children's room you can place small shelves made of boxes, decorated in a fairy-tale style, in the form of animals or cartoon characters.
Properly selected material and technology make it possible to produce more functional items:
- kitchen sets;
- sofas, armchairs;
- chests of drawers, cabinets;
- coffee tables;
- cabinets;
- wall shelves.
Like any material, cardboard has its pros and cons. Among its advantages:
- Cost-effective - products can be constructed from cardboard boxes. They are taken free of charge at retail outlets or purchased at a wholesale base, which is much cheaper than new products made from expensive raw materials.
- Lightness - the furniture weighs almost nothing, it can be easily disassembled into its component elements, which greatly simplifies its transportation.
- Wear resistance - household items made of thick paper are characterized by sufficient strength and can last a long time. You just need to take a responsible approach to the drawing up of the drawing, the quality of the assembly, and the choice of fasteners.
- Safety - cardboard is an environmentally friendly product. It is made from natural raw materials, so it has no harmful effects on human health.
- Ease of processing - the cardboard sample is extremely malleable, allowing you to expand the boundaries of human imagination. By creating furniture products with an unusual design, you can dilute the interior with exclusive decor.
Stages of self-assembly of furniture, rules for decoding drawings
The disadvantages of a piece of furniture made from cardboard are that it is not resistant to humidity and is a fire hazard. The product must be kept in a dry room, at a safe distance from sources of fire. This type of furniture requires special care. Also, the assembly process requires a certain precision; mistakes made can lead to early breakdown of the structure.
Low cost
Lightweight furniture and ease of transportation
Safety of raw materials and absence of harmful effects on human health
Wear resistance of household items with proper assembly quality and fasteners used
Ease of processing the material and the ability to create pieces of furniture with an unusual design
Making a table using origami technique
A paper toy table, which is made using the origami technique, cannot withstand heavy weight, since it is made of plain paper. If you use a printer to print paper that imitates wood, then the appearance of the paper cannot be distinguished from the real thing, and it looks quite believable. This table looks great when paired with chairs, which you can also make yourself using the origami technique.
How to make a table out of paper using the origami technique with your own hands:
- Prepare a sheet of paper that should be folded in half.
Important! To make a table you need to use only a square leaf. If you have standard A4 paper, you need to fold it in half diagonally. The result will be a double triangle and a single rectangle. This is what needs to be cut off to get a square-shaped leaf.
- Next you need to open the folded sheet.
- The sides of your part must be bent to a vertical line.
- After that, bend it in half downwards and open the workpiece.
- Bend the upper and lower parts of the workpiece to a horizontal line.
- Now unfold our workpiece.
- Diagonally, you need to fold the right side and bend it to the side.
- The same procedure should be done on the left side.
- Fold the bottom part of the workpiece up.
- On the upper section of the paper, repeat exactly the same steps as with the lower part.
- Now we need to expand our figure.
- The right corner, which is at the top, must be bent down diagonally.
- Next is to open the middle of our figure.
- Now the side parts need to be rotated so that a square is formed.
- With the remaining corners you need to perform exactly the same actions.
- Next, we work with one square, the sides of which must be folded to the diagonal line (folding the sides is reminiscent of the method of folding an airplane).
- Now you need to open the workpiece.
- From the resulting blank, bend a figure that would look like a rhombus. In the end, we should end up with four diamond shapes, which will be placed under the large square on the corner side.
- Now you need to bend the resulting diamonds in half upwards.
The paper table is ready! It can be used to play with dolls. The child will be delighted with such a new acquisition for his toys.
Legs for cardboard table
Now you can make the base of the table from cardboard with your own hands. If you are making a corner table from cardboard, then it will only require two legs. They can be additionally equipped with shelves to make your coffee or computer table more functional. if the shelves are not made, then the leg will be a regular stiffener.
For one table leg you need to cut 4 identical pieces of cardboard.
For the leg you will need to cut out four absolutely identical pieces of cardboard. They can be rectangular or square depending on what size legs you want to make. They need to be glued together with the same glue that you used earlier. To join the stiffeners, it is necessary to make grooves and secure their connection with glue.
If a blind leg is being made, then the stiffeners can be made in a single layer, but they need to be placed quite tightly. It is recommended to glue the strips that will serve as shelves or stiffeners 2-3 pieces at a time. In this case, the result will be more reliable.
How to make a doll table out of paper?
Let's consider another option on how to make a paper doll table that will bring joy to your child:
- Bend the square-shaped workpiece three times, then turn it in the opposite direction twice, and then turn it over. Thus, we get the very first workpiece with the intended fold lines.
- Then bend the middle of each side of the square towards the center. As a result, the corners of the square rise up, thus forming the legs of the table.
- It is recommended to carefully iron all folds with your hands so that the legs of the table are clearly marked.
All that remains is to turn our manufactured product over and decorate the doll’s interior with it.
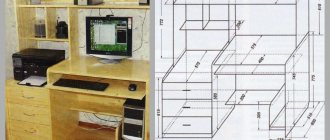
Paper laptop table stand
Nowadays, almost every user has an indispensable tool for work and communication, which is a laptop. In addition to the computer itself, all sorts of peripheral devices are attached to it. The presence of removable hard drives, a mouse, a flash drive and other necessary elements makes you want to purchase a table for convenience. Those who don’t want to run to the store, but want to have a convenient laptop stand, have a great solution - make a table out of paper with your own hands.
Materials and tools:
- a laptop, the presence of which will allow you to correctly measure the future stand;
- yardstick;
- sheets of paper or newspaper that will be used for the stencil;
- thick cardboard from which the stand itself will be made (an unnecessary box may do);
- long ruler;
- pencil or marker;
- utility knife or large scissors.
How to make a laptop table out of paper:
- Newspaper or paper should be spread on a horizontal surface. Next, carefully measure the dimensions of the table and make a stencil.
Important! If the measurements are taken incorrectly, then at best the table will turn out to be crooked, and at worst the stand will not support the laptop.
- First of all, we will make a leg, which is a crossbar between the legs of the stand to give the table greater rigidity. Using a tape measure, you need to measure the length of the computer device along the keyboard from one corner to the other. Mark half of this length on paper using a marker. Next, you need to draw a line that will be half the base of the leg. This detail should not be completely drawn out, since if the slightest inaccuracy is made, the laptop will stand crookedly.
- From the edges of the segment you need to measure 4 cm and 7 cm upward, after which you should draw a rectangle. Mentally divide our figure into 3 parts. The first third is almost a straight line at a height of 4 cm, for the second third of the part you need to make a bend to the 7 cm line at an angle of 45 degrees, using a pattern, or simply draw it by hand. At the point of contact of two broken lines you need to make a narrow sleeve, which will be a cutout for aligning the parts
- Let's move on to designing the template for the legs of the stand. You can choose any angle of the table, depending on your personal preferences. The height of the left and right sides of the leg will depend on this.
Important! When you draw the template, you need to pay attention to the protruding tooth. It will subsequently serve to prevent the laptop from falling. In height, it should be about a third of the thickness of the laptop.
- The slot in the leg that will engage with the leg should not be in the middle, but located at a distance of about ⅓ from the far edge. This affects the stability of the product.
- We draw the bends in any shape at your discretion. The slots that will be in the legs and prongs should be no more than 3.5-4 cm in height. Depending on the thickness of the cardboard, they should be about 4-5 cm in width. Both parts should be the same.
- Let's move on to cutting out paper templates. An unnecessary box with relatively thick cardboard may be suitable as a starting material.
- With the bottom cut, you need to attach the template of the first part to the perfectly flat edge of the cardboard, otherwise the stand will wobble.
- You need to carefully trace the template on one side, then flip the template over to the other side and trace it in the same way. As a result, one symmetrical part was formed, which is the leg.
- Now we draw out the legs. On another cardboard you need to lay out the second template and draw the legs, which should be completely identical.
- Cut out all parts with scissors or a stationery knife.
If you cut everything out correctly and carefully aligned all the parts, then the table in the shape of a laptop stand is ready. All that remains is to install your digital friend on the table.
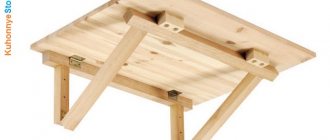
DIY coffee table.
You decided to buy a high-quality and inexpensive coffee table, but after shopping, you were probably convinced that high-quality coffee tables made of natural wood cost good money.
There is a solution - to make a coffee table with your own hands. If we knew how to make a magic wand, then everything would be much simpler, but we will have to work a little and you will see that there is nothing complicated.
In this material we will look at making a coffee table from natural wood with our own hands, as they say from “A” to “Z”.
Of course, you still can’t do without financial investments, but they will be several times less than the cost of a coffee table bought in a store.
Coffee table shown in the photo. 1 cost approximately 1000 rubles.
And two days off for the time spent on making the table (including painting and drying).
Photo. 1 DIY coffee table. Prepared for final processing - staining and varnishing.
Table dimensions table top 1000 mm x 600 mm thickness 30 mm shelf (size is selected after attaching the legs) of this table 640 mm x 430 mm, thickness 18 mm.
The height of the coffee table from the floor is 450 mm.
The most difficult part of the table is the tabletop and shelf. We will have to buy them (fortunately, the stores have everything), since, without special equipment and devices, making a high-quality product is quite problematic.
The tools you will need are a jigsaw, a screwdriver or drill, PVA glue or any other glue designed for gluing wood.
The entire process of assembling and making a coffee table with your own hands is shown in detail in the photographs.
Making the legs of a coffee table (photo 2).
Photo. 2 Making coffee table legs.
The legs are cut with a jigsaw from a block of at least 150 mm wide, 430 mm high and 45 mm thick and carefully processed with sandpaper.
For those who are interested in this coffee table design, the stencil form of the legs can be downloaded HERE.
Unfortunately, the height of the table legs is larger than the size of a standard A4 sheet, so the stencil form consists of two halves. Print both and glue them on thicker paper or cardboard. All that remains is to transfer the stencil shape of the legs of the coffee table onto the wood and cut it out with a jigsaw.
We attach the legs to the tabletop (photos 3, 4, 5, 6, 7, 8).
Naturally, we start by marking the place where the legs of the coffee table are attached (see photo 3).
Photo. 3 Marking the location of the coffee table.
We fasten the legs to the table top in a “tenon” using wooden “caps”, and put them on glue (PVA or any other intended for gluing wood), you can additionally strengthen the connection with a metal corner on a self-tapping screw (see photos 4, 5, 6).
Photo. 4 Attaching the legs of a coffee table.
Photo 5. Attaching the legs of a coffee table.
Photo 6. Attaching the legs of a coffee table.
Rice. 7 Attaching the legs of a coffee table.
Rice. 8 Attaching the legs of a coffee table.
Fastening the shelf of a coffee table (photo 9).
Photo. 9 Attaching the shelf to the legs of the coffee table.
We fasten the shelf with self-tapping screws (see photo 9). One caveat - before tightening the self-tapping screw, it is better to pre-drill a hole with a drill of a smaller diameter (to prevent cracking of the wood), otherwise you can ruin the whole job.
The coffee table is ready, and moreover, made with your own hands from natural wood. All that remains is to cover it with stain and varnish. The color depends only on your preferences.
Table made of plain cardboard
A self-made table brings an original touch to your apartment. If cardboard is treated correctly, your table can withstand certain loads. Let's consider another option for making an interior item.
Required tools and materials:
- packaging cardboard;
- regular and colored tape;
- paper tape;
- double sided tape;
- stationery knife;
- sharp scissors;
- dull knife;
- iron ruler or tape measure;
- a simple pencil;
- eraser;
- wallpaper glue or PVA;
- sandpaper;
- kraft paper and tracing paper.
How to make a paper table with your own hands:
- First you need to design a tabletop. For strength, it is best to make it two-level. Using a stationery knife, you need to cut out three blanks from cardboard, the shape of which would resemble the designed tabletop. The first part is the top level, and the second and third will be the bottom level.
- Then cut strips from cardboard that need to be bent like an accordion and secured with glue to the lower parts of the tabletop. The strips must be the same width, otherwise dents will appear.
- Next, we secure the second part of the lower tabletop.
- Now we make the top level, onto which we also glue cardboard strips.
- When the glue is completely dry, you need to connect both parts of the tabletop.
- To increase the strength of the tabletop, use tape to secure the cardboard strips and corners.
- Now let's move on to constructing the base. For the corner table you only need to make two legs. To increase the functionality of the table, you can additionally design several shelves.
- To build the legs you need to prepare 4 identical sheets of cardboard. They can have either a rectangular or square shape, since it all depends on the size of the leg. You can attach them with glue. At the junction, grooves must be made, which are secured with glue.
Important! If the table leg is deaf, then in this case, single-layer cardboard is sufficient for the stiffening ribs, only they must be very close to each other. In order to have a more reliable result, it is best to glue the stiffeners and shelves 3-4 pieces at a time.
- To strengthen the edges of cardboard furniture, you need to use kraft paper, which has a dark color. Using wallpaper glue, you need to glue all the seams with it.
- Next we do the finishing. First, all the elements need to be covered with old newspapers, then the surface needs to be leveled with tracing paper, wrapping paper or craft paper.
- White paper (or tracing paper) is glued to the entire piece of furniture, since this way it is much easier to decorate the furniture.
Important! Before gluing kraft paper and tracing paper, they should not be cut, but should be torn by hand.
- And only now, after a layer of paper, can you apply acrylic paint. This way the base for decoration is ready. Now the work of your imagination begins, the main thing is that after finishing work the designed table fits harmoniously into your interior.
Important! The tabletop can also be made from newspaper tubes. This option will create a special flavor in your room. In this case, you will have to acquire additional weaving skills.
Making a countertop
First you need to make a tabletop. In order for it to withstand the load, for example, from a monitor or laptop, it needs to be made two-level. It is necessary to use a stationery knife to cut three pieces of cardboard in the shape of the future tabletop. One of them is a part for the top level, and the other two are for the bottom level. Cut thin strips of cardboard and bend them like an accordion. These strips need to be glued to one of the parts of the lower tier. To do this, coat a piece of cardboard with Moment glue or use a glue gun. The last option is much more convenient.
Drawing of a cardboard table.
The strips, folded like an accordion, are glued edgewise. It is very important that the strips of cardboard are the same width. To do this, it is best to cut them with one movement of the knife or mark them very carefully. If the difference in their width is significant, then dents will very soon appear in the surface of the tabletop. The tighter you pack the strips of cardboard, the stronger the tabletop will be.
After laying the accordion on top, the second part of the lower level of the tabletop is glued on top. When the bottom element of the tabletop is ready, you can move on to the top part. You also need to glue strips of cardboard onto it like an accordion. When the glue dries on it, you need to glue the upper and lower elements of the tabletop together. To do this, use the same “Moment” glue or a glue gun.
From the same cardboard you need to cut strips equal in width to the thickness of the tabletop and glue them to its sides. Additionally, they need to be secured with masking tape. Pay special attention to the corners.
Return to contents
How to make a cardboard table more durable?
- If you made a table out of paper with your own hands, then to give strength to the cardboard and protect it from moisture, you can use parquet varnish, which must be applied to the finished parts.
- When making furniture, make sure it is symmetrical. If you create an asymmetrical piece of furniture, you need to add additional supports to it to strengthen the structure.
- The presence of a large number of transverse supports allows you to make a piece of furniture more stable.
- When making a piece of furniture, different cardboard is chosen, which can be single-layer, two-layer or three-layer. The thicker the material, the stronger it is.
In principle, even from cardboard you can create practical furniture for domestic use. And what can we say about arranging a dollhouse - there are no limits to imagination. Use such a simple and accessible material to create various crafts - beautiful, original, applicable not only for decoration, but also in everyday life.
If you are tired of creating ordinary flat crafts on animal and plant themes using the origami technique, then we suggest you create a three-dimensional table for small dolls. It can be of any size, because it depends on the parameters of the paper sheet that will be used in the work. The color can also be chosen to suit your taste or the interior of the doll's kitchen.
So we get the beautiful dining table of your dreams from such a simple and affordable material. This way you can make several pieces of furniture in a short time and add them to a small dollhouse and veranda.
Our hands are not for boredom: how to make a table for dolls from paper, cardboard and matchboxes
You want to go for a walk with your favorite toy, change its outfit, comb its hair, feed it, put it to bed. Through play, the baby seems to be rehearsing her future role as a mother, wife, and housewife. And the doll’s favorite must certainly have everything - outfits, a house, furniture, and a car.
Of course, today everything can be bought in specialized stores. But, firstly, it is not so cheap, and secondly, it is much more pleasant to prepare a pleasant surprise for your daughter with your own hands. In addition, you can introduce her to needlework. Then it will not be just a homemade project, but a pleasant time together.
Stages of making a three-dimensional table using the origami technique:
We prepare a square sheet of paper of any size. Also, any color of paper can be selected. If you want to make an original shade, then use designer paper or multi-colored sheets for scrapbooking.
Fold a square sheet of paper in half. To do this, take the right side of the sheet and move it to the corners of the left. We go through the fold so that it turns out smooth and beautiful.
We open the folded blank to create a paper table. The sides should be folded to the resulting vertical fold. This should be done carefully and slowly so that the lines of the future table are identical and even.
We return to the original position. You should go along the center fold line with scissors in order to then get two identical parts for folding the craft using the origami technique.
At the same time we bend the upper and lower corners to the central fold lines.
Fold two parts of the blank in half along a vertical line to create a table using the origami technique. We get two table blanks with legs.
Place the right piece in the middle of the left one.
Next, you should bend the upper and lower parts of the workpiece, which have table legs.
Raise the folded top and bottom sides a little. We turn it over and get a finished three-dimensional table using the origami technique from plain paper.
Paper furniture is in demand in interior decoration; you can make simple shapes with your own hands. Another area of application for these items is toys for children. Every child will want to have a dollhouse with beautiful paper furniture made with their own hands. To make such products, you do not need additional origami skills, you just need to follow the instructions provided.
Origami furniture is an interesting trend that requires special attention. Making such figures does not take much time, and the resulting result pleases adults and children with its appearance. The main feature of the products is their maximum similarity to real furniture items: sofas, tables, cabinets, armchairs and chests of drawers.
It is unlikely that you will be able to use such furniture in real life, but the items will be a good option for creating a model of a future room or designing a dollhouse. To achieve similarity with real furniture, textured paper is used during construction to imitate various surfaces: stone, leather, fabric, wood and metal. When creating objects, it is better to use paint that does not completely saturate the material, but only gives it color.
The following materials are used for production:
- Material for the base – matchboxes, some corrugated cardboard, colored thick paper;
- Pieces of fabric, decorative film and textured paper for finishing finished items;
- Scissors;
- Black pencil or pen;
- PVA glue or any other for working with paper.
You can work with paper yourself, or you can involve loved ones in the process. Then the resulting products will be diverse, but together they will form a single ensemble.
Master classes on making tables
Round table
To make such a piece of furniture, you will need:
- plywood;
- glue;
- jigsaw;
- sandpaper;
- acrylic paint.
Using patterns, we cut out blanks for future furniture from plywood.
- circle (table top and shelves) – 2 pcs.;
- legs – 4 pcs.;
- jumpers – 4 pcs.
Carefully sand the cuts.
Let's start assembling. First, glue the jumpers and legs together, as shown in the photo.
We attach the legs to the bottom surface of the shelf, and the jumpers to the top. Let's let it dry.
And finally, use glue to secure the tabletop.
We coat the finished product with paint. The finished product can simply be varnished, or you can continue decorating it using any technique you like.
If you are not very comfortable with a jigsaw, you can replace the plywood with durable cardboard. The assembly remains unchanged.
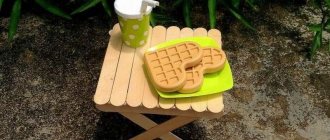
Rectangular
To implement the following idea you will need:
- 17 popsicle sticks;
- glue gun and hot glue for it.
Cut off the rounded ends of the ice cream stick. We will need two of these blanks. Using a glue gun, we assemble the future tabletop as shown in the photo.
Now the legs. We assemble a table support from three sticks. The second part is done in a similar way.
Glue the legs to the table top.
Writing
The desk is very easy to make. You just need to arm yourself with PVA glue and stock up on a sufficient number of matchboxes.
Materials for work:
- matchboxes;
- colored paper;
- PVA glue.
- Assemble the top of the table from three boxes.
- From other boxes, assemble a cabinet with drawers. Pull out the inside of one box.
- Cover each part of the workpiece with paper.
- Attach a cabinet and a niche for the system unit to the top. Attach beads or small buttons to the side surface of the drawers.
- If you don’t want to bother with paper, then just paint the furniture. Gouache and acrylic paints are best suited for this.
Decoration
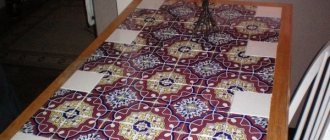
A separate stage is the decoration of finished products. Do-it-yourself furniture, diagrams of which can be found in this material, is decorated as follows.
| Material | Peculiarities | What is it suitable for? |
| Self-adhesive paper for furniture | This material can be used in the manufacture of any type of furniture. This film is ideal for beginning craftsmen, because it is easy to cut, and the adhesive layer allows you to decorate the surface without any problems. | For tabletops, seats of chairs, sofas and armchairs, for decorating cabinet doors and chest of drawers. |
| Using paints | Paints allow you to show creativity and move away from standards. Using paint you can paint any pattern and design. When choosing a product, make sure that it does not damage the paper base. Acrylic or water-based compositions are preferred. | For all types of crafts, especially for decorating the front parts of products. |
| Application of fabric | The fabric allows you to imitate the structure of furniture as much as possible. | Suitable for sofas, armchairs and chairs. |
If gouache is used for decoration, you need to mix it with PVA glue (1:1). After drying, the paint will not imprint on your hands, and the product will receive additional rigidity.
Do-it-yourself paper furniture will be an excellent option for a dollhouse or designing models of a future interior. Creating miniature objects is a fun activity that you can involve all family members in.
Necessary tools and material
In the process of manufacturing cardboard furniture, the main role is played by the main raw material (cardboard) and related materials to create the final product. Regardless of the type and purpose of the creation being invented, the list of tools will remain unchanged:
- a stationery or construction knife with a sharpened edge;
- ordinary or paper tape, double-sided;
- scissors;
- roulette;
- ruler;
- pencil and grater;
- sandpaper for sanding cuts;
- PVA glue, Moment, hot melt glue or construction glue (selected depending on the type of cardboard used);
- kraft paper.
In addition to these positions, it is worth thinking about the decor of future furniture. Fabrics, paper, wallpaper, paints for creating unusual designs, etc. are suitable for this.
As for the choice of the main material - cardboard, you need to take into account the strength parameters that will extend the service life. Furniture made from corrugated cardboard should be preferred because old boxes may not be durable. The more sheets there are in such cardboard, the stronger it will be in the future. The number of layers of paper and cardboard varies from 2 to 7.