The main task of inversion tables is to perform medical procedures. But due to the relatively high cost, purchasing it for use at home is not available to everyone who needs such therapy. A way out of the situation could be a do-it-yourself inversion table, the costs of which will be noticeably lower. Especially if you use relatively inexpensive but durable materials. However, before you get down to work, you should become familiar with the features of its implementation.
Purpose
The effectiveness of this simulator has long been proven by experts. Such tables are intended for the treatment of various diseases of the musculoskeletal system .
Attention : in case of severe diseases, such as arthrosis and arthritis, the inversion table must be used extremely carefully and under the supervision of specialists.
Inversion tables are effective for the following diseases and pathologies:
- moderate postural disorders (initial stage scoliosis);
- chronic spasms in the muscles of the back or neck;
- as a prevention of varicose veins on the legs;
- for training people who lead a sedentary lifestyle;
- chronic stress as relaxation;
- to strengthen the back muscles.
Keep in mind that you shouldn’t expect any special miracles from using an inversion table .
Although it is used for the treatment and prevention of various pathologies, as a separate treatment method, it has little effect. Since the simulator treats existing diseases and does not in any way affect the cause of their formation.
Therefore, exercises on an inversion table must be combined with other treatment methods, for example, lifestyle changes.
You can buy a finished product in a store, or you can make it yourself. If you have little experience in manufacturing and assembling furniture items, you can resort to the second option.
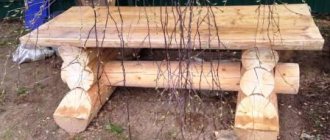
Homemade device for spinal traction Page 3
You can easily attach the same description to your simulator. Everything is certified. For Russia as well.
The inversion table back trainer is a highly effective means of relieving spinal tension. It is indispensable for people with mental work, for sedentary work, and for work involving prolonged static load on the spine. There is the possibility of adjustment taking into account human growth. The design was developed taking into account the latest achievements of vertebrology (the branch of medicine that studies the spine). Soft fastenings in the shin area carefully and tightly hold your legs, and the variable tilt of the table allows you to take the most comfortable position for you. Using the inversion table exercise machine helps:
- Improve posture - Relieve tension in muscles - Strengthen ligaments - Increase flexibility and range of motion - Reduce back pain - Relieve stress - Stimulate blood circulation and lymph flow - Relieve the effect of aging caused by heavy weights you
And some forum users are simply stuck in another century... Don't be offended by them. They just don't know what they don't know..
Good luck to you in caring for your fellow citizens...
Material
Having decided to build a table for studying with your own hands, carefully select the materials for it. It could be:
- natural wood. It is environmentally friendly, durable and has high technical characteristics;
- Chipboard or laminated chipboard. They have good performance, have a wide color palette, are lightweight and easy to use;
- MDF. It features excellent performance, ease of use and affordable cost .
Help : most often, chipboard or boards are used to make a simulator at home.
Making an inversion table with your own hands, operating tips
The main task of inversion tables is to perform medical procedures. But due to the relatively high cost, purchasing it for use at home is not available to everyone who needs such therapy. A way out of the situation could be a do-it-yourself inversion table, the costs of which will be noticeably lower. Especially if you use relatively inexpensive but durable materials. However, before you get down to work, you should become familiar with the features of its implementation.
Drawing and dimensions
Before you start making the simulator, you need to make a competent drawing. Here the dimensions of the product, materials of manufacture, and methods of fastening individual elements must be thought out. Keep in mind that how effective and useful the classes on it will depend on a well-designed project.
The sizes are selected based on the person who will use it.
Tip : Use the following dimensions as a guide: 120x60x140 centimeters.
Design Features
Inversion tables are recommended for use by people with musculoskeletal disorders. With their help, simple exercises are performed for the spine, providing a rush of blood and lymphatic fluid to places that are inaccessible under normal conditions. And over time, using the table leads to the following effect:
- the vertebrae straighten, posture improves, pain in the back disappears;
- Ligaments work better, blood vessels are strengthened;
- the likelihood of developing a hernia, protrusion, and inflammation of the spine is reduced;
- blood circulation improves and the speed of lymphatic drainage increases;
- the occurrence of a number of serious diseases is prevented - from stroke or heart attack to vegetative-vascular dystonia or hypertension.
The costs of purchasing such a product can be quite large. Some models cost 30, 50 or even 150 thousand rubles. And, although factory models have an increased number of settings and provide different exercises, choosing an inversion table with your own hands reduces costs several times. Therefore, if a patient needs to get rid of back pain, but there is no way to acquire a simulator, it is worth making it yourself. The main thing is to comply with all the requirements for the drawings, as well as use high-quality materials.
Vertebrae straighten, posture improves
Reduces the likelihood of developing a hernia, protrusion
Vessels are strengthened
Blood circulation improves
Prevents the occurrence of a number of serious diseases
Tools
The tools you need to prepare are:
electric jigsaw;- drill;
- screwdriver;
- screwdrivers;
- grinding machine;
- knife;
- wrench;
- hammer;
- brushes
Materials you will need :
- wooden beam;
- metal tube;
- abrasive wheel;
- bolts and nuts;
- washers;
- braided cord;
- steel pipe;
- wide cargo belt;
- screws.
Manufacturing instructions
The first stage, which is carried out by a master who has decided to carry out all the work himself, is the preparation of all elements. The slats are sawn to obtain the required length. All elements are polished using a grinding machine with an abrasive wheel. To prevent wood or chipboard from clinging to skin or clothing, the grain size should be approximately P220. It is advisable to coat the boards with varnish, thus increasing their service life and resistance to moisture.
In accordance with the instructions, making tables requires the following steps:
- Make special holes in those places in the structure where metal tubes should be located.
- Fasten the boards using a drawing chosen or developed independently.
- Insert the fasteners into the tubes using the diagram. Secure the hinge joints of all elements - legs, levers, stops.
- Secure the cross bars using screws.
- Attach restrictive cords, the location of which is selected according to the diagrams. Fix the ends of the elements using a drill, making sure that they do not unravel during use.
- Secure the straps located below to hold your feet in place while performing exercises. Make the same protection in the chest area.
- Attach rubber to the ends of the legs to prevent the table from sliding.
- Check the strength and build quality.
- Complete the production by painting all parts with paint of the desired color. Wait until it dries.
You can use other, more detailed assembly instructions. On online resources there are enough descriptions and stories from home craftsmen who also assembled inversion tables on their own. Using the correct instructions, even a person without experience in carpentry or assembly work can easily cope with this task.
Prepare details
Secure the hinge joints of all elements
Secure the cross bars
Attach restraint cords, secure straps
Paint, check strength and build quality
How to do it?
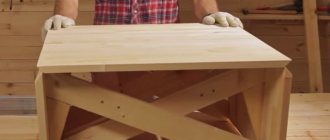
After preparing the necessary materials and tools, you can proceed to the manufacture and assembly of the simulator. To begin with, according to the existing drawing, is detailed . You can do it yourself using a grinder and grinder, or you can order it from a specialized company. Keep in mind, when contacting a furniture production company, you will receive parts completely ready for assembly with edged sides .
If you are cutting out the product yourself, carefully draw a sketch of the future product on the surface. Next, the manufacture and assembly of the table is divided into the following stages:
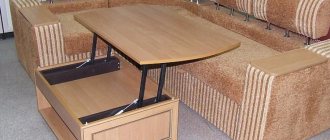
It is better to use chipboard or laminated chipboard as a countertop.
Its thickness should be about 3 cm. Using this material, you can assemble a table measuring 1.5 by 2 meters. If you cannot find a tabletop of the required thickness, glue two sheets of chipboard measuring 1.6 cm. To do this, cut out two identical pieces, carefully coat each side with furniture glue, fold the sheets together and tighten them with 2 cm screws along the edges and in the middle.Select a drill diameter such that the screws can be inserted into the holes without any problems.
- Even when using laminated chipboard with a beautiful texture, after gluing and tightening them with screws, it is recommended to treat the surface with varnish or paint . If there are small defects that form during the manufacturing process, cover them with putty before painting.
- Technological holes are drilled in the places where the structural elements will be mated together .
- Metal tubes are inserted into them .
- We connect the slats by hammering the pipe sections into the holes with a hammer.
- Bolts and washers under the nuts are inserted into these tubes .
Use a wrench to secure the bolt heads.- We fasten the hinge joints of the legs, levers and supporting planes with nuts
- Next, install the cross bars and secure them with screws. They will guarantee the safe operation of the product.
- Restriction cords will be attached to the legs of the machine . Their ends are drilled to prevent the fibers from unraveling.
- The cords are attached with screws and washers to the table legs.
- To allow the rear support frame to move easily, two hinges are installed at the bottom.
- At the bottom of the table, a series of loops are attached with screws from the tie strap to secure the feet and legs.
- You can also make a system of straps to secure the chest.
- rubber can be glued to the end of the legs to prevent the machine from slipping .
After assembling the inversion table, to give it aesthetics and to extend its service life, the boards are coated with paints and varnishes.
Tip : A massage table, a good desk and a comfortable laptop table can also help maintain your health.
Top 5 best models
Budget table
The angle of inclination of the simulator (from 15 to 85 degrees) is adjusted manually using a movable pin that is screwed into one of five slots. Most inexpensive inversion tables do not have this feature, and adjustments are made only with a belt.
The adjustment system itself is hidden under a gray plastic box, so the design looks minimalistic. This inversion trainer is designed for heights ranging from 4ft-10in to 6ft-6in and weights up to 300 lbs.
Despite the low cost, the simulator is stable and durable. This is because its frame is made of steel, and not of plastic, as is the case with cheap analogues.
On the Russian market, similar functionality is provided by the DFC SJ6100 model.
Price:
The best inversion device for back pain
The massage pillow is controlled using a remote control. It is attached with Velcro, so it can be moved to other areas of the back if desired. The price for this trainer is still ~$150.
On the Russian market, similar functionality is provided by the DFC IT002 model.
Price:
The Lightest Inversion Trainer for Back Pain Relief
Now Teeter inversion tables look different: the slippery material of the back, on which a person would slide forward when lying on, has been replaced with thin plastic with holes. Perhaps this is what makes the Teeter EP-560 more compact than its competitors (it weighs 58 pounds). There are also multi-colored plastic elements in the lumbar area for acupressure and a removable plastic roller. Otherwise, the functionality of the Teeter EP-560 is inferior to the more budget Innova models. So, there is no possibility to adjust the angle of inclination. The only thing you can do is fix the table at an angle of about 30 degrees using a belt. There is also no headrest adjustment function here.
Overall, the Teeter inversion table feels lightweight and well made. The ergonomic ankle straps received special praise from users. Teeter's lightweight inversion table costs ~$329.
On the Russian market, similar functionality is presented by the Body Sculpture model.
Price:
The heaviest and largest inversion trainer
The frame of the machine is not only made of steel, but also powder-coated for added protection. It also has ergonomic ankle mounts, like the Teeter EP-560, while cheaper models usually only have foam pads.
In general, the quality of the IRONMAN Gravity 4000 is not inferior to Teeter products and at the same time costs significantly less.
For an additional fee of $26, you can order a special mat for the simulator for better sound insulation. The cost of the simulator without an additional mat is ~$199.
On the Russian market, similar functionality is provided by the DFC 75303 model.
Price:
The best fitness inversion trainer
Removable armrests and rubber handles allow you to train your biceps, forearms, chest, abdominal and upper back muscles. This sports equipment, with its small dimensions (82 pounds), can replace several stationary exercise equipment at once.
Without a doubt, the idea is good, but the execution leaves much to be desired, some users say. They note that the simulator is difficult to assemble and disassemble, so it cannot be put away somewhere after training. Plastic handles become chipped over time. Since inversion is only one of the functions here, and not the main component, it is difficult to adjust it perfectly - there is simply no subtle mechanism for this. On the other hand, if Conquer were more advanced, it would cost many times more. And so its current price of ~$189 is almost half the price of the simplest table from the Teeter brand.
On the Russian market, similar functionality is provided by the DFC 75306 model.
Price:
Benefits of DIY
An inversion table is a device that is used for therapeutic and preventive purposes in cases of dysfunction of the musculoskeletal system. Using such a device, you can perform simple exercises for the spine, ensuring the straightening of the vertebrae, the flow of blood and lymphatic fluid to hard-to-reach places. Regular exercise on the simulator can improve your overall health and lead to the following positive effects:
- improve posture;
- strengthen the ligamentous apparatus;
- prevent the development of hernias, protrusions, infectious, inflammatory diseases of the spine;
- improve blood circulation and lymphatic drainage.
Activities based on the position of the body upside down are recommended for all ages. It is especially useful for older people to do them. Smooth movements and work on the simulator can strengthen blood vessels and prevent the development of the most dangerous diseases: vegetative-vascular dystonia, hypertension, stroke, heart attack, ischemia.
A noticeable disadvantage of an inversion table is its cost. For this reason, more and more often people who suffer from pain in the back and cannot afford an expensive exercise machine or massage are trying to make a wellness device with their own hands. Even taking into account the cost of the necessary materials, a self-made product is several times cheaper. If all drawings are followed and quality materials are used, you can obtain a safe device for treatment.
Labor costs
The time spent on making an inversion table with your own hands according to the drawings is combined in the following table.
| № | Work stage | Number of hours |
| 1 | Timber cutting | 1 |
| 2 | Sanding wood | 2 |
| 3 | Varnish coating | 2 |
| 4 | Assembling the simulator | 6 |
| 4 | Total | 11 |
Taking into account technological interruptions in work, it took 2 days to make an inversion table with our own hands.
Tips for use
Having assembled the structure, it is worth adjusting the height in accordance with the height of the person who will most often use such a table. If there are several of them, adjustments must be made before each start of classes. In addition, there are a number of safety requirements to reduce the likelihood of injury when performing exercises:
- The table cannot be used by a person whose height exceeds the recommended height for the selected size of the exercise machine. Because of this, the risk of injury will significantly increase.
- When starting to practice, you should not set the inclination angle to more than 10 degrees. Large values may be too dangerous for untrained people. When you get up from your desk, you may experience severe dizziness and even a headache.
- Exercises should be performed slowly and carefully. This applies even to those who have been training on inversion tables for a long time. Incorrect movements can worsen a person’s condition and even damage the back, aggravating the course of the disease that is treated with the help of a simulator.
It is worth getting acquainted with a number of contraindications for using tables. Such devices are not recommended and even dangerous for people who suffer from severe hypertension (stage 2 and above), glaucoma, arrhythmia or aneurysm. It is not advisable to use exercise equipment if you have connective tissue pathologies, coronary artery disease, dementia, a joint implant or pregnancy.
Do not use the table for a person whose height exceeds the recommended height.
For beginners, do not set the inclination angle more than 10 degrees.
Do the exercises slowly and carefully
Setting up the simulator
Before starting the exercises, you need to properly configure the inverter table. To do this, you need to perform a series of steps:
- Insert the tilt angle lock into the special grooves.
- Adjust and secure the footrest according to your height, following the markings.
- Place your feet on the footrests.
- By pulling the special lever located in the foot part of the simulator until it clicks, secure the lower limbs. Do not tighten the fastener all the way, so as not to compress the vessels. It is better to leave a gap between the bolsters and the legs by about the thickness of a finger. Then you need to insert the lock into the desired hole located at the bottom of the lever.
- Holding the handles with your hands, we begin to roll over in the simulator.
You should not set the length of the simulator to be greater than your height, otherwise a shift in the center of gravity relative to the axis of rotation will complicate turning over.
While performing a turn, be sure to close your eyes to focus on your sensations. If your health worsens, you should stop exercising.
When you lower your head below the level of your legs, blood flow to the brain increases. Therefore, turning should be done slowly.
Etiology of pain
The growth and formation of the human skeleton occurs until the age of twenty, after which the body begins to age. The nature of the processes in each case is different, in some they proceed faster, in others - more slowly.
Almost always, the first symptom of the disease is pain; if pathological symptoms are ignored, the disease progresses to the following stages:
- Protrusion - an intervertebral disc protrudes into any part of the spinal column;
- Hernia is the next stage of the disease.
The listed diseases are accompanied by pain; when the pain is localized in the area of the sacrum and lower back, it irradiates to the leg or gluteal region.