Types of repairs
Chest restoration operations are divided into three classes:
- adjustment;
- redecorating;
- complete renovation.
Products need adjustment after purchase and after complete restoration of the old one. And here we mean adjusting mechanisms, hinges, setting levels, securing loose handles. It happens that you want to repair a chest of drawers, simply updating a boring design or one that has lost its freshness. Then they resort to cosmetic restoration, based on the current condition and the desired result. A complete renovation implies the return of functionality to furniture parts and the replacement of elements that cannot be restored.
Repair tool
The required set of tools for working with a chest of drawers depends on the nature of the problem, therefore, first carefully inspect the product and make a list of breakdowns. But it’s a good idea to keep the following on hand:
| Tools | Consumables |
|
|
Decoupage
This technique is a kind of appliqué made from various materials. Most often they use drawings cut out from napkins or magazines.
It is recommended to layer the paper so that the applique protrudes less above the general level of the facade. The further algorithm of actions is as follows:
- We prepare the surface: remove handles and other fittings, clean the paintwork, sand and repair defects.
- To achieve transparency of the varnish layer, mix white acrylic varnish and white paint.
- We paint the background in the direction of the wood grain.
- We place the prepared pattern, cut out and thinned, symmetrically relative to the facade and cover it with a layer of PVA.
- After letting the glue dry, we treat the surface with fine sandpaper, after which we apply a transparent varnish composition.
- After sanding the dried varnish, apply a new layer. And so on until the desired result is obtained.
A detailed master class on decoupage of furniture from chipboard is in the next video.
Another option for decoupage is the formation of ornaments using putty:
- Mix PVA glue and oil putty until the consistency of thick sour cream.
- We make a stencil of the future design from thick paper or cardboard.
- We fix the stencil on the facade, then apply the prepared solution with a spatula.
- After drying, we sand the ornament and coat it with varnish: first transparent, and then matte.
Decoupage can transform the most unattractive furniture. There are a great many options for the materials and technologies used. It all depends on the imagination and artistic taste of the master.
USEFUL INFORMATION: Corrugated siphon for sink: technical characteristics, selection and installation
Frame repair
Since the chest of drawers itself is a load-bearing structure, it is subject to increased requirements for strength and stability. Ideally, it is advised to remove the drawers from the chest of drawers on runners, disassemble the parts, and replace panels that have dried out or cracked. Before screwing furniture bolts, it is important to thoroughly lubricate the joints with PVA glue so that they do not come apart later. After the glue has dried, restoration begins. And to do this, remove the old coating by using a solvent with methylene chloride (allowing it to act for a maximum of half an hour), or by peeling it off with a spatula, knife, or sandpaper. Then the defects are puttied, the surface of the chest of drawers is sanded, thoroughly cleaned and degreased, after which a new selected coating is applied (stain with varnish, tint varnish, paint with varnish, decorative film).
Coating restoration
A mixture of linseed oil and alcohol will help restore the varnish coating in case of small amounts of damage. It wipes the damaged area, after which it is polished with cloth. The process will be facilitated by using a mixture of GOI paste with kerosene.
In case of large-scale damage, the varnish is washed off using special solvents. The softened composition is removed with a spatula, after which the surface is dried, sanded and re-varnished.
USEFUL INFORMATION: How to choose the right location for kitchen outlets
Solving problems with the design of dresser drawers
Often there is a repair of drawers, which consists of correcting the fastenings of the bottom or facade. With the overhead type of installation, the drawers are pulled out, old nails or staples are removed from the bottom, and then the panel is nailed into place with new fasteners. With a mortise type of bottom (a sheet of plywood or laminated fiberboard fits into the grooves of the side walls), the boxes are disassembled, the grooves are carefully cleaned, the bottom is replaced with a new one from a suitable material and glued into the grooves. The façade that is loose or in need of replacement is unscrewed, coated with PVA in the places where it contacts the front and side walls of the box, and then screwed or nailed with pins (chops), using new fasteners.
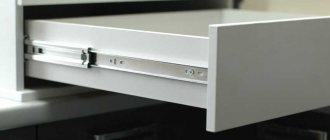
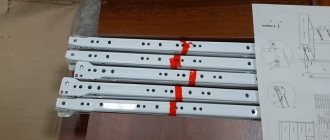
General guidelines for installing drawer slides
How to install everything correctly? Calculation of parts when installing guides for drawers can be made using the formulas that manufacturers provide for their products. Usually all the necessary information is also contained in the instructions.
The key to successful installation of drawer guides is accurate marking. All guides must be installed at the same level and strictly parallel to each other. It is most convenient to make markings before assembling the product on a flat horizontal surface with sufficient lighting.
There are two ways to install a drawer front: external and internal. With the external installation method, the facade covers the end of the body. Then the guide must be attached close to the outer end of the product stand. With the internal method, the end of the product stand is in the same plane as the facade. When attaching, the guide must be moved inward from the visible end to the thickness of the facade.
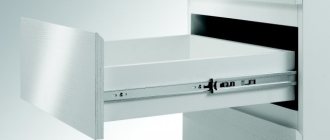
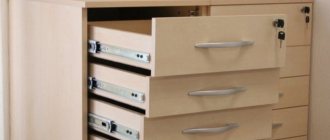
Repair of ball or roller drawer hardware
The type of retractable fittings dictates how to resolve problems. If the roller version (metabox) has become difficult to guide, then the fasteners may have sagged and then unscrew the runners and then attach them in the correct place, making sure the surfaces are horizontal. If the metal parts are deformed under the weight of the contents of the box, the guides will need to be replaced with new ones. After which it is important to adjust the chest of drawers on the roller guides. Ball options (telescopic) are more reliable than roller ones, and often only require proper adjustment, and not repair. If a loss of functionality is noticed (the frame flies off the wheels), the slide is dismantled, disassembled and cleaned, and the wheels are lubricated if necessary.
Tips for repairing drawer chests of drawers:
- If you can’t get the nails out of the box because they are very rusty, then use a special hacksaw and cut off the head of the nail. After this procedure, you can easily remove the nails with pliers to reach the bottom.
- If, after disassembling the structure, you cannot remove the glue with a brush dipped in hot water, then remove it with a sharp knife or chisel.
- If the drawer is coated with paint and the parts are connected using a tongue-and-groove method, first remove the old coating with a hot hairdryer and then glue the parts together.
- Before gluing the sides of the chest of drawers, check that the top and bottom parts are level by applying a metal ruler or level to them. If they are uneven, remove the beveled part with a plane.
Strengthening the structure of drawers and chest of drawers
Very often, a chest of drawers in the basic design does not provide the required level of strength, which is why the panels become deformed, fasteners loosen faster, drawers move out worse or fall out, guides fly off, and a shelf falls. This means that the frame needs to be strengthened. For example, replace a thin bottom made of plastic or fiberboard with a similar thickness made of varnished plywood or laminated chipboard. Strengthen the back wall in the same way. If you plan to heavily load the furniture, it is recommended to additionally tighten the joints (facade - side wall, back wall - frame) with corners.
How to fix a dresser drawer with a cut-in bottom?
The second type of bottom fastening in furniture is a mortise bottom, which most often consists of plywood that is glued onto the walls of the box. Manufacturers rarely use this fastening method, but it still exists. Such a bottom very rarely causes problems and in most cases they occur due to its destruction. So, if manufacturers used laminated chipboard for the bottom of the chest of drawers, then you are probably faced with the situation of tearing out the glued zones from the grooves. Of course, they can be put in place using the methods described above for attaching the overhead bottom, but it is better to change the chipboard sheet.
What is not necessary to repair pull-out chests of drawers?
We figured out how you can quickly and easily independently repair a drawer that wobbles and constantly falls. In some cases, there is no other option left than a complete replacement of the bottom. Let's discuss what is not recommended for doing such work:
- Nails. You should forget about this option, as it is not suitable at all. Today, only lazy people use nails to repair their furniture. Due to the fact that over time wood can change its previous shape, the heads of the nails will come out and damage the guide mechanism. No matter how long the nails are, they will not secure the structure as firmly as, for example, construction staples.
- Glue gun. It is not suitable for one simple reason - the glue will not hold the bottom of the retractable furniture well, since it is not able to withstand such heavy loads. When using hot glue to repair a drawer, you may encounter problems with the compound leaking out of the bottom.
A number of repair recommendations and useful life hacks
- For lightly loaded dresser drawers, eight-millimeter brackets are used when installing the bottom. But, it’s safer to take a hot 10.
- The worse the quality of MDF or chipboard, the thinner the fastening screws are chosen (maximum 3.0 mm).
- If the pins become loose, simply drill out the old holes to a larger diameter and take a larger diameter of the fastener.
- Pins, grooves, and even connections nailed with staples or screws are pre-coated with PVA for reliability.
- To ensure that the chest of drawers does not lose functionality, drawers do not become difficult to pull out, and the shelf doors do not stop closing, in no case should you apply too many layers of paint or varnish. If the appearance still requires a multi-layer coating, first remove the extra 1-2 millimeters of the base with a grinding wheel.
- Extend the life of retractable rollers by regularly applying silicone lubricant. This is, by the way, how to care for furniture from IKEA.
In any cabinet furniture, moving elements are the first to fail. Drawer repair may be needed for various reasons. The guides may have failed. Or the box itself became deformed during operation due to heavy loads. Let's consider the most likely cases.
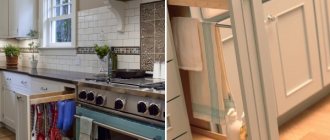
Repair with self-adhesive film
The self-adhesive film will give the headset a unique appearance.
Repairing facades using film is simple:
- The surface is prepared: the fittings are removed, the facade is sanded, degreased and primed.
- A piece of film is cut with an allowance of 2 cm on each side.
- The protective layer is removed from an area of 10–15 cm, the film is glued to the edge and at the same time smoothed with a piece of fabric.
- Next, gradually unwinding the roll, you need to fix the entire fragment on the facade, avoiding, if possible, the appearance of air bubbles.
- When pasting the ends and rounded areas, it is recommended to slightly heat the film with a hairdryer to make it more elastic.
- If it was not possible to avoid their formation, the bubbles are pierced with a needle or carefully cut to allow air to escape. All that remains is to smooth out the film.
- Excess material is carefully trimmed.
More details in the video.
The use of self-adhesive film during renovation often completely transforms kitchen furniture.
Repair of drawers: causes of breakdowns
Before you start repairing drawers with your own hands in a closet or chest of drawers, you should understand the cause of the breakdown. Understanding what caused the problem is the key to successful repairs. The main thing is not to confuse causes and effects. For example, warping the cabinet or cabinet body itself can cause incorrect movement of the guides and their failure. And if you do not “return” the body to the original correct geometry, replacing the guides simply will not solve the problem.
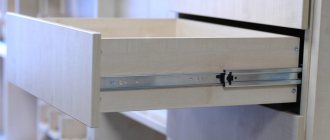
The box frame has fallen apart or the bottom is falling out
This kind of breakdown is especially common in wooden chests of drawers assembled on spikes. Over time, the boxes dry out and become unstuck. All that is required is to take them out, disassemble them into parts, level them, sand them and reassemble them with glue. For reliable tightening, use additional fasteners in the form of furniture corners and self-tapping screws.
The bottom of the fiberboard box may not be nailed securely at first. Fasteners on small nails are especially unreliable. If the drawer is made of chipboard, then it is better to attach the fiberboard bottom to it using 3x16 self-tapping screws. Use washers to expand the clutch area.
The drawer falls out or warps in the guides
Most likely the reason is the insufficient rigidity of the cabinet or chest of drawers itself. Due to the uneven load of the shelves, the body inevitably deforms: the sides bend, the distance between them increases, and the drawers begin to fall out. The cabinet may warp if the floors are uneven and the cabinet or chest of drawers itself is not level.
Correct, smooth movement of the guides is possible only with the correct geometry of all elements. That is, both the body and the boxes of the drawers must be aligned diagonally. Perhaps the assembly was incorrect from the beginning - if you screw the guides unevenly relative to each other by at least a millimeter, and over time, as the boxes are loaded and they sag, this inaccuracy will become critical.
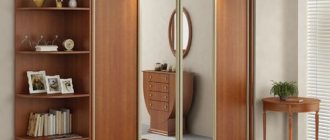
Door repair
A common defect in cabinet furniture is poor functioning of cabinet doors and bedside tables: they warp, do not want to close, and open spontaneously. The reasons are different: incorrect adjustment, defective hinges or magnetic latch, misalignment of the entire structure, swelling or delamination of the material.
Note: changes in the geometry of cabinets are often associated with the unsatisfactory condition of the back wall. The fiberboard sheet nailed there plays the role of a kind of retainer. If necessary, it is changed by cutting out the required fragment to size and attaching it with nails or small screws.
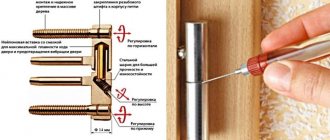
If the problem is in the loop, then replacing it is not always necessary: in most cases, adjustment helps. For this purpose, the design of the device has two screws: one is responsible for the fit of the door to the body, the second regulates its position in the frontal plane, moving it to the right or left.
A loop that has been torn out with meat can be put back in place using screws of a larger diameter. Another option is to drill holes, place wooden dowels in them using wood glue, and then screw fastening screws into them.
If the hinge breaks, it is replaced. Installation in old sockets is simple: mounting screws are screwed into the existing holes. It is more difficult if the hinge is installed in a new place or the door is changed. Assembly occurs in the following order:
- Sockets with a diameter of 35 mm for disc hinges are marked and cut with a milling cutter.
- A hinge plate is inserted into the slot located in the door perpendicular to the end and secured with a pair of self-tapping screws.
- The second plate is placed in the body, secured with screws through special holes in the bosses.
- Screw in the two adjusting screws to achieve the desired door position.
USEFUL INFORMATION: The tap is leaking, how to fix the faucet in the kitchen with your own hands?
Details of adjusting the hinges are shown in the video.
Spontaneous opening of doors occurs when the magnetic strip is faulty. In some cases, it helps to clean the magnet and the iron plate it attracts from contamination, adjusting their relative position strictly opposite each other. If these measures do not help, then the element is changed.
And one more video: a little trick that will solve the problem of adjusting a cabinet with worn out hinges without replacing them.
DIY drawer frame repair and replacement
Summarizing all of the above, we can identify several repair methods to return the drawer to its former strength and smooth operation:
- Strengthening the structure itself . It is necessary to add rigidity by installing strips along the back wall. You can also level furniture that is standing unevenly so that its geometry becomes correct. After checking all the corners, you can repair the drawers and replace the fittings (if required).
- Strengthening the drawer frame and strengthening the bottom . If during operation it becomes clear that the fiberboard bottom is not able to withstand the load and is expected to fall out even after replacement, there is a reason to strengthen it. To do this, install a stiffener horizontally or vertically along the bottom - a partition. You can additionally attach the bottom to this part. This method will also help make a large box more rigid without warping.
- Replacement of drawer boxes. Sometimes wooden tenon boxes that have fallen apart are easier and cheaper to replace than to repair. For example, make them again from chipboard. You can read how to calculate the dimensions of the drawer parts for replacement here. It is also worth doing if it turns out that the dimensions of the drawers were initially calculated incorrectly, and therefore fall out of the guides. Or the fittings themselves are already outdated and are no longer available (such as some types of guides with an insert into the groove of the drawer).
For roller and telescopic guides, the optimal clearance for smooth extension is 13 mm on each side.
How to fix a drawer with a false bottom?
What to do if the drawers in the closet or desktop are damaged? The most problematic place of the retractable structure is the bottom. We can safely say that 90% of manufacturers moderately simplify the manufacture of furniture by strengthening the drawer with an overhead bottom, which is located at the bottom of the retractable mechanism and on the sides. This configuration greatly simplifies the technological process, and the bottom takes on the entire load of not only the placed objects, but also the pressure of the sliding elements.
How to repair a chest of drawers with a similar type of bottom fastening? Most often, the cause of failure was insufficiently strong and poorly installed fasteners. The bottom is secured with nails to the front and back of the box, and several guides hold it in place on the sides. Yes, indeed, at first this scheme works quite well, but then it fails: the nails begin to loosen and the bottom begins to move away, even if the chest of drawers is not overloaded. Let's figure out what and how this damage can be repaired:
- Staples. This is an excellent option for repairing retractable furniture. To work, you need to take special hardened staples 1 cm long. In this case, you can safely use nickel-plated hardened staples - they are even better than the previous ones: very durable and do not rust at all. Working with this type of fastening is a real pleasure. To do this, you will need to remove the old fasteners and drill through the bottom with staples around the entire perimeter of the structure, including the area under the guides.
Important! Removing such staples will not be difficult for you. They are held in place by three screws on each side. Punch the sides of the box in strict sequence so as not to disturb its geometry.
- Screws. If you have problems getting staples or a staple gun, then screws will be your salvation in repairing a drawer. Screws with a diameter of 3-4 mm and a length of 15 to 30 mm are best suited for the job. In order to repair drawers in the kitchen, you just need to take a 15 mm long screw. However, when working with low-quality porous chipboard, it is better to stock up on a 30 mm screw.
The two most common methods given are also suitable for replacing the bottom of a box - you will need to cut out material of a suitable size and fix it with the above material on the furniture box.
Repair and replacement of guides in drawers
It happens that the guides quickly fail because the box is large and heavily loaded. Telescopic (ball) guides allow installation in two rows. In this case, the drawer will be endowed with greater load-bearing capacity and will last longer.
With such an “upgrade,” it is quite possible to replace the bottom made of flexible fiberboard with chipboard or plywood in order to store, say, tools in such a box.
It is better, of course, to replace the metal guides. They don't cost that much. However, if upon visual inspection the rollers are intact, have an even shape, and only the metal of the runners is bent, you can try to return it to its original shape. To do this, use a vice, pliers and other hand tools.
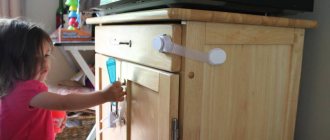
Reading time: 4 minutes No time?
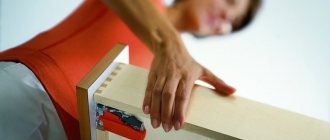
Our reader Natalya Petrenko from the Krasnodar region is a young mother and a very active housewife. Her video blog is full of recipes, travel impressions and practical advice. And Natasha prepared this material specifically for HouseChief on the topic of repairing dresser drawers.
Good afternoon I'm on maternity leave and many mothers will understand me. A strong half of my family is sure that since this is called “vacation”, then I’m relaxing on it. Little does he know that compared to his work, housework, and even with a small child, is hard work. I once drew my husband’s attention to the skewed drawers of the chest of drawers for linen. He reasonably noted that this requires the experienced eye of a furniture maker and suggested that I find a craftsman.
Read in the article
Buy neodymium magnets N52 20x10x3.5 mm
[Link] , [Link] , [Link]
The magnets were carefully packed in isolon. As it turned out, it was not for nothing that they were generously wrapped in isolon; neodymium magnets are quite fragile. While playing with them, one magnet broke