4251 0 0
Vadim November 24, 2018
To this day, many houses still have Soviet coffee tables, dining tables and desks. The design itself is made soundly and with high quality, but the years have not been kind to the appearance. Let's look at 10 ways to restore such furniture at home, and craftsmen will receive a master class on restoring tables with their own hands.
It is quite possible to restore old but good furniture at home.
What will it take?
Let's take a look at the standard set of tools and useful devices that will come in handy in your work:
- saw, jigsaw - used for cutting, shaped cutting of solid wood;
- a set of screwdrivers - indispensable when tightening;
- fasteners - you can use screws, self-tapping screws, nuts and other devices, depending on the type of shelves;
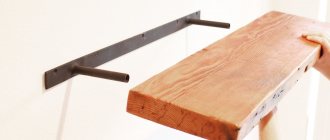
- fittings - to attach the shelves you will need steel corners, which are attached to the wall using dowels;
- hammer drill, electric drill - necessary for drilling holes in the wall, useful when installing shelves.
This is the main set of tools. It will be useful to stock up on additional equipment:
- a pencil to make notches;
- masking tape, which is never superfluous;
- hydro level so you can hang shelves neatly;
- a measuring angle that will help you make everything clearly along the line.
All of the above can be purchased at any hardware/construction store.
Add Trim
Some of the drawers were so old that they had holes in them, so I filled them with putty and then putty. I also reinforced the top with side slats.
The two pieces are joined using pocket holes made by Kreg Jig. Despite this, the chest of drawers was still unstable.
The coldest places to live on earth in ten photos
Scientists have discovered how harmful radiation from smartphones is
Another “Sputnik”: in Yakutia, a unique yellow diamond was named after the vaccine
Cheap furniture has cardboard backings made from cheap MDF. I decided that my "tower" needed a little reinforcement at the back, so I attached a piece of long plywood.
Where to begin
First you need to understand the table into its component parts. There can be 3 or more of them, depending on the type of furniture, the presence of drawers, etc. It is recommended to remove fasteners, including nails, in advance, since they will become a real problem when sawing solid wood.
Disassemble the table, see how many components are available. This is the material that will be used to make future shelves. If you want to save money and use the existing array to the maximum, take small parts of the table as a basis. These could be the side walls. The tabletop is always larger, wider, longer, so if desired, it can be divided into several shelves.
Deciding on the project
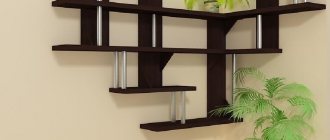
Decide on the type of shelves you want to end up with. They can be standard, protruding from the wall, multi-level, composite, folding, etc. Everything is limited only by imagination.
On the Internet you can find a great many ideas for making shelves from old furniture. Here are some striking examples:
- Mobile bedside table. To make it, it is enough to connect together 4 sheets of wood in the shape of a rectangle, make a side wall, and install ordinary swivel rollers at the bottom. The cabinet is easy to use and looks original in the interior.
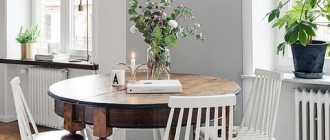
- Flower stand. Using table legs as a base, you can attach several sheets of solid wood to create a multi-level shelf for indoor plants. The solution is ideal for a Provence style interior.
- A small chest for storing children's toys. Its main advantage is its compact size. From an ordinary dining table you can make several similar drawers, additional wall shelves for toys and photographs.
- Original cabinet for the bathroom. It can be hung above the sink and used to store personal hygiene products and cosmetics. A small table will be enough to make such a cabinet.
Drawers are the ideal material for making all kinds of shelves and stands. Place them vertically and you will see that they resemble small bedside tables or shelves in shape, which can be adapted to store books, glossy magazines, cookbooks or souvenirs brought from a trip.
How to update furniture with your own hands: changing the design
Soviet-era furniture - walls, cabinets, chests of drawers - is not beautiful, but reliable and strong. Well, I just can’t bring myself to take it to the landfill. And rightly so. It is very easy to update it, giving it a completely new sound and modern look. Remaking cabinet-type furniture may not be very difficult: there are materials that can significantly change the appearance with little effort. The easiest way is to change the color and accessories. Everything is clear with the fittings - choose what suits your style best, and the color can be changed in two ways - paint and glue film (or wallpaper).
Remaking an old wall: changing the design
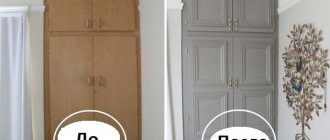
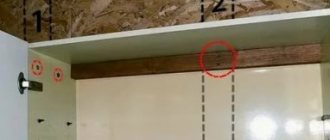
Covering old furniture with self-adhesive film is the easiest option for changing the decor. Today, film is available both plain and colored, in different colors, textures and shades. There is no point in gluing a film with a wood pattern; otherwise, it is in trend today. But plain or patterned ones are what can turn an old wall into new furniture. The steps are simple, but the work requires accuracy. But the result is excellent. See two photos. The first one shows an old Soviet chipboard wall before renovation, the second one shows it after.
Updating an old furniture wall - before and after
Now about how it was updated. Compacted furniture self-adhesive film was used, cream color, matte surface. The open part of the old wall was closed with glass doors; a translucent matte film was used for the glass. The edging is furniture layout (also self-adhesive) chrome color. The order of work is as follows:
- Everything that can be removed, you remove and disassemble. Remove old fittings.
- Surfaces must be clean and free of grease. This is easier to achieve with a soft cloth soaked in dishwashing detergent. Then everything is washed off with warm water and a small amount of vinegar. Wipe with a dry cloth.
- Cut out the details. It is better to cut the film 8-10 mm larger. The remains are then cut off with a paper knife.
- Spray the part to be glued with water from a spray bottle. On a wet surface, the film can be moved if something goes wrong. You can even peel it off without damaging it.
- After removing the protective layer from the film, carefully lay it out. Having leveled it, begin to smooth it with a soft cloth from the middle to the edges. Try not to have any bubbles. To do this, you need to move gradually, without jumping from place to place.
- If there is still a bubble, you can pierce it with a thin needle approximately in the middle. Then expel air from the edges of the bubble to the hole and rub the puncture site.
- Having glued the film, take a clean thin cotton cloth, spread it on top and iron it with a warm iron (medium heat).
- We glue the trim and install new handles.
This is the sequence of work with every detail. It’s the same with glass, you just need to glue it to the inner surface. After assembly you have a renewed wall. This technique can be used for any item: chest of drawers, bedside tables, wardrobe, kitchen set, etc.
With lighting, the updated wall looks magical
For example, after a successful experiment with a wall, we remodeled an old cabinet in the same way and added it to the right. Now the entire wall is occupied. You can update your kitchen set in the same way: apply self-adhesive film and replace the handles.
There is a second way. It is a modification of the proposed method, but it is simpler and not so labor-intensive. Only the doors are covered, not with film, but with non-woven wallpaper. The wallpaper is glued with PVA glue. To prevent the edges from riding up, the parts are cut 5 mm smaller on all sides. It turns out a kind of edging. Everything looks good (example in the photo below).
A simple renovation of an old Soviet-era wall: paste suitable non-woven wallpaper on the doors
What's good about this method: it's easy to change the decor. Tired of the old appearance, they tore off the wallpaper and put on new ones. Despite the fact that the method seems frivolous, the appearance is maintained for several years. Its author even tried it on a kitchen set. Only the wallpaper on top is coated twice with PVA glue. In this case, the cabinets can be washed. It is important to apply the varnish layer evenly, without sagging; there are no other difficulties.
Sometimes wallpaper is varnished. But before you do this, try it on a scrap piece: see how they react to it.
When choosing a varnish, you need to remember that acrylic and cellulose varnishes remain transparent after drying, while polyurethane varnishes turn yellow after time. Also, polyurethane is almost not softened by solvents: it can only be removed mechanically (from wood - cleaned with sandpaper).
Dresser update
The old chest of drawers had stood for who knows how many years in the attic, but it was very strong and reliable, it had not dried out one bit, only the polish was cracked. It is much stronger than modern products. This is a feature that is inherent in old, Soviet-era furniture. It's not very detailed (to put it mildly), but after standing in poor conditions for several decades, it remains strong. Remaking a chest of drawers is more complex: two techniques were used: painting, and then decorating using polyurethane moldings and wallpaper.
This is what it was in the beginning: an old thing that had been collecting dust in the attic for a long time
Step 1. Remove the fittings and remove the old coating. In some places the polishing was scraped off, in others it was sanded with sandpaper. The chips were covered with wood putty and waited until it dried. At the final stage, everything was cleaned with fine-grain sandpaper. At the same time, the chest of drawers became the same as in the photo below.
This is after it was puttied and leveled with sandpaper
Step 2 . Installation of polyurethane moldings. When choosing moldings, make sure that they are not bulky: too thick ones will look very rough on a small chest of drawers. They should be no wider than 5 cm and as narrow as possible when looking at them in profile.
The purchased polyurethane moldings were carefully cut, the corners were filed at 45°. (Read here how to properly file the corners of moldings). The pattern match must be perfect. We glue them on PVA. For reliability, you can additionally secure it with screws with wide heads. A small recess is made under them, after the self-tapping screw is screwed in, the hole is covered with putty. Try to ensure that the putty immediately lays down perfectly (you can correct it with a wet finger), since it is problematic to clean off dried putty.
Moldings are glued and mounted on self-tapping screws
Step 3. Everything is treated with a primer. You can use PVA glue diluted with water in a ratio of 1:2. After the primer dries, paint (two layers). For this case, water-based acrylic paint was chosen. The color is coffee with milk, although it looks completely different in the photo. Color rendering is inaccurate.
This is after the second application of paint. Cute
Step 4. For decoration, wallpaper was selected whose coating was made using the silk-screen printing technique. Pieces are cut to the size of the inside of the frames from the moldings and glued to PVA. After the glue has dried, the entire chest of drawers is coated twice with water-based varnish.
This is the decor for the chest of drawers
Step 5. And the last to be installed are new legs (furniture wheels) and handles.
We install the handles and legs)) The updated chest of drawers is completely different from the one you saw in the first photo.
As you can see, there are no difficult jobs. Everything is really elementary. But all processes require accuracy - the appearance depends on it. You can also update an old wardrobe in the same way. Get a set for the room. Stylish and original.
When updating furniture, the worst thing is if the surface is varnished. The varnish takes a long time and is difficult to remove. If the surface is smooth and the polishing is not damaged, you can apply primer for complex surfaces and paint after drying. This greatly speeds up the process of painting lacquered furniture.
If you have children and a summer house or yard, you may be interested in reading how to make a playground with lots of photos. You can read about making a sandbox here.
How to update an old nightstand
In the photo gallery below you can see the process of restoring an old polished bedside table. First, the old polish was removed from it, puttyed, sanded and after processing it was painted twice with acrylic paint. Then paper with an interesting design was glued to the doors (it was a gift paper bag). Once dry, the whole thing was coated with two coats of semi-gloss acrylic varnish.
The sequence of work is not difficult if you know how to do it. All processes will repeat the sequence of actions that you saw in the example of updating the chest of drawers. The result is also impressive.
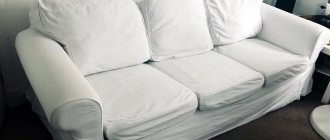
Remodeling furniture with your own hands is a painstaking task, but the result is worth it. Below is a photo of a bedside table restored using a simple method: it is covered with embossed wallpaper, and varnish is applied twice on top.
You can hang embossed wallpaper, and to prevent it from getting dirty, cover it with a double layer of transparent varnish
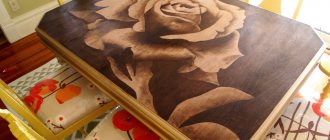
Table makeover
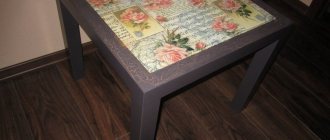
Using the same technology, a banal coffee table can be turned into a modern piece of furniture. In this case, it was covered with wrapping paper. It is dense, adheres well and does not become limp when applying varnish.
Before starting work on decorating the tabletop, the legs of the old table and the edges of the tabletop were painted in a light color: this way it fits better with the new design style. Then the process of its transformation began.
When pasting, the panel is cut out significantly larger than the dimensions of the tabletop. It's necessary. The paper is glued to PVA and rolled with a roller so that there are no lumps or blisters. The surface must be absolutely smooth.
The paper is glued gradually, roll it with a roller so that there are no bubbles
After gluing, take sandpaper with fine grain (it is more convenient to work if it is attached to a block). By running it along the edge, they bend and at the same time separate the excess paper.
How to make a beautiful edge
Even cutting with a guillotine will not give you a fairly even edge. And with this method, it turns out professionally designed. There is no smell of amateur activity.
This is what the edge looks like when all the excess has been removed
After the glue has dried, the surface is coated twice with a thin layer of varnish. It should be applied with a soft brush in a small amount. Layers are applied in different directions: first along the long side, then across.
Furniture remodeling: photo ideas
Remaking furniture with your own hands is a creative endeavor. Even from a boring shelf you can make a great thing. And it is not at all necessary to repeat exactly what you saw. Many useful ideas come during the implementation of a “project”. It’s just a pity that some of what was planned turns out to be not as attractive as it seemed. Try it, experiment. Fortunately, modern technologies allow this to be done at minimal cost.
Further actions
Having decided on the style, type, dimensions and parameters of the shelves, proceed to marking. Be guided by the truism: “Measure twice, cut once.” If desired, you can restore incorrectly sawn boards, but they will look ugly and sloppy.
When using measuring instruments, maintain a right angle of 90 degrees. This way you will be completely sure that the shelves will turn out even. Correctly measure each component part, if necessary, draw up a tentative diagram on a sheet of paper, write down the dimensions. Check everything several times, then mark with a pencil and start cutting.
The saw must be held confidently, firmly, straight. If the tool creeps, the saw will go downhill and the cut will be uneven. An ideal solution would be a jigsaw, since the flat metal sole ensures that the tool is held strictly perpendicular to the surface.
Primer and paint
It's time to start painting. But before you do this, it is better to seal all the holes from the original handles on the front walls of the drawers with adhesive tape. Also fill them with wood putty and let it dry. I didn't want to paint the inside of the drawers because I wanted them to be easy to get out of the dresser. Besides, they were still in pretty good condition. So I taped the inside and then used a spray bottle to apply primer to all the parts. However, after a few coats the surface was still uneven, so I added a little putty where needed.
I then sanded the surface and added a final coat of primer. My dresser looked much better, but not as good as I would have liked, so it got the nickname "tower of terror".
Humanity's first outpost on Mars: NASA plans to colonize the Red Planet
There is a risk, but it is small: the expert spoke about the transmission of COVID-19 in the air
Psychotest that reveals all hidden sides (they may turn out to be dark)
How to remove varnish
Often, old tables have traces of varnish, all kinds of abrasions, scratches and defects that spoil the appearance. You can get rid of them by using a chemical solvent. You can buy it at a hardware store.
Observe precautions, avoid contact of the solvent with the mucous membrane and hands. Wear safety glasses, gloves and in a well-ventilated area.
After removing the old layer of varnish, treat the surface of the wood, restoring the noble tone, pattern, shade. A stain or other impregnation will do. Such treatment will help preserve the structure of the wood, extending the service life of the shelves.
Additional decor
There are a huge number of options for decorative shelf design. Careful treatment with stain helps to emphasize the natural structure of the fibers, making the wood more beautiful and expressive.
As an additional design you can use:
- mirrors are convenient, practical and help to visually expand the room;
- mosaic - quite difficult to make, but helps to achieve a stunning effect;
- carved decorative overlays - they can be cut from ordinary veneer using a stencil.
If you don’t like the way the screw heads look, you can cover them with plugs or ordinary stickers that resemble wood in texture.
Where can you use these shelves?
This is where the important advantage lies. Homemade shelves are suitable for any room. There are many examples when they were installed in the living room, bedroom, nursery, kitchen, bathroom, hallway and balcony. Shelves made from an old table are convenient because they can be adapted to store any utensils, and things will look stylish, neat, and well-groomed.
Wooden shelves create a feeling of coziness in the interior. We've provided plenty of ideas to help breathe new life into old furniture. Feel free to take note of them and implement them.
Dresser handles
After I drew the design with the stencil, I marked the drawers with duct tape to get them back in place in the correct order. Now it's time for new pens. As you remember, we removed the old ones and applied a layer of putty to the holes.
If you've ever tried to center parts and get the handles to line up exactly, you know how difficult it can be. Fortunately, there are tools that help you do this. The handy Rockler Jig lines the hole from the left edge and the center piece from bottom to top. The automatic part squeezes out a small hole - this is where you need to drill. So my handles were installed in no time.
Always on top without effort: the easiest haircuts to care for spring 2021
A man’s real dream: a guy made a cozy “den” out of a closet
A woman was looking for her lost twin brother: she found her where she did not expect
As you can see, it turned out to be quite an interesting chest of drawers with 8 drawers. I like that two of them are bigger than the rest. This table, which I repurposed as a dresser, can be used for a variety of purposes. I'm not sure what room I'll put it in or what I'll use it for. You can store filing cabinets, papers, underwear or even jewelry in it. If you use it as a file cabinet, then you can store folders with files in deep drawers. In addition, the chest of drawers will help organize accessories - bags and shoes, jewelry and much more.