How to connect kitchen cabinets together
Developer
Group: Users Messages: 150 Registration: 21.5.2010 User No.: 4137
Everywhere about intersectional ties it is said in passing, something like “you can already tighten the sections with intersectional ties. “. But there are a few questions about the details:
1. How many pieces of intersection ties are needed for one wall-to-wall connection? It is clear that one is definitely not enough. How much do you need? For example, for cabinets 600 deep and 2000 high? And for the upper kitchen sections, such as endings?
2. How does it make sense to place them? In depth - in the middle, or, for example, one closer to the facade, and the other to the back? What about height? And, if you put more than two of them, what is better: all in one straight line, or in a “broken line”?
3. What is the best way to make holes for ties: – mark everything on the parts in advance using a ruler/tape measure, and then adjust the cabinets until the holes line up? – or should we install the cabinets first and then drill holes in place? – or some other option?
4. Accordingly, at what point should I tighten the cabinets: - immediately after installation in place, and then level them with adjustable legs as a single whole, - or level all sections separately, and then tighten them?
Naturally, the last two questions do not apply to upper kitchen cabinets, but with lower kitchen cabinets, everything is not so obvious.
Developer
Group: Moderators Messages: 529 Registration: 10/13/2008 User No.: 4
1.
For sidewalls 2000x600, four pieces is enough. Three are closer to the face, and one pulls up the rear. Or 5, then 2 pull up their butts. For kitchen top ends, two pieces are usually sufficient. In general, sometimes in kitchen ends it makes sense to tighten a 4x30 screw from inside the adjacent section with a self-tapping screw so that the cap does not protrude into the face.
2.
It should be positioned so that the front parts are pulled together well. On uneven walls with bumps, it makes sense to tighten only the face, leaving the back free. “Straight, broken, square” is whatever you prefer, here we should rather proceed from technical necessity. Sometimes, on well-exposed products, two ties holding the front part together are more than enough. To determine how close to place the screed to the front end, you should pay attention to the depth of the sidewall. This is how I place the zip ties. There are two on the upper sections, 10 centimeters from the face. In height depending on the height of the section. The lower sections, I put 3 ties according to good standards. Two from the front and one from the back closer to the top. But as a rule, I do only two, on the front part.
3.
It can be done either way. The first depends on how accurately the craftsman can drill the holes for the screed before installation, so that they later fit together and there is no need to drill holes, because due to a 0.5 mm misalignment (the drill has moved or something) the screed will not fit. When you start hammering such a screed with a hammer during installation, it looks noisy and not beautiful. But this is also possible, let’s say for a screed of 5 mm. make holes 6 mm in advance, and set the tightening accuracy during installation. Ideally, it is better, of course, to do the answer. under the screeds in the workshop. But. As ideals often happen, they remain ideals. Again the same walls with bumps, why leave extra holes, even if made in advance, when they may not be useful. Everything is on a specific occasion.
4. This question applies to upper cabinets too. There are different moments. But this question is needed when question No. 3 “about the use of screeds at the time of installation of the product” has already been resolved, in favor of installing screeds “on site”. It's better to do it this way. A). pre-set the sections as accurately as possible, b). temporarily fix with clamps, c). install ties, d). finally adjust the tightened group of sections. That's what I do with kitchens. First, I level the sections, then I pull them together, and finally lay out the bases before hanging the top, when there is already a tabletop, i.e. I’m already leveling the whole structure on the tabletop.
P3017023.jpg (173.94 kilobytes) Summer downloads: 1477 p3017022.jpg (132.57 kilobytes) Summer download: 1718 p2287013.jpg (161.55 kilobytes) Steel of downloads: 1596 p2287006.jpg (112 .46 kilobytes) Number of downloads: 1156
Sometimes it happens.
PICT0024.JPG (198.58 kilobytes) Number of downloads: 1222 PICT0026.JPG (311.34 kilobytes) Number of downloads: 1350
What are the features of fastening
If you are faced with the task of connecting several separate modules together, the most correct and convenient solution would be an intersectional tie for furniture.
In household use, self-tapping screws are often used for such purposes. But this is not the best idea, since they do not connect well and spoil the appearance of the furniture.
Therefore, it is better not to save money, but to immediately buy a screed from the same Leroy Merlin store and other similar retail outlets. In St. Petersburg, Moscow and other cities there will definitely be no problems with purchasing zip ties.
Furniture ties: laying out the essence
Assembling furniture is a non-trivial task when it comes to non-standard and interesting solutions. But there are clear rules for how the elements are attached to each other. At a certain point, dowels were common, and they are still used until that time. There are other solutions for fixation, which will be discussed in the article.
Corner screed
This is a simple element in design, consisting of a metal plate bent at a right angle. The tie also has a hole and a groove on opposite sides. The complete set contains 5 parts: an angle, two bolts and two fittings. The advantages of such fasteners include the possibility of hidden installation and strength. For small loads, a corner furniture tie made of plastic is used. Such models are distinguished by their aesthetics, but it is important to carefully calculate the fastening force so that later installation does not result in operational problems. All types of corner fasteners also include a problem with the arrangement of objects - bent plates in a furniture niche still conceal a small space.
Purpose
When assembling a furniture product, the location of the connected parts of the structure must be checked so that its integrity is not compromised during operation. This is what a furniture tie is intended for - a fastener that makes it possible to tightly and firmly connect structural elements located in a certain position (most often at a right angle) relative to each other. If previously furniture was assembled mainly using screws and self-tapping screws, now different types of ties are used for this.
This replacement is due to three reasons:
- Increasing the aesthetics of furniture, thanks to the use of ties, the fastening of parts becomes invisible;
- Each disassembly of furniture assembled with screws reduces reliability;
- Sometimes the use of conventional fasteners is simply impossible for structural reasons.
And finally, the use of furniture ties allows for quick and durable assembly of the product.
How to combine kitchenware?
Let's look at how connections are made. For example, kitchen cabinets will be used, but in the same way you can mount them next to each other:
- wardrobes;
- bookcases;
- bedside tables;
- other furniture.
Connection of adjacent walls
To connect cabinets, you need to proceed as follows:
- Place furniture where it should be.
- Align the side walls with each other so that they are in the correct position.
- If the sides on which the doors are installed are adjacent to each other, remove them first.
- Clamp the cabinets together with clamps. With their small size, two pieces are enough, tightening them at the top and bottom; for heavier furniture, 3-4 clamps will be required. If there are no clamps, you will have to call a second person to help, who will hold both pieces of furniture with his hands.
- At a distance of 7–10 cm from the inner corners of the cabinets, place marks for future holes.
- Drill holes for the zip ties. The drill must be taken with the same diameter as the outer diameter of the nuts (it is indicated on the marking; in extreme cases, measure it with a ruler or, better yet, with a caliper).
- Countersink the edges of the holes so that the bolt heads and nuts can be recessed into the wall material. This is done with a special tool (wood countersink) or a thicker drill whose diameter corresponds to the size of the tie heads. If you don’t have one at hand, you can simply insert the bolt and nut into the hole one at a time, without twisting them together, then trace them with a pencil or permanent marker.
Then, using a thin drill like a roller cutter or cutter, carefully select the material along the outlined line to the desired depth.
This method allows you to achieve ideal evenness of the front surface of the cabinets relative to each other.
We must remember that furniture ties are not intended for frequent assembly/disassembly . They should be used only when the cabinets are fixed to each other for a long time. Typically, ties cannot withstand more than three to four cycles of twisting/unwinding.
Rear wall
Usually the connection is made so that the back walls remain free: this allows you to compensate for unevenness of the floor and walls in the room where the furniture is installed. However, if necessary, the connection can also be made along the rear wall. You can do this in the following ways:
- If the wall is made of fiberboard or plywood, you can first install furniture ties, leveling the cabinets, then remove the walls and make a new common one from a sheet of similar material. They put it in place of the old ones, fasten them with self-tapping screws, furniture nails or staples (if you have a furniture stapler at hand).
- Connection with fastening strips. They can be made of wood, but it is safer to use metal ones. You can make them yourself by taking a strip of aluminum or thin steel and drilling two holes in it. All that remains is to align the cabinets along the back wall, attach the strips to the ends of the top and bottom of the cabinets, then secure them with self-tapping screws.
This method of joining two pieces of furniture is rarely used.
Types of fasteners
Furniture ties can be used individually or in combination with others. Some furniture items are designed for special occasions. It makes sense to consider the features of each and the principle of its installation.
You might be interested in:
- Online furniture store Alanamebel.ru
- Industrial mountaineering and reasons to choose it
- What to do if you need to get a loan?
- Single-leaf plastic windows
- What is the difference between artificial and natural rattan furniture?
- Diesel generator
- Projects of attic houses
- Principles for creating public transport stops
Eccentric coupler
This element is used for fixing cabinet parts and intermediate modular shelving that require reliable fastening. The eccentric coupler consists of three elements - a rod, the eccentric itself and a plug, which creates a decorative effect. Also, eccentric furniture ties are available in reinforced versions designed for structures with increased loads. The main function of such a screed is to ensure a tight and reliable connection of furniture components, and at different angles - from 90 to 180 degrees. The advantages of this method of tightening are that it is completely hidden from view and can be used repeatedly without the risk of damaging the furniture structure.
Confirmat
The most common type of fastener is confirmat.
At the same time the easiest to use. With its help, assembling furniture is easier and faster than using other types of furniture screed. Especially if during assembly you have to drill holes for fasteners yourself. Using a confirmat, two parts are connected at an angle of 90 degrees. Fig.1.
Confirmat - used to connect parts at an angle of 90 degrees. The two parts are connected with 2 confirmed screws. The confirmat is installed at a distance of 3-7 cm from the end of the parts to be connected. To install 1 confirmation screw, you must first drill 2 holes in the parts to be joined: in the end of the first part for threads (drill diameter 5 mm), in the second part for the head (drill diameter 6 mm).
In order to tighten the two parts, you need to drill two holes. One in one part, with a diameter equal to the diameter of the confirmator head, the other, at the end of the second part, with a smaller diameter equal to the diameter of the threaded part.
As a rule, drills with a diameter of 6 and 5 mm are used for this, respectively. However, there is a combination drill available for drilling holes at the same time. It is very comfortable. There is no need to constantly rearrange drill bits or use two drills at the same time.
Fig.2.
Drill for confirmation. Allows you to make a hole for 1 confirmat screw in two parts at once, and also forms a recess for the confirmat head. Increases the speed of furniture assembly by at least 50%.
Confirmat is a universal fastener, but it has some disadvantages and application features.
Confirmat should be used simultaneously with the use of dowels.
A dowel is a wooden rod with a diameter of 6-8 mm and a length of 20-30 mm (in the photo below, next to the confirmation). The dowel acts as a guide and does not allow parts to move during tightening. Fig.3.
Connecting the parts using a dowel with a diameter of 6-8 mm and a confirmat. This joining method is used in factory furniture, for example furniture from IKEA. Provides high accuracy of joining parts.
Despite the fact that furniture assembled using confiramate can be assembled or disassembled, furniture made from laminated chipboard does not tolerate this very well. As a rule, after one disassembly, the furniture screed no longer holds well.
The confirmation should be wrapped carefully.
The best option is by hand or with a screwdriver at low speed. Otherwise, the confirmation thread turns into a drill, which breaks the hole. Fig.4.
Tightening of parts with confirmation. The tie is performed with a hand wrench or a screwdriver with a low rotation speed of the chuck. The screwdriver must have the correct tightening torque to prevent thread stripping.
In order to recess the head into the body of the furniture part, you should use a wrench and do it carefully, otherwise there is a possibility of the thread breaking. Sometimes it is necessary to pre-calculate.
Tools
Before assembling the kitchen set, you need to assemble the tools for work. Simple tools are required, but they make the job much faster and easier.
- Screwdriver or set of screwdrivers.
- Drill with drills of different diameters.
- If the walls are concrete or brick, you need a hammer drill - drill holes for fastening the upper cabinets.
- A hacksaw or jigsaw may be required.
- Hex key - for fasteners (can be included in the kit).
- Hammer, ruler, square, bubble level.
DIY kitchen assembly can take a day or more
It's a good idea to have a plane builder or laser level. It makes arranging cabinets in one plane much easier.
Assembling kitchen furniture: process features
Assembling kitchen furniture and its subsequent installation is a labor-intensive process that requires the master to be able to correctly “read” the instructions, work with tools, and know the features of fasteners.
If you have never encountered such work, then it is better to use the services of specialists. Are you sure that you can do it yourself, but some of the nuances from the instructions are not clear? Then read our article. In it we will look at the main stages and features of assembling kitchen units.
Installation of intersection screed
First of all, holes are drilled through in the places where it is planned to connect the modules. This is an important stage, since during the process of through drilling of laminated chipboards, chips may appear. There are two ways to eliminate the possibility of their formation:
- A wooden block is pressed as tightly as possible to the drill exit points;
- Do several approaches. First drill a hole using a thin drill, and then bring it to the desired diameter with a tip of the appropriate size.
Read also: How to install a circulation pump in a heating system
If the creation of the hole was successful and without defects, then the furniture screed is installed, followed by the furniture objects being brought together. It is advisable to prepare the furniture in advance for final installation at the assembly site.
Main stages of furniture assembly
Assembly of kitchen furniture is carried out in several stages:
- Wall cabinets are assembled and installed;
- A cabinet is mounted and a sink is built into it;
- Floor-standing cabinets are assembled;
- Additional elements are installed.
Installation tools
To assemble furniture, the required tools are:
- Screwdriver to speed up the process of fastening products with various attachments;
- Impact drill or hammer drill for preparing holes and installing bolts in them to which hanging cabinets will be attached;
- Set of screwdrivers and keys;
- Rubber mallet, hammer;
- Construction level to obtain an even geometric line on the wall along which holes will be drilled;
- Construction knife;
- Ruler, square, tape measure.
Furniture fittings
To avoid complicating the process of assembling a kitchen set, it is better to understand in advance the fittings that are used to connect the elements. The most common fastenings are screws and nails.
The former are used to install mechanisms for opening and closing doors, the latter – for fixing the rear walls. The second no less popular fasteners are Euro screws. They differ from the standard ones in their greater thickness, blunt end, larger thread pitch, and in the head they have a hexagon-shaped hole for a special key, which is closed with linings after installation. European screws are used to fasten cabinet walls.
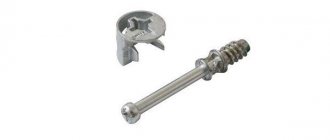
An excellent fastener that allows you to connect furniture elements without making through holes in them is an eccentric coupler. It consists of an eccentric (it has a round shape and a cross-shaped hole) and a rod (resembles a self-tapping screw, sometimes with a rubberized core). Thanks to this screed, furniture can be assembled and disassembled several times. The docking process is carried out in the following order:
- An eccentric is installed in a wide round hole in the furniture;
- A rod is screwed into a narrow round hole in another element (for example, a wall);
- The elements are connected by inserting the rod cap into the eccentric cavity;
- Turn the eccentric with a screwdriver until it is completely fixed.
Furniture screed – used for joining kitchen cabinets together. It consists of two elements - threaded bolts that are inserted into one another. One has a head for a Phillips screwdriver, the other has a head for a flathead screwdriver.
Eccentric coupler
An eccentric coupler is often used in the factory production of furniture. The reason for this is the difficulty of drilling holes. An eccentric coupler consists of two parts: a pin and an eccentric. The pin is installed in one part, and the eccentric in another.
The main advantage of this type of fastener is that this fastener is hidden and therefore does not spoil the appearance of the furniture. In addition, this type of fastener, unlike confirmat, allows you to repeatedly assemble and disassemble furniture, which is important, for example, when moving. Also, using an eccentric coupler, you can connect parts at different angles.
Read also: How to calculate electricity consumption based on the power of the device
When making furniture yourself, it is not often used due to the difficulty of drilling holes and the inability to correct the joint during assembly. The main difficulty in drilling holes lies in the hole for the eccentric. This hole is not through and requires the use of a special drill - a Forstner drill.
After installation, some parts of cabinet furniture may have a slight slope in relation to each other. To prevent the body from loosening during operation, as well as to firmly secure the structure to form a single ensemble, the parts are secured to each other with special fasteners - steel ties.
Preparatory work
The assembly of kitchen furniture should begin after the preparatory stage is completed. First you need to dismantle the old set - sequentially disassemble the floor cabinets, then the wall cabinets, carefully stack their elements in small piles, wrap them in some cloth or sheets of cardboard from under household appliances, wrap them with tape, take them out of the room, put them in the pantry, take them to garage or transfer to the country house.
The next step is to check the evenness of the walls and floor using a building level. If there are unevennesses, they are eliminated in various ways: the floor structure is rebuilt, the coating is changed, a leveling mixture is applied, etc. If this is not done, then problems will arise during the installation of the cabinets - it will be difficult to align them perfectly, eliminate gaps, etc.
If necessary, you can move sockets, water pipes and sewer outlets to another location. When all the changes have been made, all that remains is to take out the bulky garbage and clean the room with an industrial vacuum cleaner or a regular broom.
Prefabricated kitchen furniture is supplied disassembled - cabinets for dishes, food storage, forks, spoons, a cabinet for the sink, etc. Each module is packaged separately. They need to be spread evenly in the room so that they do not interfere during assembly. It is better to bring one module at a time into the kitchen and leave the rest of the packaging outside the room, especially if it is a small area.
Peculiarities
Furniture intersection screed is the optimal way to connect individual modules together. Home craftsmen use self-tapping screws to fasten the walls of the set. It’s better not to do this: under the weight of the structure, the screws can be torn out and the appearance will be ruined.
The coupler consists of a cylindrical nut with an internal thread and a screw. Hardware is often chrome plated and is not subject to corrosion. This is especially true if the furniture is located in a room with high humidity. On the nut, for reliable fixation of structures, there are slots. An intersectional tie for furniture should be installed without overtightening the fasteners, since if screwed in tightly, the nut or screw head can deform the furniture walls.
It is better to place wide washers under the nut and screw. They will help to tighten the screed as tightly as possible without damaging the polish. To ensure that the screed does not stick out from the inside of the furniture, it is necessary to countersink. This is not a difficult process, so you can do it yourself.
Cabinet assembly
Prefabricated kitchen furniture can be mounted from any cabinets - from wall cabinets or floor cabinets, but it is better from floor cabinets to make it easier to measure the hanging height of the upper cabinets. There is no need to worry about fastening elements - they are included with each module.
Upper furniture cabinets can have doors with or without glass inserts, hinged and retractable doors with various opening mechanisms. Most base cabinets have drawers. The presence of certain elements makes certain adjustments to the installation process.
Assembly of lower cabinets
The process of assembling kitchen furniture begins with assembling the structure. The first step is to take out the prepared elements - the bottom, walls, front and rear partitions, shelves. All of them have holes for European screws; the keys for them are included in the kit, but it is better to use a screwdriver with certain attachments to screw them in so that the process does not take many hours. The cabinet under the sink is installed in the following order:
- Take the bottom and one wall of the set, connect them together;
- The second wall is screwed to the resulting workpiece. It is important here that the unprotected edges of the walls are on one side. Also take into account the location of the holes for the furniture hinges that will hold the door. The direction of door opening depends on their location (right or left);
- Place the structure “on its feet”, install partitions or shelves if they are provided for by the cabinet design;
- Nail the back wall, covering the bare edges;
- Turn the module over so that the bottom is at the top;
- Mount the legs according to the markings. If it is not there - by eye, placing them in the corners at equal distances from the edges;
- Furniture hinges are installed in two holes and fixed with self-tapping screws into the existing holes;
- Install the door.
Assembling a cabinet with drawers
The frame of such cabinets is assembled as described above with one difference - guide profiles for roll-out drawers are first installed on the walls according to existing markings. Assembling the boxes is also not difficult. The bottom and rear walls are attached to the side walls, which are usually metal, through holes, and then the front door. The assembled box is carefully attached to the guides.
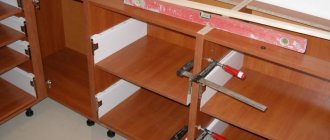
In this way, all the cabinets of the lower row are assembled, installed next to each other, checked for level, and fastened together with furniture ties. A tabletop is placed on top of them and fixed through special holes in the cabinets using clamping mechanisms and bolts.
A hole is cut out for the sink using an electric jigsaw. To do this, first make a marking by placing the sink upside down on the countertop, tracing its outline with a pencil, drilling a hole for the file, and cutting out a piece of the countertop.
After the modules are laid out and fastened to each other, a tabletop is installed on them, doors are hung and roll-out drawers are installed.
Assembling upper cabinets
Before assembling kitchen cabinets, it is better to make markings on the wall for the rail on which they will be mounted. The optimal height for hanging the upper cabinets above the lower ones is 55-60 centimeters . To make markup you need to do the following:
- Set aside the required distance (55 or 60 cm) from the lower cabinets upwards, draw a line;
- Measure the height of hanging cabinets;
- Again set aside a distance from the marked line equal to the height of the cabinets, draw another line;
- Along this line it is necessary to secure the rail on which the modules will be suspended by drilling holes with a hammer drill for self-tapping screws.
Now you need to assemble the modules, finally installing adjustable hangers on them. Upper cabinets can have different opening mechanisms; in the washing cabinet, shelf holders are additionally installed in special holes.
The assembly process itself is no different from what was discussed above when installing floor-standing cabinets. The only thing you need to pay attention to is the correct positioning of the opening mechanisms. However, there are also marked holes for them.
Intersectional screed: installation
To connect the sections, the parallel or standing walls to be fastened are secured to each other using clamps. Holes with a diameter suitable for the fasteners are drilled through at a distance of approximately 8-15 cm from any corner of the walls. The intersectional screed is inserted into the hole and the fasteners are screwed in. Thanks to the relief located under the top of the nut, there is no possibility of turning when tightening, but in some cases fixation with a screwdriver is necessary.
It is worth considering that the heads of the couplers will be noticeably visible on the front side. You can now find masking overlays in stores, but they are presented in a fairly narrow range, and it is not always possible to choose a decorative overlay for the required chipboard finishing option.
If the order of installation of the sections as stated by the manufacturer is not followed, problems with fastening are possible. This may not be a full opening of the cabinet doors, which will require tightening the hinges.
Fasteners are an essential link in the furniture assembly process. They represent a wide range of fittings that ensure reliable arrangement of a set or individual furniture objects. Along with ordinary bolts and self-tapping screws, this class of fasteners includes ties. They often have a non-standard shape, and in some cases they are even designed specifically for certain sizes. But for the most part, furniture ties are produced in standardized configurations with standard fastening methods. Another thing is that there are quite a lot of varieties, and in each case an appropriate approach to installation is required.
Read also: Torque wrench manufacturer ratings
The cost of assembling the headset by specialists
For assembling a kitchen set worth up to 100 thousand rubles, various companies charge from 10 to 15 percent of the amount. For kitchen installation costing more than one hundred thousand rubles - 6-7%. The most expensive work is considered to be the work of connecting the sink to communications and its insertion, as well as installing and connecting household appliances - a washing machine, built-in hob, oven, etc.
Instructions for assembling kitchen furniture are always included in any set of furniture. Before work, study it carefully so that as few problems as possible arise in the process.
Intersectional screed
To connect parts of furniture for executive premises, an intersectional furniture tie is used, which also allows the formation of monolithic structures. For example, with the help of this element you can combine into a single object sets for rest rooms and reception areas, reception desks, sets for workplaces, meeting rooms, etc.
As a rule, such elements are used to work with modular structures and sections, the fastening of which requires durable and reliable fittings. By design, the furniture intersection coupler is a screw that is connected to a plastic or metal plug in the hole. Depending on the parameters of the furniture, products of different sizes can be used. Since ties of this type work with individual models, and not with parts of furniture, they are subject to special requirements in terms of decorativeness.
Manufacturing materials
Ties for connecting two parallel walls of cabinets are available from:
Dimensions may vary: M4-M6, screw length L1 – 15-30 mm, length L2 – 10-15 mm, outer diameter 5-8 mm. It is worth noting that over many years of using various fasteners, intersectional fasteners are the most optimal when connecting headset modules to each other. It allows not only to perfectly fasten the structure, but also facilitates the process of assembling furniture. This fastener has an attractive appearance thanks to the anti-corrosion coating.
Sometimes you can find a plastic tie design with a metal screw. Its dimensions do not differ from its metal counterparts, but it is less reliable in everyday use.
Table top screed
A special type of screed is required to connect two parts of a table top. Used in the manufacture of kitchen furniture.
Fig. 19.
Screed for table tops. Provides a reliable connection between two parts of countertops. To increase the accuracy of joining parts, it is advisable to use it together with a dowel. For a standard screed, non-through holes with a diameter of 35 mm and a depth of 19 mm are made in the connected parts of the tabletops. The distance between the holes should be 15 mm less than the length of the tie. The groove width must be at least 7 mm.
To tie two tabletops together, use a pair of ties. To install the tie rods, it is necessary to make recesses for the tie rod stops and a slot for the screw. This can be done in various ways. The most affordable option is the following. The recess for the stops is made with a Forstner drill of a suitable diameter; the slot for the screw can be made using a jigsaw.
Fig.20.
Connecting table tops with a screed. At least 2 ties are installed for connection. To install the screed, holes and a groove are milled in the tabletop slab. The holes can be made with a Forstner drill, the groove can be cut out with a chisel, or using a hand router.