Basic Rules
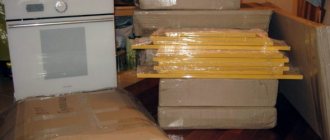
First of all, in order to assemble any piece of furniture well, it must be of high quality. Therefore, when accepting delivery, first check the contents of your order. Most often, a single piece of furniture, or an entire set, should be accompanied by a list of parts, which will be the first part of your instructions for properly assembling the furniture.
Before this, you should have accurately measured the space that the furniture you bought will occupy, so that in the end it would not turn out that the conventional wardrobe simply does not fit in the right place.
Moreover, you need to take into account that the same cabinet must also be assembled indoors, and the latter must be spacious enough to comfortably carry out assembly and subsequent movements. Carpets should be removed and the floor itself should be covered with something like a blanket to protect the surface from damage.
Completing the build
After the frame is completely assembled, it is necessary to check it for “distortions”. To do this, use a tape measure to measure both diagonals of the cabinet. If the measurement results coincide, everything is in order. Otherwise, the furniture is supported on the inclined side and the loose fasteners are tightened.
Back wall
The next step is to install the cabinet in the space allocated for it. Having coped with the task, using a level, they carry out a control check of the angles of inclination in all directions. If necessary, adjust the height of the legs, achieving ideal horizontality along the lid and bottom. Then they begin to install the internal contents: rod, guides for drawers, etc.
Doors
Sliding wardrobe doors are installed on rails. The upper one looks like a two-section profile, mounted flush with the end of the cover. The lower one, consisting of two guides for the rollers, is attached to the bottom with an indentation of 1-1.5 cm from the front edge. Before installing it, the wheel stoppers should be inserted into the grooves.
With swing ones everything is a little simpler. If the furniture manufacturer has provided holes for hinges, then, focusing on them, first install the corresponding elements on the door and in the body. Then they are connected and adjusted using a screwdriver. That's it, the installation of the door is complete.
Otherwise you must:
- attach the door to the body;
- identify and mark places for hinges;
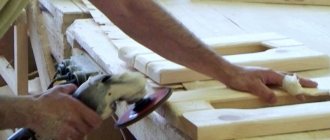
- using a router, drill holes, focusing on the depth of the hinge bowl;
- assemble the structure.
After final adjustment of the fit of the doors, you can attach the fittings. The furniture is ready for use.
Beginner difficulty level
For simple pieces of furniture, you will need a simple tape measure, a hammer, a few screwdrivers (can be replaced with a screwdriver), a drill (situational), a hammer and a few wrenches. All this is enough to assemble the initial difficulty levels.
Read here: DIY kitchen table: a step-by-step master class for making interesting options
Working with Bottom Elements
The assembly of floor-standing cabinets is carried out similarly to the upper elements, the only difference being that the tabletop plays the role of the top, and you also need to install legs in the bottom, which come in different designs, including adjustable ones.
Once the cabinets are assembled, it's time to install. Installation should begin from the corner.
Installation:
- We put cabinets in the planned places.
- Adjust the legs to the desired height. We use a bubble level to properly install the cabinets.
- We hang the doors. Let's regulate them.
- We tighten the cabinets with a corner tie, which allows you to install the set perfectly evenly. The tie is inserted into the drilled holes; if there are none, you need to drill them yourself, having first secured the adjacent sections with a clamp. Two ties are used per section. Holes are drilled in the hinge area closer to the front of the cabinets.
- We place the tabletop in its regular place and fasten it according to the design and the supplied fittings.
Complex designs
This category includes large pieces of furniture with a large number of parts, including moving ones, or furniture of complex shapes. Photos of assembling furniture with your own hands, of this type, can often be found in magazines and catalogs.
For it, in addition to the items mentioned above, you may need: a level, a hammer drill with various drills, a furniture stapler, and the like.
Step-by-step diagram for assembling the cabinet
How to assemble a pencil case
The frame can be assembled in several ways: vertically and on the floor. The latter option is often recommended because it is considered the only one that allows you to do without outside help. This statement is not entirely correct, since vertical assembly can also be done independently.
And it does not have the disadvantages characteristic of horizontal assembly, such as:
- the need to take into account the diagonal of the side wall - if the value is equal to or greater than the ceiling height, then it will not be possible to lift the assembled cabinet;
- loosening of fasteners during lifting, which affects the overall strength of the structure - the risk of damage increases if self-tapping screws are used.
Stage 1 - bottom
If the cabinet is supported by legs, then they are first fixed with a central screw, and then you need to screw in the side screws. The base is usually attached using dowels. In this case, the spikes are first driven into the bar, which is then fixed on the panel that serves as the bottom.
Stage 2 - frame
There are two options for attaching the sidewalls. If they are longer than the internal partitions, then lateral fixation is assumed. When they are equal, from above to the base.
- Based on the drawing, select two adjacent partitions and a set of shelves for them.
- Dowels are driven into the shelves and with their help the vertical panels are connected.
- The resulting part of the structure is installed on a support and duplicate fasteners are mounted.
- Subsequent assembly is carried out according to the same principle: a dowel into the shelf, it to the vertical and connection with the rest of the structure.
The procedure for installing the cover depends on the method of fastening the outer walls. With the side option, the top panel is first installed on the partitions, and then the fasteners are inserted and tightened. If the lid is located on top of the wall, then first the clamps are attached, then the canvas is brought into place and fixed.
Dresser
Let's look at a diagram of assembling furniture with your own hands using the example of an ordinary chest of drawers. The item is very useful, and in any living room - it’s hard to imagine a bedroom or children’s room without it.
Previously, its role was played by simple chests. The disadvantage of this piece of furniture was its very simple design - at its core, it was a box that was closed with a lid, which is very inconvenient for storing a large amount of clothing, despite its obvious spaciousness.
Its modern analogue, a chest of drawers, is well suited not only for outerwear, but also for shoes, cosmetics and other things that the owner may need.
Final assembly
Features of combining beds with a carriage frame with interior styles
The assembled part of the pencil case, the TV stand and the section with shelves are installed along the wall and aligned. The stiffening rib between the sides of the pencil case and the section with shelves is secured with Euroscrews. Then install the shelf on the dowels of the stiffening ribs and secure it between the sides.
Fix the decorative horizontal shelf on the side of the pencil case with euroscrews, having previously installed it on the dowel of the decorative element.
Double-sided tape is glued to the mirror at the location of the horizontal slats of the pencil case and installed, pressing it against the slats.
The assembled structure of the rotating bar is carefully installed on the lid of the cabinet so that the intersection tie connects the base of the rotating element, the plastic separator and the lid. Similarly, an intersection tie connects the upper part of the bar and the cap.
Install drawers and doors at the place of use.
Glass shelves are installed on the shelf holders.
All Euroscrews are closed with plugs. Through holes are sealed with adhesive plugs.
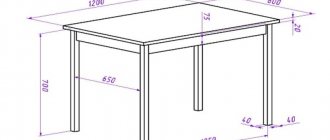
Blueprints
If we talk about step-by-step assembly of furniture with your own hands, then you should always start with drawings. First you need to decide on the place where the chest of drawers will stand - depending on this, it can be made higher or wider.
As for the assembly process itself, here the drawings, namely graphic and text descriptions, will help you assemble the furniture not only correctly, but also quickly - usually they serve as simple assembly instructions, which good stores supply with almost any piece of furniture.
For example, IKEA completes all its designs with all the necessary documentation, consumables in the form of screws, bolts, and the like.
If the kit contains fastenings that require a special tool (hexagon) - this is also included in the delivery kit.
Types of furniture fasteners
Tenon joints.
To make it easier to master furniture assembly, you need to at least briefly become familiar with the existing fasteners for it.
- Let's start with a universal-type screw with a countersunk head. Its standard size is 3.5X16. This type of fastener must be purchased separately from the furniture, since it is usually not included in the kit. With its help, you can secure the back wall of furniture, attach handles and hinges, and it also does an excellent job of fixing pull-out guides for various types of shelves. You can use a screwdriver to screw it in.
- Furniture screw. Connecting with it is quite simple and convenient. Its design includes both a nut and a screw. The screw head is usually square-shaped with curves. Its feature is the ability to conveniently tighten without scrolling.
- Corner. With its help it is very easy to connect structures of a perpendicular nature. The material used for its manufacture is most often metal, but there are also plastic options (it all depends on the purpose of this fastener). The dimensions of the furniture corner can also be different.
- Another type of permanent fastener is a tenon joint. Its design is a cylinder-shaped element made of wood. To use it for its intended purpose, you will need glue, which is applied to its end part, and it is placed in a previously prepared hole. The other end part, protruding outward, is also treated with glue and is located in another part of the furniture, thereby fastening them together.
- Confirmat belongs to the category of basic fasteners intended for furniture assembly. It is screwed into both parts of the furniture, as if attracting them together. The standard size of these fasteners corresponds to 6.4x50 mm. In order to use the confirmation, you need to prepare a hole for its placement. A hex wrench is used to secure it.
You may be interested in: How to make chairs for the kitchen?
There are other types of fasteners for furniture; you can get acquainted with them in practice when assembling furniture yourself.