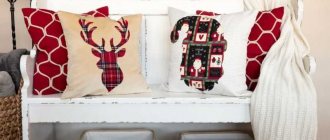
Classic of France. This is how you can briefly describe the carriage screed. Today, this method is used to decorate sofas, chairs, armchairs, headboards and bedside tables, and to cover walls when styling cafes, lounges and other premises. This method allows you to visually increase the height of the ceiling, thereby achieving a beautiful optical effect. For these purposes, plain furniture fabric, leather and eco-leather are traditionally used.
In this article we will talk about how to make a carriage screed with your own hands. You will also learn about the advantages and disadvantages of this technology. Step-by-step instructions with photographs for making capitonne will be provided, as well as separate instructions for making buttons for it. In addition, we will take a moment to look into history and find out how this upholstery technique actually appeared.
Let's go back in time
The Chesterfield sofa is a timeless classic.
Carriage upholstery technology dates back to the mid-nineteenth century. Royal carriages were upholstered with it, so capitone immediately began to be associated with wealth, luxury and chic.
In those days, finishing of upholstered furniture, and sometimes even walls, was found in almost every rich home. Later, this technology became a thing of the past, but today it is coming back into fashion and becoming increasingly popular.
In a modern interior
Carriage screed in a modern interior
Today, as in the past, this upholstery is found in the luxurious homes of rich people. Although, if you put in a little effort, time and money, then every craftsman can make a carriage tie.
There are three types of this screed:
- classic diamond-shaped;
- square;
- modern complex screed with varying geometry from floor to ceiling.
The chic and nobility of the screed is achieved, of course, through buttons. They can be very different, but we'll talk about that a little later.
Button closure forms a carriage tie
A distinctive feature of capitonné is the characteristic folds that run between the buttons; with conventional tightening, these are absent. A rhombus can have different depths and sizes. These indicators depend on the thickness of the foam rubber.
Traditional capitonné or carriage tie
It is worth noting that tightening with buttons is much easier. You need to know the technology of creating beautiful folds. We will talk about this a little later.
Design features
Despite the precise manufacturing technology, the carriage screed on the wall can be made in several variations:
- with a harmonious square pattern;
- in the classic form (assuming rhombuses);
- with changing geometry (increase, decrease or change the selected repeat).
Expert opinion
Mikhailov Ivan Maksimovich
Furniture maker. Work experience 3 years.
The volumetric covering on the wall can be rectangular, asymmetrical or abstract in shape. In addition, the upholstery pattern can have different depths and sizes.
A correctly selected relief will help achieve the desired visual effect: expand and ennoble the room, make the hallway more comfortable and warm. In addition to the external transformation of the hallway, the carriage screed has noise-absorbing properties, providing sound insulation that protects from nosy neighbors.
Advantages
Advantages of carriage screed
As mentioned above, the carriage screed looks expensive and elegant. But is it practical? What are its advantages? I would like to note that capiton allows for individual selection of fabric or leather.
In addition, this way you can choose the same design for the bed and poufs or for the sofa and armchairs, etc. Another significant plus is the ability to choose colors in accordance with the interior palette.
The decorative surface is easy to care for. If you decide to make a wall with carriage upholstery, then it will act as additional sound insulation.
Some nuances
Decorating with carriage screed is an expensive type of finishing. Since it gives a luxurious look to the product and the interior, the covering fabric must meet the following criteria:
- dense texture;
- color harmonizing with the interior;
- discreet and not too bright design.
Important. To fasten the capitone structure to the wall, special holders are fixed on its inner side, and special hooks are attached to the supporting structure. For this purpose, you can also use screws that are screwed into the walls.
The colors for the upholstery are chosen according to your own taste, but the pattern should not attract attention to itself. Pronounced bright or contrasting patterns on the fabric in the finished design look sloppy. Plain, dense fabrics are considered the best option.
Thin fabrics such as taffeta and silk, although they look good, may not withstand the pressure of buttons or studs and ruin the appearance of the finished design.
Important. The thicker the elastic lining, the more prominent and luxurious the geometry of the pattern is and the more luxurious the design as a whole looks.
When choosing nails or buttons, the design concept of the interior and the volume of the room are taken into account: in large rooms, furniture buttons look more appropriate. If they are chosen, they are sheathed with the same material as the upholstery.
Fabric for decorative covering should not be chosen from low price categories, since the durability of the structure as a whole depends on its quality. Furniture nails with decorative coatings and decorations look original, as they can favorably emphasize the luxurious design of the structure. The carriage tie is not only beautiful, but practical:
- when applied to walls, it provides additional sound insulation to the room;
- the decorated surface is easy to clean;
- it is a complete design option and does not require the use of additional accessories and decorations.
To acquire the necessary skill, it is better to try decorating a small piece of furniture, an ottoman or a bench before work.
Decoration in the form of a carriage screed looks modern in interiors of different styles, and since it is a timeless classic, it will never disappoint.
Classic of France. This is how you can briefly describe the carriage screed.
Today, this method is used to decorate sofas, chairs, armchairs, headboards and bedside tables, and to cover walls when styling cafes, lounges and other premises. This method allows you to visually increase the height of the ceiling, thereby achieving a beautiful optical effect.
For these purposes, plain furniture fabric, leather and eco-leather are traditionally used.
Expert opinion
Mikhailov Ivan Maksimovich
Furniture maker. Work experience 3 years.
In this article we will talk about how to make a carriage screed with your own hands. You will also learn about the advantages and disadvantages of this technology.
Step-by-step instructions with photographs for making capitonne will be provided, as well as separate instructions for making buttons for it. In addition, we will take a moment to look into history and find out how this upholstery technique actually appeared.
Choice of fabric and buttons
Variety of fabrics and buttons
Of course, silk and taffeta would look good, but these fabrics are very thin and will not withstand the pressure of buttons or nails. The appearance of a headboard, pouf or sofa made of such fabrics will quickly lose its attractiveness.
The thickness of the elastic lining is very important, since the beauty of the geometry of the resulting pattern depends on it.
When choosing carnations, you should take into account the interior design of the room. Furniture buttons look better on a carriage tie made in a large room. Furniture nails look great with decorations and decorative coatings. They will give the finished product even more sophistication and luxury.
The durability of an ottoman or bed, or sofa, or wall depends on the quality of the leather, fabric or eco-leather. And here the conclusion suggests itself: if you want to get a durable product as a final result, then you shouldn’t skimp on upholstery material.
You can choose one of the following fabrics:
- chenille is a wear-resistant natural material;
- jacquard - has a large embossed pattern, holds folds well and looks luxurious;
- genuine leather – wear-resistant and durable;
- flock is a fabric with a pile, there is a rich palette of colors;
- velor is also called velvet fabric; thanks to its plasticity, deep folds can be made;
- eco-leather is wear-resistant, fits well into folds and holds its shape well.
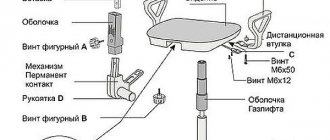
Making your own buttons
You can make buttons yourself
If you cannot choose buttons that match the tone of the main fabric or leather, then you can make them yourself. To do this, you will need blanks and leather/fabric for upholstery with a reserve.
Do not buy a button with a plastic loop: it will not withstand the loads and, if not in the process of making capitone, will definitely burst during use. Buy a product only with a metal loop.
To save money, it is better to buy the most ordinary smooth metal buttons, since blanks intended for plating are expensive.
| Making buttons | |
| Cutting a strip of leather for buttons | The first thing you need to do is cut a small strip of fabric/leather. |
| Rectangular button blanks | Then a blank for a button is made from this strip, that is, a rectangle is cut out. |
| Rounding rectangular blanks | Then the corners of the resulting rectangle are rounded. The circle should be 2 times larger in diameter than the button. |
| Preparing leather for buttons | This is what the leather/fabric for the button should look like. The advantage of leather is that its edges do not fray, which cannot be said about fabric. |
| We make small stitches in a circle | Take a thick, dense thread so that it does not come off during work, and thread it into the needle. Then the thread is folded in half and a knot is made at the end. You should step back a little from the edge and make small stitches in a circle. |
| Button cap | You should get a kind of cap into which a button is inserted. |
| Securing leather to button | Then the thread is pulled together. You need to fasten the thread, and the covered metal button is ready. |
| Homemade and factory button | It looks like a smooth edge and the homemade button is almost identical in appearance to the factory one. |
| View of a button from the inside | From the inside, of course, the appearance of the button is not so attractive, since the accordion remains. |
Making a template
The success of the event as a whole will largely depend on the correctness of the pattern, so care and accuracy are important when making it.
For the template, take a sheet of cardboard that matches the dimensions of the finished product. The easiest way is to draw a square marking of standard sizes 10x10 cm.
To obtain such markings, you need to apply marks along the length and width every 10 cm using a marker and tape measure, then draw horizontal and vertical lines. When choosing the geometry and size of figures, it is important to maintain proportional compliance.
To obtain a geometric pattern in the form of a rhombus, you can use a surface marked into squares. In each square you need to draw its diagonals.
The intersections of the diagonals of the squares and the vertices are marked with a felt-tip pen so that the required geometric figure is obtained. Trace the resulting diamonds with a marker or felt-tip pen.
Holes are cut out at the tops of the diamonds through which buttons or furniture nails will be attached in the future.
Materials and tools
What is needed to make capitone
To begin with, you should purchase all the necessary materials and prepare the tools. Materials for production:
- The plywood will act as a base, it all depends on what it will be - the sides or head of the bed, the wall.
- Foam rubber corresponding to the shape and size of plywood and having a thickness of 5 cm.
- Fabric/leather/eco leather is 0.5 m wider and longer than plywood, add 30 cm for buttons if you have to cover them. The amount of material depends on the pattern report; the smaller it is, the greater the consumption, and vice versa.
- Metal buttons.
- Glue for foam rubber.
- A piece of padding polyester that follows the shape of foam rubber and plywood. They need to be covered with foam rubber.
Tools you will need:
- furniture stapler, preferably pneumatic;
- cord for fastening buttons;
- crochet hook;
- sharp knife;
- drill for drilling holes in plywood;
- drill with Ziefendorf attachment.
Screed manufacturing processes are completed in a matter of minutes if you have a special tool. You can learn about the principle of its operation and features from the video we offer.
Video: features of manufacturing carriage screed
Tips for working with carriage screed technology
Before you start finishing a particular surface using the capitone technology, it is recommended to listen to the advice of experienced craftsmen. So, you should start upholstery by drawing up a detailed diagram with indicated dimensions. This point is fundamental, otherwise it will be difficult to do quality work.
Recommendations from experts will help you avoid mistakes in your work
If you do not have any experience in finishing furniture using this technique, it is recommended to first practice on small pieces of material. This will prevent you from spoiling the whole canvas. The foam rubber is connected to the base using special glue. It is sold in bulk cans and spray bottles. It is advisable to opt for the second option, because it is much more convenient. It is necessary to make cuts in foam rubber and wood only after the glue has hardened. In order not to make a mistake when marking the foam rubber, you must first mark it on thick cardboard of the appropriate size.
Marking foam before work
As we said earlier, usually buttons covered with the same material as the base are used to decorate the carriage tie, but this is not a mandatory step. For such purposes, you can purchase decorative nails with rhinestone-shaped heads.
Important. Some craftsmen prefer to make structures with a more pronounced relief. To do this, you will need to use polyethylene in the form of foam, onto which a dense layer of padding polyester (about 5 centimeters) is fixed using the same glue. Before you start fixing the fabric, you need to straighten it and smooth out all the folds. As a result, there should be no skewed areas.
An example of a neat drawing using the capito technique
Buttons or decorative nails must be placed at exactly the same depth. Otherwise, you will get a crooked drawing. The threads for attaching buttons must be very strong, otherwise they will quickly break during use of the product (especially if it is upholstered furniture). If you can’t make an even pattern on a test piece of material, then it’s better not to do the finishing yourself - this could ruin the expensive fabric. In this case, it is recommended to use the services of an experienced professional.
Cost of labor and materials
Step-by-step instruction
Step-by-step instructions for making a carriage screed
So that you can complete the carriage screed yourself, we suggest you consider the step-by-step instructions with photographs of this process. After familiarizing yourself with it, you can also watch an additional video on how to make capitonne using a different technology. All details can be seen in the table:
| Manufacturing instructions | |
| Plywood marking | The first thing to do after cutting out the plywood of the desired shape and size is to mark and make holes in it. |
| Applying glue to plywood | Then glue is applied to the plywood. |
| Gluing plywood | Foam rubber is glued. |
| Marking screed on foam rubber | The screed is marked on the foam rubber using a simple pencil. The marker may transfer to the fabric, causing the upholstery to lose its attractiveness. |
| Making holes | Then the holes are drilled using a drill with a Ziefendorf attachment. |
| Excess foam is removed | Excess foam rubber is removed. |
| A padding polyester is laid on top of the foam rubber. | A padding polyester is laid on top of the foam rubber. |
| Gluing padding polyester | The synthetic winterizer is glued with foam glue. |
| Markings on the skin | We make markings on fabric/leather. We retreat from the edge by the width to the first tightening + 7.5 cm for the allowance. |
| Stencil to help with marking | Next you need to take a stencil prepared in advance from cardboard with holes. It is applied to the wrong side of the fabric/leather. |
| Reconciliation of markings | The first marked point on the fabric/leather is checked. On all sides, the indentation of fabric/leather from the edge to the marks should be the same - the length from the edge to the first drawstring + 7.5 cm. |
| Putting the dots | Let's put points. |
| Insert threads | We insert threads into all marked tightening points. |
| Securing the first row | Now we pull the first row of threads using a needle or a special hook through the foam rubber and plywood and nail it to it with a stapler. |
| Formation of the second row | Then we turn the fabric/leather inside out and insert the next row of threads, lay out the folds and nail the threads with a stapler. If the template and markings are done correctly, then there will be enough fabric to create beautiful folds. To avoid skew and correctly lay the folds, you should lay them gradually, from row to row. |
| Straightening out wrinkles | It is convenient to straighten wrinkles using a special stick. After the row is completed, we proceed to the next one. |
| Fastening the ties from the middle | You should start securing a row of ties from the middle. In this case, the fabric will not stretch, and the finished capitonné upholstery will look very attractive. Before securing the thread with a stapler, you should carefully straighten the folds. |
| Product check | We check the product to ensure that all diagonals are even, straighten the folds if necessary. |
| Inserting and fixing buttons | We insert and fix several buttons. You can also insert buttons along the edges. But before the folds are fixed. |
| Formation of side folds | We form the side folds. |
| Fixing side folds | We fix the counter fold, which will result in a perfectly straight edge. |
| Fixing the corner | After all the extreme folds have been laid, the corner should be fixed. If you correctly calculate the material and fix the ties, there will be no difficulties at this stage. |
| Securing an edge | Ready corner. Final fastening of the edge. |
| Ready screed | The finished Capito screed made using this technology looks very attractive. It is worth noting that the process of its manufacture is not that complicated. What takes the most time is preparing materials and marking, while screeding is a fun and not so complicated process. |
With a little time, patience and investment, your home will turn into the beautiful possessions of a count's family. For clarity, we suggest you watch a few more techniques for making capitonné in the video materials.
Video: options for making capitone
Proper execution of decor
At the end of the carriage screed, all the holes made are found and marks are made with a pencil. Using a drill, shallow holes are made in these places. The diameter of the drill and hook must match to ensure smooth fastening.
Then a hook is inserted from the inside of the panel, and its edge is brought out. This procedure is performed in each hole, after which cords are attached to the hooks, and buttons are placed on their ends.
After this, the cords are pulled from the inside so that the buttons are pressed into the material with the same depth.
As holders on the back side of the panel, you can use special screws that are fixed into the wall.
Photos
Useful tips
When working, it is important to follow all instructions and choose high-quality materials for it.
The carriage screed in the interior will look beautiful if you follow the following recommendations:
- Wall panels, beds and doors are made separately and then secured. On upholstered furniture, the screed is done permanently.
- A workpiece of suitable size is cut from the selected material.
- The foam rubber is glued to the finished base. Then you will need to wait until the glue is completely dry.
- The upholstery must be distributed in such a way that it forms folds, but cannot strongly compress the padding polyester and foam rubber.
In this way, you can make a carriage fastening of furniture with your own hands, decorate an important section of a wall or a door. If you do everything correctly, you can get an unusual interior element, devoid of shortcomings.
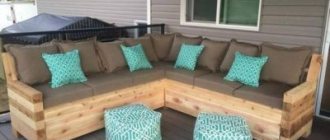
ASSEMBLY OF THE BED:
Place the headboard in a vertical position:
We collect kings:
We place the central jumper and supporting elements in the center:
We attach the orthopedic base with a lifting mechanism:
Now you need to make a bottom to form storage compartments under the base. To do this, I cut thin slats from 18 mm plywood:
We drilled the slats and screwed them with self-tapping screws inside to the drawers, lintel and headboard:
I cut out panels from 6 mm plywood that are placed on screwed slats:
Then, when everything was done, we remove everything and cover it with acrylic varnish:
After the parts have dried, put everything back:
Wherever the orthopedic base comes into contact with the elements of the bed frame, I glued strips of sheet felt:
To prevent the mattress from rolling down when lifting the base, I made a small support from 6 mm plywood and attached it to the base with rivets:
The back of the bed had to be covered with spunbond, but it was not on sale in the city, and ordering it separately from Moscow for delivery would have been more expensive than the material itself. A local large “garden” complex found geo-textiles of very decent quality, dense, and light gray in color. 2 meters were purchased and nailed to the back of the bed around the perimeter:
Finished bed:
Project budget:
| № | Name | Price, rub.) |
| 1 | Orthopedic base with delivery | 7'000 rub. |
| 2 | Plywood | 3'500 rub. |
| 3 | Eco leather | RUR 2,310 |
| 4 | Foam rubber | 2'450 rub. |
| 5 | Glue | 280 rub. |
| 6 | Sintepon | 400 rub. |
| 7 | Cord and needles | 270 rub. |
| 8 | Fasteners | 500 rub. |
| 9 | Delivery | 1'200 rub. |
| 10 | Press form | RUR 1,050 |
| 11 | Geo-textile on the back | 200 rub. |
| 12 | Staples | 100 rub. |
| 13 | Acrylic lacquer | 400 rub. |
| 14 | PVA glue | 400 rub. |
| — | TOTAL: | 20'260 rub. |
Set of main tools used:
COVER OF THE DIGITAL GROUP:
Let's move on to covering the drawers. Cutting strips of artificial leather:
We stretch the leather and nail it to the drawer with a hand stapler. Here my wife and I worked with four hands, one stretches and holds the skin, the second nails it with a stapler:
When covering the semicircular edges, the stretching properties of this leather helped a lot; it stretches in all directions, and we managed to do everything without folds on the front side. True, on the headboard these properties of the leather only interfered: