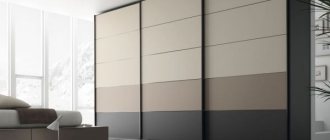
Why do you need lighting for the work area in the kitchen?
Not many people think about installing additional lighting for the work area, but there is almost always an urgent need for this. Let's list a few reasons why it immediately becomes clear that countertop lighting in the kitchen is simply necessary.
Additional illumination of the working surface has a beneficial effect on human vision
- The main light source in the kitchen is almost always located in the center. While cooking, the housewife stands with her back to this light source. Thus, not only does light not reach the surface of the countertop, but it also creates a shadow that falls on the table and makes the cooking process even more difficult.
- The lighting of each zone performs the function of zoning the space, visually delimiting it.
- It is especially important to illuminate each zone separately in a small kitchen. By dividing the space, light visually enlarges it and makes the room more spacious.
That is, lighting can simultaneously add convenience to cooking, perform a zoning function, and also add comfort and mood to the space.
It is worth highlighting several areas in which lighting is especially necessary - this is the cutting area, sink and stove.
In most cases, the built-in lighting in the hood is sufficient to illuminate the stove.
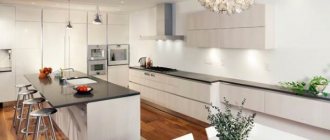
General lighting in the kitchen
Now let's see how you can create general lighting in the kitchen. The traditional option is a chandelier. But it does not fit into every modern interior; nevertheless, it has its place.
Traditional general lighting - a chandelier in the middle of the ceiling
Often kitchens are not square, but rectangular in shape. In this case, you can find a chandelier that is elongated. For a long and narrow room, this is the best option that will provide optimal light distribution.
Install a long lamp in a narrow kitchen
If the ceilings are low, you won’t be able to hang a chandelier—it will get in the way. The solution is to find a lamp that is almost flat. It can be square or round - whichever suits the chosen kitchen design style best.
Recessed square lamp
If you are going to make a suspended or suspended ceiling, you can “scatter” spotlights over the surface or create some kind of pattern from them (read about ways to place spotlights and more here). You can also make lighting around the perimeter of the “central” zone. Such lighting in the kitchen visually helps to raise the ceiling and make the room a little more spacious.
The lighting can be made in a plasterboard ceiling or with a suspended ceiling
All these methods can be combined, so the number of options is very large. But it is important not to forget that there is also lighting for two other zones and to look for lighting fixtures for this area as well, because they must match in style.
Kitchen lighting options
Where and where can I install/build in lamps to illuminate the kitchen unit?
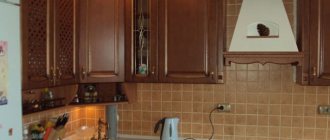
- Under wall cabinets: in the corner between the bottom surface of the cabinet and the apron, in the middle of the bottom surface of the cabinet or closer to the end as shown in the photo below;
Under the top cabinet directly above the sink - such lighting can be either built-in or surface-mounted
It can be brighter than the lighting under the cabinets, but at the same time, it is important that it does not blind the eyes. And, of course, the lamp above the sink should not be afraid of humidity and splashes of water;
- Above the kitchen wall cabinets;
- Inside cabinets and drawers;
- In the base of a kitchen unit to create the effect of “floating” furniture.
The latter options are decorative and rather of secondary importance, while the first option is truly mandatory for lighting the kitchen working surface, that is, the countertop and sink.
Tips for choosing lighting
In order for the lighting location to be correct, you need to know the basic requirements:
- light sources should be chosen so that they do not blind a person;
- the location of the light should be such that no shadow falls into the dining area and on the work surface;
- the larger the kitchen area, the more light sources you need;
- when designing a work area, an important point is the distance from the tap to the lamp, which should be at least 60 cm;
- it is necessary to choose different lighting power for the working and dining areas;
- Lamps of white and warm lights are considered the most favorable;
- take into account the color scheme of the kitchen.
DIY LED strip installation in the kitchen
Organizing additional lighting is not a difficult task, but requires care.
When connecting circuit elements, it is important to observe polarity. The tape itself must not be twisted or kinked.
If you need to make a sharp bend, then it makes sense to make a cut and connect the terminals with solder or a connector.
Other installation tricks include:
- minimizing the number of adhesions;
- mandatory insulation of conductive paths at connection points;
- protection of the power supply from overheating;
- parallel connection of strips whose total length exceeds 5 m.
And most importantly: the flexible board can only be cut in places marked by the manufacturer. Otherwise it may be damaged.
Installation procedure:
- Cutting the tape into strips of the required length and exposing the extreme contacts.
- Solder the cables and insulate the connection point.
- Fixation of LEDs in the designated area.
- Connecting wires to the dimmer (if necessary) and the power supply.
If all work is carried out correctly, the backlight will last no less than the period guaranteed by LED manufacturers - about 10 years.
How to choose lamps: useful tips
To make the process of choosing lighting for your kitchen interior easier, it is best to take the advice of experienced designers.
It is important to choose a lamp based on the zone in which it will be installed. Work surfaces require brighter lights than other areas of the room.
Their shade should be cold. To illuminate the living room or dining area, you should choose specimens with warm light and low brightness. It is important that the design of the lamp matches the overall stylistic concept of the kitchen. Plastic and minimalist models are suitable for modern styles. Classic design requires traditional chandeliers with luxurious elements and so on. To illuminate the work area, you should not choose lamps with shades, as well as with a large number of decorative elements. On such models, grease and dust particles will quickly accumulate. It is important that the lamp is easy to clean from dirt (and there are more than enough of them in the kitchen), and the material of the lighting device must be resistant to cleaning agents.
The choice of one type of lamp or another is based on the design of the room and personal preferences.
How to choose the color of lighting for the kitchen
When choosing a lamp, it is important to consider the color rendering index. On the packaging it is designated by the abbreviations Ra or CRI . This determines how correctly the color of the products will be displayed. The color is not distorted if Ra corresponds to 80...100 .
Apple color at different color rendering index values
Color temperature is also important for correct color rendering. This indicator is measured in Kelvin (K).
Table 1. Shades and color temperature values.
| Hue | Color temperature, K |
| Warm | 2700-3000 |
| White (neutral) | 4100 |
| Cold | 6500 |
A cool shade will help you concentrate on work. Warm shades relax and create a feeling of comfort. Neutral does not distort colors.
Reference. When choosing a shade, designers advise taking into account not only the influence of the color shade on the psyche, but also the color of the furniture. So, for wooden sets they advise giving preference to the warm zone of the spectrum, for high-tech style - cold ones.
The principle of installation and connection of LED strip
As mentioned above, the question of how to connect LED lighting in the kitchen can be solved very simply. Briefly, this process can be described as follows - after removing the protective strip from the tape, it is glued to the right place, after which, using a special adapter (it is soldered to one of its ends), it is connected to the power supply, which, in turn, is connected to the apartment electrical wiring If we are talking about an RGB strip, then its control unit is connected between the network adapter and the strip - all adapters are included with the strip.
In words, all this is simple, but in reality you need to know some subtleties.
- Almost always, when connecting an LED strip, it has to be cut to size. You cannot cut it anywhere - to do this, the manufacturer applies special lines to the product, along which you need to cut the LED strip.
- A tape with an adapter (plug) soldered at the factory is not always installed. If you do not purchase a full reel but, for example, a couple of meters of tape, then you will have to solder this plug yourself. You can do without it by connecting the network adapter directly. There is one important point here - the tape, whatever it is, is powered by a direct current of 12V. The polarity cannot be reversed - there are marks on the tape (+ and -) that must be aligned with the same polarity of the adapter. If you mix it up, the tape will not work.
In principle, these are the most basic points, but in addition to them you will have to face some technical difficulties.
- Where to hide the adapter? Here we can say only one thing - there is no fixed place for its installation. Where you hide it, you will hide it - use, as they say, the “relief” of the area. You can put it on a cabinet, a hood, if we are talking about the ceiling, then they usually use a niche. In principle, no one will forbid you to place the adapter even in your apartment electrical panel - in this case, you will need to run a lot of wires to the installation site of the tape.
- Where to connect the adapter? In principle, this is not a question - the adapter can be connected anywhere in the electrical wiring, including any outlet. The ideal option is your own section of the circuit, equipped with a separate switch. But if we are talking about installing lighting when the kitchen renovation has already been done, then you can’t think of a better place than the connection point for the kitchen hood - you can even hide the adapter itself behind its casing. In this case, you will have to take care of a separate switch - by the way, it needs to be installed before the adapter. It is better to open the 220V circuit, since in this case the adapter itself will also turn off, which will save its resource.
- How to route wires to the tape. The essence of this question, as a rule, is where to hide these same wires. Again, you need to take advantage of the “terrain” - behind cabinets and similar pieces of furniture. Ideally, this wiring should be thought through at the repair stage.
That's all, and there is nothing more to add regarding such a device as LED backlight. Just to mention all kinds of LED lamps, including spotlights, which are very often used to illuminate the work area. You can figure them out on your own, since their only difference from conventional similar lamps is the economical LED lamp.
Where to place the backlight
Proper lighting in the kitchen should be multi-zone. This includes general lighting, light above the dining table and, of course, LED lighting for the kitchen work area.
A sophisticated consumer, technically savvy and familiar with the latest in interior design, often does not limit himself to functional lighting alone.
Where should and can kitchen lighting be located?
Work area - lighting under cabinets.
The lighting level in the work area should be as high as possible
The hood above the stove has built-in lighting.
If the hood light seems insufficient to you, standard lamps can be replaced with brighter and more economical diode lamps
Additional lighting in the following places adds convenience or simply decorates the interior:
Illuminated glass cabinets. If you don't have collectible dishes, put frosted glass in the door, it's no less beautiful.
The soft light emanating from the glazed cabinets visually lightens the kitchen set
Above the upper cabinets, if the room has sufficient height. Light directed to the ceiling will make the room visually higher
Under the lower tier of cabinets. The light source should not be visible, so a thin and inconspicuous LED strip for the kitchen is best.
LED lighting directed at the ceiling and floor in the kitchen above and below the cabinets is not intended for work, so it may not be white, but colored. The upper light can be bright, and the lower light should be dimmed, noticeably softer than in the work area
An LED strip in the kitchen can be installed under the countertop and directed along the fronts of the lower cabinets, highlighting their contents.
The tape is fixed directly under the tabletop. The tabletop itself should protrude relative to the furniture front at a distance no less than the width of the light element
You can also illuminate the tabletop itself from the inside; for this it must be transparent. They are made from several layers of glass and transparent polymer.
An LED strip is installed along the contour of the translucent tabletop
Another option is hidden LED lighting for the glass tabletop. The light source is directed from the end. To maximize the effect, the tabletop is made of transparent quartz glass with matte details applied to the surface. They are the ones who will glow
Bar counter lighting, if available.
LED lighting for the kitchen in the bar area is usually directed downwards
The luminous skin is the latest in fashion. The light does not fall on it from the outside, but comes from within.
The luminous skin came into the kitchen interior from advertising lighting. This is a flat diode panel with an image printed on milky glass.
Actually, LED lighting in the kitchen can be placed almost anywhere. Only financial considerations can limit your imagination.
WHAT ARE THERE ARE LED LIGHTS FOR KITCHENS?
Do-it-yourself LED lighting can be made using ready-made lamps, or the lighting system can actually be assembled independently from individual elements. We list the main types of devices used:
Surface-mounted linear luminaires. They are sold both individually and in sets, where several modules are connected in series into one block using a special adapter.
DIY LED lighting for the kitchen work area from ready-made linear modules
Surface mounted spotlights.
LED illumination of the work area, made of corner lamps
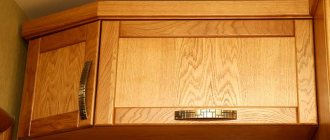
Lamps, both linear and spot, equipped with touch switches, have appeared on sale. It is enough to touch their body in a certain place to turn the light on or off.
The touch switch is usually indicated by a constantly lit blue LED
Recessed lamps, linear and spot. Being very thin, they are mounted in the bottom shelf of the cabinet flush with the bottom surface.
The recessed LED lighting for the kitchen is completely hidden in the bottom shelf. This is convenient, but installation of such a lamp requires certain qualifications
LED strips for kitchen lighting are used no less widely than ready-made lamps. The reason for this popularity is the wide choice of brightness and color and, which is very convenient, the tape can be cut exactly to the required length. It is cheaper than ready-made lamps.
The choice of brightness and color is very diverse
LED lighting in the kitchen: what is it made of?
In almost one hundred percent of cases, any decorative lighting in modern houses and apartments is made using a lighting device such as an LED strip. Essentially, this is a thin strip on which LEDs are collected in large quantities - it has a self-adhesive base, and there are no problems with its fastening. Tapes can differ from each other in several ways - by the number of LEDs per linear meter of the product and by the type of LEDs used. Both moments have a great influence on the brightness of the tape and its other performance characteristics. If everything is more or less clear with the number of LEDs per meter - as a rule, it is 30, 60, 120 or 240 pcs. per linear meter, then the type of diodes themselves needs to be understood in a little more detail.
- SMD tape - it is also called single-color. It can emit any color, but the hue of its glow is stable. That is, if you bought a tape with warm white light, then it is unlikely to glow with a green tint. Such a strip is assembled based on SMD brand LEDs, which can be of two types: SMD 3028 or SMD 5050 - the numbers indicate the size of the emitter, which, in turn, characterizes the LED in terms of the crystals used for its manufacture. If SMD 3028 is monocrystalline, then SMD 5050 contains as many as three crystals - naturally, the last diode shines much brighter. If we express the difference in numbers, then it is about 2.5 times brighter.
- RGB strip. Unlike its SMD counterpart, it is made of LEDs, which use three colored crystals - red, green and blue. It is this combination of crystals that allows the tape to glow, as they say, with all the colors of the rainbow - by changing the brightness of one or another crystal or even turning them on individually, the LED can emit any spectrum of light. White light is achieved by turning on all three crystals at the same time. In most cases, the LED strip for RGB kitchen lighting is equipped with a remote control, which is used to change the color of the strip.
Among other things, both LED strips may or may not have moisture protection - a waterproof LED strip has silicone protection. It can be used even outdoors and nothing happens to it in the pouring rain. You can see about such LED lighting for the kitchen in the video attached below.
Types of LED strips
One of the multi-diode light source options (by design) is light-emitting diode (LED) strip. It is essentially a flexible board. On this basis, LED emitters are fixed at the same distance from each other.
The standard width of the flexible base is from 8 to 20 mm, and the thickness together with the LED is from 2 to 3 mm. LED strips are sold in reeled form (rolls) 1÷30 meters long.
There are also resistors mounted on the board. In an electrical circuit, these ballast resistors limit the amount of current flowing through the light-emitting diode.
LED strips differ in the following parameters:
- number of LEDs per linear meter (30÷240 pieces): determines the amount of light radiation;
- the type of semiconductor emitters used;
- number of colors;
- level of protection from external influences (protection class);
- color temperature (working range is within 2700÷10000 K).
Examples of products with different protection classes are shown in the photo below.
Varieties of glow
Manufacturers produce the following types of tapes according to the type of glow:
- Plain (SMD technology, monochrome). The LEDs of such a product emit radiation only of a certain color (for example, red, white, yellow, blue). The number of crystals in one diode can be from 1 to 3 pieces. At the same time, options with three crystals burn more intensely.
- Multi-colored (RGB, universal). Such models are made using LEDs of different colors: red (LED-R-SMD3528 or LED-R-SMD5050 types), green (LED-G-SMD3528 or LED-G-SMD5050), blue (LED-B-SMD3528 or LED- B-SMD5050). The arrangement of these diodes alternates on the board. The color variety of radiation is represented by white, red, green, blue, yellow and other shades. This effect is achieved by alternately connecting the crystals or through various combinations of them when changing the intensity of the glow.
Monochrome product
To control the operation of RGB strips, remote controls are often used. With their help, they control a microcontroller that regulates the intensity of lighting and its color range.
RGB tape
Types of tapes by connection method
Tapes can be connected to the network in two ways:
- directly (Duralight);
- through a power supply unit (PSU).