Decoupage as a kitchen restoration
The kitchen is characterized by high humidity and constant temperature changes. All this affects the surface of the furniture. Small mechanical damage can also be a reason that prompts restoration of the kitchen set. There are simply many reasons for this:
- After many years of use, any furniture needs changes, especially its appearance.
- Minor furniture repairs may be needed after a flood caused by your neighbor on the floor above.
- Having repaired the walls and floor in the kitchen, you can use decoupage to update the furniture.
- By changing the configuration of kitchen furniture and using decoupage technology, you can completely change the interior of the kitchen.
- Decoupage will help remove minor scratches on the surface of furniture.
There are a lot of reasons to use decoupage to revive a kitchen set.
There is no finance for a full-scale renovation, you can decorate the interior and everything will sparkle with different colors. A wooden stool can be decorated with a beautiful image and varnished. Decoupage will allow you to change the facades of hanging cabinets and the set itself.
Designers' suggestion: in order not to use the same pattern throughout the kitchen, you can choose several similar plot pictures that will smoothly transition into one another. This kind of work requires a lot of effort, but the result is worth it.
General information
One of the simplest, most budget-friendly, but at the same time original ways to decorate a kitchen is decoupage. This wonderful technique of decorating with pictures will help make the interior truly unique and individual. You can decorate anything in this way: from small items to furniture, walls and doors. And most importantly, it’s very easy to make decoupage for the kitchen with your own hands.
If you are not yet familiar with this technique, you should sign up for a decoupage master class, where they will tell you the main points, however, learning the basics is not enough; besides this, you also need to have taste, spatial thinking, in order to correctly combine colors, decorative elements and create an image in the kitchen in a single harmonious style.
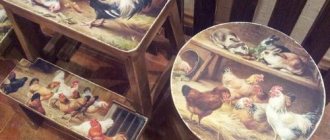
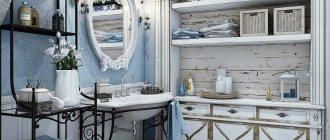
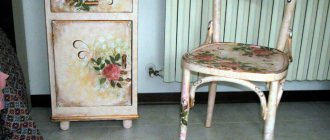
It is very popular to make decoupage in the Provence style, then the accessories look as if they have been used for many generations. In this case, varnishes are used that crack after drying, abrasions, roughness, chips are deliberately created, pictures depicting fields, fresh bright flowers, rustic motifs, lavender, spices, and more are selected.
Examples of beautiful and unusual kitchen design can be found on the website https://kyhni.guru.
If you just want to decorate some elements, then just choose a suitable design that will refresh a simple or long-unused item, making it attractive.
Suitcase of tools for kitchen decoupage
Many of the necessary tools for kitchen decoupage are purchased depending on the material used to make the furniture. But there is also a standard set:
- To repair small cracks, a vapor filler is required.
- The surface of the headset is cleaned with fine sandpaper.
- Purchase special glue for decoupage. It is used when working with thick paper. An alternative could be PVA glue, but its use is possible if it is applied to the surface of a napkin.
- The hardness of the brush should be medium to work.
- The obligatory presence of acrylic varnish, which is used to cover wood, possibly plastic. It all depends on the material of the headset.
- Small scissors are more convenient to work with.
- Extracts from magazines, photos taken on a printer, special napkins, photo wallpapers, self-adhesive film can be used as images for decoupage.
- A common tool that will help you cope with twisting loose furniture.
It is better to start your first experiments on a smooth, level surface. For example, chairs and stools are suitable.
Master class on decoupage of kitchen units
Pictures are glued to the prepared surface, otherwise they will wrinkle and peel off. Different processing methods are used for different materials:
- Small cracks on the wooden surface are covered with foam filler. Significant flaws are puttied and processed with fine-grained sandpaper. Then the product is cleaned of dust with a damp cloth.
- The glass is washed, degreased with alcohol, and wiped dry.
- The metal parts of the headset are treated with a mixture of vinegar and water (ratio 1:1). Heavily contaminated areas are cleaned with a brush with metal bristles.
- Polished surfaces are degreased using dishwashing detergent, using minimal water to avoid getting wet. In case of severe damage, the top layer is removed with sandpaper.
To make the drawings stand out against the general background, the prepared surface must be painted in a light tone. White acrylic color is usually used. To obtain the desired shade, colored gouache is added to it. While the paint dries, elements of the composition are cut out of napkins. Then:
- Glue is applied to the drawings so that they are saturated.
- Only the places where the pictures are placed are blurred on the surface.
- All elements are glued. If air bubbles have formed, smooth them out with a soft brush.
- After the glue has dried, varnish is applied in 3-4 approaches. The entire surface is covered, not just the pictures. Each layer is dried for at least 1 hour.
When using wallpaper for decoupage, they are either pasted in sheets or a composition is created from pieces left over after renovation. It is worth attaching decorative strips to the edges so that the pictures do not come off if accidentally touched. It is more convenient to work with doors and glass if you remove them and place them on the table.
Decoupage with self-adhesive film will be inexpensive. It does not need to be varnished, since vinyl is resistant to moisture and temperature changes. The stores offer film of all colors of the spectrum with patterns, ornaments, and pictures.
Working with this material has its own characteristics:
- In the absence of skills, waste is inevitable, so you need to buy with a reserve.
- Surface preparation with degreasing is mandatory.
- For gluing, use a film of matching colors. For example, decorate the upper tier in light colors, and the lower one in dark shades.
- The sticky side of the film is protected by paper. First, a small strip is released and applied to the surface. The pasted part is smoothed out, small bubbles are removed by piercing with a needle. The procedure is repeated until the entire area is covered.
- Since complete setting occurs after 2 hours, incorrectly laid film can be re-glued immediately.
Decoupage taking into account the style of the kitchen
Kitchen design largely depends on your desires. But designers advise adhering to some nuances in order to maintain the interior style:
- Images of butterflies, various cats, an abundance of vegetables and fruits, bouquets of wild flowers, rustic motifs in various forms, intertwining patterns - all this is possible in ethno, country and Provence styles.
- Garden flowers, richly painted drawings, images of grape vines, angels decorate the kitchen in a classic style.
- Newspapers, geometric shapes, images of inscriptions, photos in black and white style, a zebra pattern - suitable for a kitchen in a modern style.
Styles
There are several types of decoupage, including:
- Simple City. Emphasized negligence is demonstrated with the help of torn newspapers, stickers and other things. This type of needlework does not require experience or high professionalism from the author.
- Shabby chic has become increasingly popular in recent years. Work is underway to give things signs of their “former splendor.” For this purpose, techniques are used to artificially age objects, causing the effect of antiques.
- Provence is characterized by lightness and grace. The technique of “faded” paints is often used.
- Victorian style should evoke a feeling of classicism and pretentiousness. This style combines themes from antiquity, subdued tones and gilding. It requires special qualifications from the authors, since it does not forgive mistakes in the structure of the decor.
"Delicious cuisine
You can use coffee-scented kitchen design technology:
- Lightly moisten clean sheets of paper.
- Instant coffee is sprinkled over them.
- Lightly press the coffee into small grains with your hand and rub it onto the sheets.
- In this state, leave the sheets to dry.
- After complete drying, they can be glued to furniture. The kitchen will smell like coffee.
What is decoupage
Decoupage is a decorative method . It involves gluing cutouts from a variety of available materials (paper, fabric, napkin, etc.) onto the surface of various objects and applying varnish for effect.
Decoupage of old furniture literally transforms it. The kitchen changes a lot and becomes very sophisticated and interesting . This decoration technique is within the power of any person and allows you to create exclusive interior items at virtually no cost.
Doing decoupage on furniture with your own hands requires diligence and patience . However, the result will exceed all expectations.
Decoupage any surface in the kitchen
Of course, a set embellished with decoupage techniques greatly changes the atmosphere. But you can also decorate other surfaces in the room.
Decoupage floor
The wooden floor must be sanded and all uneven surfaces removed. Today, one of the stylish techniques is to create an imitation rug using fabric. Of course, everything needs to be covered with 2 layers of high-strength varnish. Otherwise, all the work will be done in vain.
Decoupage walls
The walls with photographs and pictures randomly placed on them are transformed in an interesting way.
Ceiling decoupage
This is where you can show a full flight of fantasy. Images and clippings from magazines are suitable here; various patterns can be assembled into a composition.
Zoning
In the kitchen-living room, using the decoupage technique, you can easily highlight a certain corner in the room.
Decoupage apron
A beautifully designed apron will simply decorate the kitchen work area and will immediately catch your eye. The drawing is not too small. The choice should be made based on the area of decoration.
Furniture made using decoupage technique
Furniture is the most noticeable part of the interior and it is it, decorated using the decoupage technique, that will truly decorate the kitchen space. This is especially appropriate if your furniture is already old and uninteresting - this will breathe new, colorful life into it.
In the photo of kitchen decoupage, you can find stunning examples with different designs, choose the most suitable ones, or use the examples to come up with your own.
Decoupage of household items
In the kitchen, it is small household items that create an atmosphere of comfort. If you decorate them, they will help emphasize the atmosphere in the kitchen. Decoupage of small items can be entrusted to children if they are interested in the work. You can decorate a cutting board, salt shaker, decanter. To transform these parts you need to purchase a non-toxic varnish. It is better to decorate a set of some items with pictures of one composition. Duplicating one design on all objects, for example a set of jars, will not look so bright. Decoupage can be done on almost any item in the kitchen.
The availability of materials for decoupage will allow you to quickly and economically transform your kitchen. Creative work will bring you satisfaction when your kitchen becomes a small masterpiece. Decoupage also helps to breathe new life into many old things.
Accessories decor
Expert advice:
- Decorating small kitchen items gives the kitchen an incomparable aesthetic meaning. In addition, decorating small objects does not require special skills and knowledge, and even schoolchildren can do it.
- Utensils intended for cooking and exposed to high temperatures (pots, frying pans, etc.) should not be decorated, since no varnish coatings will withstand high heat.
- Tableware and cutlery require careful and careful selection of coating components. They must not contain toxic substances.
- Repeating identical images on decorated objects is less attractive than different designs connected by the same theme.
- Even small cutlery can be decorated. However, such work will require significant labor and can only be successfully completed by patient and careful craftsmen.
- Decorated cutlery that is no longer in use can be used as pendants.
Decoupage is a simple decoration technique accessible to most home craftsmen. With its help you can decorate most household items and improve the interior design of your apartment.
Updating kitchen facades: glass elements
- To achieve a satin glass effect, first clean the glass sash thoroughly. Apply a layer of reusable adhesive to the back of the stencil, wait a few seconds, then place the stencil on a dry glass surface. Cover the edge of the glass with newsprint, securing it with paper tape.
- Take a glass satin spray varnish and spray it at a distance of 20-30 cm from the stencil, wait 10 minutes, then spray a second coat of varnish. When using solvent-based varnish, carefully read the instructions for use.
- Wait 15 minutes, then remove the stencil and leave to dry at room temperature. Place blue cardstock on the back of clear glass to highlight the satin glass effect.
Preparatory work
You will need:
- scraper (broken glass) or grinding machine;
- sandpaper (sanding block);
- primer;
- wide brush (flute);
- screwdriver or screwdriver.
If you have finally decided to update your old kitchen set, then you will have to work hard. The first step is to unscrew all the fittings and doors and remove the varnish from the wooden surface. Having a grinding machine on your household will greatly simplify the process of removing varnish, but if you don’t have one, then the easiest way to do this is to use special solvents. They are applied over the varnish, covered with plastic film, left for the time specified in the attached instructions, after which the residue is removed with a spatula. But this method has a significant drawback: the solvent can penetrate into the wood, and then the water-based paint will not adhere tightly to the surface, which will subsequently lead to its peeling.
Tools and materials: three-layer napkins, glue, varnish, scissors, brushes.
It is best to remove varnish from wooden furniture using a scraper (sold in a hardware store); if such a tool cannot be purchased, it can be easily replaced with ordinary broken glass. The varnish is simply scraped off the surface, then everything is sanded with a sanding block. There is another way to remove old paintwork: the surface is moistened with water, and then sandpaper is passed over it; under the influence of moisture, the varnish will begin to dissolve little by little, and it will be easy to remove.
If you have a set made of chipboard, then it is enough to sand it with sandpaper (first use a coarse texture, then a finer one) and degrease it with a medical alcohol solution. The surface prepared in this way must be primed; select the primer according to the material from which the furniture is made. This completes the preparatory work; the next stage of remodeling is painting.
You may be interested in: Installing a niche-shaped shelf for the kitchen
What tools and materials will be needed?
Decoupage of furniture with napkins involves the use of a number of tools, as well as the acquisition of the necessary materials. The list of the latter includes:
- paper napkins . In this case, the choice can be made in favor of ordinary dining rooms or you can buy ones specially designed for decoupage. Paper handkerchiefs will also work;
- Pore filling agent - necessary for sealing cracks and crevices on old furniture, helps to make the surface perfectly smooth;
- sandpaper - for sanding;
- decoupage glue or PVA (it is better to use a special one, PVA leaves marks);
- acrylic varnish for wood , matte or glossy - optional;
- applications – images used for this technique.
How to make it yourself
Once you have decided on the design technique, you can move on to preparing everything you need. You will need scissors, a stationery knife, glue (preferably special). You cannot do without a foam roller, with which you will remove wrinkles, and you also need a sponge to remove excess glue.
For your information! If you plan to use napkins, you can get by with PVA glue, but for thick paper you will need a special adhesive mixture.
Materials you may need for work
In order to level the surface, you will need an aerosol varnish, you can also use acrylic, the main thing is that it is of high quality. Newspaper/magazine clippings and bright napkins can be used as decorative elements. These could even be pictures simply printed on a printer. In a word, you can use any material to create a decorative panel for the kitchen.