A story about how I made a backlight for a retractable shelf for a keyboard and mouse with galvanically isolated power from USB and control from the shelf.
Because I very often work at the computer late into the night, so the idea of making a local backlight for a retractable shelf with a keyboard and mouse came to me a long time ago, but somehow there was no specific way to implement the plan “in hardware.”
And then one day, hanging around the car market, I saw a self-adhesive LED strip. The strip is a set of parallel-connected white LEDs with ballast resistors. The current consumed by it depends on the length of the tape.
↑ Idea!
Exactly half of it went into my work - the current consumption turned out to be equal to 60 mA
. The idea worked, the tape was immediately purchased. The rest was found in reserves. At first I wanted to connect the tape directly to the 12V circuit of the system unit. But the prospect of blocking an additional connector on the rear wall was not encouraging. And you can’t use such backlighting with a laptop... What do all computers have these days? That's right - USB. It remains to turn 5V into 12V.
I didn’t have a ready-made DC/DC converter, it was too expensive to buy... And then I remembered the old network card - it turned out to have the right converter on it, and even with galvanic isolation. Here it is - GTS H05U09S
.
Network card with already soldered DC/DC
But
H05U09S
an output voltage of 9V.
No problem - my tape shines brightly at 9V.
LED workplace lighting
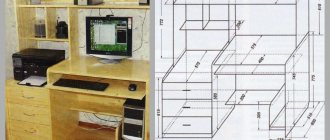
I read for a long time and couldn’t decide what to write that would be useful and interesting to others. And so, once I read the article Home CNC milling machine by vbifkol, I decided - this is it! A year ago, when I was still a beginner and a greedy CNC beginner, I decided that I could take something cheaper and it would trample on me. I bought one machine, produced in small series by one person. As a machine for a beginner, the machine was an acceptable choice. But, as they say, the miser pays twice. Being a sociable person, I told advertisers I knew about the machine and immediately received my first trial order. And then it started, it’s not like that, it’s not like that - there’s no speed, the accuracy is not the same, the working field is funny (33 by 43 centimeters). After a little over a year, the decision was made to sell the machine and buy an industrially assembled machine. If you are interested in what happened in the end,
Since I am a humanist (a physicist by training), I began an active search by studying specialized forums. I deliberately do not provide links to these forums; if there is interest, then I will publish the links. Studying the forums, I came to an understanding of what I needed and what parameters needed to be communicated to sellers.
So, the choice was limited to the following: 1. CNC control must be carried out by a DSP processor; 2. the working field must be at least 90 by 60 cm, and the height of the workpiece must be at least 100 mm; 3. The spindle must be water-cooled, minimum 1.5 kW; 4. the presence of a tool sensor for setting the height along the Z axis.
I spent almost 2 weeks corresponding with 3 sellers, during the conversation reducing the number of sellers and clarifying all sorts of details, including such as delivery, packaging of the machine, warranty, etc.
Due to the characteristics of the rented premises and the lack of regular transportation of almost 200 kg, it was decided to take a tabletop version of the machine (tabletop - conditionally, since the table needed to be welded, the so-called bed). Characteristics of the selected machine
| XYZ working area | 600 x 900 x 150 mm |
| Portal clearance | 120 mm |
| Accuracy | 0.1mm |
| Repeatability | 0.05 mm |
| Frame structure | Cast iron, casting |
| Table structure | T-slot, reinforced |
| Linear movements XYZ | PMI profile guides on all axes |
| drive along XYZ axes | Ball screw |
| Maximum no-load speed | 15 m/min |
| Maximum operating speed | 10 m/min |
| Acceleration | 1200mm/sec2 |
| Type of drive motors by axes | Stepper |
| Motor Driver | Yako 2608 |
| Spindle | 1.5kw, liquid cooling, 4 bearings |
| Collet type | ER16 |
| Maximum spindle speed | 24000 rpm |
| Inverter | Delta |
| Operating voltage | AC220V/50-60Hz |
| Control code | G - codes |
| Computer interface | USB 2.2 |
| Software | ArtCAM Express 2012 rus |
| Control system | DSP A11 (Digital Signal Processor) |
| Machine size | 1300 x 1000 x 930 mm, 225 kg |
| Machine size in package | 1450 x 1100 x 1100 mm, 270 kg |
Having paid almost 200 thousand rubles via bank transfer, I began to nervously wait for a letter from the seller about receiving the money. 3 days later I received the message “the machine has been sent to the transport company, wait for a call.” Upon receipt, the time of 4 friends was wasted, the jeep of one of the friends was hit - the pickup door was opened at the wrong time.
A week later, after reading an article about a home CNC router, a decision was made to finally do something useful for the home. As an active PC user, I was constantly concerned about the issue of workplace lighting. The table lamp, fitted with an energy-saving lamp, provided too little light, and the lamp burned out with alarming regularity. Changing a lamp costing 90 rubles 2-3 times a month turned out to be a very sad process.
So, the implementation of the topic was a resolved issue.
Choice of material and design
I thought for a long time about how to solve the issue of organizing background lighting behind the monitor.
There was an option - to glue an LED strip to the back panel of the LCD monitor, but then this option was discarded: 1. the strip heats up quite noticeably, and I decided that such heating would not be beneficial for the monitor; 2. The power supply for the LED strip will still dangle on the table uncontrollably; 3. there is a high-tech unit available; 4. p1-p2 in combination will look very unflattering, and p3 gave no reason to do this at all. It was decided to choose 10mm plywood as the material. Plywood is a fairly convenient material for processing using a CNC router, and the price is quite affordable. A sheet of plywood was purchased at the nearest hardware store for 450 rubles (1.5m x 1.5m)
Electronics were purchased: 1. 1 meter of LED strip (I don’t remember the name, it was just the brightest strip in the store) - 260 rubles; 2. 12 watt power supply - 320 rubles; 3. plug for connecting to the network - 25 rubles; 4. meter of wire to connect the power supply to a 220V network - 12 rubles. Total: 617 rubles.
Build process
After spending a lot of time, following the principle of marking 7 times, cutting once, the required sizes were selected (looking ahead, I’ll say that I still missed). The entire process of cutting the parts for the stand took about 15 minutes. A little less than 30% of the time was spent securing the plywood to the workbench.
Stand Details:
So, I got ready, opened the tube of Moment glue and the process began:
After waiting about an hour, I removed the clamps, and here it is, the stand: rear view
she's in frontal view
After making sure that the glue had set and the halves of the supporting structure did not separate, it was decided to glue the LED strip:
The power supply was attached to one of the side racks:
Having finished installing the LED strip, power supply and socket, I conducted a test run of the design:
(The camera made its decision, and the focus “floated away”. The use of a wire was due to the fact that the supplied 2-sided tape had very low adhesion to plywood, and when heated, the free end of the LED strip began to sag)
After making sure that everything was fine, it was decided to install this design on the permanent residence behind the monitor:
Bottom line, a day off was spent, about 700 rubles of money and this is what came out: It was: 1. my workplace without lighting:
2. my workplace, with the desk lamp on:
3. my workspace with the desk lamp and chandelier on (controlled via a dimmer, which is why the background lighting is so dim):
Now: background lighting is on, the rest of the lighting in the room is off:
and a general view of the workplace:
Conclusion. There are always areas where a CNC router will be more in demand. Next time I’ll place the stand closer to the monitor so that when standing at the table, the LED strip won’t shine into the eyes of tall guests. I hope it was interesting.
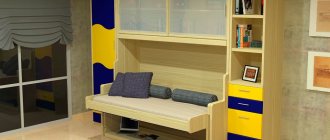
↑ Main ingredients
— two steel furniture corners; — automobile limit sensor for opening the hood/trunk; — self-adhesive white LED strip; — a small button (if you want, like me, to turn off the backlight manually) — a wire; — DC/DC 5V->9V converter from an old network card; - a piece of fiberglass; — cable channel; - double sided tape; - capacitors, resistors, LED, connectors - I used what was at hand; - a piece of USB cable or the cheapest ready-made USB cable with a type “A” connector.
Rules of care
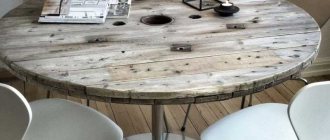
Epoxy tables do not require special maintenance. If they become dirty, they can be wiped with a dry and soft cloth. It is better to remove liquids and dirt from the surface immediately to avoid the appearance of streaks or stains. Do not wipe the countertop with substances containing acetone or alcohol, as they destroy the material.
The table should be kept clean and protected from scratches. In general, caring for a luminous table is no different from caring for a regular tabletop. It is worth keeping it clean and preventing chips and scratches, as they will be visible against a transparent background. If handled with care, the table can last for several decades.
Making a glowing table with your own hands is not a very difficult task that requires a careful approach. If you carefully follow the instructions, you can get a high-quality, beautiful and original product.
↑ Device diagram
Converter printed circuit board (50.8 x 30.5mm)
Ready-made converter (the board slightly does not correspond to the photo, because for the article I redrew it from PCAD to Splan)
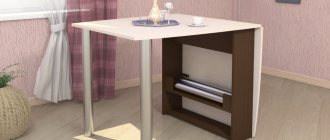
Assembling the base and legs of the product
When the backlit tabletop is ready, all that remains is to make the base and legs of the table. The legs should be thick enough (about 10 cm in diameter) so that a hole can be drilled inside one of them for the wires. Exiting the wires through the leg is a solution that allows you to make the product as aesthetically pleasing as possible. You can route the wires directly from the tabletop, but this will make the table less beautiful and convenient to use.
When the legs are made, you need to form a through hole in one of them with a diameter of about 5 cm. In the upper part of the leg, you should make two grooves through which the wires will pass, and also cut out a corner hole necessary for fixing the tabletop.
The height of the hole should be equal to the height of the table top. The depth of the hole must be calculated individually in each case; it must ensure reliable fixation of the tabletop. Similar corner holes are made on all four legs.
In addition to the legs, you need to prepare the base in which the tabletop will be placed. The width of the base should be such that the base protrudes 8-10 cm on each side of the tabletop placed inside it. Free space around the tabletop is needed to accommodate wires and related equipment.
A hole is formed in each corner of the tabletop into which a leg is inserted. Then an outer frame is attached to the base using self-tapping screws, the height of which is equal to the height of the tabletop. Then the legs are screwed on, and the tabletop is placed into the finished structure. The spaces between the table top and the outer frame house wires that are routed out through the table leg.
When the assembly of the base and tabletop is completed, all that remains is to close the space with the wires and additionally fix the tabletop inside the base. A special frame is made for this.
The width of each side of the frame is calculated as follows: the width of the trench with wires + the thickness of the outer frame + a few centimeters to ensure the frame fixes the tabletop. This frame is assembled from four blanks and fastened with self-tapping screws. It is then bolted to the outer frame as well as to the LED tabletop frame.
The holes for the bolts must be drilled in advance to avoid delamination of the wood. The design is ready!
A table with lighting is a very interesting and eye-catching element decor .
Thanks to the use of a translucent mirror and multiple light sources a stunning effect of a shining tunnel is created.
This unusual piece of furniture is also called an infinity table, 3D table and glow table.
↑ Installation
We cut and glue the cable channel, figure out how and where the converter will be attached (I have it lying on my table for now).
We modify the end sensor - carefully open its contact and replace the spring with a spring from a ballpoint pen, otherwise (this happened to me) the sensor will control the shelf, and not vice versa. If your shelf is massive and heavy, then you won’t have to modify the sensor—check it with your shelf. Glue the tape. “LUT” and assemble the converter. We solder all the wires and attach the button. Because The variety of computer desks is unimaginable, I won’t give all the subtleties of the design - most likely you will place everything differently...
What is a light table
A light table is a table coated with epoxy resin and having various types of lighting.
A light table is a table coated with epoxy resin and equipped with additional lighting. It has the following advantages:
- resistance to mechanical damage;
- moisture resistance;
- ease of care;
- sunlight resistance and color retention;
- no shrinkage of the material after pouring;
- ease of decoration, the ability to implement a variety of design solutions and high aesthetic appearance.
Such tables have many advantages.
There are also a number of disadvantages:
- high cost of source material;
- intolerance to low temperatures, from which the material begins to crack;
- with strong heating there is a risk of releasing toxic substances;
- the impossibility of placing hot dishes, which leads to melting of the material.
The high cost of materials for manufacturing is one of the disadvantages of such furniture.
When making it yourself, you must strictly follow the instructions, since any deviation from them can lead to defects.
When making such tables yourself, you must strictly follow the instructions.
Model range of dressing tables with mirror and lighting
The collection includes several modifications of furniture:
- traditional dressing tables with lighting and mirror (one or three panels). Equipped with open and closed shelves, drawers, pouf. Materials: solid wood, veneered MDF, metal;
- chests of drawers with several drawers at the bottom. Convenient if you need additional storage space in your room. A mirror and a niche for cosmetic accessories are installed under the hinged lid;
- designs that combine the functions of a dressing table and a desk. The mirror and compartments for cosmetics are hidden under the mobile tabletop. When folded, the furniture turns into a comfortable workplace.
Each model belongs to one of the furniture series for the bedroom and living room. You can buy a dressing table with lighting separately or as a set with a wardrobe, chest of drawers, bed, and nightstands. Goods are delivered throughout Russia (check with managers for terms and costs). In Moscow, there is the possibility of pickup from the store’s warehouse.
Reading time ≈ 6 minutes
You can make your interior unique and original with the help of unusual pieces of furniture, for example, a table with an infinity effect. Making such a thing yourself will not be difficult if you use simple instructions. The finished product will organically complement any modern interior and will cause genuine delight among household members and guests!
Table with LED lighting.
Peculiarities
In addition to the ability of a makeup artist, a necessary condition for high-quality makeup is good lighting. The cosmetic material contains reflective elements responsible for color camouflage, as well as many other important components. The problem of choosing a tone when changing lighting is one of the main ones when working with makeup. A successful solution for equipping a makeup artist’s workplace is an illuminated table, which has some features:
- Lighting is an important factor in applying makeup. Light coming from the wrong direction, even bright light, will distort visibility. This will lead to inaccurate application, and the intended naturalness will be disrupted. Proper distribution of light will ensure a spectacular and beautiful result.
- If you have a large number of small items necessary for applying cosmetics, a convenient storage system helps out. The product contains practical compartments for storing everything you need. This is an effective solution to storage problems
What is special about the design of a table with an infinity effect?
The originality of the design of such a table lies in the use of two mirrors and LED lighting placed in the tabletop. This table is most appropriate in a recreation area, that is, in the living room. It will fit into such interior design styles as modern, high-tech, minimalism. By attaching wheels to the legs of the table, you can easily move it around the house. Such tables look good in various interior styles. Using a mirror as a tabletop allows, on the one hand, to prevent scratches, and on the other hand, makes the structure fragile and susceptible to strong mechanical influences.
A mirror surface is used as a tabletop for this table.