Advantages and disadvantages of wooden countertops
Any surface made from one material or another has its positive and negative qualities. Before choosing wood for your kitchen countertop, you cannot miss the pros and cons of using this material for your kitchen countertops. The first include:
- long service life;
- beautiful appearance;
- naturalness;
- easy restoration.
You will avoid unpleasant consequences if you decide to make a countertop with your own hands.
Speaking about the disadvantages, they list:
- high cost;
- low resistance to water and temperature;
- capriciousness in care and operation.
But all these shortcomings can be easily corrected with proper care and the use of special protective agents in the form of oils, impregnations or varnishes. When talking about price, it is important to remember the durability of this material, and wood ages beautifully. A little restoration and it's like new again.
Consider the dimensions - the load on the kitchen table depends on this.
Drawing with dimensions
To make a table with your own hands, you will need to draw up a drawing. This way you will prevent errors during the work process and make furniture much faster. This drawing should contain the following designations:
- length of the product;
- width;
- depth;
- height.
Also in the drawing it should be noted the materials of their manufacture. For furniture designed for 8-10 people, the optimal tabletop size would be 80 by 120 cm.
Important: the dimensions of the table for a summer cottage are calculated based on the needs of users and the availability of free space in the summer cottage.
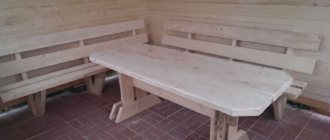
If there is a lot of free space, you can assemble a spacious country table with benches. The advantages of this design include:
- capacity;
- sustainability;
- ease of use.
Some people prefer tables with an ice chest. Such designs are convenient. In the summer heat, you can cool drinks in them. This model is practically no different from the product with benches. Only in the middle of the tabletop is an ice box made. Instead of an ice chest, you can build a table with flowers. You will have a beautiful flower bed in the middle of the tabletop.
If there is not much free space on your garden plot, you should opt for a folding furniture model. It is different:
- compact size and ergonomics;
- light weight;
- different transformation options.
Important: to make a tabletop, you should choose a board 3-5 cm thick.
Basic principles and rules for gluing boards for table tops
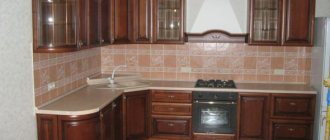
Most wood countertops are made from individual pieces of wood using a variety of methods. The gluing option is quite expensive. The correct approach to manufacturing will make it possible to install it not only for a straight kitchen set, but also for a corner one. It consists of assembling a single layer from individual bars. The principle of fastening directly depends on further variation of the assembly. With further high load on the surface, the shields are connected to the parts or to each other with grooves that fit into each other.
There is no need to make the width of the tabletop more than 60 cm, and the thickness should not exceed 5 cm.
The next option is fastening with insert plywood. How to glue boards for a tabletop:
- inserted tenons, their diameter should be half the thickness of the bar, and their length should be 10 times the diameter;
- end connection using glue (the weakest);
- angular fastening at 45 degrees (increases strength and fastening area);
- joining “half-tree” using recesses for tightening locks (recesses are made from the ends of the boards);
- connecting boards along the entire length using wedges or tenons using glue (tenons are selected depending on the model of the tabletop - trapezoidal, flat, round or jagged);
- joining with inserted round tenons.
The easiest way is to join using wood glue and wooden nails.
Don't forget to treat the outer ends of the countertop.
Selection of material (board or solid pine)
Lumber is inspected and selected without knots. A tree with a wormhole, a longitudinal core cut, and non-parallel fibrous wood is rejected. Planed beams and boards bent by the drying process, moving away from the planned parameters into any of the planes, are not suitable for the tabletop.
Natural wood
Available wood, its properties:
Substitutes
Improved properties have led to the creation of wood boards without strong torsion in a humid environment, protected by plastic (laminate), and therefore moisture-resistant, with a wide range of decorative properties, ease of processing, and low specific gravity. Widely used materials:
- plywood,
- Chipboard, laminated chipboard,
- cement bonded particle board,
- OSB (oriented strand board),
- with the addition of cement and gypsum - DSP, GSP,
- MDF, fiberboard – medium and fine fiber.
Most pressed boards contain phenolic resins and are therefore relatively safe. Natural wood smells of phytoncides - it’s useful.
Which tree to choose
The future tabletop must be strong and resistant to possible cracks, scratches, and abrasions during operation. The right type of wood is very important here. Cherry, cherry, walnut, oak or beech wood is suitable for long-term use.
Solid beech is widely used in the furniture industry, as products made from it are characterized by a high level of strength and durability.
The harder the rock, the more difficult it is to process, the stronger the reaction to changes in temperature and humidity, and the higher the cost. Tabletops made of wood are not only practical, but also beautiful. Shades and textures can transform any room, creating warmth and comfort. Regarding the disadvantages of suitable wood species, we can only talk about the high price.
Solid wood is considered to be a material that consists entirely of natural wood.
However, if you consider the number of years they can last, this minus quickly pays off. Pine as a starting material is the least expensive. This is due to the fact that its wood is too soft and short-lived. But if used correctly in a small family where the kitchen is not used 24/7, this option is also suitable.
Furniture made from solid pine has a light amber tint.
Choice of design and construction
There are many variations to implement any ideas. But first of all, the main thing is not to overestimate your own capabilities and skills. It will be much more pleasant to make a tabletop that is simple in design, but of high quality, than to aim for something global, for which you do not have enough strength, time and skills. In addition, be sure to take into account the stylistic decision of the kitchen, the dimensions and weight of the finished product, the material for the base, and the complexity of the modification.
It is suitable for sophisticated kitchen design. It will look especially impressive in a country house.
Important! Beginners in this business are recommended to start with simple options, minimizing mortise parts.
It is better not to use old wood, because... As a result of improper storage, it can be damaged by mold, mildew or bark beetle. And accordingly, the service life of the product will be short. The necessary design can be achieved using special tint products. This product will last much longer. The main point in the ideal completion of kitchen design is considered to be a countertop, in which all dimensions are correctly calculated. And they directly depend on the size of the kitchen and methods of operation.
A wooden surface always looks presentable and expensive.
Drawing
A drawing is necessary, because thanks to it the table will fit exactly into the room. The drawing will also allow you to calculate the volume of material required. But first things first. What problems will the drawing allow you to solve?
- Dimensions. If this is a kitchen table, and the kitchen is of non-standard sizes, the table, accordingly, will differ from the standards.
- Model. Despite the fact that in general terms a table consists of four legs and a table top, there are a huge number of options for how to make it. There are a lot of table models, types of table tops and legs.
- Calculation of consumables. Having basic mathematical skills, you can calculate the volume of required material from the finished drawing. So that after purchasing the board it does not turn out that there are a lot of scraps left, or that there is not enough material.
Advice. You can download a ready-made drawing from the Internet and modify it to suit your needs.
Drawing up drawings
Before you start work, be sure to have a drawing at hand. To compile it, you need to take measurements of the piece of the kitchen where the countertop is supposed to be installed. The drawing must contain the parameters necessary for manufacturing:
- length (the distance to walls or equipment is also indicated);
- width (the distance from the wall should be 5 mm);
- height (the height of the owners serves as a guide);
- thickness (depending on the material and load on the countertop);
- location of sockets;
- communications;
- technological holes.
The durability of the countertop depends on the manufacturing method. Solid wood is more prone to warping than glued wood.
Necessary tools and consumables
Tools, materials and supplies vary from modification of the selected surface and wood. The following are commonly used:
- stationery;
- drawing;
- wood (boards, bars or slab);
- consumables (nails, screws);
- hammer;
- pliers;
- milling machine;
- sandpaper of different grains;
- plane, jointer or grinder;
- paints and varnishes;
- wood antiseptic;
- brushes
This list may be changed as necessary.
Step-by-step manufacturing guides
Table surfaces can be assembled in a variety of ways. Some are made from solid wood, others are prefabricated, glued or paneled from wooden plates. When everything you need is at hand, there is a drawing, a step-by-step action plan, you can begin making the countertop. Considering the sources, there are several manufacturing options.
The tabletop, as a working surface, is subject to strict conditions. It must have an aesthetic appearance, resistance to damage, heat and water.
From pine
Pine has a very beautiful pattern on the wood, however, being a soft species, it is more susceptible to cracks, cuts and scratches, i.e. mechanical damage. Lumber is inspected and selected only without flaws. There should be no knots, damage by pests or wormholes, or deformations resulting from improper drying and storage.
Hot dishes leave stains, so the product must be varnished.
Initially, it is necessary to properly process all the boards, creating a perfectly smooth surface without splinters. Next, a drill is used to make holes for dowels at each side end. The same distance of 10 cm should be left between them. In the outer boards, holes are drilled only on one side. Dust and chips formed as a result of work must be carefully removed.
At the next stage, all boards must be glued with special wood glue or PVA. Then connect the boards together using wooden dowels placed in the prepared holes.
Important! When gluing a pine tabletop with your own hands, it is recommended to direct the pattern in different directions. This increases the strength of the product and reduces the risk of deformation.
After complete drying, cut off excess glue with a construction knife and sand the surface with a grinding machine. Apply a special antiseptic to the finished shield. Cover with varnish or wax with added varnish. This method allows you to create countertops of any shape and variation.
From bars
The whole process is a sequence of the following manipulations:
- cut bars of the required length in the required quantity;
- process the outer surface with a plane;
- cut grooves from the ends;
- cut slats to fit the width of the grooves;
- insert the slats into the groove, having previously lubricated it with wood glue;
- connect the bars by inserting slats into the free grooves of adjacent bars, lubricating them with glue;
- compress the structure with clamps.
When the layers of the constructed countertop have completely dried, its surface is carefully sanded, cleaned of dust and impregnated with antiseptics. Next, you need to cover it with protective agents (varnish, wax or oil).
The table, made entirely of 100 mm thick timber, is massive, solid and looks impressive.
From oak
Solid oak is usually used as sawn wood. This type of countertop manufacturing is called slap. It is very popular among beginners in carpentry, because... quite simple. The most important thing here is to choose a good and correct cut. The best option is wood without flaws in the form of long cracks, approximately the same thickness. In addition, the material should be properly dried and leveled.
Important! When choosing thickness, you need to remember about grinding, which will reduce it.
Initially, you need to remove the bark from the cut with a scraper or chisel. The next step is to level the surface and sand it. Cover with protective agents, stain, varnish (moisture resistant) in several layers.
It is important not to rush, but to let each coating dry thoroughly.
Ways to decorate a product
When choosing a finishing option for a finished product, you should rely on the interior design of the kitchen. There are many ways to decorate:
- self-adhesive film;
- craquelure (creating an aging effect by applying a special varnish made from egg white or PVA glue);
- painting;
- decoupage (decorating the surface with various drawings, photographs or images prepared on special decoupage napkins);
- simple or intricate coloring;
But the tree itself has a beautiful, unique pattern, so applying protective coatings will not only emphasize the beauty of the material, but will also extend the service life of the product. Another option for decor when making countertops is to use different types of wood in gluing. This gives the tabletop a unique ornament and color palette.
What is the most effective way to apply glue?
It is important to distribute the glue over the surface of the wood in an even layer, so you should not limit yourself to simply squeezing strips out of a bottle or tube. For smearing, a small brush with stiff bristles is usually used. But the simplest toothbrush will be a more effective assistant: bristles of optimal stiffness will carefully and evenly distribute the composition over the surface, providing an optimal adhesive layer.
Examples of handmade wooden countertops
There are many examples of handmade countertops. The following are examples of different types of bases.
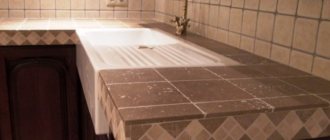
- Table top made of slab;
- Tabletop made using corner joint method;
- A tabletop made by joining boards along the entire length.
Kitchen furniture is often made to order and has an irregular shape.
Wood in this case is the most pliable material. Based on your desires and your own abilities, you can make such an important kitchen detail as a countertop. Depending on the chosen option, you will need a little more or less skills, time, and costs. But regardless of this, the result obtained from such a creative process will exceed all investments.
Edge-groove connection
A more reliable fastening method is lining; in this case, boards with a tongue-and-groove connection are taken for the shield. The ridge in front of the tenon has an advantage in that it allows the load to be evenly distributed, which helps strengthen the structure as a whole. Grooves and ridges are made using a milling machine or a hand cutter.
Instead of slats, plywood or MDF, 6-12 mm thick, is suitable. Blanks of the required width are cut from this material.
The groove is made after the strip is completely ready, since its width is directly dependent on the thickness of the plywood.
If the countertop will be used outdoors, such as in an outdoor kitchen, you should consider using a tongue and groove board. The assembly is similar to the assembly from a wood panel, but the role of the edge for the groove is played by the tongue.
The boards are fastened with a transverse beam located below and self-tapping screws. Such tables are of little use for an apartment or house because of their external massiveness and roughness, but they will perfectly decorate a summer garden or veranda.