Today our kitchens are equipped with more and more new appliances. So, relatively recently they began to install a hood over the kitchen stove. And if you have an idea to buy this equipment, then the question may arise: how to install it correctly then? There are two answers. Or invite a specialist, but then you will have to pay up to half the cost of the hood for the work. Or do everything yourself, which can take a lot of time and effort. But installing a hood with your own hands will ensure that all your requirements are met exactly; you yourself will do it exactly as you want. This article will tell you how to install a hood in the kitchen according to the rules yourself.
Choose a hood to match your set
Types of kitchen hoods
Before you start talking about installing hoods, you should know their types.
- Flat hoods. They are made of metal and hung above the hob. Almost all work in recirculation mode. Using filters allows you to remove fat if you do not have a special hole for ventilation or do not want to stretch the corrugation.
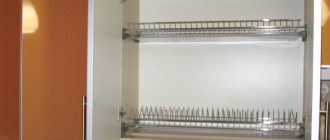
- Built-in hoods. This type is used in small kitchens where the availability of free space is very limited. Such equipment is attached to cabinets and is able to perform its functions without an air duct thanks to grease filters. Filters need to be changed at least twice a year. Typically, built-in hoods in the kitchen are equipped with a retractable panel, this allows you to increase the area of vapor intake from the stove.
- Dome hoods. The most expensive, but also best suited for stylish kitchen interior design. Dome hoods are usually made of metal, but it is possible to make the body from wood or glass. The price of the model depends on the material of manufacture and suction power.
When choosing a particular model, you should pay attention to the presence of a recirculation function. Not all hoods have this mode. But if there is no ventilation duct in the kitchen, then the presence of such a function is simply necessary, otherwise there is no point in installing a hood.
Almost all models have grease filters. The frequency of their change is usually once every six months. But the service life of the filter can be slightly extended if you periodically wash it with a special product. After washing, the filters should dry for 1-2 days.
Criteria for selecting exhaust equipment
Before purchasing, it is important to prioritize: comfort or savings. Design, power, sound insulation and type of adjustment significantly affect the price. The choice is based on 4 main criteria.
- Power. To determine it, you will need a calculation taking into account the size of the room.
- Noise. Turn on the device to assess the noise level. For an apartment, the recommended value is up to 50 dB. Silent models are equipped with three fans or a casing made of sound-absorbing materials.
- Material and type of air duct.
- Additional accessories: lamps for illuminating the work area, simultaneous automatic switching on together with the stove, timer for stopping by time, control panel.
Some models come with a choice of operating modes. If you plan to purchase a circulation device, then you should choose one with a filter clogging indicator.
How to determine the power and performance of a device? The calculation can be made as follows - how much air is purified in 60 minutes. According to Russian standards, air circulation should be carried out 12 times per hour. To calculate power, use the formula:
S (room area) * H (wall height) * 12 = M
For example, what power is required for a kitchen with an area of 8 m2, with walls 2.8 m high?
8 * 2.8 * 12 = 268.8 m3.
If bends in the pipe or a long shaft are planned, then add 30%. Taking into account the power loss we get:
268.8 m3 * 1.3 = 350 m3.
Necessary tools for installing the hood
To install a hood, like most other jobs, you need the right tools. It is better to prepare them in advance so as not to waste time searching. You will need:
- Drill or hammer drill. The choice is up to you. Some people prefer to work with a hammer drill, while others prefer a drill. But we must not forget about the place where you will use this tool. If installation involves drilling holes in the interior partition, then a drill will do. But if you need to drill concrete floors, then it is better to choose a hammer drill.
- Screwdriver.
- Construction level and tape measure.
- Hammer.
- Depending on the design of the hood, wrenches may be needed.
Correct connection of the air duct to the ventilation system
For this you will need:
plastic air duct
offset check valve
tee splitter
In the end, you should end up with something like this.
How does it all work? When the hood is turned off, the valve will be open and warm air from the kitchen will quietly flow by gravity into the ventilation duct. As soon as you turn on the exhaust hood, the valve immediately closes automatically, blocking the air flow into the room.
In this case, all odors from the stove will easily go outside. When switched off, the pressure in the box drops and the valve automatically opens, connecting the ventilation shaft to the apartment.
Installing a hood in a kitchen cabinet
The first of them is installing a hood in a cabinet. Flat and built-in hoods are suitable for this installation.
Before installation, you should order a special wall cabinet to match the style of your kitchen unit. Its distinctive feature is the absence of a bottom; the hood is attached to the middle shelf. Before ordering a cabinet, you should determine the distance from the bottom edge to the middle shelf; this size must correspond to the dimensions of the hood. Otherwise, the structure will stick out from the cabinet and spoil the appearance. Typically this distance is no more than 15 cm.
It is also necessary to remember about the air duct, if provided by the design. For it you need to make a hole in the middle shelf and the roof of the cabinet. The diameter of such a hole depends on the type of hood, but usually does not exceed 12 cm.
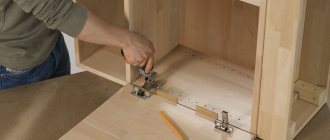
After the cabinet is delivered, we attach our hood to it. For these purposes, there are holes or other fastening devices in the upper plane of the hood. Fastening occurs using self-tapping screws or bolts. In the second case, you need to drill holes in the middle shelf of the cabinet. Then you need to fix the cabinet to the wall. If non-adjustable “ears” are used, the dimensions must be carefully measured. If universal fastenings are used, that is, canopies attached to a metal strip on the wall, then a small error is permissible (within 0.5 cm)
Installing a hood in the kitchen in this way is quite simple and aesthetically pleasing. With the help of a cabinet you hide the entire structure, including the air duct (if such is provided for in the design). To achieve complete “secrecy”, it is advisable to install an outlet for powering the hood inside the cabinet.
Features of operation
During operation, the usual requirements are observed. The device should not overheat and water should not come into contact with it. Pay attention to wires that should not touch the hot surface. In addition, the following maintenance is carried out:
- The grease filter is cleaned regularly. To do this, it is removed and washed using detergent. Then it is put in place.
- A critical element of a recirculation hood is the carbon filter. It needs to be replaced every six months, since during this period it loses its properties.
- Attention is drawn to the retractable panel. The resulting layer of fat is removed so that the element moves without difficulty.
- The touch panel is being wiped. There are always fingerprints on this part of the device. If a thick layer of fat appears, the equipment will be harder to turn on.
- It is necessary to ensure the cleanliness of the front panel even when turning on the button. Fat gets into the cracks and the buttons stick.
We recommend that you read: Corrugation for ventilation: what it is and how it is used
Installation of a hood under a cabinet
Built-in and flat types of hoods with a recirculation function are suitable for this installation option. They are perfect for families where cooking occurs quite rarely and large exhaust powers are not needed. Do not forget that the installation height of the hood has an important influence on the efficiency of air suction.
Basically, with this option, models without the use of an air duct are used. But if it is necessary to install an air duct, then the holes for it should be prepared in advance. Make rounded holes in the bottom of the cabinet. Their diameter must correspond to that specified in the documentation for the hood.
Hood pyramida wh 20-60 white
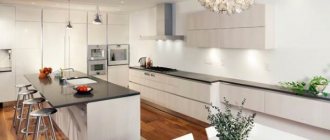
The cabinet itself is mounted as in the first version. The main thing is to decide on the mounting height. It should ensure the efficiency of the hood, while harmoniously fitting into the overall layout of the main kitchen unit. Then the hood is attached to it using a fastener. To prevent the design from spoiling the appearance, you can hide it using a false panel. A panel similar to the facade of the kitchen unit is selected and attached to the hood using special glue or double-sided tape. You don’t have to do this, but then you should choose a hood model that matches the overall interior of the kitchen.
The principle of operation of an electric hood
First, let's remember why a hood is needed and how it works. The purpose of any model of exhaust equipment designed for installation above the stove is to clean the air from combustion products and the smell that spreads throughout the apartment during cooking.
As is known, when natural gas burns, it forms many substances harmful to the health of the human body, including large amounts of nitrogen, carbon dioxide, carbon monoxide, and various impurities.
The faster unnecessary elements are removed outside, the cleaner and safer the air environment will be. In a small room with a low percentage of oxygen in the air, a person quickly begins to get tired and feel unwell.
Electric hoods have long become an indispensable attribute of kitchen premises. They are installed directly above a gas or electric stove; some models are equipped with an air duct to remove combustion products outside
Air purification occurs in two ways. Some models simply remove it from the room, others pass it through cleaning filters. It should be understood that the hood cannot fully ventilate the kitchen.
In order for the air to become truly fresh and healthy, it is necessary to establish fresh ventilation. The simplest option for air access is regular ventilation by opening windows and vents.
Wall hood installation
The third installation option is on the wall. This option is acceptable for any model of hood. It is the most popular and reliable.
The first thing you need to do is measure the distance from the stove to the hood. To minimize losses in the efficiency of the hood, certain rules must be followed. The minimum height for installing equipment should not be less than 50 cm. The maximum height is set at 80 cm. Having measured the distance, draw a line using a ruler and pencil.
Lean the hood against the marked line and mark where it is attached to the wall. Using a drill or hammer drill, make holes to a depth of at least 5 cm. Then drive plastic dowels into them. If you use a flat hood, then fastening is done using two self-tapping screws. If you are installing a dome structure, there should be at least four attachment points.
The mounting diagram itself must come with the hood. But even if you haven’t found it, don’t be upset. You can look at ours.
How to connect the hood to electricity
Since the power consumption of kitchen hoods rarely exceeds 1 kW, they can be connected to regular sockets. It is desirable that they be grounded. This requirement must be met if you want the warranty to be valid.
If the wiring in the apartment is old, you can install the grounding or grounding wire yourself. Just don’t attach it to water supply or heating pipes. This threatens the possibility of electrical injury or even death for you, members of your group or neighbors.
To reach the ground wire, on the shield, find a busbar with wires attached to it or a pipe to which a stranded wire is welded/screwed. You can also connect your own stranded wire to these devices (without discarding those that are already there). For it to work properly, the cross-section must be 2.5 mm, the conductor must be stranded copper, and a non-flammable sheath is desirable.
Connect the hood via Vago terminal blocks
Some hoods come with a plug at the end. There are no problems with connecting such models - just plug into the outlet and that’s it. But there are models in which the cord ends with wires. This is not because of the greed of the manufacturer, but so that the consumer himself can decide how best to connect the equipment. If you want, you can connect a plug. This option is not suitable - take the terminal block and connect through it. Another option is Wago terminal blocks. You need to take three of them - according to the number of wires. In one terminal block, identical wires from the hood and from the panel are connected - phase to phase (the colors may be different here), zero (blue or dark blue) to zero, ground (yellow-green) to ground.
Schemes for installing and connecting the hood
Grounding and grounding
Before telling you how to make a hood in the kitchen, it’s worth mentioning electrical safety. Since a lot of grease splashes get inside the housing and moisture accumulates, the risk of electric shock increases if the hood is incorrectly connected to the electrical network.
Therefore, a kitchen hood installed by yourself must be connected to the network with three wires: phase, ground and zero. The standard ground wire is yellow with a green stripe. Before installation, ensure proper grounding to ensure safe use of the electrical appliance.
If the house has a grounding loop and Euro-type sockets are installed, there will be no problems: when connecting, the wire is connected to the grounding terminal, which is indicated by strips of different lengths or the word Ground (GND). If your equipment does not have a grounding connector, you can make one yourself by screwing the wire to a metal part of the case.
A Euro socket with connected grounding in Russia is found only in new apartments
But many may not find Euro-sockets, and will wonder: how to connect a hood in the kitchen if there is no grounding? In this case, you can do the grounding yourself, but under no circumstances connect the neutral wire to pipes and batteries. You need to connect it to a dead neutral.
To do this, open the electrical panel with the meters and find a bricked-up pipe in the wall where the wires come from (be careful, the wires are 220V!), or a special bus, as shown in the photo. Most likely, you will find a ready-made pin on it and neutral wires already attached. This is a solid neutral, the pipe is perfectly grounded. You need to run a stranded wire with a cross-section of at least 2.5 mm2 from it to the kitchen, and connect the hood through a 6.3A automatic separator.
Zero tire on the panel at the entrance
Note! If there are already wires connected to grounding, then under no circumstances disconnect them! This may result in an electric shock. Throw your wire over someone else's and tighten the nut. If there are no wires and the pipe is smooth, strip it and secure the wire contact to the clamp. If you do not understand this matter, it is best to contact a professional electrician.
Air duct installation
The process of installing an air duct may seem much more complicated than installing the hood itself. For this work, you should prepare some materials and tools. So, you will need:
- Corrugated tube. Its diameter depends on the brand of the hood. The length is selected on site, it depends on the distance from the hood to the ventilation shaft.
- For tight fastening you will need various clamps.
- Special ventilation outlet. It is selected depending on the diameter of the corrugated tube and the size of the hole in the ventilation shaft.
- If you decide to mount an air duct made of plastic, then you will need a nozzle for the hood. It has a certain diameter, which depends on the design model. One side of this nozzle has a rectangular shape.
- Rectangular profile plastic pipe. It must be selected according to the size of the hood nozzle. It’s better to take it with a reserve; it’s easier to cut off the excess than to run around the shops and look for the missing piece.
- Special L-shaped transition.
- Rectangular ventilation outlet.
For a more reliable and airtight installation, you should stock up on sealant and masking tape. When installing the air duct, you should adhere to the general rules:
- You cannot narrow the pipe unless absolutely necessary. In general, you should remember - the larger the diameter of the air duct, the more efficient the hood is.
- Large bends should be avoided, otherwise air access may be blocked, which may affect the operation of the hood.
- Remember that corrugated pipe is a rather “delicate” material; it does not tolerate rough mechanical influences. If the pipe is broken, you can try to seal it with tape, but this does not guarantee tightness.
By following these rules, you can easily install an air duct, while achieving high efficiency of the hood.
Preparing the ventilation shaft hole
Before all installation work, it is advisable to plaster the entry into the ventilation shaft itself and remove all sharp corners. This will give the entrance maximum aerodynamic qualities.
You should end up with approximately the same surface as a standard 90 degree round elbow.
It is recommended to add ceresit liquid (ceresit CT99) to the plaster solution.
This hole will be exposed to fat and moisture. And ceresite contains components that prevent the formation of mold.
However, do not use gypsum plaster under any circumstances. Its use in ventilation shafts is a direct path to the appearance of mold and fungi.
Attach sections of a standard air duct to the tee on both sides. From the side of the wall, 5-7 cm, wall it up in the ventilation duct. The exit itself is decorated with a square frame.
Some tips
When installing a hood, based on the experience of specialists, you should follow some tips.
- When installing, you need to focus on the height of the owner. If her height is below 160 cm, then it is better to install the hood lower. In this case, the optimal distance between the stove and the hood will be 60 cm.
- Do not place any wires above the device. Firstly, this violates fire safety regulations; the wires can become hot and cause a fire. Secondly, it spoils the overall aesthetic appearance. Agree, wires hanging above the hood will only spoil the overall picture.
- Any device makes noise when it operates. No matter what model of hood you purchase, it will still make noise. To somehow reduce noise, you should use a plastic air duct. Its design features help reduce noise.
- When installing the hood, you should pay close attention to the included instructions. It contains all recommendations for installation; they were developed taking into account extensive operating experience.
- If the walls in your house are made of sibit, then you can use simple self-tapping screws. This will facilitate the installation process, while the fastening will be quite reliable. But the main thing here is to accurately calculate the installation location. This material crumbles quite easily, and re-screwing the screw will be impossible.
Now you can safely start installing a hood in the kitchen, there is nothing complicated about it, everything has to be done for the first time. The main thing is to follow all the recommendations and instructions for the device and then your hood will work for a long time and efficiently.
Where and how to remove the air duct
Most often, the air duct from the kitchen hood is connected to a ventilation hole through which natural ventilation occurs (due to draft). This is incorrect, since in this case most of the grille is closed by the air duct, and air exchange through the remaining accessible holes will be clearly insufficient.
A significant part of the ventilation grille is closed and ventilation in the apartment will be insufficient
Correctly connect the air duct to a separate ventilation duct. In this case, the same grille as in the photo above is installed on the hole.
If there is no separate ventilation duct, but there is an external wall nearby, you can take the pipe to the street by placing a grille outside. These are two ways to have normal ventilation and ensure normal operation of the hood.
How to take it outside
To install the hood and lead the air duct into the wall, you need to make a hole in it. And this is the only difficulty. Next, an air duct is inserted into this hole and sealed with mortar. From the outside, the hole is covered with a grill to prevent debris from getting in and birds and small animals from settling in.
One example of installing a hood in a kitchen with air exhaust through the wall
To prevent outside air from blowing into the room, install a check valve (in the figure above it is indicated by an oblique line). By the way, it is advisable to install it when connecting the air duct to the ventilation system - so that odors from the pipes do not enter the room.
This is what a non-return or anti-return valve for air ducts looks like
The check or anti-return air valve is a lightweight plastic or metal plate. It is movably attached in two places to the pipe - at the top and bottom, the petals are supported by a weak spring. While the hood is not working, the valve blocks access to air from outside. When the hood is turned on, the air flow bends the plate forward, pressing the spring. As soon as the hood is turned off, the plate returns to its place using springs. If you install a hood without this valve, it may be too cold in the kitchen in winter - outside air will enter the room without problems.
So that the hood does not interfere with natural ventilation in the kitchen
Using a tee and a check valve, by the way, you can install the hood so that it does not interfere with natural ventilation in the kitchen. You will need a special ventilation grille for connecting hoods, a check valve and a tee. A tee is attached to the ventilation grille, an air duct from the hood is connected to its lower entrance, and a check valve is installed on the free outlet, only so that the petals are locked when air passes from the pipe (pictured below).
Anti-return valve for normal natural ventilation in the kitchen
How does such a system work? When the hood is turned off, the petals of the check valve are bent, air from the kitchen enters the ventilation duct through the grille and the open outlet of the tee. When the hood is turned on, the air flow from it unfolds the valve plate, and the air flows into the ventilation system. When the hood is turned off, the springs again open air access through the tee.
Externally, such a system does not look very attractive and will have to be disguised in some way. But this is the only way to connect the hood to the only existing ventilation outlet and not reduce air exchange.