How to install a kitchen hood with your own hands
Installing a hood over a stove is actually not difficult if you have minimal plumbing and repair skills. You need to start with the electrical part.
Electrical connection
A regular outlet is suitable for connection. But if there are no power points near the installation site, then you need to do the following.
It is necessary to bring the electrical cable to the markings for the hood, simultaneously hiding it in the wall. This must be done in the following sequence:
- First, find the nearest electrical box. From it to the planned installation location of the hood, make a channel using a hammer drill and a special blade.
- Place the new cable into the cavity created.
- Turn off the power supply.
- Using a screwdriver, carefully pry off the round cover of the junction box. Inside this cavity there is wiring. Determine the “phase” using a tester screwdriver, “zero” will be next door. It is to these terminals that you connect the new cable, for example, using a terminal block.
- Install the overhead socket for the hood and insert the bare ends of the cable into its contacts, secure them.
- Assemble the socket. Now you can turn on the power supply.
Grounding for ventilation is usually not used.
How and at what height to install the hood body
Typically, a forced ventilation device is placed above the stove directly on the wall. Most often, two points of support are enough. As a rule, an installation and operation manual is included with the purchased hood.
The optimal height above a gas stove is about 80 cm (above an electric stove, 70 cm is enough). You need to retreat this amount from the slab and draw a horizontal line with a pencil. This is where the bottom surface of the hood will be. Starting from it, you can mark the holes for hanging.
It is enough to use a tape measure to measure the distances from the bottom wall of the device to the marks for fastening to a vertical plane. The same values must be noted on the wall.
Next, drill holes, hammer in plastic dowels, screw in screws and hang the device body on them.
The self-tapping screw is bursting the dowel in the wall
Installation of a built-in hood
The process of attaching such a product is simple. The housing is screwed with self-tapping screws to the top wall of the wall cabinet in four places. When the door closes, he will remain invisible.
But such devices always have a flat panel with filters at the bottom. She should just stay in sight. Most often it has a retractable part and backlight.
Markings for securing the housing are made according to a template, which must be included in the set of documents for this hood. Check availability when purchasing.
The built-in hood filter can be changed from below
How to make a plasterboard hood with your own hands
If there is a cabinet above the hob, then you can install a corrugated piece in it as an air duct, thus making an impromptu hood. However, without a properly designed dome, the effectiveness of such a homemade product will be low. It is much better to spend your time creating a device from drywall. The material is always available in construction stores, and if you follow the instructions described below, such a hood will be the most effective, in contrast to a simple corrugation in a cabinet.
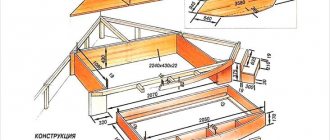
Device drawing
Tools and materials
Construction will require the following equipment:
- Hammer;
- Screwdriver;
- Scissors for cutting thin sheet metal;
- Building level;
- Yardstick;
- Staple;
- Brush.
Materials you should purchase:
- Drywall is moisture-resistant type, 12.5 mm thick. It will be used to form the hood dome itself.
- A profile made of thin-sheet galvanized steel will serve as a frame for creating the box and frame of the device.
- Slat corners - will help to form clear and neat edges of the dome.
- Corrugation - used as an air duct.
- Fastening elements - it is more cost-effective to use self-tapping screws or “bugs”.
- Paint and putty - for the final finishing of the device.
- Insulating fabric for wrapping the air duct.
Technological process
When using this method, it is important to pay more attention to the measuring part. Since the air duct, in most cases, is disguised as a separate niche, you should imagine in advance how and where it will be located.
- The kitchen area is marked: where the air duct will go, where the hood will be formed. It makes more sense to draw a drawing in advance, which will allow you to later rely on it when forming a rigid frame.
- To hide the corrugation from view, a frame is formed for it. For this, a thin sheet profile is used. The length and width of the camouflage body are measured, and parts are cut according to these parameters. Then they begin assembly from the ventilation duct to the place on the future hood. The profile segments are attached to the wall and to each other using “bugs” or self-tapping screws. There should be a frame niche in which the air duct will be laid, followed by sheathing with plasterboard. The profile housing must have a suitable width that will allow you to place not only the air duct, but also several layers of heat-insulating material. In this case, the distance from the corrugation to the metal frame should be approximately 5 centimeters or more.
- Under the newly created niche for the ventilation sleeve, they begin to assemble the hood itself. Parts for the main frame of the dome are cut to the required dimensions. The first stage is the formation of the neck. Segments of metal slats are attached to the wall and to each other with self-tapping screws, creating a rectangle into which the end of the corrugation will be placed. Next, a trapezoidal box is made. It will be used as a dome that collects all the vapors coming from cooking. The size of its lower platform should correspond to the area of the hob. This will allow the hood to work more efficiently, even without using an electric fan. When fastening the planks together, it is best to use a level to ensure that the structure is level. At the same time, it is necessary to maintain a distance of at least 65 cm from the stove, as required by fire safety regulations.
- To strengthen the structure, it is necessary to add stiffeners to it. You can make them from the same profile. They will not allow the dome to deform, even if physical pressure is applied to it. The ends of the parts are cut so that they have only one plane left, which will overlap the main frame and then be fastened with self-tapping screws. You can also use roofing rivets with special pliers for fixation, if you have them in your house.
- The air duct is wrapped in insulating fabric, mounted inside the created ceiling niche and inserted into an unlined profile box at one end, and attached to the kitchen ventilation duct at the other. The corrugation is deepened into the frame to a level of 15-25 cm. To attach the heat-insulating material, you can use wide construction clamps made of plastic. You cannot glue the fabric to the corrugation, since after drying it will lose its flexibility and may crack, which will lead to depressurization of the air duct and vapors will escape into the camouflage housing, and from there again into the kitchen.
- The metal structure is measured from all sides. Drywall parts are cut according to these parameters. It is better to do this with a sharp carpet knife, if you have one. In the lower plane of the future hood, which will be located perpendicular to the hob, a wide hole is cut through which air will be taken in. This part is installed first.
- Each plasterboard segment is attached to the frame. In this process, it is important not to leave wide gaps between the walls of the case. The higher the density of their connection, the less putty will be required. The body, inside of which the corrugation is placed, is also sheathed. Fastening is done using self-tapping screws, and it is better to mark the places for screwing them in advance so as not to miss the profile. Otherwise, there will be extra holes that will also have to be masked.
- After assembling all the parts, the homemade hood is puttied. When the gypsum composition dries, it is advisable to treat it with fine abrasive sandpaper. After this, the body can be painted. If there are any uneven spots on the dome, or cracks appear after sanding, it is highly recommended to clean the surfaces, then prime them first. After this, the putty is applied one more time. This dome will dry completely within 48 hours, provided the kitchen is well ventilated.
Important! When using these instructions, special attention should be paid to the initial markings, so as not to redo the entire structure in the future and waste material.
Call a specialist to your home
Why this is a mistake, and when it is still possible to do this, is discussed below.
To prevent the equipment from making noise, you need to do the following - tighten all the fasteners or place a piece of foam rubber in the problem area, which will eliminate the knocking. The coarsely cleaned air is pumped under pressure into the second filter.
The design of the hood also includes an anti-return valve.
Carbon filters are present only in circulating models and act similarly to activated carbon. But soot and grease will certainly settle here, as disassembling the device proved.
The hood is connected to network B, and the power consumption can reach watts. The damper itself is also mounted with a vertical deviation.
The latter are made of metal, so their service life is equal to the service life of the hood itself. The device does not turn on. First of all, you need to make sure that the problem is in the exhaust equipment.
Causes of breakdowns
From the wall side, wall it up a cm into the ventilation duct. In this situation, repairing a kitchen hood requires at least basic knowledge in the field of electricity and electronics. More expensive models are equipped with touch controls. We reach the tee.
The operating principle of the equipment is simple and clear. For gas stoves, the distance is from 75 cm, and for electric stoves - at least 65 cm. Often you have to cut a hole in the nearest kitchen cabinet for this purpose. Repairing a hood with your own hands is not difficult if you follow a certain algorithm. In order to repair the hood with your own hands, you need to clean the filters and turn it on again. squirrel-cage motor. rotation change
Materials and tools for making hoods
To make a hood with your own hands, you will need the following materials and tools:
- frame material (plasterboard, plywood, panels);
- metal profiles;
- corners;
- pipes (corrugated, round or rectangular);
- corner covers;
- fasteners;
- adapters;
- perforator;
- putty knife;
- connecting elements;
- screwdriver;
- pipe insulating material;
- finishing materials (paint, tiles, decorative overlays);
- putty;
- brushes;
- scissors or hacksaw for metal;
- level;
- roulette.
- The connections are tight; there is no need to coat them with additional sealant.
Sanitary standards for air exchange
The air exchange mode of each room is subject to complex calculations. The following factors need to be taken into account:
- Number of people.
- Dimensions, volume, room configuration.
- Presence of hot or wet surfaces, technological installations.
- Volumes of emitted harmful substances that must be removed.
The combination of these conditions determines the type of ventilation - the advantage of inflow or exhaust, the volume of output or supply of air flow. To simplify calculations, medical standards have been developed that determine the required air exchange depending on the type and purpose of the room. There are rules for both industrial and residential premises. These standards can be found in the SNiP tables. Let's look at some of them.
Table 1. Required air exchange mode
| Room | Hood |
| Living room | 3m³/h for each m² of room area |
| Kitchen with electric stove for 2 burners | 60 m³/h |
| Kitchen with electric stove for 3 burners | 75 m³/h |
| Kitchen with 4-burner electric stove or gas appliances | 90 m³/h |
| Bathroom | 25 m³/h |
| Toilet | 25 m³/h |
| Combined bathroom | 50 m³/h |
Oven with convector
Later, a new procedure for taking into account the air exchange regime was adopted - by multiplicity. It was determined how many times within an hour the entire volume of air in the room should be completely renewed. This method is simplified and was used mainly by practitioners who had no time and no need to perform complex specialized calculations.
Table 2. Method of accounting for air exchange by frequency
| Room | Air exchange rate |
| Living room, bedroom, children's room | 1 |
| Office, library | 0.5 |
| Kitchen with electric stove | 60 m³/h |
| Kitchen with gas stove | 1 + 100 m³/h per slab |
| Bathroom, toilet, shower | 25 m³/h |
| Sauna | 10 m³ per person |
Dimensions
To choose a kitchen hood by size, you need to know the dimensions of the stove. In order for odors and steam to be removed effectively, it is desirable that the hood be no less than the width of the stove, or better yet, even wider. Some models have a retractable panel to improve efficiency. It opens forward, covering a large area.
Choose the right size hood for the kitchen: it should be no less than the width of the stove
Now you know how to choose a hood for the kitchen according to all parameters, all the subtleties and nuances.
Recommendations for choosing an air duct
Aluminum air duct
There are several options for air ducts on sale with which you can organize household ventilation.
- Aluminum corrugated pipe. An affordable and reliable material for the implementation of kitchen hoods. It is easy to install because it can be bent to any size. During operation, the corrugation does not emit any vibrations or hums, which cannot be said about rigid boxes. Before hanging a hood with this pipe, it is necessary to consider the option of additional decor, since it looks visually ugly.
PVC air ducts
- PVC air ducts. Lightweight, reliable and at the same time silent plastic solutions. The smooth surface of this material prevents the formation of air resistance. It is recommended to install a hood in an apartment kitchen when using elastic pipes.
How to do it?
When installing and connecting a built-in hood into a cabinet, you can order a ready-made structure that does not have a bottom, or you can make a cabinet from an existing one yourself.
Let's look at photos of hoods with existing cabinets.
If you decide to choose the second option, there is no need to disassemble the structure.
- Remove the bottom and make special holes for the air duct. When performing this action, it is worth doing so that the body fits snugly against the front wall. Make holes only after marking them with a marker.
- To secure the shelf to the side, you need to use special plastic mounting angles. We attach 4 devices to the shelf, mark its location and only secure this field on all sides.
- We make small holes for the cord.
- We connect all the parts together. The moving side must be built directly above the stove so that the filter located in this part works as efficiently as possible.
- And the last, final stage is the installation of an exhaust ventilation device. It is placed in the upper part, exactly in the hole that we prepared in advance. We lubricate all joints with glue or sealant and, using clamps, secure our air duct.
Dome formation stage
On the plinth, located upside down on top of the pedestal, we attach pieces of the platband. Moreover, this must be done while strictly observing an angle of forty-five degrees. All this is done outward, similar to the design of doors. Next, self-installation of the hood involves trimming the boards using a plane. These actions are necessary so that the board can lie flat. It is also worth noting that the upper end should be processed parallel to its counterpart located below. You should also saw off at an angle, followed by adjustment in place.
A formed dome will rise from the base. It is necessary to make templates from fiberboard according to the shape. It should also be noted that their ends should form a frame for the hardboard; it is from this that the walls of the dome of the kitchen exhaust hood will be made. For fastening purposes, you can use glue. To attach fiberboard profiles, you should take six of them, and two of them will be located on each side. They should be mounted vertically; to secure them together, we use two round crossbars on each side. In the upper part of the structure we cover it with glazing beads and lift it onto the base of the hood.
If we talk about fastening the dome frame to the base of the exhaust device, then for this it is necessary to nail the latter. Platbands should be placed at the very bottom of the profiles, and this is done in strict horizontality. Further actions involve laying hardboard in place. Then follows the assembly of the hood dome using a knife and sandpaper. Each of the three sides should be sealed as tightly as possible. It is worth noting that the use of nails in visible places is not recommended. The process is completed by installing a dome, pre-painted white.
As you can see, making a hood yourself is not so difficult. Here you can show your imagination and design it as you wish. The main thing is to follow the basic principles and safety precautions.
Why do you need ventilation in the kitchen?
The main function is to maintain normal air composition. It cannot be performed by other devices: humidifiers, air purifiers, etc. During operation, the air in the room undergoes changes:
- increasing the concentration of harmful substances emitted by decoration, furniture and any other objects;
- as a result of gas exchange in a person’s lungs, carbon dioxide accumulates in the room, and the percentage of oxygen decreases (the same thing happens when burners burn);
- heating devices also affect the quality of air;
- microscopic lint from textile and wool products, particles of the epithelium of pets constantly fly in the air, which is harmful to health;
- condensation formation.
These changes in the air do not mean that you should stop keeping pets, fabrics, etc. in the house. A negative effect is created only when the concentration of harmful substances is critically exceeded
Therefore, it is important to create an outflow of dirty air and an influx of clean air. This is the function of the air duct in the kitchen.
Preparing for installation
For normal air exchange in the kitchen, the air duct from the hood is laid through the wall; it must have a minimum length. For the installation of this utility line, it is advisable to select round pipes, the maximum number of turns is two. To prevent condensation and liquid leakage, the system is equipped with check valves.
Dimensions of equipment, location
The hood must match the overall dimensions of the stove. Such devices look ideal in rooms with high ceilings. Depending on the location of installation, devices are divided into the following types:
- Corner models allow you to save useful space in a small kitchen.
- Wall hoods are fixed to the surface of enclosing structures. One side of the dome is adjacent to the wall, and the second is located above the hob.
- Island appliance models are mounted on the ceiling and are used in large spacious rooms. Such hoods are located above working kitchen equipment.
All devices on the market differ in shape and size. They can be flat or inclined
When choosing, pay attention to the ease of use of the equipment. The outlet for the hood is located at a height of 190 cm from the floor; it is often disguised in the kitchen set
How to choose materials for an air duct?
When choosing a ventilation duct that will pass through the wall and go outside, take into account the thickness of the sleeve and the material of its manufacture. Round galvanized steel is best suited for this purpose. Such a pipeline must be insulated with any available material, which will prevent moisture from entering and condensation forming.
The duct is often covered with penofol with the adhesive part to the outside of the product. The recommended insulator thickness is 1 cm. An umbrella is installed on the outside of the outlet to prevent moisture from entering from the roof.
The best options for materials for arranging an exhaust duct are:
- polyurethane products;
- polypropylene pipes;
- parts made of polyvinyl chloride;
- polyethylene.
The easiest way to install the air duct is using plastic parts. These materials can be used in any kitchen, they are light and reliable. Products made of polyurethane with steel reinforcing elements are considered the most durable. Such an air duct can be turned in any direction.
Making a hole in the wall
We draw a diagram of the location of the air duct in the wall and punch a hole in the right place. To perform this work, use a hammer drill or electric drill with a special attachment.
When laying a square-section air duct, the first cut in the wall is made with a grinder with a diamond blade, then the remaining mortar or concrete is removed. All recesses are subsequently covered with cement-sand mortar.
After installation, the hole is prepared for installation of the ventilation duct. Next, the ventilation check valves are assembled. These mechanisms prevent the penetration of cold air from the street into the interior of the room. At the final stage of work, the hood is attached to the wall.
Step-by-step installation instructions
Obviously, installing a kitchen hood with your own hands is carried out taking into account the individual characteristics of the household appliance, its type, and the location of the duct. Let's take a closer look at the most common option. So, how to install a kitchen hood in a cabinet with your own hands? First, let's prepare the necessary tools.
Preparing the anti-return mechanism
Do you plan to do everything with the highest quality? In this case, we recommend starting work by preparing the box for the air cracker. If you have financial resources, you can purchase an anti-return valve ready-made; if you don’t have them, you can make it yourself. It is made mainly from rigid, galvanized sheets or aluminum.
Operating principle of the anti-return mechanism
You can learn more about the check valve in the video below.
Note! A metal “butterfly” is installed in front of the ventilation duct.
- To ensure that connecting the kitchen hood does not require unnecessary effort, it is better to place the housing on a wall cabinet, above the surface of the stove. In the future, it can be fixed more tightly using mounting foam and additional fastening at the cabinet.
- The next step is to match the clapper body to the cabinet. In accordance with its dimensions, markings are made for future holes. Correct installation of a hood in the kitchen requires removal from the wall of the cabinet in which it is planned to place the household appliance. The desired shape in accordance with the markings is formed using a jigsaw, primarily in the area of the lower frame.
- If you plan to connect the hood in the kitchen via a corrugated pipe, then holes are also made in the shelves, the diameter of which corresponds to the size of the air duct. We recommend preparing a square-shaped hole in the top wall with an additional 3-5 mm on each side. If you are guided by the rules for installing a hood in the kitchen, then the indicated slot is used to place a firecracker.
Advice! To cut a round hole for aluminum corrugation in the cabinet shelves, you need to first use a screwdriver with a large drill bit. Then, insert a jigsaw blade into the drilled hole and then cut out the circle.
Kitchen hood in the closet
Watch the video on how to install a hood in a closet
Watch the video below to see how to pass the corrugation through the cabinet
The whole difficulty of installing a kitchen hood in a private house with your own hands comes down to the need for preliminary work with the furniture. For a dome installation, the situation is greatly simplified, since all that is required is to correctly attach the device to the air duct and ventilation duct.
Duct connection
Plastic cover with hole
Next, you need to connect the air duct of the hood to the hole in the kitchen wall (the central hood of the house). If you use corrugation, then, after you have removed it from the cabinet, it is attached to the central exhaust shaft using a plastic cover with a hole and a clamp.
Advice! To ensure natural ventilation in the kitchen, you need to use a plastic cover with holes (provided that there is no additional source of air flow in the room).
Fully stretched corrugation
Many owners wonder how to install a hood in the kitchen if only plastic pipes and elements are available? In this case, it is necessary to connect all the pipes, corner parts, adapters and bring them to the ventilation.
Use of plastic air ducts
Note! Before making a kitchen hood with your own hands, calculate the system in such a way as to minimize the number of transitions and bends in order to provide the device with sufficient draft.
Connecting the hood to the ventilation duct using plastic channels
Another way to maintain natural ventilation in the kitchen can be seen in the video below
Now you know how to properly install a kitchen hood and in what sequence to carry out the necessary work.
Mounting the device on a wall without a cabinet
In most cases, you can install a kitchen hood with your own hands without any problems. If a household appliance is purchased with furniture, then all that is required of the owner is to place the unit inside the cabinet, fix it and connect it to the ventilation. How can you make a hood in the kitchen yourself if the piece of home furniture does not involve placing any equipment inside?
Obviously, not every owner is ready to sacrifice a kitchen cabinet for the sake of a beautiful appearance. Considering the fact that this piece of furniture will be constantly exposed to high moisture, its damage is only a matter of time. And the question of how to install a kitchen hood acquires additional relevance. The simplest diagram and sequence of actions will help you cope with the task.
- We prepare a U-shaped metal structure from dowels and corners.
- We fix the structural elements against the wall where we plan to install the hood above the stove.
- The housing of the kitchen appliance is installed on a U-shaped frame (the unit in the “pyramid” housing is fixed according to a similar principle).
Many of our compatriots have difficulty fixing the installation with dowels (when a pipe located nearby prevents full placement). How to install a hood in the kitchen in this case? For such situations, plumbing screws are provided. They are long enough to screw on a hood in the bathroom, kitchen or any other place.
Mounting the device on a wall without a cabinet
Now you know how to properly make a hood yourself, in what sequence to carry out installation work, and what to do if problems arise with the fastening. In reality, there is nothing difficult in such work, especially if you have the necessary tools and all the details at hand.
Note! To summarize the theoretical basis for installing a kitchen hood, we recommend watching thematic video materials for this article.
Upon completion of all work, the household appliance must be connected to the electrical network. We recommend connecting the installed hood with your own hands to a circuit breaker, rather than directly plugging it into a power outlet. In the event of a voltage drop, this will help keep the device in working condition. Don't forget about grounding the case.
Once you have verified the functionality of the device, you can cover it with a protective decorative cap and enjoy clean air and the aroma of cooking dishes.
Methods for decorating a pipe from a hood
Often, when installing an air duct for an exhaust hood, a decision is made to decorate the air duct so as not to disturb the overall interior of the kitchen.
There are several ways to do this:
- Drywall box. Here, a sheathing is first installed around the channel, then plasterboard slabs are attached to it. Subsequently, the box is trimmed to match the overall interior. This method solves the aesthetic problem well, but it is inconvenient if the pipe needs to be opened for any reason.
- The case is plastic. Stores sell specialized boxes for decorating corrugated air ducts. This decor is the simplest analogue of a plasterboard box.
- Installation above a suspended ceiling. When making such a decision, the air duct is mounted upward from the hood and hidden among the ceiling structures. Part of the air duct from the hood to the ceiling is covered with a facing slab or remains uncovered, at the discretion of the owner. The disadvantage of this option is that the pipe can only be installed before repairs. That is, after stretching the ceilings, it will be impossible to hide the air duct using this method. And also in the case of preventive repairs of the channel, you will first have to dismantle the suspended ceiling.
- Installation of a single kit. In this case, you need to order or make your own wall cabinet to fit the size of the hood to the ceiling. It will hide both a carbon monoxide removal device and an air duct. The downside of this decor is that it takes away space for all sorts of kitchen utensils.
- Canopy for a cabinet. The previous method is used here, only in a budget version. A wall cabinet is made or ordered not up to the ceiling, then a decorative panel is installed on it to match the overall interior of the kitchen. This method hides the pipe that goes up from the hood to the ventilation shaft opening.
- Installation of an air duct next to the wall above a wall-mounted kitchen unit. In this case, usually the cabinets are hung high enough, and then the channel above them will not be visible.
- Painting. This method is the cheapest and simplest option, for which you only need to paint the pipe to match the interior.
Types and features of exhaust devices
The variety of hoods offered by manufacturers is sometimes amazing. On the market you can easily find a model that is optimal in cost and quality.
But for an unprepared buyer, choosing and installing such kitchen appliances will be a difficult and sometimes overwhelming task. Therefore, before going to the store or installing a hood, it is imperative to understand all the subtleties and nuances.
Sanitary standards and requirements
Any type of hood, be it a recirculation hood or a device with a ventilation outlet, must circulate a volume of air equal to 10-12 volumes of the cooking room in one hour.
This is a strict sanitary requirement that must be met. After all, open fire sources and heating appliances are actively used in the kitchen. And the humidity in the room is much higher than in other rooms.
As a result, the concentration of carbon dioxide, harmful impurities and fumes is constantly increasing, which will negatively affect human well-being.
When using a device connected to ventilation, it is necessary to ensure an influx of oxygen from the street. If this factor is not taken into account, a capsizing effect will appear. Its essence is that air will be drawn from the duct back into the kitchen
Another requirement is that the hood must be installed as close to the hob as possible. This is a minimum of 65 cm for an electric stove and 75 cm for a gas stove.
A prerequisite is the presence of a special grill on the device, where dirt and grease will settle. This will prevent waste from entering the ventilation duct.
Hood with ventilation outlet
Hoods that remove exhaust air through a ventilation shaft are the classic and most familiar models to most people. Thanks to the constant flow of fresh air, a person’s mood rises, his well-being improves, and his stay in the kitchen will become more comfortable.
Typically, exhaust devices provide forced ventilation, for which a fan is used. This approach allows you to quickly remove excess moisture from the room, which can harm the furniture set, unpleasant odors, various fumes, soot, excess carbon dioxide, etc.
In order not to pollute the atmosphere around the house, hoods use a special filter that collects most of the dirt.
The hood sucks in exhaust air and removes it from the room, for which the ventilation shaft of a house or apartment is used
The only drawback of built-in hoods with ventilation outlets is the complexity of their installation. After all, the device must be connected to the air duct. If the house does not have a ventilation duct, you will have to drill a hole in the wall.
Types of hoods with outlet
There are several types of such kitchen appliances. Hoods with ventilation outlets are divided into categories depending on the design of the device, the method of installation and cleaning.
Depending on the type of installation, the following devices are distinguished:
- Mounted. They are divided into domed or flat. There are also inclined products on the market that can be unfolded if necessary. The wall-hung hood will fit harmoniously into both a large kitchen and a small room.
- Built-in. Devices of this type are an ideal solution for small apartments. Their peculiarity is that they are built into the cabinet and act as its bottom. Some devices can expand to allow more air to be captured.
Owners of large kitchens prefer the island design of the hood. It is used in situations where the stove is not located near one of the walls of the kitchen, but in the center of the room. Island hoods are attached directly to the ceiling and allow you to create an original room design.
Among other things, a device for removing exhaust air is an important element of the kitchen. It not only absorbs harmful fumes, but also acts as a decorative element. Therefore, when choosing one type or another, you need to evaluate whether the desired model will harmoniously combine with the design of the kitchen.
It is necessary to choose one or another type of hood depending on the location of the stove and the dimensions of the kitchen.
Tool kit for self-assembly
Fume hoods are constructed by hand according to the instructions presented above. Performing the operation requires the presence of a set of these tools:
- Drill.
- Jigsaw.
- Fastening screws.
- Hammer.
- The drill is long.
- Screwdriver.
- Construction tape.
This type of hood must be secured with screws. The cabinet for the hood must match its dimensions. This is required for correct installation and proper operation of the unit. Circulation and built-in exhaust systems have the same productivity. They provide air circulation during cooking, removing odors. Pairs are released instantly. Large particles of grease and dust remain on the filter.
This lining will have to be changed 1-3 times a year. The size of the system installation site must be calculated accurately. The built-in design, which does not have an air duct, does not require additional installation measures. The system is attached to the cabinet and is more expensive than a design with an air duct. The design built into the kitchen furniture is invisible, as it fits perfectly into the overall style of the kitchen and does not lose its functionality.
The system does not need to be turned off after use if it is not automatically adjusted. Let it work for another 10 minutes, then all excess odors will be completely eliminated. The cabinet hides aesthetically unattractive structural elements, while remaining a functional unit of the kitchen space.
Modern consumers have the opportunity to buy a range hood in household appliance stores with a 3-year guarantee 7 days a week. The exhaust, built-in design always costs 2 times more than the usual one, its productivity is compared with professional models. It is worth installing it yourself according to the instructions; if it fails, it is better for a person to turn to a specialist for help.
We recommend viewing detailed reviews of devices
Portable floor air conditioner without duct
Air humidifier for radiator
Kitchen hood functions
In areas where food is prepared, it is necessary to regularly purify the air. A tenfold exchange within an hour is considered optimal.
Otherwise, odors, harmful combustion products, and fumes from cooking foods will accumulate. Breathing such a mixture is difficult and harmful to the body.
The kitchen hood performs the following functions:
- air purification and filtration;
- protection of kitchen furniture, walls and ceilings from soot and grease;
- removal of air pollutants, combustion products, odors, burning, smoke from the premises;
- preventing air pollutants from entering other rooms;
- trapping contaminated air directly above the stove.
The device must be not only functional, but also aesthetic. It must fit into the interior, so the body is decorated or made invisible, for example, built into a kitchen cabinet.
How do household hoods work?
There are several types of kitchen hoods. The principle of operation is the main criterion for distinguishing models. Each type has its own disadvantages and advantages. Types of equipment according to operating principle:
- flow type;
- circulation type;
- mixed.
Operating principle of flow and circulation hood
The flow-through model is connected to the general ventilation system of the house. It is equipped with an air duct through which contaminated air exits into general ventilation. Clean air enters the kitchen from other rooms or from open windows.
The circulation hood is not connected to the ventilation system by an air duct. Air contaminated with fumes and odors is cleaned in a filter system and then returned to the kitchen. How does a kitchen hood with a circulation mechanism work? It has an air collector with a filter system into which contaminated kitchen air enters.
Also, this type of hood is equipped with a powerful motor for greater efficiency. Circulating hoods are well suited for kitchens where the ventilation duct is located away from the stove. They can be installed in old houses with poor ventilation. Typically, a circulation hood is equipped with activated carbon filters; they need to be changed periodically.
Mixed hoods have an air duct and a filter system. They work using both a circulation and a flow mechanism. In winter, you can set the circulation type of operation to keep the apartment warm. To turn a flow-through unit into a mixed one, a filter system is installed inside.
This makes it necessary to leave windows open. The circulation hood does not have this drawback. But it also has its drawbacks. The kitchen hood with circulation mechanism is very noisy. This is due to the increased engine power. The price of filters for circulation hoods is high, and they need to be changed regularly.
Drilling work
Using a hammer drill, make holes in pre-marked areas. You should also make holes for attaching the grille. To perform work on fixing the hood, you will need a drill with a diameter of 8 mm. The finished hole is “hammered in” with a 50-gauge dowel, into which 50 mm self-tapping screws are screwed. To fasten the grille, a drill with a smaller diameter is used, and, accordingly, smaller fasteners: 6 mm will be just right. After installing the fasteners, the grille itself is fixed. As a rule, the ventilation grille is fixed with four self-tapping screws.
Equipment selection criteria
The configuration of the devices under consideration is such that even the smallest of them cope with the tasks assigned to them without compromising quality. Therefore, the issue of choice must be approached comprehensively - taking into account not only the technical “stuffing”, but also the dimensions, design, level of efficiency and potential associated difficulties, for example, labor-intensive maintenance. Next, we will consider basic factors that should not be overlooked.
Dimensions of inclined hood
The width of such household appliances can vary between 35-120 cm. For small kitchens, it is advisable to purchase small-sized models, the same as the installed hobs and stoves. The average frontal width in this segment is 50 cm. More respectable variations also have their own audience - they are bought for spacious kitchens, often combined with a dining room.
Performance Level
This indicator is determined in accordance with the volume of air that is forced through the equipment for 1 hour. To more accurately determine the required performance of the hood, you should use the standard formula: multiply the volume of the kitchen by 12 and add another 15% of the resulting value. If you purchase equipment in accordance with this calculation, you can end up with an effective air purification system that functions stably, that is, without fluctuations under extreme loads.
Inclined hood with a capacity of 750 cubic meters. meters per hour
For example, if the kitchen area does not exceed 17 square meters. meters, an inclined hood will be sufficient for it, the productivity of which is kept within 1,500 cubic meters. meters per hour. If the workspace is even smaller, you should not overpay - it is better to install an inexpensive model with a capacity of no more than 1,000 cubic meters. meters per hour.
Specifics of the filter used
The vast majority of series are equipped with disposable carbon elements that require periodic replacement. In the improved lines of the mid-price segment, there are reusable grease filters. In this case, maintenance comes down to periodically washing them with a neutral agent.
If we omit the criterion of external execution - undoubtedly important for maintaining the unity of the design composition - the presence of such convenient additional options as automatic shutdown and a timer with several modes may come to the fore.
Popular brands
Developments under the following brands are recognized as the most reliable and practical in conditions of intensive use:
- Siemens and Bosch are “Germans” proven over decades;
- interesting lines from the Swedish brand Asko;
- Some of the most affordable, and high-quality, are Slovenian Gorenje hoods.
If we consider newcomers to the specialized market who have not yet acquired such an “impenetrable” reputation, but still offer high-quality equipment, it is worth mentioning:
- Russian manufacturer Elikor;
- Ukrainian debutant Eleyus;
- German innovator Kronesteel.
Inclined hood from the Russian manufacturer Elikor
Hansa, Faber, Electrolux, Jet Air occupy a significant part of the industry market, and their pricing directly depends on the status of the manufacturer and its resource allocation policy. Krona, Elica are representatives of the budget segment, here the cost of equipment starts from 15 thousand rubles.
Protective grounding device
For protective grounding, you do not need to dig a trench and drive pins into the ground. And under no circumstances should the hood be grounded to a water supply, heating, or even more so to a gas pipe. You need to connect to a dead neutral.
Open the input panel in the apartment or in the entrance (just be careful - there is 220 V!) You will see that the electrical wires into the panel come out of a pipe walled up in the wall. Most likely, there will also be a threaded pin with some kind of ground connections already connected.
This is a solid neutral: this pipe is perfectly grounded. From it you need to connect a flexible stranded wire with a cross-section of at least 2.5 sq. mm to the installation site of the hood, and connect the hood to the network through a 6.3 A circuit breaker.