When the kitchen renovation comes to its logical conclusion, it’s time to start installing furniture. A wall storage system in a family home usually weighs quite a bit.
The safety of the fastening for household members is also important. We offer an overview of the simplest and most reliable options for hanging kitchen cabinets on the wall.
Mounting methods
Using dowels is the easiest way to install cabinets on structures made of different materials. In earlier times, corners were used for this purpose. Today this method has lost its relevance. It was replaced by a mounting rail. If the question of how to hang a kitchen cabinet on the wall is being decided, a specific device called a wall mount is also considered.
Mounting rail
The use of such fasteners increases the reliability of the structure. Cabinets are hung on a horizontally oriented strip, which is called a mounting rail. It has several holes. The main task is to mount this element on the wall. All that remains is to secure the cabinets with screws. The advantage of this solution is that there is no need to regularly use a building level to control the position of furniture.
The use of self-tapping screws for point installation of individual cabinets does not provide a long service life. If you fix the furniture using a mounting rail, you can not only quickly mount the set, but also get a structure that will be used for a long period. However, to ensure that the cabinets are level, you will need to carefully check the position of the mounting rail.
Loops
This type of fastener allows you to adjust the position of furniture in the horizontal plane. Installation instructions:
- A cabinet is placed between the previously drawn marking lines. It is held to mark points for installing the dowel.
- A hole is drilled in accordance with the markings.
- Then you need to take the cabinet again and hold it in its original position (between the lines on the wall). The point of the second fastening element is marked. You should first check whether the product is level.
- Install hangers for kitchen cabinets. After this, you can fix the product on the wall.
Hanging on a plasterboard wall
If you try to fix a fairly heavy structure on an unreliable partition, the furniture may collapse after a while. To avoid this, when it is necessary to hang cabinets on a plasterboard wall, the only option considered is mounting on a strip, which is an element of the partition structure. In this case, the weight of the upper part of the headset is transferred to the most reliable area, made of metal. Fixing pieces of furniture is carried out using special dowels.
If you are deciding how to properly hang kitchen cabinets, you should follow the instructions:
- A magnet is used to search for fastening elements in a sheet of drywall.
- Correlate the distance between the nearest screws inside the partition structure and the size that determines the location of the hinges on the cabinets. If necessary, use an intermediate strip for fastening. This method will allow you to redistribute the load across the entire partition.
- Heavy furniture is fixed to the gypsum board wall using anchors and long screws. The partition is drilled through to get to the supporting structure.
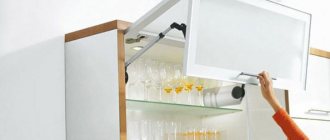
Features of the suspension design - how it works
As a rule, this furniture fittings has a decorative plastic case, inside of which the adjustment mechanism is hidden. Only the heads of the adjusting screws can be seen from the outside; in addition, the case has through holes, reinforced inside with metal plates included in the suspension mechanism block. However, some models are made entirely of metal, which distinguishes them with higher strength and, accordingly, price. And regardless of any external differences, the design always includes the main part with which the cabinets are hung - a strip with hooks at the end, connected inside the body with adjusting screws.
The suspension is usually a plastic case with an adjustment mechanism inside.
The movable mechanism gives the suspension some freedom to move the clamp bar back and forth and up and down, with the main amplitude along the second vector occurring at the end with the hooks. Thus, by rotating the screws, you can extend the suspension from the body by 2 centimeters, and vertically adjust the height of the cabinet box within 22 millimeters. This is more than enough to ignore some unevenness in the wall and still get an ideal line of position to hang each cabinet evenly on the kitchen wall relative to its neighbors.
Useful drilling tools
Many home craftsmen have encountered the problem of the drill moving from the intended point due to the heterogeneity of the walls. This leads to the fact that the exact horizontal line is lost and it is not possible to hang a shelf or other piece of kitchen furniture straight.
In such a situation, craftsmen recommend that you independently prepare a sheet of plywood with a hole (a jig) through which the drilling will be carried out. To prevent it from moving when applied to the wall while the drill is operating, double-sided tape or sandpaper is glued to the surface oriented to the plane being drilled. For versatility, you can make several holes of different diameters. If you provide one edge with a plate attached at a right angle, then the dust will not fly away, but almost all of it will settle on this shelf.
To secure cabinets, it is often necessary to prepare holes with a specific distance. Here the conductor will also come to the rescue, on which precise markings are made, and two holes are prepared. Further actions will be aimed at drilling the first socket for the dowel in the wall, in which one side of the conductor is attached with a self-tapping screw. All that remains is to level it using a building level and drill a second hole.
Installing the top of the furniture
The first priority is to fix the hooks in the middle position. For this, adjusting screws are used. After this, you need to fix them from the inside on the side walls so that the hook is on the outside by 2-3 mm and it is possible to fix them on the fastening bar.
The design of the hinge allows you to adjust the mount in height and depth.
The next stage is applying markings to the wall. But for this you must follow a number of rules.
This is done for clarity, so that you can see the number of centimeters that need to be taken into account when making the final marks.
The next step is to make holes in order to install the rail. Here are some useful tips that will come in handy:
- If the drill "jumps", make small notches using a nail or punch and hammer;
- If the wall crumbles during work, then first you should make a small hole, and then drill it out to an acceptable size;
- If you need to change the drilling depth, you need to use a prepared dowel;
- If you need to make a hole in a concrete wall, but there is no hammer drill, you can do it with a hammer and a punch.
Wiring locations require special attention.
Upon completion of all actions, the dowels are placed in the holes. Next, the mounting strip is installed on the fasteners. The cabinets are fixed to the mounting plate. To adjust their position, screws of mounted mechanisms are used.
To make the set look like a single “wall”, they need to be connected closely to each other.
The elements are fixed with clamps, starting from the corner, avoiding chipping (in accordance with the above instructions).
Thus, alignment of the overall ensemble of cabinets in one plane is achieved.
The next step is to drill holes between the tightly fitting parts of the headset to then fasten them with intersectional ties.
At the final stage, shelves are installed and doors are secured.
Method 3. Plastic and metal wrap-around dowels
This is the fastest option for hanging a cabinet from a plasterboard wall. The downside is a significant limitation on the maximum load. The video below demonstrates what load different types of dowels can withstand:
For fastening, special roll-up dowels for DRIVA plasterboards are used. They come in metal and plastic, with or without a drilling tip, and have large external threads and a cross slot for screwing into drywall with a screwdriver. In contrast to previous methods, these fasteners should not get into the metal frame profiles.
DRIVA is simply screwed into the plasterboard sheet in the right place, its end is flush with the plane of the wall. The force when screwing should be controlled so that the dowel does not “fall” through the gypsum board. To fasten hanging furniture, self-tapping screws or self-tapping screws are screwed into DRIVA.
The declared maximum load on DRIVA fasteners is 25 kg. At the same time, we should not forget about the additional dynamic loads that arise during operation. Craftsmen recommend using DRIVA for attaching small cabinets, shelves, plasma panels and paintings to drywall.
Another innovative solution is the use of the Fischer DuoTec self-aligning dowel. The principle of its operation and installation technique can be seen in the video:
Initial stage of work: how to determine the height of the suspension?
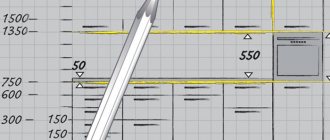
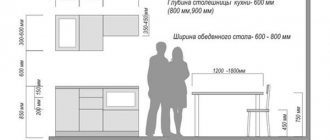
Before you start attaching cabinets to the wall, you need to correctly determine the height of their hanging. Approximately, the gap between the countertop and the bottom of the cabinets is 50-60 cm, and according to GOST - 45 cm. If you mount cabinets above a refrigerator or high oven, then their height will indicate the required hanging point.
Size is influenced by several factors, but the primary one is human height.
You should also take into account the quality of the wall partition. In modern houses it is most often made of plasterboard. In this case, do not hang the cabinet too high - the wall may become deformed. In older houses, the floors may also be dilapidated. The walls will not bear such weight and will crumble. In this case, the furniture may fall, and you will be forced to repair it or purchase a new one.
To prevent heavy loads on the floors, you must install auxiliary supports and metal frames.
In most cases, the height of the suspension can be influenced by design innovations. We are talking about facade kits, where everything you need is included in the kit, and this is very economical.
The instructions indicate what height the suspension should be.
Other types of fasteners
To hang several rather heavy cabinets on self-tapping screws already screwed into the wall, you can attach a strip to their back surface. This flat piece has a slot that resembles a keyhole in configuration. It is selected so that the diameter of the widest part of the hole is slightly larger than the head of the screw. The narrow part of the hole should be slightly larger than the diameter of the thread. When hanging the cabinet, the head of the self-tapping screw enters the wide part of the slot, and then moves under weight into the narrow zone, ensuring reliable fastening.
If you need to fix a fairly heavy object on the wall, made with plasterboard sheathing, then you can first make a hole with a diameter of ≈ 3 cm in the area of the fastening room, through which a solution can be introduced into the empty space, allowing you to create a strong bridge to the wall.
You can simplify the process if you correctly calculate the length of the screw. In order for the kitchen wall cabinet to be firmly fixed, several values are added up: the thickness of the drywall, the gap from the finish to the wall, the layer of plaster, the depth of the hole in the wall itself.
Types of fastenings and their features
After choosing the height for mounting the cabinets, you should decide on the type of fastening. It can be different: corners, pendants and tires.
Corners or pendants
Previously, special metal hangers were used when installing cabinets. They were attached to the rear ends of the module walls. Today, such devices are no longer used, as they have quite a few disadvantages. For example, the inability to adjust the position of cabinets after installation on the wall. And how evenly they will hang depends only on the accuracy of the markings on the wall.
Corners are almost the same as pendants, only they are attached to the roof of the cabinet. When using them, it is important to determine the upper limit at which they will be set. You must strictly adhere to one horizontal line, otherwise the wall cabinets will be installed unevenly.
Installation on corners or pendants is a rather labor-intensive process (compared to a tire) and requires perfect precision. If there is a mistake, you may need to make new holes in the wall.
If the walls were not leveled during the kitchen renovation, then fixing them to the corners will be the best option. An outdated method does not mean it is bad, you just have to spend a little more time on installation than when using other types of fasteners.
Tire (bar)
A mounting rail or strip for hanging cabinets is much more convenient and saves time. This kind of work can be done even alone, which cannot be said about installing it on corners.
The fastening consists of two elements - adjustable canopies and a special strip. The canopy is installed inside the cabinet, in the back wall of which you need to make a hole. A rail is attached to the wall, onto which the module is subsequently hung.
This type of fastening has its advantages:
- Self-installation. You can handle the installation of wall cabinets yourself by first fixing a plank to the wall, and then installing modules on it.
- Possibility of adjusting the position of the cabinet. In this case, there is no need to remove furniture from the wall; all the work can be done under the canopy.
- Reliability. Unlike mounting on corners, the option with a bar is considered more reliable and capable of withstanding high loads. Even if a couple of screws in the structure become loose, the rest will hold the modules well.
Rules for wall preparation
Before installation, the working surfaces (rough) are put in order. The most important points:
- The walls are checked for distortions. In this case, you should use a level or a long-length building level.
- Assess the condition of corner areas. The walls here should make an angle of 90°C.
- Installation of sockets, chiselling of rough surfaces - these actions are completed before the process of attaching kitchen cabinets to the wall begins. The same should be the approach to the distribution of water supply communications and sewerage.
- Finishing work is in progress. Cabinets in the kitchen are installed after finishing the wall cladding, otherwise the joints between the pieces of furniture and the finishing material will be visible.
If the walls are wavy, it is recommended to remove the old layer of plaster down to the brick/concrete. Then the partition is finished from scratch. If cabinets are hung on wavy surfaces without eliminating the defects, the furniture will be positioned unevenly. This will negatively affect the interior.
Don't forget to prepare the walls!
Before hanging the cabinets, you need to prepare the walls by doing some work:
Use plaster or plasterboard sheets.
These points will be the basis for the work ahead.
After hanging the cabinets, painting the walls will be very problematic.
Method number 1: on a wooden beam
In cases where you install plasterboard partitions yourself, you can mark out your future kitchen in advance and lay a wooden beam at the location of the mounting rail before finishing work. Choose a beam of medium width, about 8-10 centimeters, so that later you can slightly adjust the height of the cabinets. The timber is laid in the spaces between the vertical guide profile to a width equal to the width of the kitchen unit, and is attached to the main wall of the room. Subsequently, choose the fasteners for your cabinet so that its length is enough to sew through the plasterboard sheet and secure it in a wooden block. This method is usually chosen in cases where main walls are leveled with sheets of plasterboard.
Classification of fastening structures
Although the cabinets are fixed directly to the hangers themselves, there are still special designs that are attached directly to the wall. With their help you can carry out this operation. Among them are some of the most popular products:
- Self-tapping screws. A relatively simple option, which is used to fix structures that are not susceptible to significant loads.
- A crutch is the same self-tapping screw, but it has an L-shaped end, which limits the sliding of the cabinet of such a loop.
- The mounting strip (mounting rail) is a special metal profile with several holes. The upper edge of this product lags slightly behind the wall and forms a kind of hook on which the cabinet is hung.
Useful drilling tools
A jack of all trades always needs certain tools to work in a private house, on a summer cottage, in an apartment, or when building his own house. Many of them are not even worth purchasing if they do not require constant use. For example, for drilling, there are many different attachments that will greatly increase the functions of your drill and significantly expand them.
Let's look at some devices for auxiliary potential.
To obtain precise holes of significant diameter in different workpieces, a device such as a drilling and milling attachment will help to carry out individual milling work.
Make a milling machine out of a drill.
The next device worth mentioning is very expensive, but has the highest versatility. You will sharpen all the tools that you have on the farm, be it knives, shovels, axes, hoes, various drills, effortlessly with the universal sharpening device.
When purchasing drill attachments, be sure to check their compatibility.
Holder with clamp. With its help, you can fix the drill anywhere, use it with various kinds of devices, use it as a mini-lathe, sharpening, milling or grinding and polishing machine.
The drill holder allows you to quickly secure the drill.
All kinds of attachments are also designed for drills. These can be stops that limit the depth of drilling, platforms with which you can drill at a certain angle or perpendicularly. There are nozzles that are adapters and extensions of different designs: offset, angled, flexible.
The angle drill adapter is designed for hand and electric drills.
Metal cutting attachments turn your drill into a one-of-a-kind tool. Some resemble sheet metal shears, while others have a different feature, such as roller shears. The nozzle, called the “Cricket,” seems to cut through the metal.
The main advantage is that they do not damage the polymer coating of the metal.
There are also other attachments designed for monotype work.
- For installing aluminum rivets. There are types for both the same size and those with interchangeable bushings for different calibers.
- Tape-shaped attachment for self-tapping screws. With its help, you will significantly save time when working with plasterboard partitions or when you need to secure other materials with self-tapping screws.
- A belt sanding attachment will completely replace a sanding machine, and it will be much cheaper in cost.
- An attachment with which you can turn your drill into a hammer drill will not be superfluous.
- Using the corner pruner attachment, you can cut various cables, as well as tree branches.
- Using a variety of attachments, the drill will replace your jigsaw, circular saw, pump, and you can polish surfaces and sharpen drills.
- There are unusual attachments.
Whatever attachments we use, the main thing is that the work is enjoyable.
Disadvantages of hinge mounting
- In order to hang the cabinets perfectly level, you need to carefully mark them.
- This fittings are quite unreliable and cannot always withstand a lot of weight.
- Even under the weight of its own weight, cabinets with this type of hanging very often break off the hinge attachment point on the back wall.
- It is almost impossible to hang wall cabinets this way alone.
But this type of mount has, perhaps, only one advantage – low cost.
Mounting options
There are 2 methods by which fastenings for kitchen cabinets are made. Installation is carried out:
- One line, that is, the location of the fastener is equidistant from the ceiling;
It is considered the most common type of accommodation. This way you can easily secure the cabinets yourself.
This method is used much less frequently, since its implementation is much more complicated than a linear fastening scheme.
The first method is popular because you can use only your own strength to attach kitchen cabinets, without turning to outside help.
The choice of option is determined by the number, size and depth of wall cabinets.
The second option for attaching fixation items is less common among ordinary people. This is because the roof of this furniture is used as an additional surface.
Any of the proposed variations is perfect for both a room with a small area and a large one.
And all because they do not have any effect on the fullness or compactness of the room.
When choosing a method, only the interior and design change.
Advantages and disadvantages
Despite the fact that hanging furniture appeared not so long ago, its main advantages and disadvantages are already clearly defined.
The advantages of a floating kitchen include:
sleek appearance. Unusual and stylish automatically becomes fashionable. The non-standard kitchen interior very quickly won a large number of fans with its simplicity and originality of lines;
extra space. Instead of cluttering a balcony or storage room, long narrow objects (remnants of building materials, etc.) can be successfully hidden under hanging cabinets. The main thing is to ensure that nothing peeks out from under the kitchen modules, spoiling the design of the set;
improved air circulation. The kitchen is the wettest room in the house (in some cases, the bathroom competes with it). Constant fumes that occur during cooking and washing dishes negatively affect not only kitchen furniture, but also expensive household appliances. The absence of a lower plinth and kitchen supports promotes unhindered air circulation, improving the atmosphere in the kitchen
This is especially important in the presence of built-in equipment that requires increased ventilation and cooling;
But there are no advantages without disadvantages; a floating kitchen is also not perfect. The disadvantages of hanging cabinets include:
high cost. Such models are practically never found on the open market; they are usually made only to order. At the same time, materials and fittings must be of high quality, otherwise the supports and fasteners will not withstand the load. It is clear that a carved oak set will not cost less. But compared to a regular kitchen from Ikea, floating cabinets are much more expensive;
There are quite a lot of pros and cons of a floating kitchen, so you should give preference to this design only after thoroughly assessing all the possible risks. After all, what looks beautiful on the cover of a fashion magazine is not always as convenient and practical in real life.
Hang cabinets on drywall
Often apartment owners have to solve the question: how to hang the kitchen on drywall.
As you know, such material is not durable, but we need guarantees of high-quality installation - who wants a cabinet to ever collapse on the floor?
The problem is still doable.
Fastening methods:
- Butterfly dowel. Only suitable for light wall-mounted modules weighing up to 5 kg. The dowel body is aluminum, made in the form of a collet (a hollow cylinder with longitudinal cuts). When the screw is screwed into the dowel, the antennae move apart and are pressed into the surface of the hole in the sheet.
- Mounting rail. It is attached to a sheet and a wooden frame - this ensures higher reliability of fastening. Knowing in advance that the cabinets will be hung, you need to, if possible, take care of a more durable base (mortgages) under the drywall in the form of timber.
- In order to secure very bulky furniture, they also use additional fasteners: decorative cable. It is attached to the ceiling. In addition, tubes coated with a layer of chromium are used. They are screwed to the floor and serve as a frame.
Loose and hollow walls
It is quite difficult to firmly fix fasteners into a wall made of foam blocks, shell rock, adobe and similar materials. Using conventional dowels or anchors does not allow achieving the desired effect for a long time, especially if the cabinet is heavy.
Expandable DowelsFisher Smart Dowel
Depending on the material and possible load, powerful screw or drop-down fasteners are used to hang cabinets. In some cases, special dowels or long anchors (120-210 mm) are used. In old adobe buildings, hanging furniture used to be attached to long nails driven into the wall without any drilling.
Chemical anchor for hollow wallsSpecial solution fills the empty space
The load on fasteners in thin, loose walls can be reduced by partially transferring them to the side elements of the kitchen, for example, to a bar pipe or a pencil case. Installing cabinets on a common hanging rail and tying them together will also help to evenly distribute the weight of the furniture.
Related Posts
- Corner cabinet drawing with dimensions
- Kitchens without upper cabinets: photos, design features, current trends
- Making a wardrobe from plasterboard, important points
- Mounting a mirror on the wall in various ways
- How to seal the joint between the bathtub and the wall? 8 popular options
- Connecting the plug to the hob
- What and how to drill into the tiles so that they don’t crack?
- Ventilation control panel: device, purpose + how to assemble correctly
- Correct installation of a hood in the kitchen with your own hands
- Wall cornice: how to hang, photo
- DIY garage accessories: all the most useful things
- How to close the pipes in the toilet
- Making a stand for a drill with your own hands: instructions, drawings, video
- How to update old furniture in the kitchen with your own hands: painting, decor, rattan, pasting, video instructions, replacing facades, photos, designer tips
- How to glue fiberglass correctly?
- How to update old tiles in the bathroom
- Options for making shelves for the garage with your own hands
- Choosing dowels for drywall
- We mount the TV on the wall securely and conveniently
- Socket in a concrete wall: installation rules
- Washbasin mount
- At what distance from the floor is it correct to hang a TV?
- The door handle creaks: causes of the problem and solutions
- How and with what help to fasten stair balusters?
- Zoning a room into a bedroom and living room (70 photos)
Read with this
- Corner cabinet drawing with dimensions
- Kitchens without upper cabinets: photos, design features, current trends
- Making a wardrobe from plasterboard, important points
- Mounting a mirror on the wall in various ways
- How to seal the joint between the bathtub and the wall? 8 popular options
- Connecting the plug to the hob
- What and how to drill into the tiles so that they don’t crack?
- Ventilation control panel: device, purpose + how to assemble correctly
- Correct installation of a hood in the kitchen with your own hands
- Wall cornice: how to hang, photo
Advantages and disadvantages of the plank
This simple design has a number of advantages, which is why it has gained its popularity:
- Even non-professionals - people with basic construction skills - can cope with the installation.
- When installing adjustable awnings, there is no need to measure and drill holes for each wall hanging cabinet separately. The general level is reflected.
- Using anchor bolts you can adjust the position of the cabinets. They can be placed on the same level, regardless of the flaws of the wall.
- Unlike fastenings for wall-mounted kitchen cabinets with dowels, a design with a strip is considered more “durable” and reliable. Even if a couple of screws loosen over time, the rest will hold well even when the cabinets are as full as possible.
The system has no global shortcomings. The only thing you should keep an eye on when purchasing a bar is the quality of the material. Low grade metal will bend a lot and may even break during furniture installation.
The locking mechanisms of kitchen cabinets have to endure heavy loads.
Methods of fastening a wall base - choosing according to strength
The main thing you should pay attention to before installing kitchen cabinets is whether the walls in the room are level enough. The fact is that there may be some deviation from the plane, and a bend, imperceptible at first glance, can be quite easily identified using a laser level and a plumb line. Based on how smooth the wall is, you should choose the method of attaching the cabinets. There are 2 installation methods - rigid, using steel corners or plates, and with movable hangers for kitchen cabinets. The first option is possible when the wall is bent only if you screw in the screws to different depths so that the heads are on the same line, while the best solution is to attach them to hanging loops. In general, it is preferable that the surface be leveled, especially if corners are considered as fastenings.
The mounting strip for wall kitchen cabinets can be used when the wall has a relatively slight bend. The fact is that the special groove into which the adjustable hangers cling can be easily deformed if the plank is strongly curved along the base topography. In this case, the cabinet is suspended on adjustable systems with small protrusions facing down and exactly fitting into the longitudinal groove of the strip. Thus, the upper base simply clings and is held by its own weight. But if you lift the cabinet a little, it will fall off along with its contents. In this regard, corners and plates with lugs for screws are still quite popular: the former firmly fix the kitchen base, the grooves of the latter also prevent the box from falling off.
Bolts, anchors or tires?
To ensure that the fastenings are reliable and the filled cabinet does not fall at the most unfortunate moment, you should take into account the material used to make the walls and furniture. Carefully consider the type of fastening.
How to fasten and what fittings are most optimal for a brick, concrete, wooden wall?
For a wooden wall of a country house, fastening with countersunk screws made of hardened alloy would be optimal. The most effective installation is with self-tapping screws with a large pitch and double-start thread.
It is better to attach shelves to a concrete and brick base using dowels, plugs, metal bolts, and plastic fasteners. You can strengthen the fittings in the holes after the drill with gypsum mortar.
Molly or butterfly screws will securely secure hanging furniture to a plasterboard wall.
For open shelves with light loads, decor, and lighting, you can use plastic butterfly dowels and drill dowels.
Hanging storage systems for dishes, food, and equipment should be mounted on classic metal fittings. For example, you can buy regular dowels made of durable alloy or molly (butterfly dowel in a metal version).
If it is impossible to reach the wall through the sheathing, you can use wooden bookmarks. The thickness of the embedded beam should be equal to the thickness of the transverse frame. If these numbers do not match, the structure may become deformed. The thickness of the timber is adjusted according to the profile sample. A metal butterfly screw is optimal for fastening hardware.
The attachment is attached directly to the bar made of bars. To enhance the load-bearing capacity, use the longest length of the plank: for example, along the width of the entire set of hanging furniture.
The two most proven types of fasteners are:
- mounting rail;
- classic bolts and screws.
Installing fittings - installation in the cabinet box
As a rule, the upper base of a kitchen block has, in addition to side walls made of chipboard or MDF, also a back one, which is usually made of a thin sheet of MDF or fiberboard. It can be attached both over the edges of the side, top and bottom panels, and into specially made grooves, which, in fact, does not play a special role when installing suspensions. The basic rule when marking for fittings is that its body must be recessed into the box so that there is a gap of 5 millimeters from the edge of the rear edge of the panel. Even if there is a back wall that is not recessed into the grooves, the freedom of movement of the hook plate is enough to extend and hook onto the strip for hanging kitchen cabinets.
In order to install the hangers, you must first make cuts in the back wall, exactly to the width of the hooks. As a rule, to do this, it is enough to remove areas in the upper corners of the back sheet, measuring 35x55 millimeters, taking into account the thickness of the side and top panels. However, these values may be different, depending on the material used to make the cabinets. Kitchen cabinets are fastened to the wall using a plank, so you need to make a preliminary measurement of the total length of all sections of the upper base. Based on the obtained value, the length of the profile strip is calculated, which, however, can be divided into small sections, as we said earlier, in order to save money.
To secure the metal strip, one mark is enough at the desired height, after which, using a level, we get a horizontal line along which we drill holes for fasteners. As the latter, anchor bolts or dowels are preferred for a concrete base, and only anchor bolts for a brick wall. For drywall - screws with special clamping cartridges. If the fastening for kitchen cabinets to the wall is divided into segments, each of them is screwed with two bolts or screws. Now all that remains is to hook the hooks of the hangers and use the screws to adjust the height of the box and minimize the deviation of its rear wall. Before installing the cabinet, make sure that the hooks are extended to a sufficient length so that the box does not fall off when hooked.
Installation method
To properly secure kitchen wall cabinets, you need to select a tool in advance and strictly follow the installation technology. It’s easier to do the work with 4 hands, but 1 person can do it
Of course, this will take a little more time and will require extreme concentration, accuracy and caution.
An important factor is the reliability and quality of fastening of each part of the headset to the wall.
Preparatory stage
Before starting the process of drilling surfaces and direct installation, you need to perform the following steps:
- Cleaning and leveling walls. The easiest way to do this is with drywall. First, you need to secure a frame of profiles to the wall, on which the structure of the cabinets will be supported.
- For corner kitchens, the angle between the two planes should be maintained at 90 degrees. If the curvature of the walls is insignificant, you can simply plaster them.
- Applying basic markings. Using a perpendicular, a construction pencil and a level, you need to schematically arrange the attachment points and select the height of the structure.
- If the situation requires it, you must first install all sockets and lighting fixtures and attach all related elements.
- Before starting work on the installation of kitchen cabinets, the walls must be painted or wallpapered - no repair work should be carried out after installation.
Hanging height indicators
It should be convenient to use the set, so the height of the cabinets directly depends on the height of the owners and the anatomical features of their figure, and the features of the room.
Before you start assembling the set into a single “wall”, you need to decide on the height at which the furniture will be hung.
Main criteria and numbers:
- The drawers should be tactile and located at eye level. On average, the distance from the plane of the table top to the top cabinet is 55-65 cm. In this case, a person must reach the very top shelf without the risk of dropping the desired item and without the use of auxiliary objects (chairs, benches, etc.).
- If you do not plan to mount a table top or the lower part of the set, then the ratio of human height and fastener height should look like this:
- up to 165 cm – 175-180 cm;
- 165-157 cm – 185 cm;
- 175-190 cm – 200 cm.
To correctly carry out these manipulations, preliminary calculations must be made.
Required tools and materials
To carry out the work quickly and efficiently you will need:
- Drill or hammer drill with drills or augers. For brick and concrete, the impact mode should be used; for other surfaces, regular drilling will be sufficient. When working with tiles, you need to stock up on drill bits with pobedit tips.
- A screwdriver, which will be used to tighten the screws for attaching the holders to the cabinets.
- Construction pencil and tape measure.
- Level for marking the location of cabinets and adjusting awnings.
- Stable ladder.
Tools and preparatory work
In order to install wall cabinets with your own hands using canopies and a mounting strip, you should prepare the necessary tools in advance:
- Hammer or drill (depending on the wall material).
- Screwdriver and screwdriver.
- Construction level, tape measure.
- A hacksaw for metal.
Before you begin the process of installing wall cabinets, it is necessary to carry out some preparatory work. The most important thing is to make sure the walls are strong. If the set is installed on drywall, then a wooden beam should be secured under the front surface for strength. Otherwise, you may need butterfly dowels in large quantities.
With a corner set, the corner of the kitchen should be treated with special attention. If you lay it out carefully, there will be no gaps when installing the corner cabinet. It is better to lay the electrical wiring in advance so that you do not have to dismantle the furniture later, which is extra work and a waste of time.
For the hood, it is better to mount a socket under the ceiling directly above it. So, you can get rid of wires in the area of the stove and work surface. And in terms of safety, this is a big plus.
The final finishing of the wall with wallpaper, tiles or plaster must be completed before installing the kitchen. After hanging the modules, this will not be possible.
Methods for assembling hinged elements
Any disassembled kitchen is a set of parts made of chipboard and MDF, fittings, and fasteners. Using all this, you need to assemble the cabinets. The kitchen is mainly equipped with upper and lower cabinets.
Methods for assembling a kitchen set:
- In pairs. The master assembles the upper and lower cabinets and then installs this pair.
- First, assemble the upper cabinets, and then the lower ones.
- The lower elements are assembled first, and then the upper ones. Many people find it more convenient to hang the upper elements while standing on the countertop.
If you collect everything at once and then install it, you can clutter the entire apartment, but sometimes this is not possible, especially if the apartment is one-room or heavily cluttered with furniture.
Tips for hanging cabinets
There are several rules for how to attach kitchen cabinets to the strip.
- The height of the wall cabinets should be such that adult family members can freely take the item on the top shelf from the floor.
- Cabinets must not block ventilation outlets.
- The fastenings must be as strong as possible so that the cabinets can withstand quite a lot of weight - their own, food and kitchen utensils.
How to place it correctly?
There are a few simple rules:
- accessibility of food, dishes and other kitchen utensils stored in the closet - to ensure this possibility, it is recommended to place pieces of furniture at a given distance from the countertop, and not under the ceiling;
- cabinets should not interfere with air circulation, so they are installed next to the ventilation grille, and it is prohibited to close the entrance to the duct;
- pieces of furniture in the kitchen are placed so that they do not spoil the geometry of the room.
The distance is enough to place all kitchen appliances on the table. Moreover, more often they choose an option within 45-50 cm. A distance of 65 cm and above in most cases determines the position of the hood (from the countertop to its lower edge).
You should also focus on the growth of the residents of the house. Possible options:
- If a person's height is between 155-160 cm, the recommended height from the floor to the top shelf is 175 cm.
- If your height is 160-170 cm, the top shelf should be located at a height of 190 cm.
- For tall home owners (height 170-190 cm), a suitable option is when the top shelf is at a height of 200 cm.
If you do not follow these recommendations, it will be difficult to freely use dishes and kitchen utensils located in cabinets. You will have to use a stool for this purpose. In addition, you need to check at the installation stage that the hanging furniture is level. Any distortions can lead to the collapse of part of the kitchen equipment. In this case, the appearance of the interior also deteriorates. A building level should be used to check the position of the cabinets.
Almost always, wall-mounted and floor-standing pieces of furniture are placed so that they are on top of each other. Otherwise, the set will not look organic and symmetry will be lost. If necessary, cabinets are positioned higher or lower than existing standard values. However, before you finally drill holes in the wall, you should make sure that a person can easily reach the top shelf. Recommendations for calculating the installation height of cabinets:
determine the height of all residents of the apartment, take the average value - if you focus on only 1 family member (the tallest or shortest), then the rest will be uncomfortable using the furniture; take into account the dimensions of the upper cabinets; The most harmonious look is the set, which occupies most of the wall, for this reason, when choosing, you need to focus on the height of the ceilings of the room; sometimes it is important to make the apron high enough (for example, when installing specific decorative elements, the upper cabinets are raised additionally); The style direction in which the set is made is also taken into account (sometimes it is necessary to place cabinets at some distance from each other)
The position of the suspended modules of the kitchen unit - we determine the height
Before installing the kitchen unit on the wall, markings should be made, taking into account all the features of the upper base. The fact is that all models differ slightly in size, and in some cases the difference in size can be quite significant. This refers to both the total height of the cabinets, which is usually observed for all wall sections of the block, and the spans between the shelves, as well as their depth. Moreover, the last 2 values have the greatest impact on the usability of the upper base. Let's look at a few examples.
The most effective solution for kitchen furniture is sections of 3 shelves no more than 30 centimeters deep. Moreover, the height of each span should be such that the middle level can be reached without resorting to aids in the form of a chair or, especially, a stepladder. As for the upper shelves, they can also be made in a direct access area or left at a height exceeding the height of a person with an outstretched arm, reserved for rarely used utensils. In this case, the lower plane of the cabinet should not interfere with tilting over the work surface intended for cooking, at a standard tabletop height.
Before you begin installing kitchen cabinets, you need to mark
Of course, in order to increase the capacity of the hanging sections, you can make them as deep as possible, up to half a meter, by providing each with 4 shelves, divided into compartments. However, an increase in internal space will be achieved by limiting access to it. The fact is that hanging kitchen cabinets below eye level is not the best option, as this will reduce the usability of the work area. Especially if the “apron” of the kitchen wall is used for hanging utensils and dishes. And to hang it high means to make the top 2 shelves out of reach at once.
Thus, based on GOST, the minimum height of the lower plane of the cabinet above the countertop is considered to be 45 centimeters, while the depth should be less than 30 centimeters. This will allow you to conveniently use the cutting area and at the same time leave room for a microwave oven and electric kettle. But the most comfortable height for a person of average height is considered to be 60 centimeters with the same tabletop width. The recommended height of the middle or second shelf from the bottom for a user height of 155 to 160 centimeters should not exceed 175 centimeters, so that a raised hand reaches the entire depth of the compartment. With a height of 160–170 centimeters, the average shelf should be at a height of 190 centimeters, and with a height of 175–190 centimeters – no more than 2 meters.
Installation instructions
- After completing the preparatory work, you can begin assembly. After screwing the screws, you need to align the hooks in one position and make sure that they are at the middle level. Canopies must be secured in one position. The protrusion of the fastening part (has a hook configuration) should be 2 mm in relation to the rear of the wall.
- If you planned to cut the tire, then it’s worth taking care of the preparations.
- Holes are made on the pre-marked wall for fixing the tire.
- The body of the hanging furniture must be mounted on a tire. The reference point is the plane of the wall. The next fastening of wall kitchen cabinets is carried out based on the previous one.
- The next step is the sequential fixation of installation objects using fasteners. A clamp is used for this. To prevent the surface from being damaged, a thin layer of insulating material must be laid.
- Next, you need to drill holes in the housings. To avoid cracks or splinters, use plywood or wood overlay. After preparing the apertures, the elements are connected with ties.
- After hanging and fixing the drawers, the doors should be screwed on. To do this, they must be laid out on the floor in such a way as to attach the loops to special niches. After this procedure, installation to the housing occurs.
Preparing the wall surface
The preparatory stage is not necessary in every case, but sometimes the installation of fittings and high-quality hanging of cabinets is complicated by unfinished finishing or uneven walls.
Wall furniture hides minor defects, so sometimes they don’t put wallpaper under kitchen cabinets or do decorative painting. But in the case when the finishing work is not completed, it is necessary to level the walls. To level out crooked walls, the beacon plastering method is most often used.
The walls are cleaned of mortar build-up and several layers of primer are applied. Next, metal or plastic slats are installed, which play the role of “beacons”. Ropes are pulled through two longitudinal strips fixed with plaster.
Using the first section as a guide for the building level, the remaining planks are attached. Apply the solution over the beacons and level it. After a few hours, when the solution has dried a little, carefully pull out the metal strips. Plastic ones can be left in the plaster.
If there is already a layer of plaster on the walls, the surface is carefully leveled with mortar and a spatula. If you are not confident in your plasterer skills, use the wooden plank method. Two horizontal strips of wood are attached to the wall with screws, which act as tires. The fittings are hung on these strips, so the furniture does not come into contact with the walls.
Installing wall furniture on completely finished walls has several nuances. Some finishing materials require a special approach. Let's consider the difficulties that may arise when attaching fittings.
Features of wall materials
Walls covered with plasterboard look perfect - smooth, neat and beautiful. But even the strongest sheet will not withstand hanging furniture. For this reason, it is worth figuring out in advance how to properly hang kitchen cabinets on a thin wall.
If the plasterboard box is fixed on top of a load-bearing wall, then the fittings are mounted directly on the wall beams. The mounting strip is hung on fasteners 12-16 mm long, drilling through the drywall. The entire load falls on a strong supporting base - the thin box is not used.
The second case is more complicated. We are talking about a hollow plasterboard partition, which is installed on a metal frame and painted. Using a magnet, the internal metal structure is located and marked. Having drilled through the plasterboard box, a mounting rail is installed on the metal frame using special fasteners with spacers. Now the fittings are firmly mounted and you can hang the cabinet without fear for safety.
Important. Clay, adobe and wooden walls are drilled with a drill with a diameter of 8 mm and the fasteners are reinforced with wooden plugs or glue for self-tapping screws. A more modern option is “chemical” anchors.
The load-bearing capacity of aerated concrete is sufficient to support the weight of the kitchen unit. Specialized anchors and dowels are inserted into the drilled hole and secured until it stops. The spacer created by the opened anchor firmly fixes the furniture to the foam block wall.
Cinder block is the most durable of the materials listed , but hollow cells inside can create a problem. A multi-chamber cinder block is drilled so as to pass through one chamber and long metal anchors are installed as fastening.
A single-chamber cinder block is drilled through, a long pin is inserted and the fasteners are fixed on the back side.
Marking the wall and determining the height of the cabinets
To choose a comfortable height for wall cabinets, it is recommended to focus on the average height of the household.
A simple way is for the shortest member of the family (or the housewife who will use the kitchen furniture most often) to stand on tiptoes and extend their arm upward. The point that your fingers reach will be the main mark. It is used to determine the height of the top shelf of the kitchen unit. This simple method determines what arrangement of furniture will be convenient for the whole family.
There is also a standard chart that will help you figure out at what height to hang kitchen cabinets.
Verified and accurately calculated data on the relationship between height and height of the top shelf:
- height up to 160 cm - height 175 cm;
- height up to 175 cm - height 185 cm;
- height 175-190 cm - height 2 m.
Accurate and correct markings will ensure accurate installation of hanging furniture. All measurements are carefully checked by level and correlated with the position of the floor, ceiling and vertical wall. It is especially important to take accurate measurements when you plan to hang a row of upper cabinets. Unevenly secured cabinets violate safety regulations and spoil the interior.
Important. The hood above the gas stove, built into the panel of the upper block, is planned taking into account the safety requirements of the gas supply service. The central ventilation window must not be blocked by the air exhaust pipe. The rule is effective from January 1, 2019.
The technology for applying markings to the wall varies slightly for different mounts, but the general procedure is the same.
It is divided into several stages:
- First, determine the height of the furniture. Focusing on the height mark, the horizon is leveled, i.e. draw a straight line on the wall. For accurate marking you will need a construction hydraulic level and a tape measure.
- When installing a corner set, markings begin from the corner. The central cabinets are marked from the side wall of the outer one.
- All marks made using a level and tape measure are connected into an even line. Fittings for cabinets are installed according to the markings.
The height of the top shelves of the kitchen set above the kitchen apron
According to the manufacturers' standard, the minimum height from the tabletop to the top cabinet is 45 cm. The parameter varies up to 50-60 cm, because a narrow gap is often inconvenient. All sizes are adjusted to ensure comfort for household members.
To avoid difficulties when joining furniture with a kitchen apron, follow the useful recommendations of experts:
- Accurate measurements of the upper and lower cabinets, as well as the thickness of the countertop, will help to avoid inconsistencies with the kitchen apron. For example: the cabinet does not fit between the tiles on the backsplash and the ceiling. In this case, it is very difficult to fit all the furniture.
- Measuring the walls for furniture is done after installing the kitchen apron. Otherwise, there is a risk that the tiles will interfere with the correct placement of the cabinets.
- If the cabinets and countertop are hung end-to-end with the apron, then behind the hood it is made according to the size of the niche between the pieces of furniture.
- The “overlapping” option on the apron is less practical and is used forcedly. In this case, an overlap of 1 cm is made, including on the apron behind the hood. The margin will help to avoid distortion and place all cabinets strictly in the same plane.
- It is prudent to stretch the wires for sockets with a good margin. When moving a socket, difficulties may arise if the “tail” of the wire is too small.
How to properly apply markings on walls?
90% of successful work on hanging cabinets depends on correct marking. So, how to hang a kitchen cabinet perfectly level on a rail? You just need to carry out the markings consistently and correctly.
- Install the base cabinet and measure the distance from it to the wall cabinet. According to GOST, it should not be less than 45 cm, in practice - 50-60 centimeters.
- Using these marks, draw a line or stretch a thread, always measuring everything according to the level.
- Already from this line, measure the height of your cabinets and also draw it or mark it with thread.
- Set aside the required distance from the top edge at which you have attached awnings or other fittings for hanging cabinets, and approximately mark the holes.
- Measure the width of the mounting strip and make sure it will not protrude over the top of the cabinets.
- Place the strip along the top line or slightly below (depending on your measurements) and mark the holes as shown above.