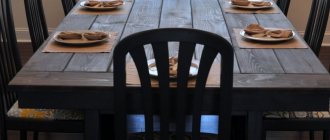
Many people notice that even the highest quality and most beautiful furniture loses its original appearance over time. However, completely changing kitchen furniture is not a cheap pleasure. But due to the fact that the old furniture in the kitchen is made of high-quality wood, many decide to transform the furniture. Therefore, the question arises: how to paint the countertop so that it looks like new. What paint and tools to choose to get the right result.
Pre-treatment of surfaces
Before painting, laminated surfaces must be prepared so that the paint lays evenly and adheres firmly.
You will need:
- dishwashing liquid;
- sponge;
- roller, brush;
- primer tray;
- rubber spatula;
- putty;
- a set of sandpaper;
- Sander;
- rags;
- gloves, protective mask and goggles.
The final result will depend on how well the surfaces are prepared.
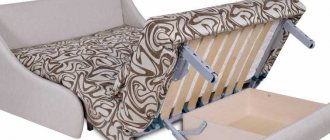
Advice! If the product consists of many parts (a table with drawers, for example), then it is recommended to disassemble it before painting. Furniture of simple shapes - a wardrobe - can not be disassembled if you only need to refresh the facade by painting it white.
Sanding
The next step is to sand the surfaces. After sanding, the coating will acquire a rough structure, and it will be easier to paint and the paint will adhere better. Start with coarse-grained sandpaper and finish with fine-grained sandpaper. You can get the job done faster by using a grinder.
If you use a sander, it is important not to overdo it and sand evenly over the entire surface, otherwise you may end up with a wavy surface with different sanding depths.
Important! During work, the respiratory tract must be protected with a protective mask: the substances contained in laminated chipboard can be harmful.
Degreasing
All surfaces that are planned to be painted are thoroughly washed, removing dust and dirt. Then degrease using a sponge with dishwashing detergent applied to it, rinse off and wipe the treated surfaces with a clean, dry cloth or napkin.
Leveling surfaces
If the furniture has chips, cracks or other imperfections, they should be repaired at this stage before painting. It is best to fill all the recesses with latex-based putty or special products with epoxy resin. When the mass hardens, the surface is leveled with sandpaper.
After this, the product is primed again and dried thoroughly.
Padding
It is much easier to paint surfaces treated with a primer: the paint goes on smoothly and no air bubbles form.
It is advisable to purchase a primer that is suitable for smooth surfaces (tiles, glass). You can also use bumper priming compounds - they come in cans, making application more convenient and quicker. While working, you must wear a protective mask.
After applying the primer layer, you need to let it dry. This process can take about 12 hours; you can find out more precisely by studying the label of a particular product.
Production of painted facades
Painted panels and facades are produced according to a specially prepared scheme:
- First of all, the slabs are prepared. They are cut according to the specified dimensions. Then sanding, priming, and sanding again is done. The appearance and performance characteristics of facades depend on the quality of this process.
- The next stage involves painting the MDF. The slabs are painted not in one, but in several layers. Moreover, each layer is completely dry, dried and sanded. This is done in order to achieve the effect of a glossy photo.
- After painting, the surface of the future facade is varnished.
- Before the work is completed, the final polishing takes place.
As you can see for yourself, the process of painting facades is not that complicated. Looking at various photos of kitchens in magazines or on the Internet, you will see that MDF facades can have absolutely any shape. Of course, in most of the photos the facades will be even and smooth, since this option is the most common.
In general, MDF is a very plastic material that lends itself perfectly to a wide variety of processing. Thanks to such remarkable characteristics, the slab can be given absolutely any shape. In the photo you can see the convex and concave shape of the slab. In addition, you can also do embossing, milling, and also round the edges.
Furniture with bent MDF
During the last, final painting, polyurethane enamel is applied to the MDF board. It is capable of creating a real protective field for the material, filling all the edges, recesses and other volumetric details on the facade. Modern designers use the features of this decorative coating, bringing their wildest ideas and fantasies to life.
Paint selection
Furniture with a laminated facade is best painted with water-based acrylic paint. It is suitable for painting products white, and to add color to the base you can add a color of the desired shade. Also, if necessary, the paint can be diluted with water to achieve a lighter tone.
Acrylic paint can be used indoors: it does not have a pungent odor, does not emit harmful compounds, is durable and easy to clean. To paint large surfaces, you can use acrylic paint in cans.
Thixotropic paint is also suitable for painting furniture - it has a special consistency, thanks to which it applies smoothly, without running down or forming smudges. Painted surfaces will resemble plastic ones.
Construction portal No. 1
In a room like a kitchen, absolutely everything is important.
Not only comfort and convenience, but also appearance. Specially designed kitchen designs with thoughtful content and good fittings will help you achieve just this effect. As for the facades, they will provide you not only with beauty and comfort, but also with a good mood every day. For all fans of modern style, painted MDF facades are perfect for kitchen decoration. Beautiful red fronts definitely decorate the kitchen
To finish such facades, polyurethane enamel is used, which is why painted facades can also be called enameled. But the point here is not at all in the name, but precisely in the fact that such facades look not only beautiful, but also modern, irresistible and simply luxurious. Moreover, painted MDF facades combine perfectly with modern kitchen appliances.
Coloring
To paint old furniture, you should prepare:
- paint container;
- roller, brush;
- paint;
- masking tape;
- gloves, mask.
Hardware protection
Before starting work, it is worth removing all fittings from the furniture. If this is not possible, all elements are carefully sealed with masking tape to protect them from accidental paint.
Roller and brush painting
In order to paint laminated surfaces, it is best to use a velor roller rather than a foam roller - it applies the paint evenly, preventing the formation of air bubbles. Foam rubber, due to its porous structure, can leave noticeable marks on the surface.
For hard-to-reach places and corners, use a narrow brush with a beveled edge. The tool must be of high quality, with tightly secured lint. If you paint with an old brush, individual hairs may fall out, remaining in the applied layer of paint.
If you plan to paint chipboard furniture white or light colors, it is advisable to apply two layers of paint so that the coating is dense. It is necessary to take a break between applying the first and second layers to allow the paint to dry completely.
Using a spray gun
An easier and faster way is to paint furniture using a spray gun. In this case, 60–200 g of paint will be spent on each m², depending on its consistency, layer thickness and other factors.
Plastic classification for fiberboard
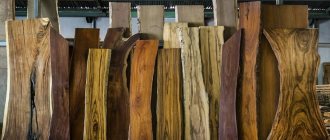
HPL – paper-laminated plastic – is used as a coating for MDF panels. This unique material is made using special technology. The paper is impregnated with specially designed resin compounds, folded in layers and pressed at high temperature and high pressure. The result is a very high-quality and beautiful material for kitchen furniture.
This material is glued onto a base board made of MDF or chipboard. In this case, the processing of the ends is usually carried out using the post-forming method: two sides of the plastic are folded onto the ends, and the remaining two are pasted over with a special edge. There are also alternative methods of finishing edges, for example, all ends can be covered with an acrylic edge, aluminum, ABS or PVC edging. The edge may not differ from the color of the facade, or may be contrasting.
Finish coating
Laminated chipboard has a smooth surface, but after sanding and applying paint it becomes matte. You can restore the shine of furniture and additionally protect painted surfaces by covering them with water-based varnish.
After the varnish has dried, the surface can be polished with a mildly abrasive auto polish, because it is almost impossible to apply the varnish with a brush or roller in an even layer and there will be small or noticeable waves on the surface; after polishing, the surface will be perfectly smooth and glossy.
Advice! It is recommended to purchase products for pre-treatment, coloring and finishing from the same company: they can definitely be used together, and the compositions of products from different manufacturers may be incompatible with each other.
Painting furniture yourself is quite simple: if you follow these recommendations, the new coating will be perfectly smooth, and the result will last for many years.
How to repaint laminated furniture with your own hands
The question “How to paint laminated furniture with your own hands?” worries those who have decided to update their interior and save money at the same time. And is it even possible to repaint furniture that is considered “disposable”? Furniture made from laminated MDF and chipboard is a budget option that can be easily replaced with a new one with a different color, texture and shape.
However, craftsmen easily take on the task of repainting laminated furniture with their own hands. And if you have the necessary tools and knowledge, this is not at all difficult to do.
Provence
The French Provence style is famous for its softness, naturalness, lightness and freshness. In no other design direction will you find so many white shades. There is a lot of beige and light brown here. Traditional lavender flowers for Provence are a calling card. It was they who at one time became the ticket of passage. This style is recognized by lavender.
Provence style kitchen with lavender notes
The flooring should exude warmth. And it is better to entrust this effect to natural wood. Parquet or parquet boards, polished to a glossy shine, fitted one to one board is the best solution. Provence originated in the south of France in one of the villages. Its identifying features are lavender, wicker rattan furniture, as well as decorative compositions of baskets with fruits, flowers and household utensils.
Kitchen in Provence style in blue shades
The kitchen set is purchased in a white color. You can use the effect of aged wood. This solution looks great. The lower and upper wall cabinets are standard. The frame and panels should be here. Open shelves hung along the walls are especially valued in Provence. Decorative compositions are installed on them.
Kitchen in Provence style with white cabinetry and open shelves
The countertop here is marble and textured. Be sure to have a glossy finish with a patterned chamfer on the edges. Color – white with dark, black splashes. If there is an island part, a free-standing block is made with a figured table. This makes it more convenient to cook on one side and dine on the other.
Provence style kitchen with black marble countertops and white splashes
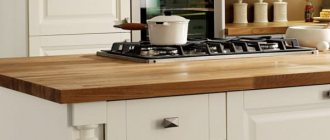
Fiberboards coated with a layer of decorative, resistant plastic are a popular, environmentally friendly and affordable material. They serve for a long time, are resistant to temperature and mechanical influences, and are easy to maintain.
A Provence style kitchen with an MDF countertop will serve you for many years
See alsoFeatures of surface finishing with decorative stone
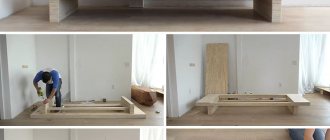
We repaint laminated furniture with our own hands - stages of work
Stage 1 - Preparatory
The laminated surface of any furniture is plastic (polyvinyl chloride, PVC), resistant to water. If you paint such a smooth surface, the paint will not stick, even the most expensive and high-quality one. Therefore, the surface must be carefully prepared. First, you should remove all fat from the surface using special solvents and detergents.
To make work more convenient, it is better to disassemble the furniture. But if you only need to repaint the facades, then you can remove only them from their hinges and lay them on a horizontal surface. If the fittings are not removed during painting, then it makes sense to protect them with masking tape.
Stage 2 - Sanding the surface
To prevent the paint from falling off after application, the top layer must be removed from the laminated surface. Sandpaper is suitable for this. First, you should use a coarser-grain sandpaper to remove the laminating layer, and then sand the furniture with a fine-grain sandpaper. This treatment will create a rough surface on which the paint will adhere better.
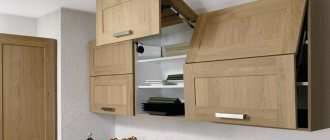
What could be the decor of facades?
Material such as MDF is quite expensive. It is not only high quality and highly durable, but also very environmentally friendly.
Moreover, it should be borne in mind that MDF boards can be given absolutely any color and shade, and this, in turn, means that furniture made from painted MDF can be matched to absolutely any style.
Don't forget about special paints with special effects. You could see them in photos in magazines more than once.
When choosing facades for the kitchen, the customer can give his preference to any shade and make his kitchen either monochromatic or multi-character, choosing different colors for the facades of floor and wall cabinets, but combined in one color scheme. Let's look at the most interesting special effects that facades can have:
- The most popular of them is called “chameleon”. Kitchen fronts made with this effect will never be monochromatic or monochromatic. They will constantly change their color depending on the viewing angle and lighting.
A kitchen with a special “chameleon” effect changes its color
For classic kitchens, facades with a “crackle” effect, which is also called “patination,” are often chosen. This interesting coating helps give the kitchen façade an aged effect. Crackles are small cracks that give modern furniture a classic, aged appearance. You can see options for such kitchens in photos in magazines or on the Internet.
How to update your kitchen countertops with your own hands?
Kitchen countertops made of any materials sooner or later lose their presentability and need updating. If you can’t afford a new set, you can restore the work surface.
In our article you will learn how to update an old countertop in the kitchen with your own hands, how to completely change its appearance without turning to specialists.
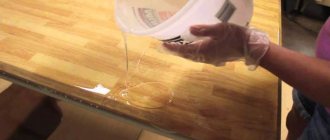
Achieving a stone effect using a glaze additive
A beautiful “stone” surface can be obtained by covering a layer of paint with glisal (glaze). This method is also called glazing. Glizal is a translucent layer that provokes a shimmer of color. To make the tabletop material look like stone, it is advisable to make the appropriate texture.
- Having prepared the surface, paint it with base paint.
- Immediately apply a film to the paint, carefully stroke it with your palm and fingers, making small waves, lines, etc. Remove the film and wait for the surface to dry.
- Apply a layer of glaze. Waiting for it to dry.
Having chosen the appropriate method, you can paint not only the tabletop, but also other furniture, kitchen apron, window sills, doors, etc. as stone.
Source: www.domstoy.ru
Types of countertops and their defects
Working surfaces are made from different materials:
- A natural stone. It is less susceptible to wear and tear than others. A countertop made of natural granite, for example, is not at all afraid of damage.
- Acrylic is a type of artificial stone. It is not resistant to scratches and cuts.
- Quartz agglomerate is durable like granite, but over time it still loses its appearance.
- Casting stone is a solid thin-layer polymer on a base. Requires careful sanding.
- Plastic is a budget option for countertops. It wears out quickly without the use of cutting boards.
- Wood treated with impregnations and varnishes also requires care to maintain its appearance.
How to update an old countertop made of natural and artificial stones?
The optimal method of restoration is polishing and grinding, because the tabletops have an identical texture throughout their entire thickness. Care must be taken with cast stone applied to the base in a thin layer; it will only withstand 2-3 polishing updates. In the future, it is optimal to improve it in the same way as wood or plastic - by gluing, painting, glazing. The same methods can be used to transform a stone if the set has already become boring.
Before you get tired of the set, scuffs and scratches form on the stone surface, it’s time to sand and polish it. Required tools:
- Sander.
- Polishing machine.
- Polishing paste.
The device for grinding and polishing can be one with different attachments: for the first stage abrasive P120, for the second - up to P1500.
You can update your kitchen table top with your own hands by following these steps:
- Adding water to the surface to reduce the heating of the stone, sand the countertop, leveling the top layer.
- Using polishing attachments from coarse to fine, process the surface to a matte, semi-matte or glossy texture using polishing paste.
Important . Neither the polishing nor the grinding wheel should be dry, they must be moistened.
Updating the table using decoupage
Unlimited flights of imagination, transformation of the kitchen countertop and minimal expenditure of effort and time are the advantages that the use of decoupage opens up when the decision is made to make the countertop with your own hands.
In order for the transformation of the countertop to be completed successfully, you should use your imagination and use a creative approach to reconstruction. How to make a table from decoupage - creating your own creative objects or integrating decoupage techniques. When decorating surfaces using this method, you do not need to have any talents or special abilities. Any person can do this task, and a minimum number of tools will be involved, namely: glue, furniture varnish and pictures.
How to update a kitchen countertop: radical methods
How to update a kitchen countertop with your own hands if its old appearance is no longer satisfactory? There are several options.
Pasting
The easiest way to transform your work surface. What to cover the tabletop with? To do this, you will need a thick vinyl film with a self-adhesive backing; photo wallpaper is also suitable.
- The surface of the tabletop must first be degreased and sanded for leveling. Important . If there are potholes or chips on the surface, they must be filled with repair putty.
- Paste the film. It is important to fix one side correctly so that when rolling, the canvas moves parallel to the edge of the table. During the pasting process, you need to help with a plastic or rubber spatula to force out bubbles and smooth out the coating.
The service life of the film is 3-4 years with careful use.
Painting and glazing
The second easiest way to solve the problem is to update the countertop. Suitable for any type of surface that must first be puttied or sanded for leveling.
How to paint a kitchen countertop:
- Acrylic paint.
- Alkyd enamel.
- Water-based paint.
The coloring composition should be applied to a degreased surface in 2 layers. You can use your imagination and draw something on the tabletop. For those who don’t know how to draw, you can use ready-made templates.
It is advisable to protect the finished coating with tempered glass. It will prevent small chips of paint from getting into food and preserve the color coating from abrasion. Glass can also be used for pasting.
Decoupage under glass
A creative way to update your kitchen table top with your own hands is the decoupage technique. It is characterized by freedom of creativity - you can use any applications, ready-made or homemade, sparkles, memorial cards, etc. They must be glued to a previously degreased surface using PVA, and after drying, covered with 3-4 layers of furniture varnish or glass.
Major update
How to radically update your countertop:
- Cover with tiles.
- Apply mosaic.
- Make a composition with stones, shells and other three-dimensional decor in transparent or colored epoxy resin.
How to update a countertop with your own hands depends mainly on the budget, imagination and capabilities of the kitchen owners. You can use any available restoration and transformation techniques.
The nuances of repainting furniture chipboard
Painting old furniture with your own hands is considered a difficult and risky procedure. The fact is that for the manufacture of interior items (cabinets, chests of drawers, kitchen modules) processed materials with a decorative layer are used. Therefore, it is necessary to correctly determine the type of coating in order to draw up a work plan.
Chipboards used in furniture production can be of the following types:
- Lacquered. Wardrobes, beds and dressing tables made more than 30 years ago are made from this material. Now this furniture is being produced again. The manufacturing technology is that several layers of varnish are applied to the decorative base. Parts processed in this way are used for facades or visible parts of the body. It is very difficult to repaint varnished products; it is much easier to polish if there is damage.
There are other types of slabs, but they are not as common.