Advantages and disadvantages of the material
Traditionally, countertops are made from ceramic tiles or porcelain tiles, which are considered an improved and more durable version.
Ceramics are quite easy to install, even if you have virtually no experience in carrying out this type of repair work.
Main advantages of the material:
- Nice appearance. The design and color can be chosen to suit your taste. For a kitchen countertop, it is better to choose a matte surface, since cracks, chips, and scratches from knives and other utensils are less visible on it.
- High level of strength. Ceramic tiles do not lose their quality even after several years. If installation technologies are followed, the degree of susceptibility to mechanical damage will be very low.
- Resistance to moisture, making the tile suitable for tiling kitchen countertops, where moisture is an essential companion.
- Thermal resistance. Such a tabletop will not be damaged by a hot kettle or pan placed on it; no marks will remain on the surface.
- Ceramic tiles do not require special care; simply wipe them with a damp sponge and a small amount of detergent.
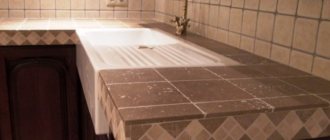
Photos of do-it-yourself tile kitchen countertops
The smaller the size, the more difficult it is to install. The more textured its surface, the more difficult it is to care for. Tiles can be not only of different sizes and colors, but also textured or smooth, glossy or mirrored. The catalogs contain a wide variety of materials made of stone and stone imitation; you can also find tile imitation like wood and metal.
An apron made of the same material as the table surface looks good: you can choose a similar color or one that harmoniously matches it from the same manufacturer’s collection.
Choosing tiles for countertops
When choosing materials for a kitchen countertop, special attention should be paid to such parameters as strength, moisture resistance, temperature resistance and reliability. The most suitable material is porcelain stoneware, which is not inferior in strength to natural stone.
The main advantage of porcelain stoneware over the same stone is its pleasant appearance, smooth surface and the ability to neatly fit it into the design. Natural stone looks rougher and more inconspicuous.
The increased strength of porcelain stoneware protects it from cracks and chips that can appear from impacts with dishes, a kettle, or a knife. The material practically does not absorb water and is suitable for covering countertops in the area of the sink and water filter.
Porcelain tiles are practically not affected by various types of acids and detergents with a high content of chemicals.
When choosing a detergent, you can safely choose any one - it is unlikely that any of them can cause significant harm to the porcelain stoneware.
Pros and cons of tiles for kitchen countertops
Usually, ceramics are used to finish and decorate the surface of the table, which has many advantages:
- Aesthetics, large selection of shades and patterns;
- Strength, durability;
- Moisture resistance;
- Not damaged by hot objects (frying pan, kettle);
- Easy care: wet cloth, some cleaning products.
Minuses:
- If the installation is incorrect, then dirt will accumulate in the joints;
- Do not wash with liquid containing acids.
Kinds
When choosing, it is important to pay attention to its size. The standard one is easier to install, and it won’t look too massive. In some cases, preference can be given to small materials (for example, mosaics), but in this case, it is unlikely to be possible to cover the surface without prior experience.
Traditionally, 15x15 ceramics are used to lay the countertop, if this does not contradict the features of the interior. Typically, small details are used for small-sized kitchens, where too large tiles will simply look out of place.
Much depends on the choice of surface. It should be level enough so as not to interfere with cooking or make cleaning difficult. The main types of kitchen surfaces are presented in the table below.
| Surface option | pros | Minuses |
| Embossed | Unusual appearance, the ability to create a unique design | Dirt quickly accumulates in the folds, which is quite difficult to remove. |
| Polished | Does not require special care, easy and quick to clean, can be used as a decorative element | Over time, the shine of the surface disappears; without the use of special products, it becomes dull and inconspicuous |
The larger the tile, the easier the installation process. However, materials should be selected not only for convenience, but also correspond to the design idea and look neat.
Ceramic
Standard option for covering kitchen countertops. The main pros and cons can be considered below.
| Advantages | Flaws |
| Easy to install, this type of repair work can be done even by beginners | Over time the shine is lost |
| Repels moisture well | All cracks and scratches are clearly visible on the glossy surface. |
| Resistance to thermal effects, high temperatures | Not as durable as porcelain tiles or natural stone |
| Ceramic tiles are easy to care for | May crack under heavy objects or impact |
Mosaic
Mosaic tiles are usually made from appropriately sized ceramic tiles. It looks bright and original, but only an experienced craftsman can install it. A beginner will have to give preference to another material. For example, standard ceramic tiles.
Particular attention should be paid to the seams. If handled incorrectly, dirt will accumulate in them, which will not be easy to remove.
Mosaic tiles must be the same shape and size so that the picture looks holistic.
Granite
The material is not found very often. Granite tiles are very durable, but are rarely used for countertops. The surface requires special care, otherwise its shine and smoothness will disappear over time. In addition, granite tiles are quite heavy, which is reflected in their appearance and the complexity of laying the material.
Porcelain tiles
It is best to finish a kitchen countertop made of tiles with porcelain stoneware. The material has excellent strength, resistance to moisture, mechanical damage and heat. A wide variety of textures and shades, as well as availability. Porcelain tiles do not look as sophisticated as ceramic tiles, but they do not pose any particular problems during installation.
Ready to serve for many years. Resistant to various types of damage.
Types of tiles
To cover a kitchen surface, you need to choose glazed tiles with protection class 5. Kitchen tiles should not be afraid of grease, hot and cold objects, should not absorb moisture and should be easy to clean. There are a great variety of kitchen tiles, let's look at the most interesting options:
- Tiles imitating brickwork. These tiles are in the Italian and Provence style; they will fill the kitchen with warmth and comfort.
- Stone effect tiles. It will decorate the kitchen in Country and Classic styles, giving the kitchen individuality and novelty.
- I imitate leather on tiles. It will fill the kitchen with an atmosphere of chic and glamor. The imitation of snake and crocodile skin looks impressive.
- Tiles with crystals, painting or hand-decorated. These luxurious products are created for the rich decoration of the kitchen. They will give the interior uniqueness.
- Tiles with ornaments. They embody the most colorful and unusual design ideas. The kitchen will be decorated with patterns, prints, ornaments, drawings, and abstraction.
- Mosaic tiles. Gives off notes of oriental and Arabic interiors. It is very practical, but you need to take it with a reserve in order to select a design.
- Tile with photo printing. You can take any picture or photograph as an image. Thanks to special technology, the image on the tile does not erase, fade or drip.
- 3D tiles. It will add dynamics to the calm interior of the kitchen and make the design as interesting as possible.
- Tile with texture. Trend of the season: a glossy pattern is applied to a matte surface, it looks cool and tasteful.
- Figured tiles. The tiles are produced in the form of polygons, trapezoids, and round shapes. These tiles will turn your walls into a beautiful decoration.
Decorating a kitchen countertop with figured tiles.
IMPORTANT! You can cover the window sill with kitchen tiles, thereby increasing the working area. And if you cover the dining table with tiles, you will get an original design solution, original and bright.
See also: Wedding hall decor: tips, photos.
Ceramic variety
To cover a countertop with ceramic tiles, you must choose glazed tiles. Preference should be given to small sizes of 10 × 10 cm - such a surface will look neat and elegant. For the edges and ends of the kitchen surface, plastic or metal baseboards, corners and borders are purchased. A variety of colors makes it possible to realize the most daring design solutions.
Covering the kitchen countertop with ceramic tiles.
IMPORTANT! Buy ceramic tiles with a reserve, they may come in handy if over time some of the tiles break or need to be replaced.
See also: DIY kitchen: drawings, diagrams, photos.
Mosaic wealth
Mosaic is a very small tile up to 2.5 cm. Made from porcelain stoneware or marble, malachite or onyx, and other natural stones. Mosaic fragments can be of very different shapes. Tabletops decorated with mosaics look perfect and impressive at the same time. Mediterranean or Moorish styles will look very harmonious.
Surface tiling with mosaic tiles.
Mosaic for cladding is divided into the following types:
- Glass is the most common type of mosaic; it can be matte, transparent, glass, with various shades and additions;
- Metal mosaic;
- Smalt is the most expensive, but also the most reliable;
- Stone made of travertine, marble, lapis lazuli.
There are 3 types of mosaics for countertop cladding.
Reliability and a unique appearance are the qualities of mosaic. Small tiles can be used to create pictures and patterns.
IMPORTANT! A mosaic tabletop has considerable weight, so when choosing a base, do not forget to take this fact into account.
See also DIY kitchen panels: 9 original ideas
Eternal Granite
Granite countertops are very popular, but they are quite expensive. Granite has a great advantage over tiles and ceramic tiles. A kitchen surface made of polished granite has excellent water-repellent properties - this will not allow bacteria to accumulate on such a surface. It is distinguished by increased mechanical strength - only diamond is stronger than granite. This table top will serve you for a really long time. Granite is a beautiful stone with many unique patterns and colors.
Kitchen surface made of polished granite.
IMPORTANT! If suddenly scratches appear on the granite countertop. They are easy to disguise using a special wax pencil. Apply a pencil to the scratch and buff it with wool or flannel material.
See also: Making an educational mat with your own hands for children from 0 to 3 years old with photos
Porcelain tiles
Porcelain stoneware is a mixture of quartz sand, clay, kaolin, and feldspar. This mixture undergoes heat treatment and high pressure treatment. In appearance it is difficult to distinguish it from granite. Tiles made from porcelain stoneware are extremely durable. And it has a number of advantages:
- Porcelain tiles are much cheaper than stone;
- Increased strength, it is not afraid of sharp objects, there are no scratches or chips on it, it withstands all detergents;
- Wear resistance, long-term use of the surface;
- Heat resistance, porcelain stoneware does not deform due to temperature changes;
- Increased hygiene, dirt is not absorbed into the tabletop; to remove it, just wipe it with a cloth;
- Lack of pores, protection of porcelain stoneware countertops from mold;
- Similarity to natural granite;
- Unlimited length of the product, allows you to make a tabletop without joints;
- Variety of color palettes.
The porcelain stoneware countertop has sound insulation properties.
IMPORTANT! Porcelain stoneware countertops reduce noise levels in the kitchen.
See alsoWhy you need to make crafts for the interior with your own hands
Required tools and materials
To create a tile countertop for the kitchen you will need the following materials:
- Tiles of suitable size and shape.
- Plywood/chipboard board.
- Adhesive for laying ceramic tiles/porcelain tiles.
- Materials for grouting joints.
- Silicone sealant for sealing cracks and seams.
Basic tools that will be required for work:
- A building level is necessary to measure and adjust the position of the tiles.
- Roulette.
- Pencil, ruler.
- Tile cutter for cutting tiles.
- Rubber and notched spatula for applying materials.
- Hacksaw for wood/chipboard.
- Hammer.
- Screwdriver for securing plywood.
General tips for tiling countertops
The execution of work must be approached very carefully. It must be said right away that using tiles as finishing coatings for countertops is not the most optimal solution and has many risks, which we will talk about in this article a little lower. If for floor coverings such errors go unnoticed, then countertops react extremely negatively to them. What is the best tile to use?
Table. Types of tiles for finishing countertops
| Tile material | Brief description of technical parameters and operational characteristics |
| Ceramic tile | The cheapest and most common option in budget versions. In terms of mechanical resistance of the surface to various types of damage, it occupies a leading position and is far ahead of the properties of artificial and natural stone. The tile is covered with glaze, and this is glass, a very hard material. Ceramics have an unlimited choice of design solutions and linear dimensions. The disadvantage is great fragility. Ceramic tiles are completely non-plastic; when exposed to critical forces, they do not bend, but immediately crack. |
| Porcelain tiles | In all respects it occupies a middle position between ceramics and natural stone. The tiles have different thicknesses and surface areas, the appearance most often imitates natural stone. The cost is cheaper than natural stone tiles, but much more expensive than ceramic tiles. It is made using synthetic resins - this is a significant drawback. Professionals strongly do not recommend using it for kitchen countertops. The lining has direct contact with food products, including hot ones. Under such conditions, porcelain stoneware releases harmful chemical compounds that end up in food. |
| Natural stone tiles | The most expensive option, used only in exclusive interiors. Stone tiles are thick and are more often used as a countertop without various bases. Such kitchens are very prestigious and indicate the high social status of the owners. As for performance characteristics, natural stone is significantly inferior in all respects to the two described above. Its surfaces are easily scratched, the stone reacts with many chemical compounds, and cracks under the influence of moderate dynamic forces. |
Choosing tiles for countertops
We have outlined brief physical characteristics of the tiles, but there are also very strict requirements for the bases of the countertops.
Tiles prices
Ceramic kitchen tiles
Making a tile base for a kitchen countertop
Typically, a tile countertop is applied to a ready-made kitchen unit. In order for it to withstand the load without problems and not deteriorate under the influence of heavy materials, some adjustments will have to be made to its design:
- Add additional legs to the cabinets in case they cannot support the weight of the porcelain tiles. The legs should be evenly spaced from the center so that the load is evenly distributed.
- Before you start laying the tiles, it is recommended to fasten the cabinets together at the same level so that the countertop is level.
- A sheet of plywood or chipboard is laid on top as a base for the tiles. The board must be strictly adjusted to the dimensions of the cabinet. Initially, it should extend beyond the cabinet by 1-2 cm on each side.
- Impregnate the top of the wood with special products to increase its resistance to humidity and temperatures - otherwise the wood will begin to rot and the entire structure will have to be redone.
It is important to carefully coat each section of plywood so that over time the wood does not begin to rot or dry out. Additionally, you can treat it with an antiseptic solution.
Table top base made of two layers of plywood
If the countertop area is very large, you may need two sheets of plywood to create the base.
To begin with, one sheet is laid and strictly adjusted to the size of the kitchen cabinets. Use a second board to cover the free areas.
Secure the plywood tightly using a screwdriver. Cover everything on top with a moisture-repellent compound and antiseptic.
Assembling the base for a tile countertop
Assembling the base is the basis of all work, on which the service life and appearance of the future countertop depend. Main stages of base assembly:
- Level the cabinets. For additional fixation, you can attach them to the back wall using self-tapping screws.
- Place the first sheet of plywood on top, the caps should hide inside. It is attached to the cabinet with wood glue, which ensures reliable adhesion of the materials. It is better to apply the glue in different directions to firmly attach the materials.
- Secure the plywood around the perimeter using self-tapping screws, since glue will provide the necessary adhesion in the center.
- The drilling site and location of the screws must be treated with moisture-repellent impregnation.
Materials for making countertops
A do-it-yourself tile countertop, lined with ceramic tiles, can be made from the work surface available in the kitchen set, or made independently from moisture-resistant fiberboard (MDF) or plywood. When making a tabletop yourself, it is possible to slightly increase its size or give it the necessary shape: for example, make a recess in it for a more convenient location near the kitchen table or make it in two or more levels - by arranging additional surfaces on which you can place small household appliances or other kitchen utensils.
When making a complete desktop yourself, the ceramic tile countertop is made from furniture fiberboard panels, laminated or industrially painted, choosing the color depending on the interior of the kitchen. The degree of moisture resistance of the material used is very important, since there is usually high humidity in the kitchen, especially during cooking, and it is also possible to spill water or other liquids on the countertop. If you use chipboard that is not resistant to moisture, it will begin to delaminate and insects may settle in it or mold may develop.
Types of tiles
This is an original competitor to other types of finishes when decorating a kitchen area. To cover the tabletop, ceramic squares with sides of 5, 10 or 15 cm are most often chosen. A table decorated with mosaics looks intricate and unusual.
You can successfully combine expensive designer items and textured details from other collections. The key to a stylish work area will be a natural combination of shades of elements.
This is an original competitor to other types of finishes
Ceramic variety
The material is clay. During the firing process, excess moisture is removed. Ceramics have many advantages. A variety of shades/textures, ease of installation, low cost, waterproof. Since the products tolerate high temperatures well, you can safely leave hot dishes on the table.
Mosaic wealth
Such products are produced in squares with sides of 1, 2.5 cm. Typically, mosaics are sold in the form of large sheets attached to a mesh lining.
Advantages: easy installation, durability. The rich palette allows you to lay out original patterns and ornaments on the table. Thanks to the elegant multi-colored palette, chips on individual tiles are almost invisible.
The tiles withstand temperature changes
Eternal Granite
Using natural stone to cover the table is a fashion trend. Stone squares stand out for their beautiful appearance, durability, and strength. Thanks to the natural texture, fingerprints and traces of dishes remain invisible.
Cons: heavy weight, cost. It is necessary to periodically carry out preventive maintenance on granite - treat it with sealants. Squares with an area of 30x30 cm are best used for decorating items in a spacious room. No housewife will refuse a kitchen “island”. After all, this is an additional work area and a convenient storage system for various small items.
And in this case, it is appropriate to decorate the table with different materials - combine ceramics with wood or plastic, MDF. The design of the “island” should fit into the style of other elements of the kitchen set. Using similar materials will help create a unified composition. The kitchen apron and island can be finished with the same ceramics or granite.
Such products tolerate high temperatures well
Porcelain tiles: interesting solutions
To make tiles, small quartz crystals and several types of clay are used, which are pressed in a special way along with resin. Since the mixture is sintered under high pressure, the resulting material is of increased density and very hard.
Available in several types:
- technical;
- glazed;
- matte;
- polished.
Its surface can imitate the texture of granite. Minimum size – 7.5x7.5 cm .
Affordable cost, high strength and reliability (higher than that of granite tiles) are among the advantages of porcelain stoneware squares. When styling, it is easy to realize any floral fantasies. Due to its non-porous structure, the quartz surface does not require periodic sealing. Such a countertop is not afraid of microbes.
Using natural stone to cover the table is a fashion trend
Color solutions
The interior of a modern kitchen is directly dependent on the concept of the chosen style. For example, if it is a classic, light colors and monotony are welcome. At the same time, you can decorate a simple design with elements with gilding and monograms.
When the boho direction is chosen as a basis, it is important to use variegated colors.
It could be patchwork tiles. Moreover, you can only partially decorate the tabletop with it, leaving the role of the base to the kitchen apron.
When choosing the color of the tiles for the countertop, take into account the shade of the existing furniture, the tone of the set, or focus on a minor interior accessory. For example, this could be the tone of the finish of the lamp, small elements of the print of the curtains, or even the shade of the flower pot.
Considering the fact that a kitchen countertop can set the main mood of the entire interior composition, its color should not be too dark or, conversely, too bright. This deprives the interior of its high status, as well as the feeling of home comfort.
For expert advice on laying tiles on countertops, watch the video below.
Laying tiles on the base
You can proceed to installation only after the base has dried thoroughly and been saturated with protective solutions. First, prepare a cement pad, which provides the future tabletop with strength and securely secures the structure. Acts as a screed.
Making a cement pad
The cement pad is laid as follows:
- A cement mixture is being prepared; it can be replaced with tile adhesive. Dilute the composition with water according to the instructions.
- Install beacons on the surface of the tabletop, which can be used to measure the distance. One is attached to the wall, the second - to the end of the future tabletop.
The tiles are carefully laid on the resulting pillow. Excess material is removed using a spatula. It is important that the pillow does not touch the walls.
Laying
The process of decorating with tiles is quite simple.
In order for the working plane to be level, special beacons must be placed on the surface.
The marking is done as follows:
- The middle of the future tabletop is measured. Two perpendicular lines are drawn - along the length and along the width.
- Apply the adhesive solution to the screed after it has completely dried. It is better to start from a visible corner so that the tile there is intact. Use a notched trowel.
- Place the tiles in even rows, following the markings. Correct the position using a building level.
- Leave cuts for edges and hidden areas.
How to cover the end of a countertop
The end should look aesthetically pleasing. The edge of the tile should protrude slightly beyond the edge of the cabinet, the remains of the product are cut and secured to the sides.
Grouting joints
Grouting is the final stage, necessary to finish the seams. It is better to choose a transparent material or grout that matches the color so that it is not visible on the surface.
The grout is applied using a rubber spatula and distributed evenly over the surface. The second way to remove excess is to apply masking tape and carefully tear it off the surface. This should be done no earlier than every other day.
We also recommend looking at - Epoxy grout Litokol
How to make it yourself
You can make a tabletop with your own hands step by step:
- We select materials;
- Preparation of the base;
- Laying tiles;
- We rub the seams.
Laying a tile kitchen countertop.
Now let's look at each point in detail.
See alsoLifehacks for home and interior
Selecting the material
A kitchen countertop can be made of tiles with a smooth or textured surface; experts are more inclined towards the first type. A mosaic tabletop will also look original.
IMPORTANT! When choosing tiles, you need to take into account the size of the kitchen. The smaller the size of the kitchen, the smaller the diameter of the tiles.
When choosing the size of the tiles, the size of the room plays an important role.
See alsoHow to beautifully decorate a wall with photographs
Preparing the base
The most suitable material for the base of the tabletop is FSF or FB softwood plywood. We measure the required dimensions of plywood. To prevent the tabletop from delaminating due to moisture during use, the plywood is treated with impregnation and waterproofing. So it is necessary to saturate all the wooden parts involved in the formation of the tabletop.
Plywood is often used for the base of a kitchen countertop.
Then we install the tabletop frame; we fasten the frame to the cabinets using side ties. Then we secure it with self-tapping screws. We also attach the side walls to the plywood, connecting them with metal corners and screws.
Waterproof PVA or wood glue is applied to the thoroughly reinforced frame. And we lay the second layer of plywood on top and fix it with self-tapping screws. We place the screws at a distance of 10-15 cm around the entire perimeter. We attach plywood with a diameter of 4 cm to the edges.
Waterproof adhesive is used to lay the tiles.
With the second layer we make notches 6 cm long. A painting mesh is applied on top of the notches, we stretch it well over the edges of the plywood and secure it with a stapler.
The final stage will be applying liquid glass and covering the structure with waterproofing. You can start laying tiles.
See also: Useful tips for those who want to decorate their home with their own hands
Laying tiles
To avoid distortions, you need to make markings and apply a cement layer that will connect the tiles to the base. We mark two points in the middle along the edges and connect them with a line. We get the center line of the tabletop. In the same way we mark the center in width. As a result, we get two perpendicular lines, which will serve as our guide for facing the countertop.
We spread the glue. For reliability, you can add a little primer to the glue (approximately 1/3 ratio).
Laying adhesive for laying tiles.
We begin laying the tiles from the side that will be visible. You can start from the outside of the tabletop. Using a notched trowel, apply a layer of glue to the cement base. We lay the first tile on the corner of the countertop, lay out the first row, being sure to maintain an angle of 90 °, checking the outer and horizontal lines using a level. The tiles should converge with the markings made earlier.
When adjusting the tiles to the sink, you can allow an error of half a centimeter. The main thing is that the sink rests completely on the tiled surface.
IMPORTANT! The tiles are easily cut with a lever tile cutter, so to make the work easier when cutting tiles under a sink or refrigerator, you can make blanks from cardboard and then mark them.
To make the work easier when laying the first row, we will also lay out the end cladding.
Laying the tiles begins from the middle of the countertop.
Next, lay the tiles in rows, do not forget to insert crosses into the seams and remove excess glue. Be sure to check the plane using a level.
When the finishing of the countertop with tiles is finished, you can begin to cover the end of the countertop.
IMPORTANT! Lay the tiles as close to each other as possible.
Laying begins from the center of the tabletop.
See also: Room decoration ideas for a 1 year old boy's birthday
How to cover the end of a countertop
We attach slats to the bottom of the tabletop; they will serve as a support for covering the tabletop. We fix the corner outer profile on the end side. Carefully prime with a layer of cement and wait for it to dry.
When tiling, the first layer of tile must be laid with a protrusion equal to the thickness of the tile. After which the tiles are cut and glued to the end of the countertop. Trimmed tiles or decorative borders are glued at right angles. And the underside of the trim is masked in the profile.
The end of the tabletop can be covered with tiles or a decorative border.
When the finishing work on the end is completed, the tiles have dried a little, you can start grouting the joints.
There are three types of closing the end of the tabletop:
- so that the edge of the tile overhangs;
- so that the edge of the tile protrudes;
- the most difficult option (usually trusted to a master) is closing the end at an angle of 45 degrees.
There are several types of covering the end of the countertop with tiles.
Grouting joints
When the countertop is covered with tiles, it is important to grout the seams correctly. For work we will need: grout, foam sponge, wooden sticks, rubber spatula, mixer. When choosing a grout mixture, you need to pay attention to the recommended joint width. This work takes place in several stages:
- We remove the remaining tile adhesive; you need to use a foam sponge or wooden sticks so as not to damage the tabletop.
- We clean the slab from cement residues.
- Prepare the grout according to the instructions on the package. Remember to prepare the grout in small portions. It dries quickly.
- With the prepared solution (it should look like very thick sour cream by eye), using a rubber spatula, fill all the cracks without gaps
- After drying, wipe the tiles with a sponge, often moistening it with water.
Grouting joints using a special spatula.
The tile countertop is ready to use.
IMPORTANT! For kitchen countertops, you need to choose epoxy resin-based grout. They are resistant to chemicals and acids, as well as temperature changes.
Required tools and materials
For the base of the tabletop we take three cabinets (sink cabinet, cabinet with drawers, two-door cabinet) measuring 1600 × 560 cm.
For the base of the tabletop we take two sheets of FSF or FB plywood made of coniferous species.
FSF is plywood glued with phenolic resin. FB is bakelized plywood, it is impregnated with bakelite varnish (this plywood can be used in hot and humid rooms).
We will also need:
- carbon grinder with tile disc for dry cutting;
- spatula - for grinding cut tiles;
- spatula – 60 cm and 12 cm;
- high-hold adhesive for tiles;
- level;
- crosses for tiles 3 cm;
- silicone sealant;
- protective composition for wood;
- latex or primer;
- wood glue;
- electric drill;
- oilcloth, old rags for cleaning;
- felt-tip pen, pencil;
- liquid glass and waterproofing composition;
- stainless steel self-tapping screws – 3.5 -3.8 cm – 400 pcs.;
- jigsaw;
- mixer;
- wood drill;
- bucket for solution.
Tools for laying tiles.
Installation nuances
Professionals advise paying attention to the following nuances:
- When adjusting the dimensions of plywood for tiles, you should leave an overlap of 1-2 cm on each side.
- The ends and corners of the countertop should be processed at least twice, especially when it comes to the cut for the sink. A large amount of moisture will cause the wood to rot, so the entire structure will have to be redone.
- Near the hob, the tiles will need to be treated additionally so that they do not crack under the influence of high temperatures.
- To make the cement pad waterproof, add a little tile adhesive to the solution when stirring.
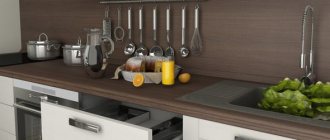
Wood-effect porcelain stoneware countertop
GlobalWS has a homemade set - laminated chipboard sheets as supports for tabletops and shelves, plus a wooden beam is fixed along the perimeter of the wall. The base is made of plywood, 15 mm thick, the floor porcelain stoneware imitates wood, the edging is made of the same, only sawn.
This is his second positive experience with the use of non-specific material. By the way, floor porcelain tiles can also be used as roofing.
GlobalWSForumHouse Member
In terms of strength - the first time I did it with regular tiles, no problems arose during the entire period of use, although something was periodically dropped on the surface, the tiles were not scratched or chipped anywhere. This time I used porcelain floor tiles - no complaints about durability at all. I tried to damage the remainder on purpose, to no avail, even a drill does not leave any marks. Regarding the reliability of fixation - liquid nails hold the side edging perfectly, nothing falls off or wobbles.
Examples in the interior
Mosaic and small-format porcelain tile countertops
The base can be different, including plasterboard or moisture-resistant plywood.
podmalForumHouse Member
During the renovation, I made countertops from plasterboard in my kitchen and bathroom and covered them with ready-made mosaics. In terms of aesthetics, it turned out to be satisfactory right away. And now, after three years of operation, and in practical terms everything is fine - spills are not absorbed, dirt is easily removed, and the appearance has practically not changed.
Malena has a countertop in her kitchen made of artificial stone.
Due to temperature changes, when hot and cold were placed on the surface, the seams came apart and restoration was required. However, some time after the repair, the seams came apart again and they decided to replace the tabletop completely. As a base, we used moisture-resistant birch plywood, 21 mm thick, in two layers. Cladding made of porcelain stoneware, dimensions 10x10 cm, glue and epoxy grout.
This is interesting: Window sill-countertop in the kitchen
Advantages of tiling
There are several reasons why tile is the best choice for countertops. Firstly, it is practical; there are no scratches on the tiles. Secondly, the price is affordable; tiling a kitchen surface with ceramics will cost less than with natural stone or solid wood. Don't skimp on tiles. The quality of the tile determines how strong and durable the surface of your table will be. The tiled kitchen countertop is easy to clean and moisture resistant. She calmly tolerates any exposure to acidic or alkaline agents. Also, the tile countertops do not fade. The only drawback is cleaning the seams between the tiles. When grouting joints, you can cover the tiles with masking tape to protect them from contamination.
Tiling your kitchen countertops has a number of advantages.
IMPORTANT! For tiling the kitchen backsplash, you can choose the same tiles as for the countertop. This will create the effect of harmony and unity, and will also visually increase the space in the kitchen.
Where to start
The first thing you will ask yourself is where to start the whole workflow. And this is correct, because everything must be divided into several stages and performed in the specified sequence. And the first section we will introduce you to will be the choice of finishing material.
It’s possible to do this, but the cost of curved tiles may scare you
Choosing tiles for countertops
To limit (save time) the widest range of materials, you should immediately say that a kitchen countertop made of tiles should only be made of porcelain stoneware.
Here's what it has to do with:
- Porcelain tiles for the kitchen are not inferior in strength to natural stones. That is, by laying such tiles on the countertop, you will avoid the appearance of cracks and chips even when in contact with heavy pots and pans. It can only be broken with a hammer, but this is far from a kitchen tool.
- High wear resistance. No matter how much you rub it, the surface will remain in its original form. Manufacturers provide a 10-15 year warranty. Tell me, what other material can be used so much?
- Very low water absorption compared to tiles and ceramic tiles. The indicator fluctuates around 0.05%, which allows the use of porcelain stoneware even in rooms with a humidity of 95%.
- Resistant to fats, oils, various acidic and alkaline reagents. Therefore, you can safely use household detergents without harming the surface.
Types of surfaces
However, you still have to choose, not the composition of the material, but its surface, since there are several options:
- The relief (textured) surface - its disadvantage is that dirt accumulates in the pores very quickly, which is not so easy to clean. On the other hand, the kitchen creates a unique design that is difficult to recreate with smooth materials.
- Polished (semi-polished) – easy to clean, pleasant to the touch. But, as we said earlier, the charm is lost.
Advice! Choose whatever you like. Because if the wavy texture suits you, it’s okay - you can clean it with a brush once a week.
There is porcelain tile in the form of a mosaic, but we do not recommend it for those who are laying tiles for the first time. A harmonious combination of apron and countertop will benefit the kitchen. This option will decorate the room.
For lovers of large sizes, there are tiles with dimensions of 60x60 cm, so if you want to simplify the installation workflow, this option is for you. Look at the photo to see what it looks like.
Tiles are very bulky and therefore rarely used as finishing materials for countertops