Blueprints
A computer desk refers to specialized multifunctional furniture that combines a desk, a place to place a PC, store documents and office supplies, and conveniently place peripherals and lighting fixtures.
Today, manufacturers offer the widest. Very often, the layout of the apartment does not allow installing a full-fledged shoe closet in the hallway. As a rule, the corridors are very narrow and it is not possible to install wide chests of drawers. There is a huge selection on the furniture market.
Walking around furniture stores and showrooms, you can often be horrified by the price tags presented there. The most offensive thing is that a simple bed is made of the cheapest material (not wood at all, but ordinary chipboard or...
Usually, for those whose hands grow from the right place, before buying furniture for their home, the question always arises: “Which is best? Buy a ready-made bed right away, or is it better to make one?
This page presents a small selection of drawings with dimensions according to which you can assemble a real chest of drawers for things. Why do you need a chest of drawers at all? To free up as much space in the room as possible, do.
What could be more convenient and practical than a compact and roomy chest of drawers that will complement the interior of your bedroom or hallway with its unique design? Probably nothing yet. And if you decide to make the chest of drawers your own.
Whatever one may say, in order to assemble a sliding wardrobe, you will need drawings, according to which the entire assembly process will actually take place. To easily assemble a built-in or corner cabinet with your own hands, drawings and.
Source
We design furniture
Design may include several stages from preparation of technical specifications to testing of prototypes.
You can design in absolutely any way. As I wrote at the beginning of the article, when it comes to design, many people start talking about working in computer programs. Yes, working in the program has undoubted advantages. This includes speed of work and the ability to avoid many mistakes - but this is not the main thing.
Understand one simple thing. Any program is just a shovel. But if you are a bad digger, then no matter what super shovel you have, your ditch will still be crooked and sloppy.
Any computer program is simply a reflection in a model or drawing of your thoughts, ideas, knowledge and skills. Nothing more. If you have an understanding of what needs to be designed, you will draw it by hand. Without any program.
At the beginning of my not even a design career, but while I was working in a carpentry shop, my boss and I sat down and drew sketches by hand. With dimensions, details. They signed what, where and how. It took us a little time, but such preliminary work gave us a very clear understanding of what needed to be done.
It was later that computer programs appeared and there was such an erroneous opinion that if I have mastered a program for designing furniture, then I can already design. This is all nonsense; if you can, you can design without a program. And if you don’t know what and how to design, then no program will help you.
But let's return to our project. From the concept approved by the customer, we create a design for our future product. With all the details, sections and explanations - practically a working drawing.
Furniture
For independent production of furniture items you need: a set of drawings; detailed description of manufacturing technology; assembly diagrams; relevant equipment; tools; devices; related material; components; appropriate room or workshop.
In the furniture section, we tried to cover as much as possible its various models, such as:
- soft
- hull
- classical
- kitchens
- tables
- chairs and armchairs
And also provide design drawings and background information, describe the assembly technology, and give various, and at the same time, useful advice. Using the resulting material, you can make any piece of furniture, from simple products to complex ones.
DIY transformer table, design drawings
How to make a wall-mounted folding table with your own hands, design drawings
DIY sliding table, design drawings
DIY chest of drawers, drawings and construction diagrams
Bar stool, design drawings consisting of three components
Do-it-yourself wardrobe bed transformer, one of the solutions for increasing the free space in the room
Do-it-yourself folding chair, drawings of a practical design for going out into nature, which when folded does not take up much space
Do-it-yourself folding table, drawings of a simple design, the size of the assembled tabletop is 700x800 (mm)
DIY growing chair, design drawings for school furniture that changes its geometric dimensions
Do-it-yourself growing desk, drawings of a single table for a home work station
Source
Basic solutions
What's the best way to start working on your bedroom interior? Next, we will present ideas and instructions on how to make your bedroom as stylish and competent as possible.
The most successful colors for decorating a bedroom as a whole will be cool colors. And traditional white will also visually expand the room.Don't be afraid to experiment with bright colors. Everything is individual, but preference should still be given to cold and bed colors.
Textile wallpaper or wallpaper with texture. Paper wallpaper is a thing of the past. Any textured pattern will suit the entire interior and will be pleasant to the touch.
The load on the floor in the bedroom is not too great, however, coverings made of natural materials will be more preferable.
Photo printing and artistic painting will be a must-have solution for the ceiling if you don’t want to see a simple whitewash when you wake up. You can also see all the subtleties and nuances using a photo of the bedroom with your own hands.
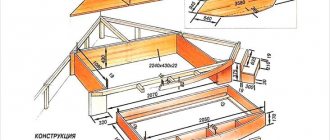
Drawings of furniture for self-production
Furniture production has come a long way in recent years. However, sometimes there is a specific idea of what furniture should be like and those models presented in furniture stores are not suitable.
There are two ways to implement the desired project: custom manufacturing or independent design and assembly. Today’s material is about how to properly make drawings of furniture for self-production.
Drawings of furniture for self-production
Furniture preparation
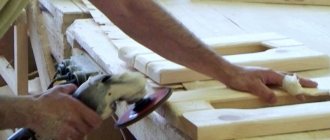
The better the furniture base is prepared for the aging process, the better the effect. At the same time, it is not recommended to completely remove the top layer of material; such treatment will only make the furniture seem newer, and the techniques used will not have the desired effect.
DIY furniture painting in Provence style
Before chemical exposure, we treat the furniture with a degreaser to improve the effect of the composition penetrating deeper. For mechanical aging, it will be enough to wipe the front part from dust; with the thermal method of aging furniture, you can do without any preparation at all.
In an apartment, in a house, in a country house, antique furniture will emphasize the atmosphere of the past and give a feeling of forgotten rural life.
Before starting work, it is recommended to completely remove all fittings from the surface.
The advantages of making furniture yourself
Making furniture yourself has its advantages, so you shouldn’t immediately give up the opportunity to create furnishings taking into account personal preferences and interior features. If you lack experience, you can start with simple things - a cabinet, a cabinet, a table, a stool.
The main advantages of making furniture yourself include the following:
- The first and main advantage is the ability to manufacture furnishings according to individual sketches, when there are no restrictions or frames.
- Personal execution is personal control of the quality of execution of each stage (selection of material, its processing, assembly). The result is a high quality product.
- When choosing materials and fittings, when making furniture yourself, the emphasis is not on reducing the cost, but on quality and durability.
- There are no restrictions on the number of items made in the same style - this allows you to create an organic atmosphere in the interior of all rooms of a house or apartment, rather than looking for suitable items in different stores.
- Making furniture is a creative process that allows you to escape from current worries, get a lot of positive impressions and pleasure from time spent usefully.
- Even when purchasing high-quality materials and fittings, we can talk about preserving the family budget, since furniture made with your own hands will last for decades.
If you make it yourself, you can decorate the facades as you wish.
Note! Over time, after gaining experience, a hobby can become a good source of additional or even main income.
Bedroom styles
Provence. Suitable for romantic people. The interior features canopies, sewing, fabrics and wall panels.
Minimalism. Simple, laconic furniture for business people who prefer not to focus on interiors and designs.
Ethnic styles. Styles that characterize different nationalities and continents require the presence of an ornament traditional for this country. Suitable for creative and creative people.
Classic. Dark wood, muted tones, all this is perfect for connoisseurs of luxury and older people.
Nuances that need to be taken into account when making furniture yourself
Making furniture yourself involves some nuances that you need to know about in advance. It is advisable to have minimal skill in working with tools and to know about the properties of the material that will be used to make furniture.
Solid wood furniture for baths
You will need to consider the following:
- The cost of raw materials indicates its quality. Therefore, as a furniture material for a dacha, you can choose cheaper raw materials than for an apartment. Operating conditions will also have to be taken into account.
- The work of making furniture requires physical strength, especially when working with solid wood.
- You should not expect that it will take little time to manufacture the product. On the contrary, especially with a lack of experience, a high-quality result of your work can be obtained after a few days, or even weeks.
Tool preparation
In each case, the set of tools will be different. It all depends on the plywood sawing method you choose. It is best if this work is carried out in a furniture workshop , since here it is necessary to ensure high accuracy and use a plunge-cut saw with an attachment for cutting sheet materials.
The furniture assembly process cannot be carried out without the following tools:
- Plunge saw, jigsaw, hacksaw.
- Tape measure, square and ruler.
- Cordless screwdriver, drill and drill set.
- Hammer, mallet, chisels, files, plane, chisel.
Important step: drawing
To make furniture yourself, you will need to develop a drawing and assembly diagram for the product. This is a must. The basis for the drawing is a sketch - an idea embodied on paper. The sketch reflects the main nuances: the shape of the product, proportions, quantity and presence of basic elements (shelves, doors, drawers), design of the facades.
Children's furniture - drawing with dimensions
As a basis for preparing documentation for furniture manufacturing, you can take a standard list of diagrams and drawings provided by the cabinet furniture manufacturer to facilitate and simplify the assembly process. This list consists of the following documentation:
- General view of the product.
- Assembly drawing.
- List of accessories.
- Drawings with details of all elements, indicating places of fastening of parts, types of holes and fittings used, location of edges.
- Specifications.
Product detailing for assembly
This is an optional list - some items can be removed, others can be added.
We make working drawings
Working drawings: an integral part of working documentation intended for the manufacture of structures, products, assemblies.
The penultimate stage before manufacturing is the development of design documentation. A designer in production or as a freelancer makes working drawings with all the developments and sections. With details, additives and specifications.
If you are your own customer and craftsman, then your product should already be so imprinted in your head that you, in general, don’t need to draw everything out. But it’s still better to reflect your ideas and thoughts in the drawings. Of course, in most cases, if you were doing a project for yourself, there is no point in making a very detailed drawing.
After all, during the production process you yourself have the right to change anything. You are your own customer and the project is yours.
What does ergonomics say?
At the furniture design stage, regardless of whether it is a stool or a kitchen set, ergonomic requirements are taken into account. Namely, it will be necessary to take into account the correspondence of furnishings to the anthropometric data of a person. Thus, when making furniture for children, the height category to which the child belongs is taken into account. When making chairs, tables, and kitchen furniture, average indicators calculated for the average person are taken into account.
Basic ergonomic requirements
As an example, we can consider the requirements for the main parameters of a kitchen set:
- To draw up a sketch, first measure the height of the room, the length of the walls along which the set will be located, the distance to protruding elements: pipes, window sills, window openings, doors, mark the location of sockets, switches and ventilation holes.
- The standard dimensions of floor cabinets are 850 mm in height, 300 – 800 mm in width and no more than 500 mm in depth.
- The width of the wall cabinets is duplicated by those below, and the depth ranges from 300 to 350 mm. The height can be chosen so that there is a free space of 200 mm between the top of the cabinet and the ceiling. Some design solutions involve placing wall cabinets the entire height of the room.
- The height of the working apron is 600 - 650 mm.
Ergonomics in the kitchen
Note! If the owner of the kitchen is taller or shorter than the average height (165 - 175 cm), then the furniture parameters are selected individually. So, the distance from the working surface to the bend of the elbow should be 20 cm.
Ergonomics depending on human height
When developing a furniture project, you will need to take into account the area of the room and choose a place to install the furniture so that it does not interfere with movement around the room. Now there are a large number of computer programs that allow you to visualize a project under given conditions.
Computer program for visualizing a kitchen project
When developing a set of furniture, you will need to prepare explanations not only for the entire set, a wall of furniture or a set of children's furniture, but also for each item separately. Detailing should concern all elements.
Detail drawing of kitchen cabinets
For example, for a kitchen cabinet you will need to reflect the parameters of the back panel, side walls, front and shelves. If it is equipped with a drawer, then its detailing is carried out separately, noting the attachment points of the guides and handles, the dimensions of the sides, front and bottom.
Assembly
When transitioning from constructing furniture with your own hands to assembly, the entire process can be described in the following steps:
- All present fittings (hinges, locks, ties, runners) are attached to the main parts;
- Assemble the frame and back wall, mount the mirrors;
- They check the fittings, attach handles, plugs, and install retractable elements in their places.
Depending on what piece of furniture you plan to assemble, the process may differ slightly, but the basic procedure remains the same. So that every person planning to create furniture with his own hands understands how he needs to act, we can analyze the whole process using the example of creating an ordinary cabinet.
We fasten the fittings
Assembling the frame
We mount the handles
We attach the plugs
Stage 1. Frame
The cut parts are connected according to the plan. To perform the screed, it is first recommended to prepare a screwdriver with special bits. Twisting will happen much faster than with a screwdriver. In addition, much less effort will be spent on such work. It is important to ensure maximum structural strength, so it is not recommended to use nails to strengthen the bottom of the cabinet. The best choice would be 4 by 16 self-tapping screws. The side surfaces, as well as the top and bottom, are connected at right angles using furniture corners. You can nail the back wall of the cabinet to the finished frame.
Assembling the base
Making holes
Installing the bottom frame
Fastening the shelves
Stage 2. Sliding system
To ensure the correct movement of sliding doors, the guides are first attached. They are mounted parallel to the top and bottom planes of the cabinet. One of the best options would be to use a specially developed system called “Commander”. Without much effort, you can not only move the doors to the desired position, but also easily make adjustments. As a rule, adjustment is needed if gaps are observed during the assembly process, which not only spoils the appearance, but also complicates operation. In most cases, during the first time after assembly, cabinet furniture shrinks, which can also result in cracks appearing. This is considered normal due to the specific characteristics of the material.
Special rollers are screwed to the doors. The finished structure is installed in the guides and the progress is checked.
Installing the stopper
Installing the rubber pad
Installation of guides
Adjusting the system
Stage 3. Installation of fittings
At this stage, all shelves, drawers are inserted into place, coat hooks and other small elements are attached. The cabinet is ready. Even a person who does not have experience in creating cabinet furniture with his own hands will not spend a lot of time creating something of excellent quality. The average assembly time is no more than three hours, excluding preparatory work. In addition, the cost of a handmade product is much lower than the price of ready-made furniture in a store.
Assembling cabinet furniture with your own hands is a combination of the optimal design solution, the choice of quality materials, as well as the acquisition of new skills, with the help of which you can create entire furniture sets in the future.
Wood as a material for making furniture yourself
After making a sketch and a drawing based on it, you can proceed to the selection of material. Before choosing a particular material, you need to study the features of working with it and learn about its performance properties.
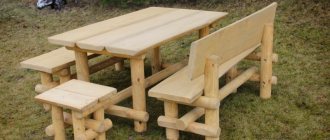
Solid wood stools
Natural wood
Due to the wide variety of natural shades, patterns and textures, natural wood is very popular in the manufacture of furniture. Wood is malleable and allows you to create objects of interesting shapes, decorated with artistic carvings.
The advantages of the material include the following:
- Strength and durability. Solid wood furniture lasts for decades.
- The array can be easily restored by removing scratches and gouges.
- Environmental friendliness and naturalness are the main advantages of the array.
- Solid wood furniture looks expensive and will be appropriate in any interior.
- When making a chair, table, chest of drawers or cabinet from natural wood, you are guaranteed to obtain a piece of furniture with excellent performance properties.
Solid wood furniture looks rich and luxurious
Wooden furniture is made from solid or press-glued panels, which are not inferior in strength to solid wood.
Properties depending on breed
Soft and hard wood is used to make furniture. Soft wood (alder, poplar, aspen) is used to make parts that will not be subject to stress during operation - decorative elements and facades with an original design.
Modern style bedroom set
Table 1. Popular wood species for making furniture
| Breeds | Description |
| The most popular type of wood for making furniture, which is characterized by high strength and wear resistance. The advantage of the material is the presence of a beautiful natural pattern. | |
| It has a creamy yellow tint with brown specks. Due to its high flexibility, it is used for the manufacture of furniture of complex, including round, shapes. | |
| The material is durable, low cost and accessible. Contains natural antiseptics, so it lasts for many years and has a positive effect on the indoor microclimate. | |
| An expensive type of wood with a characteristic reddish tint, which becomes more saturated over time. | |
| A material with a luxurious brown tint, allowing you to create exclusive interior items. |
Sequence of actions when making furniture
Table 2. Manufacturing of furniture from solid wood
| Illustration | Description |
| Markings are applied to the wood material. | |
| The parts are treated with antiseptics. | |
| Connecting holes are made. | |
| The parts are painted. | |
When making furniture from solid or glued solid wood, two methods of connecting elements are used - detachable and permanent. Wood based materialsWorking with wood requires skill and knowledge about the properties of the material; moreover, the cost of high-quality raw materials is quite high and it is not rational to “get your hands on” with it. Beginning craftsmen prefer materials that are easier to process and inexpensive. Table 3. Wood-based materials | |
| Used for making furniture of curved shapes. The material is inexpensive, durable, with good thermal insulation properties. The disadvantage is low moisture resistance. This material is recommended only in dry rooms with normal humidity. | |
| It is environmentally friendly due to the reduction in the percentage of formaldehyde in its composition. The material is durable, resistant to moisture and fire. The material is available for fine processing. However, its cost is higher than the materials listed earlier. | |
| It is widely used as a material for making furniture - very durable, reliable and easy to process. Often used to make children's furniture. |
Tools
To make your own furniture, you will need the following tools.
Tools for sizing and marking
To apply markings and carry out measuring operations, you will need a tape measure, a ruler, a pencil, a construction square, a stationery knife, and an awl.
To cut parts, use an electric jigsaw or circular saw. A hacksaw is not used because it is impossible to get a neat cut with it, and it will take much more time to cut the parts. To reduce the formation of chips when working with a jigsaw, use the cutting method through tape or use a special attachment. Using a circular saw, the cut is neat, and this tool also allows you to make neat rounded corners.
When assembling furniture, a screwdriver is used to tighten bolts, self-tapping screws, and confirmatories.
Hole for confirmation
To make holes for fasteners, you will need different drills with a diameter of 4.5 to 10 mm - it is advisable to have them on hand.
The hole for the confirmation is drilled with a special drill, and the fastener itself is tightened using a hexagon
There are bits for a screwdriver, but it is not always possible to use the tool in a hard-to-reach place.
A Forstner drill is used to make holes for hinges and fittings.
Clamps are useful for securing parts when gluing
You will also need a hammer, a hair dryer and clamps.
Making a cabinet with your own hands
Properly assembled boxes should be easily interchangeable. It is also necessary to keep in mind the overlap of the façade covering with the frame of the cabinet. This means that the outermost shelves will be from below and from above, and the upper façade will overlap the bundle located under the tabletop, and the lower façade board will overlap the bottom. There should be a gap of 18 mm between the axis and the bottom of the guide, and the bottom must coincide with the bottom of the shelf. If the facade slab is made of 18 mm coating, then 4 mm must be added to the size of the screw head of 1.5 mm. This means that the first guide should be fastened at 22 mm, but if you count from the floor itself, then 108 mm = 22 + 70 (supports) + 16 (bottom).
Now, based on all these calculations, you can simply calculate the value, which is unchanged: 16 (bottom) + 22 = 38 mm. You also need to find the length from the edge of the lower end of the facade board to the bottom of the box: 38–18=20 mm. We must remember that we will take 38 mm as a constant value (this is the distance between the axis of the guide and the bottom end).
The connecting part will be attached from below, under the tabletop. A kind of jumper that imparts rigidity also keeps both side parts at the same distance. Now you need to calculate the height of the sides of the boxes, but they should not rest against the connecting bar.
Since the dimensions of all fronts are the same, the cabinets should be easily interchangeable. Let's start from the top. The facade turned out to be 163 cm, then the height of the sides of about 60 cm will be sufficient for it, so that the mechanism can easily function. But we must keep in mind that cabinets with low sides are not suitable for storing small items, as items will simply fall out of them. The distance between the jumper and the cabinet body should be the same as the diameter of the roller - 18 mm. You should take into account the possibility of swelling of the material; for this you can add another 9 mm, that is, half the size: 9 + 18 = 27 mm. This will be the size of the gap. From the bottom of the facade surface to the bottom, the distance was already determined in advance - 20 mm, each of the drawers has a height of 166 mm (facade 163 mm + 3 mm for the gap).
Then you can calculate the distance from the top point of the drawer to the very top of the facade: 16 mm lintel + 27 mm gap = 43 mm. You need to subtract 3 mm from them, they will remain for the gap between the facade boards. In total we get 40 mm. Well, you will also need to find out the height of the sides, which will be the same for all boxes: 163 mm (front part) – 40 mm (allowance at the top) – 20 mm (allowance at the bottom) = 103 mm (this includes the bottom). The side of the box should lie on a bottom made of fiberboard of 3 mm thickness, this means that the side height is 100 mm. It follows from this that h side of the box = h facade - 40 mm and 20 mm (upper and lower allowances) - the thickness of the fiberboard sheet for the bottom of the box.
Often, lower drawers are made with a higher front than others. This is quite possible to do. You just need to divide the distance without a large box by the required number of boxes, taking into account the 3 mm gap.
What else to consider: fittings and end finishing
When making furniture from laminated chipboard, chipboard and MDF, you will need to edge the ends. To do this, use end tape. When cutting parts in a furniture shop, it is advisable to immediately order finishing of the ends with PVC tape, which is applied using special equipment.
The application of PVC edges is carried out on special machines
To do this, in the detailed drawing, the ends of the parts on which the edge will be applied are highlighted in color. It is worth considering that a thicker edge is applied to the visible ends of the parts, and a thinner one to the hidden ones.
At home, you can only apply melamine tape yourself - it is the cheapest and is fixed to the end with an iron. However, its quality and service life are much less than that of PVC edges.
You should also purchase drawer guides in advance. Depending on the opening method, there are ball and roller guides. The first ones allow you to open the drawer to its full depth, therefore they are considered more convenient. Read more about installing guides in a special article.
Furniture fittings
Furniture fittings also include: canopies, handles, legs, wheels. All these elements must be of high quality and their appearance must correspond to the design of the furniture.
Making a drawing
A drawing begins with a sketch. Sketch - from an idea. On a piece of paper you need to draw several options for future furniture, determine its shape, design, proportions. You can look for inspiration among ready-made solutions on the Internet and in special printed publications.
Sketch sketches allow you to choose the best option
After the best option has been selected, we begin to develop a drawing that reflects the main dimensions of the product and the parameters of all parts, as well as the places and methods of their fastening.
Designation of main dimensions
So, when making a drawing of a kitchen set, the following are taken into account:
- The area of the room, its configuration, dimensions (height, length of walls, along which the set will be installed, distances to protruding elements).
- Choose the type of arrangement of the headset (linear, L-shaped, U-shaped, island, peninsular, parallel).
- It is also necessary to take into account the average values of furniture, which are calculated for the average person: the floor stand has a height of 850 mm, a depth of 500 mm and a width of 300 -800 mm. The wall cabinet has a depth of 300-350 mm, its width corresponds to the width of the lower modules.
- The distance between the lower and upper modules is 600 – 650 mm.
Drawing basic dimensions when designing a kitchen unit
You can develop a drawing on a computer using one of the many design programs. A special article will tell you about the main nuances of making kitchen furniture drawings yourself.
Having a drawing of the product with the main dimensions reflected on it, you can make detailed detailing, as if disassembling the drawing into its component elements.
Parts for making furniture from plywood
When making a furniture drawing, you must consider the following:
- It is important to assess the dimensions of the room and choose a place in it to place the piece of furniture so that it does not interfere with free movement around the room.
- When making built-in furniture, it is necessary to take into account the size of the gaps.
- Take into account the free space for hidden fittings (guides) when choosing the module size.
- Take into account the upcoming load that will be placed on a single element. Select a suitable design and provide stiffening ribs.
- Take into account the dimensions of the sheet material and the possibility of manufacturing parts of one format or another from them.
- Try to reduce the load on the fittings as much as possible. So, when attaching a facade to hinges, to reduce the load, the width of the parts is made smaller than the length.
- Consider the proportions of the product and its stability.
Video - How to draw a kitchen drawing
Making a drawing of a chest of drawers
Table 4. Nuances when drawing up a drawing for a chest of drawers
| Illustration | Description |
| As an example, we can consider a chest of drawers with overall dimensions of 1200 x 832 x 500 mm. | |
| The product consists of three sections. The central one is equipped with drawers, and the side ones have hinged doors. | |
| The modules will be independent. | |
| To install the modules, a common base and cover are provided, the dimensions of which will be the same. The width of these elements will be equal to the width of the modules. Some craftsmen recommend making the cover longer from the wall side, so that there is room at the back to leave free space. | |
| The width of the central section, which will be equipped with drawers, is 600 mm. With a total overall size of 1200 mm, the outer sections will have a width of 300 mm each. | |
| With a cover width of 500 mm, the depth of the modules is reduced by 20 mm and is 480 mm when the facade is made from the same material (16 mm thick chipboard). It is important that the gap between the drawer and the stiffener ensures free movement of the box. | |
| The height is selected depending on the width - the product must be stable. It is also necessary to maintain the proportion: distance between shelves/height of drawers: height of the chest of drawers. |
Template for marking
Measurements must be as accurate as possible; errors must not creep into the calculations. To avoid unpleasant surprises, you need to stock up on a template designed for drilling or marking, or make one yourself.
Furniture jig template for marking and drilling holes
To make it you need:
- Protractor (school will do);
- 2 rulers 20 cm long (the most convenient ones are made of wood).
Homemade furniture template for marking
To begin, the rulers are glued together in the letter T, and the angles must correspond exactly to 90°. The next step will be the marking made from the beginning of the joint of the rulers: it is necessary to mark 8 mm (for drilling the end with Euro screws), 16 mm (so we note the thickness of the part), 32 mm (thickness of 2 parts), 50, 70, 100 and 120 mm, necessary for accurate marking or deviation from edges. On each of them you need to make small holes of 2-3 mm so that you can make marks with a pencil through them. The main advantage of such a homemade template is its low price, and its quality is no different from its professional counterparts. First you need to learn how to make drawings of kitchen furniture with your own hands.
Self-made furniture technology
The process of making cabinet furniture yourself can be divided into several stages.
Stage 1: design
This includes creating a sketch and detail drawing. This has been discussed in detail earlier.
It is also worth noting that in addition to information about the dimensions of the product and its components, the project must contain information about the material, color, and texture of individual elements.
In order to be able to quickly make adjustments to the drawing being developed, it is recommended to carry it out using one of the special graphic programs, in which it is possible to set the necessary parameters and see clearly what the final result will look like.
Choice of colors
Stage 2: manufacturing parts
Table 5. Algorithm for manufacturing cabinet furniture parts
| Illustration | Description |
| Select the material for manufacturing the parts. | |
| A pattern is made on a scale of 1:1. The pattern is outlined with a pencil or a bright marker when transferring the part to the surface of the workpiece. | |
| Using a jigsaw or circular saw, cut out the part in accordance with the markings. | |
Stage 3: making holes for fittingsTable 6. Making holes for fittings | |
Stage 4: machining the ends of partsYou can start assembling furniture only after carefully processing the cuts. To do this, remove excess, grind the ends and fix the edge tape. As previously noted, PVC edges are made in a factory, but at home you can use melamine tape with an adhesive layer. After fixing the edge, use a utility knife to trim off the excess and clean the edges with fine-grit sandpaper To work you will need tape, a stationery knife and an iron. The edge is applied to the end and pressed with a heated iron for a short time. If you overexpose it, the edge will be damaged. Stage 5: furniture assemblyTable 7. Furniture assembly process | |
| The remaining parts are attached to the supporting frame. | |
| Fix the handles, wheels, put the drawers in place. | |
| Attach decorative caps to the fastener heads. |
Video - How to make a sofa body yourself
What kind of walls are there?
Corner
These types allow you to arrange modules in different sequences. More often, cabinets are installed along the edges, an area for a TV is designed in the corner, and low cabinets are mounted in the middle. As an alternative layout, shelves with low cabinets under them are placed along the edges, and a corner cabinet is placed in the center.
The corner walls are quite convenient. Corner slides often completely occupy one wall and partially occupy the adjacent one, which is quite practical in compact apartments where there is a window near the corner.
As a rule, they occupy completely one wall and partially the second.
Modular
High-quality custom-made furniture takes quite a long time to make, and ready-made models from the manufacturer’s range may not be suitable for every buyer.
Ready-made large furniture walls may not be suitable for everyone. A solution was found in an original way - collections began to be made from shelves, bedside tables, cabinets in a single color scheme and style with the possibility of arrangement in accordance with the dimensions of the room and individual needs.
Modular walls make it possible to arrange parts of the kit at your discretion. A number of factories are ready to offer the same lines in several colors. You should take a closer look at modular systems if the family budget is limited.
Such modular systems are relatively inexpensive.
Built-in
A built-in wall in the hall with your own hands is a new word in design thought. It allows you to achieve the most comfortable conditions for operating the structure, since it is manufactured in strict accordance with the dimensions and interior of the surrounding space. This is an ideal solution for country houses and small apartments.
This furniture is ideal for small apartments.
Mini walls
The system includes a limited number of elements, for example, a small closet and two cabinets designed for appliances and a TV. You can install additional shelves on top, made in a closed or open style. Mini-slides are selected based on functionality, taking into account all the components that will have to be stored there.
Mini-walls are also suitable for small apartments.