Types of manicure tables
The manicure table is selected based on the total area of the master’s office, his main specialization (manicure or pedicure) and the physical characteristics of the body structure (height, weight, etc.).
The most popular options are:
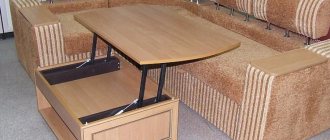
- Foldable. Such tables are suitable for novice craftsmen who do not yet have their own office. During the manicure, this transformer turns into a full-fledged table; after finishing the work, it can be assembled again into a compact cabinet. The folding model is usually equipped with shelves for polishes and other manicure accessories.
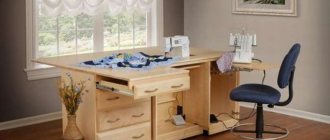
- With built-in elements. A hood or additional lighting can be provided at the table design stage. As a result of this solution, more work space will be freed up and there will be no clutter in the form of additional equipment.
- Angular. These tables with maximum capacity allow you to remove almost all consumables from prying eyes and save space. The only disadvantage of this design is its bulkiness.
- T-shaped. The models include a large number of built-in compartments, which is very convenient for the master. At the same time, a T-shaped table takes up a lot of space and is absolutely not suitable for small offices.
To make the selected table option more mobile, you can install wheels on the legs. This will allow the master to independently rearrange and change the position of the table at any time.
Detailed master classes will help you choose the right materials, tools, and assemble the structure.
Rules for storing nail polishes
High-quality nail polishes are not cheap, and the first priority of every owner is to preserve them so that they remain usable for as long as possible. To do this, you need to follow simple rules and know some secrets.
Note: you should not purchase varnishes in large quantities or in large bottles.
Nail polishes should not be held:
- near the radiator and other heating devices
- on the refrigerator door
- in the bathroom
- in places exposed to direct sunlight
To properly store nail polishes, it is best to choose a dark, cool place and keep bottles upright.
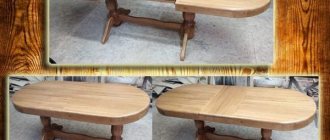
Drawings and dimensions of the table
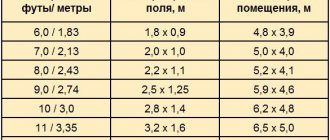
The parameters of an average table have the following indicators:
- height – 70-75 cm;
- width – 100-150 cm;
- depth – 40-60 cm.
The manicure table consists of a reliable, rather long tabletop designed for two people: a master and a client.
Important! During work, the legs of the master and the client under the table should not interfere with each other, and all working movements should not require additional bending of the back.
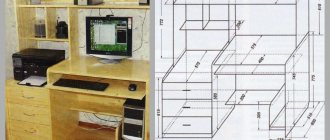
Drawings can be done manually or using graphic programs, made yourself or taken from free Internet access. The main thing is to indicate on them all the dimensions and fastening points of the parts, and separately display the types of fasteners used. This is done so that at the cutting stage the appropriate grooves are made on the material and the table can be simply assembled, like a construction set.
The furniture is equipped with drawers and shelves for storing small items.
Built-in hood
If you are going to install a special hood over the product, which absorbs all the dust and creates a safe working atmosphere, you should make a separate hole for it in the countertop.
The hood itself is purchased at a specialized store . It has compact dimensions and stylish design. You can install the hood within 10 minutes:
- Using an electric jigsaw, we make a hole in the tabletop according to the dimensions of the device.
- Insert the hood into the hole.
- We fasten it with self-tapping screws.
What materials and tools are needed for the job?
Before starting work, you need to stock up on the appropriate equipment:
- screwdriver, hammer;
- six-sided wrenches, screwdrivers;
- roulette;
- construction pencil;
- glue;
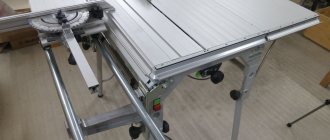
- jigsaw (preferably electric);
- iron;
- selected material (most often these are chipboard sheets).
Step-by-step manufacturing instructions
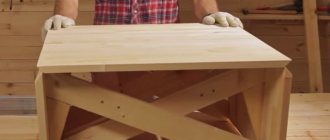
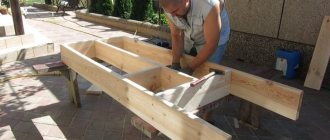
It will be easiest to assemble the table if all the parts have already been cut - the parts just need to be connected to each other. If the project is carried out independently from start to finish, you will have to work hard: first cut out all the parts and fasteners, and only then assemble them into a single structure.
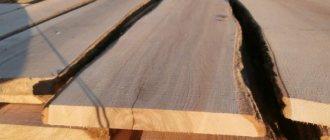
It is better to make the body of the manicure table from chipboard, the tabletop and facades from laminated chipboard.
How to make a manicure table with your own hands:
- The chipboard sheet must be laid out on a flat surface and cut into components. We must try to carry out this procedure with a minimum of waste.
- All ends are covered with veneers. Having connected the main part and the decorative strip together with glue, you need to walk over the surface with a hot iron. This way you can achieve better adhesion of materials.
- In the places marked according to the drawing, you need to drill holes where the fasteners will go.
- After the preparatory work has been completed, all elements must be connected to each other. If the table is not planned to be disassembled in the near future, you can pour glue into the grooves of the fastenings - this will make the structure stronger, and situations with shelves falling out (often encountered among beginners) will automatically be eliminated.
Manicure tables made independently are almost in no way inferior to similar products produced in furniture factories.
If you plan to install a built-in hood, even at the cutting stage it is necessary to drill a corresponding recess for it. There is no need to glue it with veneers - the cut of wood will be covered by the device itself. It is possible to make a hood for a manicure table with your own hands, but its cost is not much less than that of a ready-made one. That is why it is easier to purchase a built-in model ready-made.
Additional equipment, in particular an exhaust vacuum cleaner, plays a significant role in the work process.
Important! For attachment points, you need to make an indent from the edge of the walls - at least 20 mm.
The equipment can be purchased ready-made or made independently using an electric motor with blades, as well as a power supply.
Features of the manicure lamp
A manicure lamp is a fairly simple device in design, designed for drying and fixing shellac, and consists of:
- lamps of various types: ultraviolet, fluorescent or LED;
- protective housing;
- control panels;
- Modern models have a built-in fan and timer.
Without a manicure lamp, the gel on your nails will not dry.
Types of lamps for manicure - table
| Characteristic | UV lamps | LED lamps | CCFL lamps | Hybrid |
| How does it work | The gel polymerizes under the influence of ultraviolet light of a certain wavelength. | Ultraviolet rays are produced from LEDs. | The lamps that power the device are filled with gas. When current is passed through it, beams of the required length are formed. | Depending on the model. Combines the technologies of several types of lamps: UV, LED and CCFL. |
| Operating time (hours) | Up to 10 thousand | Up to 100 thousand | Up to 80 thousand | Up to 80 thousand |
| Ignition circuit | Electronic | Induction | Induction | Induction |
| Service Features | Replace light bulbs every six months | — | — | — |
| Electricity consumption | High. The device is sensitive to voltage changes. | Low | Low. The lamps do not heat up during operation. | Low |
| What materials are being polarized? | Everything except LED-curable gels | LED-curable gels, universal materials, gel polishes | Everything except LED-curable gels | all materials |
| Speed of polymerization (hardening of varnish) | 2–3 minutes | 10–60 seconds | 30–60 seconds | 30–60 seconds |
Do not forget about the rules for using lamps: you cannot wash the drying chamber, you can only wipe it with a slightly damp cloth. Lamps can be cleaned with a brush; if varnish gets in, carefully scrape it off with a knife or razor.
What should be on the table
For the convenience of the master, there should be a minimum of items on the table - only the most important and necessary. You shouldn’t lay out the entire base of colors and design elements on an open surface - they will fit perfectly in the inner drawers.
The table must have means for disinfection and stopping bleeding, napkins, a demonstration palette and a set of brushes. For those who constantly monitor time, you can install a clock on your desktop.
A manicure table is modern equipment necessary for the implementation of services in the field of nail services.
Cutting and assembling a manicure table with your own hands is not difficult even for a person with basic construction skills. It is not necessary to take the standard as a basis; you can create an object according to individual criteria.
Practical products vary in shape; the folding version will help save space in limited spaces.
The main thing is to choose high-quality material and take your time with assembly. The more accurately the chipboard sheet is marked, the less waste there will be. And this, in turn, will reduce the cost of the final product.
High-quality furniture is in no way inferior to factory products.