Now we have reached the final stage of assembling our cabinet. Today we will install one mechanism, thanks to which this product is called a sliding wardrobe - a sliding system.
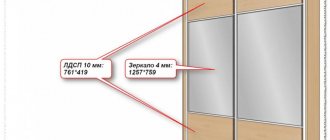
So what do we have? We have a fully assembled cabinet, but without a system. The actual size of the opening for installation was H 2318 mm (height) by L 1320 mm (top width) and L 2315 mm (bottom width). According to the drawing, this size was H 2318 mm by L 1318 mm.
As you can see, our actual width is slightly different from the planned one. By +2 mm (along the upper width), and by -3 mm (along the lower width). But there's nothing wrong with that. We order the system according to the planned opening H 2318 mm by L 1318 mm.
Instructions for installing sliding doors in a closet
For those who are familiar with tools such as a tape measure, hammer and screwdriver, installing wardrobe doors will not be a problem.
Most often, the necessary components are initially supplied with the cabinet, so the buyer only needs to intelligently arrange the rails and rollers, and then install the doors themselves. We will tell you how to do it yourself in this article. Sliding door diagram with fittings
You need to start installing compartment doors when the rest of the structure has been assembled and placed in a permanent place.
Details
Installing sliding wardrobe doors with your own hands begins with disassembling the required components:
- Rails. Mounted in the main parts of the structure from below and above. These are the main mechanisms that are needed for the free movement of the valves. Its function depends on the location of each guide, so the approach to fastening is different.
- Rollers and stoppers. They promote smooth movement and fixation of the door structure, which prevents premature deformation of the door leaves.
- Closers. Needed to ensure the movement of the canvas before closing in automatic mode. Not always used.
- Buffer tape. Attached to the door frame, it makes the impacts when opening and closing the doors softer.
How to assemble a door
W-shaped upper guides keep the panel from falling out; most often they come with two slots, regardless of the cabinet model. The compartment doors move along the bottom rail; they are attached to the bottom of the structure or to the floor covering for built-in models.
Wheels for the bottom, on ball bearings, take on the weight of the door. The upper ones keep them in the correct position. The stopper is inserted into the groove on the bottom rail and prevents unauthorized movement of the door.
Video
In the video you can see in more detail how to do it yourself. All work takes place in 6 stages:
- Preparation . Studying all the details, preparing the place and tools. The assembly takes place horizontally.
- Assembling the base and legs . Markings are made at the bottom of the cabinet, the base is mounted using mini-fixes and dowels, and the support nails are driven in. If necessary, skirting boards are cut.
- Installation of sidewalls (if any). They are trimmed to remove obstacles when adjacent to the wall. The back walls can be sanded and the sides of the cabinet can be placed vertically on a level. For a model without side parts, at this stage markings are made to attach the shelves. Then, using a hammer drill, holes are made in the walls, fasteners are inserted, and corners are fixed. Place and secure shelves and rear racks level.
- Installation of movable boxes and rods . On the drawers, guides are installed with an indentation of 100–150 mm. A response mechanism is attached to the side panels. Installation of facades. The bar is fixed inside until the installation of the boxes is completed.
- Door installation . It is measured inside, then the levels of fastening the guides of the top panel and on the podium are marked. The upper guide is slightly raised and lowered onto the lower one. The rollers are adjusted at the bottom of the cabinet using the end recesses.
- The final stage . The hooks of the side panels are attached to the outside, the assembly area is removed, and the interior space is filled with things.
The assembly is clearly demonstrated in the video:
High-quality built-in furniture goes well with other interior elements. Before starting work, choose a location for the cabinet. Use all the knowledge you have gained from this article, as well as other information materials, and assemble your furniture with peace of mind.
Guides and stoppers
Before installing the door on the cabinet, you need to measure the opening for the top rail. If the guide is cut out yourself, then you need to carefully saw off the excess length from the back side, avoiding the tool slipping and scratches on the profile. The length of the guides must be the same as the width of the cabinet opening, otherwise there will be gaps in which dust will collect.
From left to right: guides; brush seal (schlegel); wheels, stopper.
To install cabinet doors, secure the guides using self-tapping screws with a 4.2×16 press washer. You need to start with the top guide, placing it at the same level with the ends of the side walls of the structure. To do this, you need to make equal holes parallel to each other. After they are ready, it is better to clean the drilling site with sandpaper to avoid burrs on the metal that will interfere with the blade. You can also use universal countersunk screws.
We place the bottom guide approximately 20 mm deep into the cabinet. In order to correctly calculate the desired position for the bottom rail, it is necessary to measure the door in advance using a building level. The door leaf must be in a straight, vertical position. Once the location of the guide is marked, you need to remove the door and install the stops. Next, using a drill, make holes in the guide in increments of 300 mm.
Locks for the cabinet door are located in each groove of the bottom guide. They need to be installed on the correct sides, in the recess on the right - for the right blade, in the opposite - for the left. Once they are positioned, the guide is screwed on and the doors are installed to adjust the closing tightness. To do this, the door leaf must be completed and the center of the wheel on the rail must be marked; this is where the stopper should be secured.
Rollers
- The lower ones, with pressed bearings, are responsible for silent sliding. When choosing them, there must be increased requirements for strength, since they take on the weight of the door.
- The upper ones are distinguished by two wheels with bearings and a rubberized outer surface. On profiles with a metal coating, you need to install rollers measuring 39 mm, if you can buy a wooden coating
For sliding doors up to 60 kg, 2 pairs of rollers are installed; if the weight of the doors is greater, then 4 pairs of roller mechanisms can be installed. For some manufacturers, they are initially mounted inside aluminum door frames. If the doors have steel sliding systems, rollers are placed inside the door leaf on both parts. There must be a minimum distance from the edges of the door. For installation, bolts are inserted and tightened by 2 mm; this will help adjust the position of the door leaf.
Types of rollers
The first type of rollers consists of 2 wheels with bearings. On the outside, their surface is rubberized. This allows you to achieve a reduction in noise when moving along the guides. Depending on the type of guide profile, closed or open, different rollers are used, both in design and size.
If the profile has an iron coating, 39 mm rollers are used, and if it is wood, then 37 mm.
The 2nd type of rollers is responsible for noiseless movement and the service life of the entire system. Higher quality rollers are equipped with pressed bearings. Another purpose of these rollers is to adjust the door leaf in space.
Rollers from different manufacturers have different service lives. When purchasing a sliding system, saving money can cause you a lot of inconvenience, ranging from unpleasant sounds when opening doors to their breakdown. It is better to purchase high-quality products that will save you time on frequent repairs. One of the main causes of roller wear is the accumulation of debris in the guides.
READ How to install a door closer on a plastic door
In this regard, the wheel and the roller fixing mechanism fail. After which, the door leaf begins to move along the floor or inside the guide, and over time, it completely falls out. Properly, in order to extend the service life of the sliding system, you need to wipe the guides.
Door installation
First, you will need to install a canvas located further than the façade. It fits into the end of the cabinet lid and into the far groove. The door must be lifted and the spring-loaded roller located at the bottom pressed. The blade is inserted into the far groove. Do the same with the second one.
Adjust the position of the door leaves and tighten the roller screws with a hex key. To lower the angle, the screw of the wheel is twisted counterclockwise, to raise it - in the opposite direction. It is necessary to ensure that the canvases fit tightly to the side wall, and that there are no sounds of squeaking or rubbing when moving.
Tips for choosing
Before you go to the store, you should study the recommendations for choosing furniture guides:
- The width of the profile must correspond to the dimensions of the facade and the diameter of the wheels.
- When installing the part, an open rail is installed at the bottom, which regularly becomes clogged with dust and hair. To prevent the mechanism from malfunctioning, it should be cleaned in a timely manner.
- When choosing an upper profile to protect laminate, parquet or linoleum, special wheels must be installed below; their size depends on the dimensions of the remaining parts of the door system.
- The combined design, when the guides are mounted at the top and bottom, is the most durable, since the facades are held on both sides.
- Based on the shape of the canvas, the guides can be linear or radial. The latter allow you to introduce more interesting design solutions, for example, creating curved facades. Such parts are made mainly of aluminum, their cost is higher.
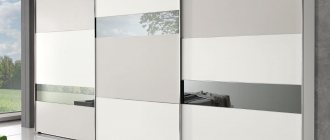
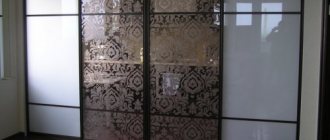
Methods of decorating mirrored facades of sliding wardrobes
To make using the wardrobe comfortable and for the door opening mechanism to last for a long time, you should choose high-quality guides. It is better if they are made of aluminum alloy. In addition, when purchasing, you must check the quality certificate and clarify the warranty periods of the product.
The width of the profile must correspond to the size of the rollers and the facade
The combined system is considered the most reliable
Radius guides allow the installation of semicircular facades
Closers
If mechanisms for automatic closing of doors will be installed on the door, then they must be secured in advance to the upper frame of the door leaf with position latches towards the spring. When fastening, the shutter points must be in an inactive position; they must be activated immediately before installing the door. During installation, you need to adjust the latch so that it does not cling to the door wheels, otherwise it may break during automatic closing. Before final fastening, the closer must be tested.
After the doors are adjusted, the buffer tape can be attached. To do this, you need to remove the protective film from the back and apply tape to the end of the door.
Thanks to these recommendations, installing sliding wardrobe doors with your own hands can be done quickly and without much effort. Afterwards, all that remains is to remove the protective film and you can put the cabinet into operation.
Source: kuppe.ru
Manufacturing materials
Guides for sliding doors are made from the following materials:
- Steel - it makes quite strong structures, but you need to choose the right profile size relative to the weight of the facade. Steel guides for wardrobe doors belong to the middle price segment, however, the cost of products from some brands is overpriced relative to the technical characteristics of the product.
- Plastic - this type of raw material is considered the least reliable. Plastic products are characterized by low cost and poor quality. They are suitable only for light, small facades. Today, combined rails are more often used, where a plastic profile provides an iron supporting surface for the wheels.
- Aluminum - the most durable profiles are made from it. They have the best features in terms of quality. It is allowed to install door leaves up to 4 m high and of any weight on them. Another advantage is the ability to choose a suitable design. The only disadvantage of the material is its high cost.
Metal profiles can be painted in two ways:
- Anodizing is the application of color using a chemical method; during the painting process, the pigment penetrates into the metal. This coating is durable, resistant to high humidity and sunlight.
- Applying PVC film - this method of painting is also considered quite wear-resistant. The presence of an external coating contributes to the silent opening of doors.
The color coating of guides and handle profiles can be not only monochromatic. Consumers are offered imitation of the texture of wood or stone, painting with an aging effect, patination.
Steel
Plastic
Aluminum
Anodizing
PVC film
Installation of a sliding wardrobe system
Now we have reached the final stage of assembling our cabinet. Today we will install one mechanism, thanks to which this product is called a sliding wardrobe - a sliding system.
So what do we have? We have a fully assembled cabinet, but without a system. The actual size of the opening for installation was H 2318 mm (height) by L 1320 mm (top width) and L 2315 mm (bottom width). According to the drawing, this size was H 2318 mm by L 1318 mm. As you can see, our actual width is slightly different from the planned one. By +2 mm (along the upper width), and by -3 mm (along the lower width). But there's nothing wrong with that. We order the system according to the planned opening H 2318 mm by L 1318 mm.
Calculation of drawers for a sliding wardrobe. Dimensions
Drawer for wardrobe, top view
To determine the size of the boxes, you need to determine their location. You should also choose the dimensions of the future storage space at your own discretion. Then we turn this “air data” into numbers. Using a tape measure, we take measurements similar to the door.
Calculation of the height of drawer parts
The box itself consists of slats that have their own thickness. This detail may cause the box to not fit. Therefore, it is worth finding out the width of this material and taking it into account. In most cases, the width of the drawer is 5 mm larger than the guides.
A complete algorithm for calculating the size of a cabinet drawer
- Subtract the thickness of the central partition and sides from the total width of the cabinet.
- Subtract the width of the material from the resulting number and divide into sections.
Components of cabinet drawers
Thus, we found out the width of the shelves themselves.
To calculate the space for drawers, subtract approximately 35 mm from the width of the shelf. And this is the width of the box itself in the shelf. The need to take away from the need to open a drawer without catching the door.
Order a sliding system
You can order a sliding system in your city at any store that sells furniture fittings and furniture fasteners. But I would advise you to find at least five such stores and find out the cost in each, after giving them the dimensions of your opening. Thus, you will choose and purchase the system at the lowest cost.
You can use our tips for choosing a sliding system for a sliding wardrobe.
My order turned out like this:
- System – Lika (Type – open)
- Opening 2318-1318
- Number of doors – 2 pcs.
- Profile color – Wenge
- Filling – Mirror
Here they recommended to me a company that specializes in cutting and sandblasting mirrors, as well as assembling doors for wardrobes.
Their assembly services amounted to 12 USD. for both doors. Since I don’t have free space for assembly in my apartment, this suited me, and after sandblasting, they immediately sealed the back wall with oracal and assembled the doors.
There is another plus to this. When assembled, compartment doors are much easier to transport, and the likelihood of breaking mirrors is reduced to zero.
Installation of guides
The dimensions of the guides must be equal to the width of the cabinet, in our case it is 1318 mm (according to the drawing). But in fact, the width of the cabinet is slightly different. Of course, we won’t cut anything; the difference of +- 3 mm is not so significant.
The first thing you need to do is install the top guide.
Top rail installation
The guides can be secured using self-tapping screws with a 4.2*16 press washer or universal screws with a countersunk head 3.5*16. To do this, we make holes in the upper guide with a 4 mm drill, approximately in increments of 300 mm.
Types of guide profiles
When choosing guides, you should pay attention to the material from which they are made.
Material of manufacture
| Photo | Guide material |
| Plastic This is the cheapest and least durable material for making guides. The period of its operation is no more than 5–7 years. To increase the reliability of the system, its plastic elements are often combined with metal counterparts. | |
| Steel Guides made from it are more durable and strong. However, only when their size and thickness relative to the weight of the door are chosen correctly. | |
| Aluminum Guides made from this material are the most reliable, durable, durable and expensive. With the help of aluminum guides, doors with a height of more than 4 m can be opened. |
Installing a stopper (latch)
The stopper is needed to ensure that the door is fixed in the closed position and held tightly without forming a gap with the touching side.
How to install
Install them in the groove of the lower guide (where the wheel goes), one stopper for each door.
We insert one stopper into each groove, screw the bottom guide, install the doors and adjust the latches, ensuring a tight closure.
In order to accurately place the lock in the right place, completely close the compartment doors and mark the center of the wheel on the guide below, and install the stop there, centered on the mark. You can move the stopper in the groove with a flat screwdriver.
Door height
All calculations are based on diagrams and data from manufacturers of a specific sliding system.
Since almost all popular roller sliding systems require adjustment of the upper and lower rollers, some averaging and rounding is possible.
To calculate the height of a compartment door, usually subtract 40 mm from the internal size of the niche . That is, the calculation formula will look like this: Hpr-40.
If you subtract less (for example, 30 mm), then it will be very difficult to insert the doors into the guides and adjust the smoothness of the move. If you subtract more, the sashes may simply fall out, since the height of the roller adjustment will not be enough to ensure sliding stability.
Thus, the calculation for frameless sliding systems (SKM, srd-1) ends here. For coupes such as Aristo, Raum+, Commander and others, it is necessary to calculate the components: the length of the upper, lower and side profiles, the dimensions of the internal insert.
Assembly diagram of a frame compartment door Upper, lower frame guide and door stops Side profile, open and closed
Buffer tape sticker
A buffer tape is absolutely necessary; it will protect the interior of the cabinet from dust, as well as soften the impact of the door on the side when closing.
They glue it at the very end, when access to the adjusting screws is no longer needed, because it covers all the holes on the vertical end of the door.
There are two types of buffer tape, differing in pile length:
- Short (up to 6mm)
- Long (up to 12mm)
If possible, when ordering your system, purchase long-pile buffer tape. Although it is not often used, the long pile will provide you with more comfortable use of the cabinet.
The color of the buffer tape is selected depending on the color of the system.
Gluing the buffer tape will not take you much time. Remove the protective film from the back of the tape and glue the brush onto the vertical end of the door.
This is where our work ends, we remove the protective film from the profile, use a rag and glass washing liquid to bring the mirrors to a perfect shine - and our closet can be hung with things.
Source: mebsam.com
Installation of guides
Installation of wardrobe doors begins with work on the guide elements. There should be two of these in a set - upper and lower. Let's start installing the top guide.
Using a ruler, we measure steps of 500-700 mm and use a special drill to drill mounting holes at the selected points. You should use a metal drill with a diameter of 5 mm and try to make the holes as neat as possible. Next, install the guide in the cabinet opening and mark the places for fastenings with a pencil. The guides are most often attached directly to the ceiling - we use dowels or other fasteners (depending on the material), after which we fasten the guide element with self-tapping screws. It is recommended to flare the upper part of the hole a little so that it is possible to hide the heads of the screws that are screwed in.
The installation of guides under sliding doors for a wardrobe should be carried out using a level - be sure to maintain the accuracy of the geometry and the same indentation along the entire length of the element, otherwise the doors will be installed crookedly, which will not only worsen the appearance, but may also make their movement difficult or impossible.
Please note that the top guide is not subject to loads and is not a support. It simply supports the structure in a given position and directs the movement of the rollers in the right direction. The weight of the door will be distributed over the lower element, the installation of which we will proceed to next.
Correct installation of sliding wardrobe doors involves precise installation of the lower guide element, since the ease of movement (opening and closing) depends on this. We proceed as follows:
1. Choose the right position.
- Apply the guide to the surface;
- Select the correct horizontal position using a level.
2. Adjust the vertical.
- We install one of the doors in a future location;
- We insert the rollers of the upper edge into the stream of the upper guide;
- We lift the rollers of the lower edge and insert them into the stream of the lower edge.
3. We carry out markings.
- Using a level we build the correct vertical;
- We mark with a pencil the places for fastenings and outline the part itself along the perimeter;
- We remove the door.
This way we get a marked place for mounting the lower guide element. Before you install sliding doors with your own hands, you should remember that the installation of the bottom guide can be done in two ways: using dowels and screws, as well as using strong double-sided tape. Each of these options has its own characteristics.
Why are sliding wardrobes in demand?
Those who have used a wardrobe at least once in their lives note its main advantages:
- the door, when the components are installed correctly, does not lock without the help of others;
- the door leaf moves on the rollers without difficulty, freely;
- with all this, if there is a draft in the room, the door does not open;
- modern models of sliding wardrobes imply connection to automatic control;
- if a wheelchair user lives in an apartment or house, he can pass through the closet without hindrance, which greatly simplifies his life;
- after all, a wardrobe is an elegant piece of furniture that fits harmoniously into any design solution and composition. This is one of the elegant cabinets that does not spoil the appearance of the room, be it a nursery, bedroom or hallway.
We use double-sided tape
This option is much simpler than the first. First, thoroughly clean the surface on which the tape will be glued from dirt, dust, grease and possible burrs. We clean it carefully so as not to accidentally erase the marks that were made with a pencil. We expose the sticky side of the tape and apply the guide to the floor in exact accordance with the markings. We press the element along its entire length for a while.
Before installing doors in a wardrobe, or more precisely when choosing a method for installing the lower guide element, you need to remember an important nuance. If you need to preserve the coating, that is, you don’t want to drill holes in it, you can use tape, but there is only one attempt at gluing it, since it will be impossible to tear the good material off the surface. Be extremely careful and attentive, and do not make mistakes when marking.
Tools and components: preparation, inspection
You will need the following tools:
- screwdriver;
- awl;
- stationery knife and blunt knife;
- hexagon;
- roulette;
- screwdriver;
- drill with drills;
- rubber mallet;
- sandpaper.
An ordinary pencil, glue and a hammer will come in handy.
First, the room in which the cabinet will be installed must first be prepared. Remove from the room everything that makes access difficult, arrange materials and tools.
If there is a garage, partial assembly and drilling is performed in it . True, this will require loading work, but the neighbors will not complain about the noise from drilling.
Attention
To work in living rooms, you will need to stock up on a base for drilling (for example, a stool covered with chipboard). For assembly, a few boards from an old cabinet will be useful.
- Inspect the components very carefully for scratches, cracks, and other defects.
- Check all the parts before purchasing so that there are no problems during installation.
- Transport furniture very carefully so as not to damage it.
- Take all precautions: secure the cabinet carefully and try to drive on a level road.