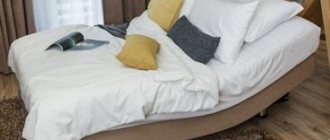
Comfortable and creative DIY bed frame
Making a bed frame with your own hands is not as difficult as it might seem. Any person with minimal carpentry skills can cope with this task, just purchase the necessary tools and materials. The decision to make a bed on their own is made by those who want to reduce the financial costs of purchasing furniture or who dream of equipping their bedroom with a unique product that no one else has. You also have to assemble the frame yourself for a mattress of non-standard sizes.
Making a frame for a podium bed
The base of the podium bed can also be made of wooden beams. Also, to assemble such a bed, a board twenty-two millimeters thick is used. It is used for the manufacture of external elements and cross bars.
Assembling the bed base
The walls of the drawers built into the base are made of boards sixteen millimeters thick.
The bottoms of built-in drawers can be made from centimeter plywood. This design consists of three pre-made blocks that make up the main part of the bed. The third block divides the main structure into two compartments in which the drawers are placed.
Headboard blocks can be secured using wing nuts. This solution will allow this structure to be easily disassembled and assembled in the future. First of all, it is necessary to assemble the blocks using pins with a diameter of 8 millimeters.
The necessary holes are pre-drilled for these pins. All connections of the block parts must be coated with glue and immediately, without waiting for the glue to dry, the assembled structure is tightened using clamps.
The middle block is significantly shorter than the outer ones. It is secured by four spacers. Recesses are made in the upper edge of the panels of the central block. These recesses are needed for the central strip that passes through them.
Horizontal load-bearing bars must be secured with self-tapping screws and glue. After this, you can install the main bars, onto which the entire main load will be distributed.
When making a bed of any design with your own hands, the final price turns out to be significantly cheaper than a similar bed offered in a retail chain. Therefore, we advise you to weigh the pros and cons, roll up your sleeves and begin an interesting and exciting task - making a bed with your own hands.
Preparatory work
First of all, you need to decide on the size of the mattress, because the dimensions of the bed will depend on it. You also need to think about the design of the future structure, its shape, height, and size of the backs. Then you should calculate the amount of materials required. It is imperative to prepare drawings and indicate the dimensions of all elements of the future bed. If desired, you can use ready-made drawings, adapting them to your own needs.
To work you will need the following tools:
- electric drill, drills;
- jigsaw;
- construction knife;
- hammer;
- scissors;
- Screwdriver Set;
- furniture stapler, staples for covering the frame or paint brushes (depending on the preferred method of decorative processing of the product).
The mother also needs to purchase materials. If the base of the bed is made of wood, then for a standard mattress measuring 2000 by 1800 mm you will need:
- 2 boards 2070 by 300 mm for the sides;
- 2 boards 1810 by 300 mm for the front and rear walls;
- slats 20 by 80 mm for making lamellas;
- a sheet of plywood (it will help strengthen the bottom of the product);
- self-tapping screws, confirmations, metal corners for connecting structural elements;
- stain, varnish, wood glue, putty, upholstery materials for processing and decorating the finished product.
It should be remembered that when determining the size of the frame, it is necessary to add 10-15 mm to each side of the mattress. The best material for making the base is a well-dried calibrated board with a thickness of at least 30 mm. Its strength is sufficient to withstand heavy loads.
We disassemble the sleeping arrangement
There are no complex parts and components in an ordinary double bed, but for even greater simplicity, we will divide the structure into a number of even simpler modules. We will agree that the bed will be assembled to fit the specific size of the existing orthopedic mattress.
The latter, by the way, can be divided into three standard-size groups based on width:
- one and a half - 150 or 160 cm;
- full double - 180 mm;
- double "Euro" - 200 cm.
The length is also the same for everyone. Double and Euro-mattresses, as a rule, are sold two meters long, and those that are narrower have a length of 190 cm. As you can see, there is nothing difficult in foreseeing the length of the mattress in advance, but let us remind you that this is of decisive importance when calculating the dimensions most details.
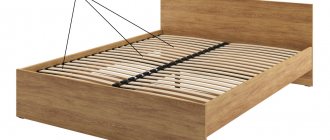
The base of the bed includes an orthopedic lattice. Its task is to provide the mattress with a fairly rigid but elastic base. To make the stand you will need:
- profile pipe 25x25x4 mm;
- maple plywood 7–9 mm thick in strips 40–100 mm wide or ready-made slats for the bed;
- factory furniture legs with adjustable screw bushings.
Profile pipe is an ideal structural element
It is best to use ready-made bed slats. They already have the necessary curved profile, are strong and elastic
It is better to choose adjustable legs for the bed
Of course, all the technical details of the design are very unsightly, so they are hidden by a seemingly blank casing around the perimeter of the frame, which has purely decorative value. Any material can be used for production - from lining and plywood to plastic sheets. As a special case, we will consider laminated chipboard: this material is not only publicly available, it supports itself, which means there is no need to build any frame.
Laminated chipboards offer a huge selection of colors and textures
The base is the most stable and durable structure, so it is advisable to attach heavy headboards to it. Especially if the decorative belt is made of light, thin lining. But, as with everything, there are exceptions. For example, if the visible pseudo-supporting structure is made of a solid 50x200 mm board, a high forged headboard can be attached directly to it. It is also possible that you will want to combine all the elements into one body, avoiding metal parts. This is quite acceptable, but the bed will be difficult to transport unless it is assembled from several smaller and lighter modules.
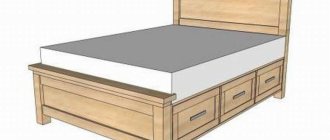
Making a rectangular box
To make the base of the bed, you must first make a rectangular box from boards. To do this, you need to lay out a rectangle on the floor, checking the evenness of the corners between the sides. Under no circumstances should distortions be allowed to occur. To align the corners at 90 degrees, it is recommended to use a construction square.
To connect structural elements, it is advisable to use metal corners; they are secured using confirmations or self-tapping screws. For reliability, the joints must be coated with wood glue before assembling the frame. To make the product quite aesthetically pleasing, the heads of the screws need to be slightly recessed into the wood. It is advisable to treat all places where wooden parts are cut with sandpaper or a grinding machine before starting to assemble the structure.
The holes for confirmations at the ends can be made slightly larger than on the plane of the wood, this will increase the reliability of the fastening. The length of the self-tapping screw should not exceed the total thickness of the parts being connected, otherwise the tip of the fastener will come out when screwed in and ruin the appearance of the product. In addition, the protruding end of the screw can damage the upholstery of the bed or even cause injury to a person. If the size of the bed is large (double bed), then for reliability you need to make a central partition.
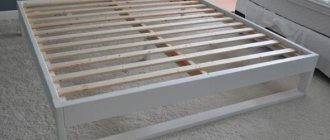
Assembling the base for the bed
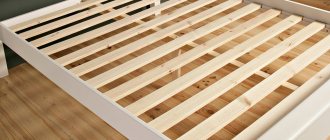
To make a base for a mattress, you need to take wooden slats, cut them to the length of the side and end elements of the frame, and then screw them with self-tapping screws to the box from the inside. Slats will then be attached to these slats. The recommended seating depth of the mattress is 50 mm, to this depth you should add 20 mm (thickness of the slats), you get 70 mm. Accordingly, you need to measure 70 mm from the top of the workpiece and attach support bars at the marks.
The slats can be made from the same slats that were used to make the support beams, only now the slats will need to be cut not to the length, but to the width of the bed. The slats are attached to the support strips with self-tapping screws from above, with a pitch of no more than 150 mm. If the lamellas could not be found, then they can be made from plywood with a thickness of at least 20 mm.
To ensure that the load distribution during bed operation is uniform, it is advisable to lay a plywood panel on the slats and place a mattress on top of it. Another practical option is to attach the slats to the base with maximum frequency, that is, in increments of 10 to 40 mm. In this case, you can do without using a plywood panel.
Bed base installation sequence
The main technological elements of the base are the drawers and backrests.
If they are made, you can assemble the base in the sleeping area, at the place where the bed is installed. The supports and main beam can then be attached. Then the base for the mattress is laid on top.
The next stage is attaching the supports with self-tapping screws to the main beam. Then holders are installed on the backrests and a beam is attached to them. Next, the base for the mattress is installed. It consists of 2 halves made of pre-polished particle board (chipboard).
At this point, the assembly of the bed base can almost be considered complete. In conclusion, we add that the base elements need to be made somewhat smaller. Following this simple rule will allow you to easily dismantle and reassemble the base if necessary.
Installation of legs, decoration of the product
The height of the finished bed, including the mattress, is about 350 mm. If a person prefers to sleep at a higher distance from the floor, then the bed should be equipped with legs. To do this, you will need a beam of 50 by 50 mm; it should be cut into fragments of suitable length and attached to the bed body using confirmations or self-tapping screws. If the bed is double, then the legs must be attached not only to the corners of the frame, but also to the longitudinal partition, which was installed in the middle of the base.
If desired, you can make wooden stands at the foot and head of the bed. They can be simple, rectangular, or figured - it all depends on the wishes of the owner of the future product, as well as on the skill of the furniture maker. When everything is ready, all that remains is to putty all the joints of the structural elements and technical holes.
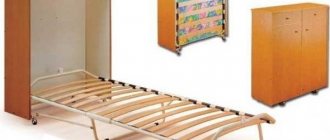
One of the serious problems of small-sized apartments is the lack of space for things, so many owners tend to buy or make beds with drawers for clothes and bed linen. It is not difficult to make such a design, but for it you need to purchase drawers and retractable mechanisms. Another popular option: equip the frame with lifts. In this case, the mattress can be raised and the space underneath can be used for storing things.
First stage
At the beginning, we prepare the materials and necessary tools. The most suitable material for our base is pine timber, which can be purchased at a hardware store or at a sawmill. Its dimensions are 50 mm by 50 mm. The base for the mattress will be furniture laminated chipboard, and we will make decorative elements of the bed from the slab material.
To calculate what length of timber to buy, you need to understand where it will be used. The timber will be used to strengthen the base, to support the base on which the mattress will rest. In our case, the most optimal size for the length of the beam is 4.5 meters. You need a couple of such bars. Since the elements made from beams will not be visible in our bed, you can purchase unplaned timber. It is better if it is cut to size on site. Such timber will be more convenient to transport.
Be sure to check how it was stored before purchasing the timber. It should be stored under cover. Pay attention to how it was laid, whether spacers were used between layers. Otherwise, you may end up with low-quality material, with mold, darkening or cyanosis. Such timber is often severely deformed due to drying.
If the timber was stored in unsuitable storage conditions, do not buy it, because you can choose a more suitable, high-quality material. For example, laminated veneer lumber. Such timber costs much more, but the quality of your product will increase significantly. Here you should not save money. After all, we do it for ourselves, our loved ones.
The next stage is preparing the base parts
The head of the bed needs to be made beautifully and neatly. The head back will be made of slab material and furniture chipboard. Make sure that the texture of the headboard material is directed from top to bottom or bottom to top, that is, it is transverse. It is good to process the bottom edge with a milling cutter according to the prepared sketch; this will give the finished product an aesthetic appearance. Take all this into account when cutting the material.
We make the holder from a block 20 cm long. It is fixed across the width and in the center, at a height of 15 cm from the bottom edge. We secure them with self-tapping screws and put them on glue.
The holder is fixed in the center of the beam. It is necessary to fix the racks on the sides of the head cloth. They are made from slab material.
The profile is connected to the headboard using prepared glue and dowels. It is necessary to apply glue not only to the dowels, but also along the entire length to the end of the head sheet.
At the top, on the headboard, we fix an additional decorative profile. Fix it in the same way as you strengthened the bed posts. Although this technology can be simplified a little. Only glue can be used. Do not use dowels. But double fasteners, reinforcing each other, will allow your product to be more reliable and durable.
If you have the capabilities and desire, and most importantly certain skills, then you can make racks in the form of columns using turned wooden elements. This will additionally give the product a more aesthetic appearance. The only point is that the turned part needs to be flattened with a plane for more convenient attachment to the side of the headboard.
The side opposite the headboard, called the footboard, is made according to a similar pattern as the headboard. The main difference in fastening the small backrest to the drawers is that it is done using eccentric ties. To ensure that the fastening elements are not visible from the outside, minifixes are used.
Now it's time to start decorating the product.
The easiest way is to level the surface of the wood with fine-grained sandpaper or a sanding machine, treat it with stain and varnish in 2-3 layers (the next layer is applied only after the previous one has dried, this will avoid cracking of the coating).
If pine boards are used to assemble the product, then there is no need to use stain. Due to the high resin content, pine may change its appearance - called tiger stripes will appear on it. It is enough to treat wood of this type with varnish.
Alternative option for assembling a bed frame
Here's another easy way to make a bed frame at home.
For work you will need boards and slats 2400 mm long, as well as consumables:
- 2 boards 50 by 100 mm;
- 4 boards 50 by 150 mm;
- 13 slats 25 by 75 mm;
- self-tapping screws 60 mm;
- screws for countersunk connections, 40 mm and 60 mm long;
- paint, wood glue, putty.
The work begins with the manufacture of elements of the future structure. The figure shows possible options for the dimensions of the future product; cutting of wood parts is carried out in accordance with the chosen option.
At the first stage of work, you need to make the front and back parts of the frame. Assembly should be carried out using an oblique and flush joint. To do this, you will need a special mechanism that allows you to drill holes at an angle.
Then the sidewalls are attached to the front and rear sections. To secure parts of the structure in the correct position while screwing in screws, it is recommended to use clamps.
Triangular inserts should be placed in each corner; they will make the structure more reliable and prevent its deformation.
After this, at a distance of 50 mm from the upper edges of the sidewalls, it is necessary to install supports for the lamellas, secure them first with wood glue and then with screws.
Parallel to the installed supports for the lamellas, you need to attach a support block that will connect the front and rear walls of the frame. The lower edge of the bar should be located at the same level with the bottom of the bed, and the upper edge should be at the same height with the supports of the slatted bottom.
If a double or single bed is being made, then an additional leg can be attached to the support bar; if the bed is smaller, then an additional leg is not required.
Then you need to make a slatted bottom. The first and last slats should be attached to the end parts of the frame, and the remaining slats should be distributed evenly between them. The distance from one rail to another should be about 100 mm.
At the next stage, the headboard is attached to the frame using L-shaped brackets and long screws. Then all joints of elements, as well as all cracks and holes, are treated with putty. Then the product is sanded and coated with paint or varnish. All that remains is to put on the mattress and make the bed. The bed is ready!
Source: nedvijdom.ru
Shutdown
Next, all the blanks need to be covered with stain. Apply a quick-drying polyurethane-based varnish on top in 2 layers. Now you can assemble the bed frame by twisting the pieces. After the frame is assembled, 2 or 3 load-bearing beams are laid on the support beams of the rear and front walls. They must be attached to the support beams at an angle of 45 ° using self-tapping screws. If the timber is not enough, you can tighten a couple of slats together.
Stepping back 2 cm from the back or front wall, lay 25 slats on the supporting structure in increments of 4 cm and screw them. For greater reliability, you can screw 2 legs to the supporting beams. Place the selected mattress on the frame. The total height of the structure will be half a meter. As a result, if everything was done correctly, you will get the following: Fig. 2. This durable and reliable design will fit perfectly into the interior of any bedroom.
Why does the bed squeak and what to do about it
Over time, any furniture begins to “sound”. The greater the load on its elements, the higher the likelihood of unpleasant sounds. Their range is very wide: from almost imperceptible creaking to loud screeching sounds. Bed music prevents you from falling asleep and wakes you up in the middle of the night. Is it really time to change the furniture or can it still be fixed? Let's figure out what to do if a wooden or metal bed creaks.
Choosing a bed
To sleep comfortably for as long as possible, you need to know how to choose a bed that does not creak. And so, the main selection criteria:
- Material. If this is a tree, then choose strong, high-quality species. Oak or ash is recommended. This wood is the strongest and least susceptible to change. Metal beds squeak much less often, as they are easier to assemble with high quality. But if the quality is poor, then the creak will be heard within a week.
- Quality. Pay attention to the joints of the bed. They must be perfectly even.
- Mattress. Not surprisingly, the rate at which squeaking occurs largely depends on the mattress. A high-quality product minimizes the load on the base.
Causes of squeaking
- Wear of the orthopedic base. Breakage of fastening elements of lath holders, deformation of wooden parts, etc.
- Loose fasteners or breakage.
- Slight deformation of the legs.
- Curvature of mattress springs.
Another common reason is creaking floors. Before you start repairing the bed, you should move it. If everything is quiet in the new place, the problem is not the furniture.
How to identify the source of sound
To say goodbye to the problem, it is enough to carry out simple manipulations: tighten the fasteners, lubricate or seal the connection, etc. But first you need to find out where the creaking is coming from. It is advisable to do this without disassembling the bed. We offer step-by-step diagnostic instructions:
- We remove the mattress. It can also be a source of noise, so we examine it for creaking. We actively press on different areas, lie down, turn over, or even walk on the mattress. If it still “sounds”, further actions depend on the model. Products with dependent blocks produce sounds from the friction of deformed or broken springs. Only replacing the mattress will help here. Models with independent blocks are turned over to remove the load from the deformed blocks. “Noisy” springless mattresses need to be changed.
- We check the orthopedic basis. It consists of lamellas attached to the frame. For budget furniture, they can be fastened with screws or self-tapping screws, which become loose over time. If there are lath holders, we check them. They are also capable of “sounding”. Be sure to press on each wooden lamella. Small chips and cracks will cause an unpleasant grinding noise.
- We are shaking the frame intensively. Often this is where the answer lies to why the bed creaks. We will examine all areas one by one. If the structure is loose, it will need to be strengthened. It is possible to install additional fasteners or glue them.
- We examine the legs. If the bed is not level, one of them, or even two or three, is not in full contact with the floor. This causes squeaking. In this case, special pads will help. It happens that the legs are poorly secured in the frame. They turn and grind.
- Sometimes creaking occurs due to friction of the mattress against the frame. To check this, return it to its place and press it in different areas. If both the mattress and the frame were silent separately, and as a result of these actions you can clearly hear creaking, you will have to look for a quiet position. Or lay a seal between the mattress, frame and slatted bottom.
Having done all these manipulations, in most cases you can determine exactly why the unpleasant creaking appeared.
What to do with a wooden bed
There are three simplest methods for providing first aid to furniture. Let's figure out what to do to prevent a wooden bed from squeaking.
- Place a small pillow or any sufficiently voluminous object between the back and the wall. It will help if the grinding noise comes from a loose headboard.
- Move it to another place. It will help if the wooden floor under it has dried out and creaks.
- Press the sleeping area tightly on both sides with heavy furniture. The loose structure will be fixed in one position, the sound will disappear.
To completely get rid of the problem, radical measures are taken.
Headboard
The cause of the sound is most often a loose drawer. It is secured by tightening the fastening bolts. Large gaps cannot be eliminated this way. You will need gaskets made of rubber, felt or felt. They are glued at the junction of the headboard and frame. You need to know that in the future this will complicate the disassembly of the structure.
Frame
Over time, the elements dry out and small gaps appear in them. This leads to movement of parts, friction, etc. To stop the furniture from creaking, it is enough to tighten the fasteners, but this is a temporary measure. It is advisable to further strengthen the frame. Lubrication helps a lot. Various antifriction agents are used. Rubbing parts are generously lubricated with the selected composition.
Manipulations with lubricant are carried out regularly, since the effect is temporary. Large gaps are eliminated using gaskets. They are cut out of felt, rubber, etc. The parts are glued to the base. Strengthening or gluing the structure helps a lot:
- Let's disassemble the frame.
- Wash the elements, completely remove dirt and dust.
- We degrease the surfaces of the elements.
- Coat the joint areas generously with glue and assemble the structure.
- Leave the furniture until the adhesive has completely cured. Additional reinforcement with furniture corners is possible.
Orthopedic base
Loads gradually destroy the orthopedic system. She has many vulnerabilities. First of all, it's armor. Each of them needs to be inspected, pressed on both areas of attachment to the frame. Double structures have twice as many elements, each one is checked. Deformed lamellas, with cracks or chips must be replaced. The intact but “sounding” armor is carefully removed from the fastenings. Their ends are lubricated, after which the parts are put in place.
All lath holders are inspected. Among them there may be broken ones, which will cause a creaking bottom of the orthopedic system. Unusable parts are replaced. Some models do without plate holders. The fasteners may become loose here. They are being pulled up. In large gaps, place spacers or just soft cloth.
How to reupholster the base of a bed with your own hands: master class + tricks and tips
If the base of your bed is upholstered in fabric, and the fabric is no longer as fresh as you would like, here is a master class on how to make new upholstery.
This method is suitable if the upholstery of the bed base is worn out, dirty, or you just want to change it. For example, in our case, for a small bedroom, we wanted the furniture in it to be light. Therefore, it was decided to change the dark fabric upholstery to a new, light pink color.
All work was completed in 1 day. Here the reupholstery took a little longer than it might have, as the original dark upholstery could show through the new light pink fabric, and the base was first reupholstered with an additional layer of white fabric. If your fabric for upholstery is thick enough, you can skip the “lining” step.
How to sew a sofa cover: 3 master classes
You will need:
— fabric for reupholstery;
- if necessary - fabric for an additional “lining” layer;
- tools to disassemble and then assemble the bed base;
- fabric scissors;
- sewing machine and threads;
- furniture stapler and staples;
- if necessary - small nails and a hammer.
Bed valance skirt: master class
Step 1
Disassemble the bed, remove the legs and other parts that will interfere with the upholstery. To avoid confusion later during assembly, you can mark the right/left parts and write down on a piece of paper at what distance from the edges of the parts the fastening points are located (holes for screws, etc.).
Step 2
First - the headboard, the “lining” layer. Take a piece of fabric sufficient to wrap the part with a large margin (minimum 20-30 cm, the excess can then be trimmed). Wrap the headboard with fabric, inside out. At the corners, secure the folds with pins. Then remove the fabric, stitch the corners and trim off the excess.
Turn the part for the headboard upholstery right side out and place it on the headboard. Wrap the edges of the fabric, pull them quite tightly and secure with a stapler. You can start from the middle of each side, gradually moving to the edges. Ideally, two people work: one stretches and holds the fabric, the second secures the fabric with a stapler.
Step 3
Now - the outer layer of fabric. Here the excess fabric is simply neatly folded into folds, and the folds are secured with a stapler. You can do the same as in the step above, sewing up the corners and cutting off the excess.
Step 4
When finished, return the headboard fastening elements to their place.
If you use two layers of fabric, as in our case, you can, after the first layer is ready, find, by checking the notes, places for fastenings, and mark them by screwing in and out the screws. It will be easier to find these holes later.
Step 5
Tighten the side and end parts according to the same principle. The corners on these bed parts can simply be cut off (see top photo). In places that are difficult to reach/inconvenient to work with a stapler, you can use small nails and a hammer.
What to do if a bed with a lifting mechanism creaks
The sleeping places are very comfortable, equipped with a lifting mechanism. If necessary, they rise to reveal a spacious bed box. Creaking in such models occurs for two reasons.
- The wooden base has dried out. The steps are the same as for standard wood products. It is necessary to tighten the fastenings, strengthen the frame, lubricate the joints, etc.
- The gas lift mechanism creaks by the bed. Silicone grease helps. Sometimes it is necessary to additionally tighten the fasteners securing the lifting unit.
A broken mechanism always “sounds.” In this case, there are no alternatives: the gas lift is replaced.
What to do with a metal bed
These are strong structures that rarely fail. True, in the classic form with armored mesh they are quite rare. Here is a list of the most common problems:
- The fastenings are loose. Inspect the item. There must be an engraving washer that secures the nut. If it is broken or lost, you need to make or buy a new one and put it in its place.
- The iron mesh makes a grinding sound. Sometimes lubrication helps. It is applied to the entire grate. A sheet of plywood is placed under the “noisy” mesh, softening the piercing rattle. This can be done if there is a crossbar under the grille. Otherwise the plywood won't hold up.
- The creaking comes from the legs. They deform from constant loads or become loose. The only thing that can be done is to tighten the fasteners. They do it carefully. Otherwise, the metal leg or side will break.
Source: www.ivd.ru
Common Causes
You can get rid of the creaking of a wooden bed if you accurately determine the cause of its occurrence. The most common among them are:
- Fasteners and connecting elements can become loose and break over time;
- Slatted bed base - the structure creaks due to the contact of wooden parts or breakage of fasteners;
- Mattress – it is not the mattress itself that makes the sound, but its springs. Under weight, they bend and deform, which leads to their contact. A mattress can also make unpleasant sounds due to friction against the frame or base. Often this happens because it simply lies unevenly;
- Legs – if the bed is not level, an unpleasant sound may appear when they touch the floor. The furniture shrinks and gaps form. The legs begin to come into contact with the frame, making an unpleasant sound.
How to care for a wooden bed
I will also write some tips on caring for a wooden bed.
- The room should have humidity between 40% - 60%. To monitor the indicators, install a hygrometer. It is sold in any specialized store. There are many ways to regulate humidity - from air conditioners to household humidifiers.
- It should be taken into account that when the heating season begins, the air in the bedroom will be much drier. This is where you need a humidifier.
- You need to make sure that the bed is not exposed to direct sunlight. From their influence, the wood becomes dull and becomes cracked due to the fact that the smooth polishing layer is disrupted. Therefore, it is better to install the bed away from the window and away from heating devices, and even from the stove, so that the wood does not dry out.
- It is also necessary to regularly wipe off the dust with a slightly damp cloth, but not wet, because wood does not like moisture. Nowadays there are many products in stores for the care of wooden furniture; I recommend periodically using polishing compounds; they will give the wooden bed frame smoothness and shine; they also have an antistatic effect.
All these simple tips will extend the life of your wooden bed.
And in conclusion, I would like to say that a bed made of natural wood is beautiful and comfortable, and making it is not so difficult. With a little patience and perseverance, you will be rewarded with a pleasant sleep on a bed you made with your own hands.
How to detect the source without dismantling the bed
It will be much easier to determine why the bed creaks if two people look for the reason at once. One of them will loosen the furniture, and the other will listen. The cause of the creaking, as has already been found out, can be different elements of furniture, therefore, in order not to completely disassemble the structure, you can resort to some of the methods described below. The bed creaks - what to do:
- First, remove the mattress. Take out the base. It consists of slats located across the bed under the mattress;
- Place the mattress on the floor and check. The cause of the squeaking is the springs located inside. Stand on the mattress, walk around it, sit down. If there is no creaking sound, then the problem is different;
- The mattress sometimes rubs against the bed itself, coming into contact with the walls of the frame. Put it back and check. Stagger or sit down, a creaking should appear;
- Press on the orthopedic base and pump slightly. The source can be wooden slats that are not fastened correctly or if they have cracks or chips. Often, in inexpensive bed models, the self-tapping screws or screws used to attach the slats to the base cause squeaking;
- Sometimes the reason is not in the foundation, but in the frame. Then you need to carefully check the entire bed. Shake it in different areas. It is possible that the entire structure has become loose and additional fasteners will be required to enhance the strength of the frame;
- Beds with a lift mechanism can also squeak. An unpleasant sound appears in the mechanism itself. Repairing it is quite complicated, so it is recommended to replace it;
- The legs also sometimes make an unpleasant sound. It appears due to their contact with the floor when the bed is uneven. This can mainly be determined by looking at the legs of the bed. Most likely, some of them will not reach the floor. In this case, you can put special stands under them. It is also common that the legs do not fully contact the bed frame, they rotate and creak;
- Check the support bars. They are necessary for installing an orthopedic base and mattress. They are attached to the base and are made of wood or metal. You need to press on the slats and listen to see if a creak appears or not.
How to strengthen a bed frame?
| 1) Attaching the lifting mechanism to the base with slats. As a rule, the first hole on the side of the headboard is drilled at a distance of 10-15 cm. and the following holes along the upper mounting bar of the lifting mechanism fall into their required places by themselves. But there is no exact definition, because... There are different lifting mechanisms from a number of manufacturers, and different types of beds with different headboards may change the position of the mechanism. In our online store there are bed base kits with a lifting mechanism, where all the necessary holes will already be drilled in the required places. After connecting the lifting mechanism to the base, the attachment points are “caught” on the side frames of the bed; to do this, you need to try the base with the mechanism in the closed position into the bed frame. The lifting mechanism can be set to open not along the length of the bed from the legs, but from the side, but it is necessary to take into account that gas springs (gas lifts) in this case are needed one and a half to two times weaker. It is possible to use the lifting mechanism without using an orthopedic bed base with wooden slats, i.e. use a sheet of plywood as a base, for example. |
2) Attaching the lifting mechanism to the bed frames. It must be secured to the side frames with bolts (do not use self-tapping screws - it won’t hold up, it will tear out). The bolts should preferably pass through the side frame and be secured with nuts and washers. If the outer part of the drawer is decorative and it is unacceptable to drill through, then furniture bushings are used into which the bolt is rotated (a non-through hole is drilled and a bushing - nut is inserted into it). You can find many videos on YouTube on this topic to see clearly.
3) Installing the base (frame) with slats into the bed. There are different types of raised beds; the base can be sunk inside the box or placed on top of it. If the base with slats under the mattress is sunk, then metal corners are attached to the inner corners of the bed on which the frame is placed on the side of the legs; often these corners are already in the beds as corner fastenings. In addition to the corners, there are other holders - for example, a plastic frame stopper, which rotates onto the inner drawers of the bed from the side of the legs. The bed frame should be divided into two parts by a central drawer. Both horizontal and vertical divisions are allowed. The central drawer is necessary for beds with a lifting mechanism with a width of 140 cm or more. it acts as a support for the base (frame) in the center; if it is absent on wide beds, the frame can simply bend in the center. For example, bed bases with a width of 140 cm or more without a lifting mechanism on legs (supports) have, in addition to the corner ones, a central fifth support. Sometimes two additional supports are placed in the center. If the base is placed on the drawers, then the central drawer - the box divider (frame support) will be the same height as the perimeter of the bed; if the base is recessed, then it is lower than the perimeter at a distance from the floor (bottom) to the recessed base (frame). The bottom of the bed linen box can be made of fiberboard or plywood, or, as many manufacturers of beds do, the material is fibertex (special felt with a print).
5) Selection of gas spring (gas lift) force for the bed. There is a popular opinion that, for example, a gas lift force of 1000 N is a lift of 100 kg. This is conditional and not entirely true; there are many parameters that affect the lifting of a particular structure, such as: the lifting angle, the angle of the gas spring, the area of the lifted surface, the center of gravity of the surface. There is a special formula for selecting gas springs. But if you go into the details of the production calculation, you can derive a conditional recommendation. Many furniture factories standardly equip a bed measuring 160/200 cm with 800N gas lifts (2 pieces of 800N each, of course - on the right and left parts of the lifting mechanism), provided that a standard mattress is used. If the mattress is high and heavy (usually more expensive models), then set it to 1000N. In proportion to this, 1000N and 1200N are placed on a bed measuring 180/200 cm with a heavy mattress, and 1200N on a bed measuring 200/200 cm. And to a lesser extent: for a bed 120/200 and 140/200 cm 600N with a heavy mattress 800N. For single beds 80/200 cm 500N. If the bed opens from the side (horizontally) and not lengthwise (vertically) as usual, then on a bed of size 160/200N they put less force - 500N and in proportion to the size +/- 100/200N. For wardrobe-bed mechanisms, gas springs with a much higher force from 600 to 2000N are used, depending on the size and type of opening (horizontal or vertical). Such gas springs (from 1200N) are reinforced and are manufactured with large diameters of the rod and cylinder (14/27 mm), thickened, reinforced fasteners, due to which they are much more expensive. There is also a “Universal” lifting mechanism, its peculiarity is that with the same gas lift you can adjust (+/- 200N) the force of the gas spring by changing its angle of location in the mechanism. Whether the gas lift force is suitable for a bed or not must be tested at full load on the base, i.e. with a mattress. Without a mattress, the base may open spontaneously and the gas lift may seem too strong. Read more about gas lifts in the instructions for using gas springs. 6) Location of the gas spring in the bed lifting mechanism. As indicated in the instructions for using gas springs, it is necessary to install the gas lift in the mechanism with the rod down, because otherwise it won't last long. The gas spring contains compressed gas (nitrogen) in the cylinder, which creates rod pressure and hydraulic oil to reduce friction in the rod stroke. At the point where the rod enters the cylinder there are special gaskets (pistons) that hold the pressure. The oil in the cylinder wets the gasket from the inside and prevents it from drying out, with the inevitable appearance of microcracks through which gas under pressure will escape along with the oil and the gas spring will have to be replaced (based on the principle of storing wine in bottles at an angle). In addition, the gas lift does not need to be tightened with a nut; it must be allowed to rotate, because When opening and closing the bed, it changes its position on the fastenings.
7) Accessories. The main accessories for a bed with a lifting mechanism are a mattress holder and a strap. The mattress holder is a metal bracket that is attached to the frame (base) of the bed in the center on the side of the headboard; it serves to keep the mattress from moving when lifting (opening) the frame with the mattress to access the linen compartment. On wide beds measuring 180/200 and 200/200 cm, two pieces can be placed at an equal distance. Sometimes, mattress holders are placed on the frame and on the side of the legs and are used as a handle for opening and closing the lift-up bed. A synthetic fabric strap is usually used just on the base on the leg side to open and close the bed frame. With wardrobe-bed mechanisms, they use straps to tie the mattress with the base. There are also accessories for a bed with a lift, such as: a protective plastic mechanism box, a mechanical gas lift lock, sliders, headboard connectors and a transverse frame lock. The protective plastic box serves to protect laundry from getting into the moving parts of the lifting mechanism and plays a decorative role. Easily attached to the drawers with brackets or self-tapping screws. Headboard sliders are used to connect the headboard and the perimeter of the bed. Allows you to easily remove (unfasten) and put back (fasten) the headboard to the perimeter of the bed. The gas lift lock is used on the gas spring rod as a lock to keep the bed from closing (this lock is more of a psychological accessory, since the bed cannot suddenly fall on your head, even if the gas lift fails, the frame will slowly lower due to the second gas lift). The transverse frame clamp is an interesting and useful accessory; it is attached to the edges of the bed frame towards the legs. Serves to protect decorative upholstery from scratches that sometimes occur from the frame towards the feet when the box is frequently opened/closed. And also, this clamp occupies the gaps between the base and the drawer and does not allow the frame to play to the right or left.
Source: www.atriume.ru
Eliminating squeaks
When a wooden bed creaks, it can cause many inconveniences. During sleep or rest, unpleasant sounds and friction irritate and worsen your mood. It’s unlikely that anyone will like squeaky beds. Determining the exact source of the sound will help you choose a method to eliminate the problem, making sleep and relaxation pleasant and comfortable.
The following are some simple ways to stop a wooden bed from squeaking:
- You need to take a pillow or other thing and place it in the space between the headboard and the wall. The creaking due to the movable headboard will stop, since it will be fixed in one position;
- The second option is to press the bed on both sides with other furniture. For example, a chest of drawers, a nightstand, an ottoman. In this case, the loosened bed will stand firmly and not wobble.
If the simplest methods for eliminating squeaking do not work, you need to approach solving the problem more specifically. You need to get rid of squeaks depending on the parts of the bed. The mattress, headboard, frame and base can creak.
mattress
Sometimes the mattress just lies unevenly on the bed, try to place it correctly. The reason also depends on the type of mattress. Their filling can be polymer or spring. Inexpensive models make squeaking noises due to the contact of springs. Only replacing the mattress will help get rid of the problem.
Expensive models are designed in such a way that each spring is located separately in a case, which performs a protective moisture-repellent function and prevents friction of the springs. If an expensive mattress squeaks, it is recommended to turn it over. The load on worn areas will be less, and the creaking will stop for a while.
Mattresses with polymer filling also make unpleasant sounds. They may be associated with a violation of the tightness of individual chambers. Air flows from one chamber to another and produces a characteristic sound. If the polymer mattress begins to creak, it must be replaced.
Headboards
The headboard can also cause a wooden bed to squeak. The most common is loosening of the drawer. The creaking appears in the places where they connect to the headboard. It is recommended to tighten all bolts and all connecting elements.
If simply tightening does not help, you will need felt, felt or rubber pads. For greater reliability they are glued. In this case, it is necessary to take into account the fact that it will become more difficult to disassemble the bed.