Frame partition
A frame-sheathing partition is the simplest and most economical option.
To mount frame interior partitions with your own hands, you need to prepare a frame made of wooden beams. The dimensions of the beam will depend on the size and weight of the future partition.
For load-bearing beams and frame ribs, timber of the same section can be used. Using timber of a smaller cross-section for the internal ribs under the cladding will reduce the cost of the structure. The following tools and materials will help you make partitions with your own hands:
- Level. Plumb. Pencil. Drill. Saw. Screwdriver. Self-tapping screws or screws, mounting dowels. Metal corners. Screwdriver. Bars: for vertical and horizontal racks.
This will make it possible to avoid further subsidence of the floor at the installation site of the partition.
It is better to install partitions on the subfloor.
The best option is if the wooden partition is installed on the subfloor, and not on the finishing coating. In this case, all the logs are clearly visible, and if the need arises, an additional beam can be installed using crossbars.
The guides can be attached to the floor in different directions: along the beams or perpendicularly. If the room has high ceilings, then the weight of the partition will be considerable.
Therefore, the base needs to be strengthened, for which an additional beam must be installed. If interior partitions are mounted on the second floor, then in this case it is better to build a lighter structure. This will allow you not to worry that the beams will bend under the weight of the partition and the geometry of the house will be disrupted.
The next stage of work is marking.
A stretched cord will allow you to mark a straight line along which the guides will be attached. Fastening begins from the ceiling, then guides are installed on the floor and walls. The frame ribs are installed at a pitch that corresponds to the width of the sheathing sheets, but no more than 600 mm apart.
During work, you must constantly use a level and plumb line and check the accuracy of the installation. When the frame is mounted, all its parts must be carefully treated with antiseptic impregnations to protect the wood from drying out, fungus, and mold.
The space between the internal ribs is filled with insulation. To fasten it, you can use a special mesh, stretch steel wire between the slats, or use any other convenient method. Then sheathe the partition with the selected material.
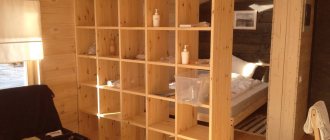
The interior partition can have a sliding design. To do this, you need to purchase moving parts. They can be installed on the outside of either side of the partition or secured inside.
Drywall is not always involved in dividing a room; often a novice builder is faced with the question of how to make a wooden partition with his own hands.
Such structures have special characteristics, and they are not difficult to build. Let's try to make a wooden partition together with our own hands.
Fastening the frame
Built-in wardrobes differ from ordinary furniture in that they may not have a full frame. Its role is played by the floor, ceiling and walls of the niche (corner) in which they will be located. Therefore, the frame here is called a false panel designed to fix the compartment guides.
- First, they arm themselves with a marker, tape measure and level: lines are marked on the wall for a false frame.
- After this operation, the guides are cut and fastened: holes for the dowels are drilled with a hammer drill, then the profile or beam is fixed. Another option is to use furniture corners.
- If a vertical partition is planned, then guides are also installed for it. Install a partition and shelves that are attached to it.
The false panels are installed in the same way, and the doors are fixed last.
The second option is to make a box for the opening, which will protect things from temperature changes, and therefore from humidity. This method is more expensive and labor-intensive. The box is assembled using dowels or metal corners, and the partitions and shelves are immediately fixed. The frame is attached to the walls with self-tapping screws. When the internal work is completed, they move on to the most difficult stage.
Categories
- All about wood
Wood species - Wood products Dog kennels
- Hangers
- Doors
- Children's houses
- Kids toys
- Paintings
- Bird feeders
- Benches
- Stairs
- Small architectural forms of Izbushka
- Wells
- Mills
- Buffets
- Alexander Viktorovich
- Wood protection
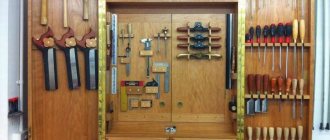
- Tool
- Bath
What type of wood to choose
One of the most critical stages is the choice of source material. Each type of wood is endowed with special mechanical and physical qualities. It is necessary to know the features of different types in order to determine which one is ideal for solving a particular problem. All wood can be divided into two categories - deciduous and coniferous.
Hardwood
This series contains the most valuable species, endowed with extraordinary strength, high density, expressive texture and attractive natural shades.
Wood has the highest value:
- beech;
- nut;
- mahogany.
If there is no reason to spend money on expensive raw materials, you can get by with more affordable ones
Pay attention to the advantages:
- cherries;
- oak;
- ash
These rocks also have high strength, but will not require such significant costs as representatives of the first category.
Oak wood is very durable and resistant to rotting. Due to the content of tannins, which react with dyes during etching, it allows you to achieve intense color effects. Processing the material is not difficult - it lends itself well to simple tools. Making parts of unusual, curved shapes from it is not a problem.
Ash is as hard and durable as oak. However, this material requires regular treatment with antiseptic compounds. Otherwise, when the first wet season arrives, it will begin to rot.
Conifers
Coniferous wood never loses its popularity. This is explained by its availability and a wide range of positive qualities. The most popular materials are those made from pine, followed by spruce.
The strength characteristics of pine are slightly lower than those of deciduous trees. This disadvantage is more than offset by high resistance to biodegradation, mold and mildew, excellent thermal conductivity and extraordinary flexibility during processing. High air and moisture permeability guarantees decent quality of treatment with protective compounds.
369f2b0d09f6bb42f5bc293b3f013721.jpe
0c876577b8227692eb88115b44330baf.jpe
034219d47ce08496ac51c87ea38cf87c.jpe
Spruce is more susceptible to rotting compared to pine, but has less hygroscopicity and thermal conductivity. Products made from this material retain their original shape much longer.
If you choose between these two species, you should give preference to pine.
What kind of wood is used
About 40 species of different trees are used in furniture production, the main distinguishing characteristic of which is their soft or hard structure. The harder the wood, the more difficult it is to process at home, but it will last a long time. Softwoods are much more pliable, but their use when creating pieces of furniture that will bear a large load is unwise.
Before you make a cabinet out of wood with your own hands, you need to find out which of the available species is better, both in terms of hardness and price.
Valuable hardwoods include oak, maple, ash, rowan, beech, elm, walnut, and sycamore. Among the superhard ones are white acacia, dogwood, yew, pistachio tree, and boxwood. Processing them requires special tools and skills, so creating parts at home is almost impossible. If there is a need to manufacture a durable frame or supporting structure from such an array, the components of future furniture are ordered from specialists.
Pine, chestnut, willow, spruce, fir, cedar and poplar have a soft and beautiful structure. They are best used for processing at home.
More often, cabinets are made from solid pine; With your own hands, using basic tools, you can create anything from this wood without much effort and a lot of time. An additional advantage of pine is its low cost, which allows a beginner to experiment and practice.
Materials
The durability of the bed primarily depends on the quality of the materials used. A reliable structure will be made from solid wood. Timber is ideal for making legs; the frame can be made from boards of sufficient thickness. When going to the store, you need to understand that the better the wood, the higher its price, but it is not at all necessary to buy all the most expensive things. We need to find that golden mean, the price segment in which the cost fully corresponds to the quality.
The board for the frame (frame) must be of high quality and dry, otherwise it will move. You should choose lumber with a minimum number of knots, without cracks, darkening and signs of pest activity. The choice of wood species depends on the project and available funds.
If the goal is not so ambitious, for example, you need furniture for your dacha, then you don’t need to spend a lot. In this case, it is easier to make your own bed from plywood or wood-based boards. Another option for a summer house or hunting lodge could be a bed made from solid logs with a diameter of about 80 mm. It can also decorate a bedroom in a city apartment decorated as a hall with hunting trophies.
We select, calculate and purchase materials
You may already have the material for a wooden cabinet for your dacha or balcony - it’s something from your supplies - wooden boards and so on.
By size we determine how much wood and boards are needed first. We look for boards of suitable length, look at the width and calmly calculate and purchase. We purchase screws, having decided on the fastening, etc. The fittings for our cabinet stand apart: handles, hinges, especially hinges.
Accessories
Everything related to the mechanisms for opening and closing the cabinet, handles, is called fittings. Accessories inside the cabinet: various holders, rod, etc. called internal filling.
Internal filling of the cabinet
If with the handles and internal filling everything is more or less clear and you can choose what you need, then with the opening mechanisms you need to give some advice and this will be discussed below when we attach the doors to our cabinet.
Tree
The easiest and most inexpensive tree to work with is pine. Other types of wood are more expensive, but they are also more durable, and for DIY work, especially for the first time, they are not particularly suitable, since the material can be damaged and it is better to spoil inexpensive material.
The boards can be planed or not. Unplaned ones are cheaper, but require sanding of parts. It’s easier to take planed boards and be sure to treat them with an antiseptic, preferably after assembling the entire cabinet.
Planed pine board is an excellent and most inexpensive option for a cabinet
The choice of wooden boards should be approached carefully; they may not be of ideal shape and you need to check their evenness by laying them on a flat surface (on the floor) both flat and at the ends. Deviations from the plane should be minimal, maximum 3-4 mm flat, and even less at the ends. Otherwise, a wooden cabinet with your own hands will turn out crooked.
I recommend: Kitchen furniture: features and specifics
The cabinet can also be assembled not from boards, but from wooden panels. Wooden shields are boards securely glued together, that is, part of the work has already been done and we do not have to assemble shields from boards.
Wooden panels are a good material for a cabinet
grooves cut out from the ends , this will make the work of attaching them easier, but they will also cost more.
A planed pine board with grooves on the sides will make your work much easier
The thickness of the board should be at least 15 mm for large cabinets, and at least 10 mm for small cabinets. the width of the board in such a way that you do not have to make a longitudinal cut, that is, if the cabinet is 60 cm deep, then choose boards 20 cm wide and you will get exactly 3 boards per wall. The same goes for doors. The back wall can be made from a sheet of plywood or MDF, which is much more convenient to assemble.
Now let's decide on the doors, or more precisely on the method of fastening them. Let's select the loops and purchase them.
How to make partitions in a wooden house
Installation of frame partitions
After installing the horizontal elements, install the vertical ones. The standard distance between them is 55 centimeters. But this is not a dogma; one must take into account the design features of the material and the overall size of the wall, its height. Nowadays, aluminum building profiles are actively used as a frame. The docking itself is carried out in the middle of the racks. Plasterboard sheets, plywood, and fiberboard are used as cladding. Here the hygroscopicity of the material is taken into account. The space between the cladding inside the frame is filled with a noise-insulating substance - foam plastic or mineral wool.
Installation of solid partitions
The rest will be deprived of the opportunity to move freely. When constructing interior partitions in a wooden house, the future wall can be sheathed with plywood, fiberboard or chipboard sheets. You can carry out a major version by covering them with shingles and plastering them. Then the structure must have an additional lag that will support the heavier structure.
Installation of plasterboard walls
How to properly make interior partitions in a wooden house from plasterboard? The main advantage of drywall when performing this task is its ability to level the walls. The job can be completed very quickly
It is important to take into account that a wooden house almost always shrinks. This should not affect or destroy the drywall. Work begins with markings, drawing the line of the future wall on the ceiling
Then they project it onto the floor using a plumb line
Work begins with markings, drawing the line of the future wall on the ceiling. Then they project it onto the floor using a plumb line.
The frame is made using an aluminum profile. Wooden beams are used less often, although the design is cheaper and more environmentally friendly. When installing plasterboard sheets directly, it must be taken into account that the structure will move slightly. If the sheets are mounted tightly end to end, they will collapse. It is necessary to leave small gaps to compensate for expansion due to temperature and humidity. The following can be used as a base for installation:
- wooden walls,
- wooden slats,
- wooden beams,
- wood sheathing,
- wood frame,
- the wooden wall itself or the floors.
There are several methods for attaching the drywall itself to the lath. To do this you will need dowels, a screwdriver, self-tapping screws, a file, and an electric or mechanical drill. A beam with a cross section of 50×100 mm or 50×74 mm will serve as slats. The optimal place for fastening is the middle of the slats or bars. The best gap between the screws is 15 cm. The fasteners should be slightly buried in the drywall. Ideally, joints should be sealed with adhesive reinforcing film. If the dimensions of the joints are more than 3 mm, then they should be puttied and then sealed with reinforcing tape.
When installing wall partitions made of glass and other materials, all of the above principles are used. And the installation of designer partitions depends only on the structure itself and is developed directly by the designer or architect.
Read how to build a house cheaply and quickly here
By making partitions in a wooden house with your own hands, you can perfectly demonstrate your abilities and construction talents. These works are easy to perform with minor installation skills and abilities. The main thing is ingenuity, logical thinking, and compliance with the simplest construction rules. If you make mistakes, it won’t be difficult to redo and correct them. Well, there shouldn’t be any consequences other than waste on damaged material.
Finding a location, optimal dimensions
The built-in wardrobe is convenient, spacious, but at the same time it takes up little space. You can find a place for it:
- In a niche. This is the most convenient option for using such an empty recess.
- In the corner. This placement makes it possible to expand the space inside the closet and use a not very functional area of the room. The advantage of this solution is the possible cladding of mirrors, which gives a chance to visually increase the area of a small room.
- Between walls - wide or narrow, at the dead end of the corridor. There are very original options: for example, rational use of empty space near the window.
If a place for a cabinet has already been found, then the first necessary step is choosing the appropriate dimensions.
- Height. In this case, a simple answer suggests itself: to make maximum use of a niche or wall, only one piece of furniture is ideal - under the ceiling.
- Depth. The standard size of a regular cabinet with a hanger bar is 500-550 mm. If you plan to create a compartment design, then you need to take into account that the sliding doors will “eat up” about 100 mm, so 600-650 mm is optimal here. When they plan to make furniture not too deep (about 300-350 mm), they must take into account that the walls will have to be attached to the walls due to instability.
- Width. It is determined by the length of the niche or wall intended for the built-in wardrobe.
After determining the dimensions, they move on to the next important stage before creating the project - measurements.
Drawing of the future cabinet
The design drawing is of great importance for all further stages of product creation. It is compiled taking into account the size of the closet itself and the layout of the apartment. The purpose of the cabinet also matters in choosing a model and working out the details of the drawing. If you need a cabinet, for example, for tools, you should make it wider and lower, and if for books - high and narrow. Next, you need to decide on the number of shelves and compartments, and for this you need to know what will be stored in the closet.
The cabinet has a unique design.
Of course, it’s unlikely that you’ll be able to do everything perfectly the first time.
After the cabinet model has been selected, it is necessary to transfer its plan to paper and depict it in the form of a drawing. First, the frame of the future product is designed, the dimensions of the walls, doors and bases of the cabinet are indicated. Then you need to depict the shelves and the internal components of the product, indicating the length and width.
bf1027c237e876e77509998d59c87b01.jpe
It will help place all the necessary things in the room, and with its originality will add a touch of extravagance to the living room.
Today, about 40 types of wood are used to make furniture, which have different characteristics.
We develop drawings for a built-in wardrobe
The most important stage is the construction of working drawings and diagrams of the internal content of the future wardrobe. You can familiarize yourself with many of the nuances of developing a design project on our website “Sliding wardrobe-INFO”. Perhaps among the presented drawings there is a suitable option.
The step-by-step development of a design project for a built-in wardrobe will look like this:
- Measurements and determination of the optimal design (straight or angular, fully or partially built-in).
- Planning the façade, the number of doors and their width. It is important. The internal filling must correspond to the width of the doors - when the facade is open, all shelves must be freely visible, and the drawers must be rolled out.
- Development of the internal contents of the cabinet. Here you should start with a clear understanding of the purpose of the furniture and the required storage space. How much you need to hang under clothes, how many shelves and drawers - it’s up to you to decide.
Fastening elements for solid wood products
During the manufacture of wooden beds, special attention is paid to fastening elements. Among these you will need:
- Wood screws (various lengths);
- Metal corners with a rounded stiffener (to make the wooden structure more reliable);
- Nails (not suitable for all wood).
For more reliable fastening of parts, it is recommended to use clamps.
How to choose self-tapping screws for fastening two specific parts:
- Measure the thickness of the part to which the second part will be attached;
- Measure the thickness of the part that is attached to the main one;
- Add both values (in mm);
- Subtract 10 mm from the resulting figure;
- The resulting value will indicate the length of the self-tapping screw required to fasten the 2 above-mentioned parts.
For example:
- The main part is 55 mm thick;
- The thickness of the attached part is 25 mm;
- 25+55=80mm;
- 80-10=70mm.
To fasten two parts (55 and 25 mm) with a total thickness of 80 mm, it is necessary to use self-tapping screws 70 mm long.
Drawing of the future cabinet
The creation of any piece of furniture begins with drawing a detailed drawing of the future product. To obtain the basic dimensions, measurements are taken of the space in the room where the homemade cabinet will be installed, and a frame is drawn indicating the external width, depth and height.
Next, the design and contents are thought through (the number and location of shelves, partitions, doors, drawers), their location inside the frame is indicated, and the dimensions and indentations are indicated.
Careful elaboration of all the nuances at the drawing stage is important, since in the future the sawing and assembly of the future structure will be carried out according to the dimensions and marks indicated in the diagram.
If difficulties arise with creating an individual drawing, you can use ready-made projects, transforming the dimensions to suit your own needs.
Create a drawing
It will not be possible to make a cabinet from chipboard with your own hands without preliminary preparation. Drawing up a diagram with a drawing is the most important stage in creating furniture. They help avoid sudden difficulties during the production, assembly or installation stages.
When creating a layout, it is important to consider not only the height and width of the cabinet itself, but also its location. It is necessary to take into account the presence of baseboards, window sills, pipes, sockets and other small elements. The cabinet itself is depicted in diagrams and drawings from three sides: front, top, side. In the first case, on paper you need to note its width and height, the parameters of the base and all sections, as well as the distance of the shelves from each other. We must not forget about the thickness of its walls and fastening points for doors. On the top and side drawings, you should note the depth of the cabinet with all internal elements, as well as the rounding of the shelves with their dimensions.
Types of partitions and their manufacturing technology
Partitions in a wooden house made of timber or galvanized logs, as well as frame buildings, can be of the following types:
- frame and frame-panel;
- panel and carpentry;
- frameless.
All the above types refer to wood structures. As additional options, you can make fences from plasterboard or tongue-and-groove. They are also fairly lightweight and easy to install.
To understand how to make interior elements for a house from timber or rounded logs with your own hands, you need to consider each type separately.
Frame partitions
Such partitions in a wooden house made of timber or logs can be used at the request of the future owner, and for frame buildings they will be the most optimal option.
The manufacturing technology is as follows:
- Measurements of the room and markings on the floor where the interior structures will be located.
- The bars of the lower trim are made, guided by the obtained dimensions. The elements are secured to the floor with screws or self-tapping screws.
- Next, the racks and transverse elements of the frame are cut out according to measurements. Installing them in the design position with your own hands can be done in two ways: individually or installing the frame after assembling it on the floor. Fastenings are made with screws or self-tapping screws. The end posts are fixed directly to the wall.
- The frame is wedged at the top and secured with fasteners.
- Afterwards, insulation is laid between the frame elements (if it is needed for sound insulation) and the sheathing is performed. It can be sheathed with plasterboard or clapboard. In this case, the sheets and sheathing elements are cut so that their joint falls in the middle of the frame post.
Panel and carpentry
To make interior fencing of this type for a house made of timber or logs with your own hands, you need to follow the following procedure:
- Room measurements and markings.
- Production of plank panels (solid) from boards 20-40 mm thick.
- Bars are nailed to the surface of the floor and ceiling, which form grooves for installing shields. The shield can be two-layer or three-layer. When making a three-layer structure, thinner boards are used for the inner layer.
- Assemble a partition from panels in height. By inserting them into the grooves formed by the bars.
- Soundproofing material can be laid between the layers.
The dimensions of carpentry partitions depend on the purpose. They are similar to door leaves and can be solid or glazed.
They are made both to the entire height of the room and with a gap of 30-50 cm from the top edge to the ceiling.
Frameless
When making simple structures of this type with your own hands, work is done in the following order:
Scheme of the simplest frameless partition
- Room measurements and markings.
- Fastening the bottom trim.
- Making a groove trim on a beam by nailing two bars. The groove should be equal to the thickness of the partition boards.
- A triangular beam is attached to the ceiling. It will be an integral part of the groove for fastening from above, so the location should correspond to the lower fastening.
- Install vertical boards, starting with the one located near the wall. It is pressed and nailed to the triangular bar on top.
- Install all the boards one by one. The space between the individual elements is filled with tow, polyurethane foam or insulating cord.
- After the installation of the boards is completed, the second triangular groove element is nailed to the ceiling.
- The partition is sheathed.
Instead of bars, metal corners can be used for fastening to the floor and ceiling.
In order to competently make partitions for a house from timber or other wooden elements with your own hands, you need to choose the right type, install them without deviations vertically and horizontally, and securely fasten the parts of the structure together. For manufacturing, it is recommended to choose first or second grade coniferous wood. All wood is necessarily treated with antiseptics to prevent rotting. If desired, the elements can be treated with fire retardants to increase fire resistance.
dd00c98d5d9feeb04591efc6e9418815.jpe
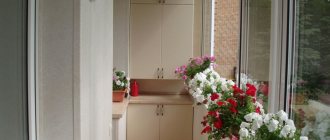
DIY wardrobe for the balcony. Scheme
Before you begin to outline the instructions for making a cabinet, you should figure out what options you can implement with your own hands. Taking into account that the home master is not a professional in this matter, and the tool is only a household one. And based on the chosen model, focusing on the size of the balcony, it is easy to decide on the dimensions of the “furniture”.
Sectional composite model. How many compartments there will be depends on their desired capacity and the dimensions of the future cabinet. This option makes it possible to combine with the size of the cells in each pencil case.
For example, if you don’t fill the long one with anything at all (leave it empty), then for the summer you can put children’s sleds, clubs and other sports equipment in it. And for the winter - a bicycle. Not a bad solution, and you won’t have to constantly trip over all this in the narrow hallway of the apartment.
Built-in model of several sections. It is advisable to install such a cabinet while finishing the balcony. Many of its structural elements are common to the supporting frame for the paneling.
For example, the same racks, which at the same time serve as sheathing slats. Well, it’s not difficult to decide how to divide it into compartments. Either as stated above, or choose your own, more original option.
Pencil case. As a rule, this design is most often chosen for typical balconies that are not large in size. The easiest cabinet option to make, and from a practical point of view, no less convenient.
You can experiment here too. For example, divide the cabinet into levels, and install shelves in each compartment so that you get “cells” of different capacities - for bulky items, jars of pickles/jams, some household items, and so on. A specific solution will be suggested by your own imagination.
Corner cabinet. This pantry option has its advantages. The main one is that its back walls, by definition, already exist. It is only necessary to properly finish the masonry (or slab) and the fence between adjacent balconies.
As an option - a modification of the wardrobe, corner, in which the door leaves can be easily moved apart. But doing it is much more difficult.
There are enough models of cabinets on the balcony, and besides, these are just tips. The main thing is that there is something to focus on, and coming up with your own scheme and determining the required dimensions of all structural elements is not so difficult. In principle, for storing property that is not constantly needed in the apartment, shelves, racks, and so on are suitable. There is no doubt that it will turn out cheap, but whether it is beautiful is where opinions differ.
Examples of drawings and sketches of cabinets that can be placed on a typical balcony will help you design them yourself.
It is worth dwelling on the nuance of what the cabinet should be - stationary or mobile (mobile). The first option is much easier to do with your own hands. And there is not enough free space on the balcony to regularly rearrange the furniture on it. Therefore, it is advisable to install a rigidly fixed structure.
Gluing the shield in the usual way
The quality of glued furniture panels primarily depends on the preparation of the workpieces. The wood selected is dry, smooth and without knots, for example, beech. You can buy ready-made timber and pass it through a thicknesser to get blanks of the same thickness.
The appearance of the glued shield matters, so the blanks are laid out by color. After this, the growth rings are marked with chalk and the arrangement of the blanks is changed so that they alternate in direction. If the growth rings are in the same direction, then when the tree dries, it will bend in one direction. When alternating the direction of the growth rings, there will be no bending.
Tree ring arrangement
Lines are drawn with chalk on the unfolded structure, which are then used when assembling the shield after adjustment.
Shield with chalk mark
Due to the uneven sides, gaps remain between the plots. To remove them, the boards are folded sideways and jointed on a machine.
Preparing boards for jointing
After jointing, check the tightness of fit of the workpieces to each other. If not all defects are removed, then jointing is repeated.
The plots matched to each other according to the marks are placed in a shield and prepared for gluing.
Assembling a shield from fitted boards
The blanks are glued together with PVA glue. It is applied to the end of the board from a special bottle, and then smoothed over the surface with a soft rubber roller.
Applying glue to workpieces
The blanks, coated with glue, are assembled into a shield and then compressed with four clamps: two from below, and two from above. The clamps must not be pinched, otherwise the shield will be pushed to one side.
Compressing the shield with clamps
Clamps are also installed at the joints of the workpieces.
Clamps at the joints of workpieces
After 2 hours, the clamps are removed, and the remaining glue is removed with a shoe knife. The prepared surface is sanded with a soft float and sandpaper size 100-180.
Sanding furniture panels
After sanding, the furniture board is used for its intended purpose.
An example taken from the YouTube channel of Vladimir Zhilenko, video “How to make a furniture board. How to make a wood board”
Materials for balcony cabinet
Even on an insulated balcony, the main threat to furniture remains moisture. Therefore, the material for its creation is selected with this factor in mind. The following options are possible:
- Wood is the best material for any furniture, as it is aesthetically pleasing, easy to process, and has excellent performance characteristics if the material is properly processed and properly cared for. Contraindication: cold balconies with high humidity. Often, wooden lining is used for this purpose.
- Chipboard (chipboard). The Achilles heel of this material is not very good resistance to moisture and temperature changes, so such furniture will only feel good on glazed balconies and loggias. Laminated chipboard is suitable for heated rooms.
- MDF. This high-quality material is closer in properties to natural wood, but compares favorably with it in price. These panels are not afraid of either humidity or temperature changes. Not the last plus is their environmental friendliness.
- Plastic - PVC panels. The most unpretentious candidate on this list, since it is not at all afraid of moisture, is practical, cheap, and very easy to care for. The disadvantages of plastic are fragility, gradual color change when exposed to sunlight for a long time.
- GKL. Another contender is moisture-resistant drywall, but this material is not the best of the “applicants.” The reason for this is its fragility. Other disadvantages are the large consumption of the profile for the manufacture of a more or less reliable structure, doors, which in any case will have to be made of a different material.
- Metal-plastic. This material is known for its practicality. He is not afraid of either heat or cold. High humidity and mechanical stress are also not too much of a threat. The biggest enemy of the union of metal and plastic is the bright sun, which sooner or later causes it to yellow. Individual elements for the cabinet (doors, shelves) are purchased at hardware stores.
To make a wardrobe on the balcony with your own hands, you can choose not one, but several materials. Combinations of them make it possible to create unusual, original furniture.
Frame
Timber is often chosen for this role; its dimensions are 40x40 or 50x50 mm. This option is traditional, but if the balcony is not heated, wood is not the best choice; its dimensions will change “thanks” to changes in humidity and temperature. Regular treatment with protective impregnations will also be necessary.
The optimal choice for balcony conditions is a metal profile with a galvanized coating. It is not afraid of moisture or temperature changes, and it is quite easy to attach any finishing material to metal. An alternative is guides with holes for brackets; shelves are mounted on them. Plus - easy change of distances between them.
Shelves
These elements are easiest to make from sheet material. It is possible to use thick plywood, chipboard or laminated chipboard, OSB, but shelves for heavy things require the “help” of wood. These elements are often made from scraps of boards left on the farm. Impregnations and paints and varnishes for processing are purchased from those intended for outdoor use. It will protect the elements from ultraviolet radiation. A water-based varnish can protect your apartment from “wonderful aromas.”
The shelves are simply laid on timber or fixed to the frame with self-tapping screws. Another mounting option is to use corners on the balcony wall, but this work will become more complicated and take longer if the walls require the entire set of shelves to be mounted on dowels. The way out of this difficult situation is to assemble the frame and fix the elements to it or guides with brackets.
Doors
There are 3 door options that are usually used when making cabinets for balconies or loggias. This:
- ordinary - swing;
- sliding - coupe type;
- roller shutters
The first ones are the easiest to install yourself; you only need doors, furniture hinges and a screwdriver. Sliding structures allow you to save space if you plan to install a bar counter or any furniture nearby, but they require a set consisting of guides and a roller system for the door leaf. New-fashioned roller shutters are an expensive pleasure, but in this case the cost usually includes the installation of these devices.
All doors can be the same height as the cabinet itself, but it is much more practical to divide the balcony furniture (especially tall ones) into several sections (2-3), and make its own doors for each of them.
If we talk about materials that are convenient for making canvases yourself, then the first place is able to separate wooden boards and lining. These elements are assembled on a wooden frame. Doors made of laminated chipboard are a good enough reason to order the sheet from a workshop, since only a circular saw can cut the sheet without chipping. High-quality lamination of ends at home is a mission that is almost impossible.
Placement method
Depending on the method of placement, cabinets can be cabinet or built-in. Both options have their own characteristics. At the same time, it is not always possible to use the second option, since it requires a special niche.
Cabinet cabinets consist of several modules. They are placed in any suitable place, and if necessary, the cabinets can be moved or disassembled. They can be given any shape or size.
Built-in wooden cabinets are placed in special niches or closets, where it is not possible to place classic furniture, effectively using the space. When creating them, you have to focus on the dimensions of the place where installation is planned. An important advantage of the cabinet is the ability to do without one or more walls, as well as a floor or ceiling. It is enough to install the most necessary elements into the walls and install the doors.
Deciding on the design
There are different ways to make a built-in wardrobe with your own hands. The body can be partially or fully built-in, straight, L-shaped or trapezoidal.
Fully built-in wardrobe, drawings and diagrams
This solution is used for niches prepared for installation. And also in cases where the wardrobe is designed the entire length of the room, from wall to wall.
The sliding system and internal filling are mounted independently. For installation of the sliding system, a depth of about 100 mm is left.
As a rule, the internal frame with shelves, drawers and other storage systems is installed first.
If the side walls, top and bottom of the niche are not perpendicular to each other, then the horizon is leveled using a panel. The cracks are sealed with putty, covered with wallpaper or painted, with the general finishing of the walls.
Sliding doors with upper and lower guides are ordered according to the internal dimensions of the niche. You can also calculate and assemble them yourself.
Partially built-in wardrobe, drawings and diagrams
There are times when it is impossible to implement a fully built-in wardrobe design.
For example, with suspended ceilings there is simply nothing to secure the upper guide to. Therefore, a roof appears in the cabinet design. There may also be sidewalls on which it will rest.
When implementing diagonal, L-shaped and trapezoidal corner wardrobes, partially built-in options are also obtained. They may have a roof and narrow sides, but the design does not include rear walls or a bottom.
A simple DIY table made of wood and ready-made furniture legs
This option is even simpler, including because the master is not limited to certain sizes.
Ready-made furniture legs are made of wood and/or metal, can be single or in the form of flat/shaped supports, smooth or with decoration.
In some models, the height can be adjusted (within certain limits) using a thread or a telescopic mechanism.
A mounting platform or a single mount allows you to mount such legs on almost any tabletop. One limitation is that it must be solid, not prefabricated. The national team will need kings.
7ccef1cc1b60697ec5aacbd4331f76aa.jpe
There is an interesting nuance when using such legs. A small supporting area requires mandatory reinforcement of the wooden tabletop, so after marking the fastening points, special washers are driven into these places.
Threaded parts are then screwed into them.
Unfortunately, this assembly method does not ensure the stability and strength of the table - in soft wood (for example, in a furniture panel made of pine), the fastenings do not hold well, and the table quickly begins to wobble.
A more reliable option is to assemble using carpentry joints reinforced with glue and/or self-tapping screws.
Manufacturing
Once the drawings are ready, you can begin manufacturing the necessary parts. Sawing boards is a rather difficult task, and it is better not to test yourself, but to order this work from professionals. As a rule, such a service is provided at the place of purchase of chipboard sheets. The difficulty is that a machine for sawing chipboard is quite expensive, and purchasing it for one cabinet is pointless. Many people prefer to cut it themselves with a jigsaw, but this results in chips, so it’s better not to risk it.
You need to decide in advance on the door opening system: sideways, up, down, move like in a coupe. Taking into account the number of shelves, drawers, doors, you can calculate the required number of European screws, rivets for them, guides for drawers, and holders.
Separately, it is necessary to say about drills. They should only be made from wood, which will allow you to make an accurate hole yourself without the use of additional force. Their characteristic difference is the presence of a blade in the center and a flat profile (and not a cone, as in other types). Before assembly, it is important to practice drilling on unnecessary scraps that will remain after sawing the chipboard.
To avoid measurement errors, you need to use high-precision instruments. You should avoid tape measures and give preference to a metal meter and half meter ruler; it can be purchased at every stationery store. But beware of Chinese-made plastic analogues; they often contain errors that can turn out to be a serious drawback when assembling the product.
Felt pads will help make further movement of the cabinet easier. They should be glued to the places where the object stands.
Drawer
How to make a drawer? Buy:
- wood processing machine;
- roulette;
- construction corner;
- unedged board 2.5*25*130 cm.
You will also need a hammer and nails. And also 4 wheels from a children's toy stroller and attachments to them.
Procedure:
- We convert unedged lumber into edged lumber.
- We cut the board into several pieces - four of 20 cm and 1 of 24 cm.
- We process blanks.
- We cut the remaining boards to a width of 4.5 cm along the grain of the wood.
- We collect the box.
- We attach wheels to the bottom.
Here are some assembly guidelines:
- use 1.5*50 mm nails, this will increase the likelihood that the boards will not split during the process of joining them;
- start by nailing the sidewalls of the lower and upper planks to the end cut, and then distribute the rest of the workpieces between them;
- Attach 24 cm long strips from below with nails.
You can put children's toys in such a box.
Installation of door frame and door
The next step is to install the frame and hang the door.
- We install the formed box in the opening and fix one side with long self-tapping screws in places that will be closed with hinges.
- We attach the hinges to the door leaf and frame and hang the door.
- We close the door and mark a place for the locking plate. Drill a hole to fit the latch.
- We secure the second side of the box. Before this, you need to close the door and adjust the gap, making it the same over the entire height of the door.
- We install a wooden wedge between the frame and the doorway at the latch level and fix it with a self-tapping screw through the hole provided for the locking hardware.
- We install the locking plate and secure the box with wooden wedges.
Materials and tools
When planning to make a table with your own hands, you need to select the necessary materials in advance and prepare them.
For the simplest model, you will need a beam with a cross-section of at least 40x40 mm (for the legs), a board with a cross-section of 10...20x50...100 mm for the drawer (can be replaced with timber) and solid wood, furniture panels or boards with a thickness of at least 18 mm for the tabletop.
Important: when choosing a massive edged board or slab (a longitudinal cut of a trunk with an unaligned edge) as a tabletop, it is necessary to increase the cross-section of the supports - the load on them will be significantly greater than from a conventional light panel.
All lumber is cut to size, processed until smooth with an abrasive material or tool, and adjusted to each other. After completing the assembly, the wood must be treated with protective impregnation (this can be done before installation) or with varnish/paint.
To work you will need:
- wood saw, manual or electric (chainsaw);
- drill for drilling holes;
- grinding machine or sandpaper (sanding sponges) with different grain sizes;
- a screwdriver/screwdriver when using threaded elements for assembly, a hammer when assembling with nails, a mallet and chisels for selecting grooves when choosing carpentry joints.
You will also almost certainly need a brush/roller/rag for applying impregnation, varnish or paint, and tools for marking.
Working with wood usually does not pose a risk to human health, but protective clothing and - especially! – It won’t hurt to get gloves; no one needs splinters in their fingers.
Harvesting and preparation
First, cutting maps are made exactly according to the list of parts. They are laid out on a sheet of material and the sides that need to be trimmed are indicated. At the same stage, the length of the edge is calculated.
The first independent work carries the risk of making mistakes, and they can be very expensive, so you need to understand that attracting professional assistants is a necessary measure. Self-sawing will take a lot of time, and no one can guarantee that the result of this work during the assembly process will only please you. There are some other advantages of turning to furniture makers:
- they buy materials at wholesale prices, and the home craftsman will have to pay 20% more, this is the minimum;
- All cuts will be edged immediately, which will additionally protect the material from moisture;
- cutting parts on a computerized machine is synonymous with speed and quality of parts.
If you have the skills for such work, then the material is sawed with a jigsaw, then the ends of the cuts are prepared for edging: they are leveled with a grinder, then treated with sandpaper.
- After completing this operation, the workpieces are edged. If melamine tape is purchased, it is glued with an iron, the excess is cut off with a stationery knife, and processed with sandpaper.
- Start drilling holes for fasteners: all parts are first marked with an awl, according to the drawing, then drilled.
- The components are prepared: the boxes are assembled, the bottoms and guides are attached to them, and the handles are screwed on.
There is no preparation of fittings at this stage. This part of the work is carried out after installing the built-in wardrobe, the reason is possible (and serious) discrepancies with the drawings.
Types of interior wooden partitions
A wooden interior partition is a simple design that you can make yourself if you wish. In private construction, 3 types of partitions are usually used, each of which has its own design features.
Frame-panel
This is one of the most common options for wooden partitions, which provides additional heat and sound insulation of interior spaces. From the name it follows that such partitions are made on a frame basis, then sheathed with panels.
For the frame, a beam with a cross section of 60 x 100 mm is usually used, which forms a horizontal and vertical frame. The distance between the elements can be calculated based on the thickness of the insulation, which will fill the free space. For these purposes, mineral wool or polystyrene foam is usually used.
The following options are suggested for wood cladding:
- plywood. A practical and affordable material that is easy to process and install, however, plywood can delaminate over time, so it is not suitable for rooms with high humidity;
- Fiberboard. Fiberboard, which is made from wood processing waste and cellulose by hot pressing. The composition often includes fire retardants, polymer additives and antiseptics;
- Chipboard. Chipboard, which is made on the basis of shavings and sawdust, the connecting link is resin or formaldehyde. The products cannot be called environmentally friendly, although the manufacturers claim that the content of volatile compounds complies with the standards. Chipboard is not recommended for the construction of partitions that are planned to be subsequently moved or installed in the nursery. Damage always remains in the fastening areas; the fibrous structure does not hold fastening elements well.
When choosing wood siding, you can pay attention to OSB - oriented strand board, which is a strong and durable material. Disadvantages include high cost and dependence on a humid environment
Carpentry
This is a paneled structure that usually does not require finishing, which provides significant benefits during construction work. In production, valuable wood is usually used, which is coated with several layers of varnish.
Here you need to take into account that such partitions do not require the use of insulation, and therefore are not able to provide the premises with heat and sound insulation. The design performs a purely decorative function and is used for zoning space, for example, separating the dressing room from the total area of the bedroom.
Solid
Solid partitions are built from the material that was used in the construction of the house (timber, logs, frame structure), therefore they have a fundamental appearance, although they do not heavily load the base. The structural elements are fastened together with metal spikes, giving the wall additional rigidity and stability. The partition is connected to the load-bearing bases using triangular bars and nails.
Thermal and sound insulation indicators directly depend on the characteristics of the lumber, but if desired, they can be increased by stitching the surface with foam plastic.
Types of structures
You can make a cabinet from laminated chipboard yourself, and it will satisfy the needs of all family members, and will also fit well into the interior. You need to decide what exactly it will be, not only in color or internal compartments, but also in three important criteria.
Case shape
Not only the appearance of the cabinet, but also the complexity of all future work will depend on the chosen body shape. This point should be given special attention, and the final decision should be made before purchasing materials.
Possible body shapes:
- linear - a classic version with a simple rectangular shape. They have the usual cells, shelves and rods, suitable for storing any clothes with accessories;
- radius - characterized by rounded facades. It is almost impossible to make a radius cabinet from boards at home, since the manufacturing technology is complex;
- five-walled - suitable for hallways or small rooms. The external side is often complemented by open consoles or special modules;
- corner - help to effectively use the space in the corners of rooms. Often decorated with glass or mirror, great for the bedroom;
- trapezoidal - visually correct rooms of non-standard shape. They have separate shelves on the sides, and the facades are often decorated.
Self-production gives you freedom in choosing the shape. If desired, you can create non-standard options, the likes of which cannot be found in any store.
Size
You need to determine the optimal dimensions based on the free space in the room and the type of cabinet. A wardrobe should have a depth of no more than 60 cm, a wardrobe - about 45 cm, a bookcase - from 35 to 55 cm. For large cabinets with a width of about 2.5 m, you need to install doors from 70 cm, and the recommended base height for them is 10 cm.