Drywall is a universal material used in a wide variety of rooms - from bedrooms to bathrooms. Plasterboard sheets can be used both for decorative finishing and for creating shelves or leveling walls. We will talk about the features of gypsum plasterboard, as well as how to make a wardrobe from this material with your own hands below.
Plasterboard cabinet
Disadvantages of drywall
Despite its versatility, drywall (like any other material) has its drawbacks, which are important to consider before starting repairs. The disadvantages of plasterboard sheets include:
- fragility. The downside of plasticity is the insufficient strength of such a material. However, this quality of gypsum boards is relative - it all depends on what weight loads the structure will experience during operation. When installing a wardrobe, it is recommended to cover the walls with several layers of plasterboard;
Drywall is susceptible to cracking if not handled carefully.
- poor sound insulation. When creating walls or partitions from plasterboard, you need to understand that sound travels well through this material. Therefore, if you plan to install plasterboard walls, you should place mineral wool between two layers of gypsum plasterboard, which will help avoid this problem.
Plasterboard walls are not able to muffle sound
Options for decorative finishing of niches
Originality can be present at this stage as well. How exactly to decorate a niche depends on your preferences, tastes, and favorite examples of such design. Don't limit yourself to just the standard options.
Niche finishing options:
- Painting to match the wall - lighting is required for emphasis;
- Decorative plaster - creates a volumetric effect that occurs when applying several layers;
- A sticker with a pattern - and this is the most budget option, which is good when beautifully framed with a polyurethane baguette, and painting the slopes to match the wall or frame;
- Textured wallpaper, as well as fabrics, relief gypsum panels, bamboo panels, linkcrust - all this is glued using special technologies.
Well, perhaps your finishing idea will be the most original. Sometimes decorative mosaics and natural materials are used, and even laying with seashells is possible. In short, there are no restrictions.
Types of plasterboard sheets
Each room requires its own cabinets - a bedroom, kitchen or bathroom have their own “microclimate” characteristics, which must be taken into account when creating or purchasing furniture.
Table 1. Types of plasterboard sheets
| Type | Description |
Ordinary | When making a cabinet for rooms with a stable microclimate (such rooms include bedrooms, living rooms or corridors), it is recommended to buy classic gray plasterboard sheets. They do not deform under the influence of the environment and will retain their proper appearance for a long time. |
Moisture resistant | When installing a cabinet for rooms with high air humidity (namely, exceeding 70%), you should pay attention to moisture-resistant plasterboard sheets, which were mentioned in the chapter on advantages |
Fire resistant | In rooms where the risk of fire of furniture is increased (in particular in the kitchen), experts recommend choosing fire-resistant plasterboard sheets for cabinets (they are marked with a special red marking during production) |
Materials for decoration
A niche in the wall can be made of absolutely any shape and configuration. Among them there are several of the most common: under a furniture wall with shelves and decorative elements, under a window and a decorative fireplace installed under the TV. Depending on the style and design of the room, choose finishing materials and decorations.
Niche painting
The simplest solution is to paint the plasterboard structure with regular paint. But first, thoroughly putty the base to smooth out all the joints, abutments and attachment points. For a more expressive decorative effect, use textured plaster. Paint the niche to match the rest of the walls for strict or classic interiors, or with a bright, catchy color for fashionable modern accents.
Wallpapering a niche
The option with wallpaper is as simple as painting, and in the same way allows you to make the niche as inconspicuous as possible. For variety, use companion wallpapers, which are available in the collections of most brands. Nowadays, the combination of different textures and patterns is back in fashion, so combine a solid color with patterns, and stripes with large flowers.
Stone finishing
Natural stone is not suitable for cladding a plasterboard structure - it is too heavy. But the artificial one will cope with the task perfectly, and in appearance it is almost no different. A stone niche in a lush classical interior always looks monumental and luxurious.
Wood finishing
Wooden finishing is another win-win classic, because such a niche is not inferior to a full-fledged furniture set. But, as with stone, choose light types of wood, lightweight wood materials or imitation. For cladding it is convenient to use panels, like lining, which are quickly installed and hide minor defects.
Decorative finishing of a niche
When designing a niche for a TV, feel free to use everything you feel like. Painting, stencils, mosaics made of small particles, glass or mirror inserts, stucco molding and complex polyurethane structures are used. You can decorate the niche with a frame, like a picture, or decorate the sides with elegant half-columns.
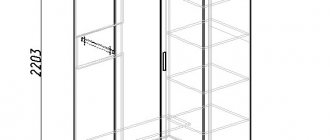
What types of plasterboard cabinets are there?
As already mentioned, the main significant limitation when using drywall is the weight limitation. A plasterboard sheet can hold a weight of up to twenty kilograms - large loads can threaten to collapse the structure. Therefore, in most cases, builders prefer to place plasterboard cabinets in niches, which give the cabinet greater elegance and allow it not to take up extra space.
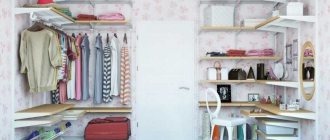
Drywall cabinets are convenient to use for storing clothes and other lightweight items
In the absence of a niche, it is important to ensure that the cabinet has support in the form of a wall or corner. Of course, in many cases a separate structure can stand for many years, but a load-bearing wall helps to increase the reliability of a plasterboard cabinet. For example, in studio apartments, where plasterboard cabinets are a kind of partitions separating neighboring areas, they rest on bar counters.
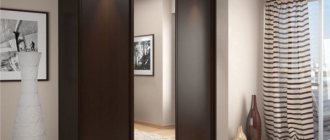
Plasterboard cabinet in the toilet
Plasterboard cabinets also look great in a bathroom or toilet, since these rooms often require niches. In addition, gypsum plasterboard toilet cabinets rarely require storing heavy items.
Recommendations for decorating a living room with plasterboard
Experts give useful tips to make it easier and simpler to decorate a living room using drywall and get an original, beautiful design:
- If the walls are decorated with plasterboard of the gypsum board type, then it is best to combine them with fabrics such as tapestry, drape, chintz, silk or velvet; it is not recommended to use standard furniture fabric.
- In order to make it easier to give the drywall the desired shape, especially in the form of an arch, you should first soak the drywall with water, and then shape and fix it.
- If the wall is decorated with plasterboard and there is a desire to place paintings and panels on it, then it is recommended to strengthen the wall with additional profiles.
- If you are making a ceiling in the living room, which is located on the south side, then you can safely paint it in blue, gray or green tones.
- LED strip, spotlights and spots are some of the popular and more suitable lighting devices for plasterboard ceilings.
- A ceiling of 3 or more tiers is more appropriate for the living room of a large private house, where space and height allow.
- A patterned arch with lighting will not only be an excellent decorative element, but can also serve as room zoning.
- Only shaped plasterboard boards that are marked accordingly should be used.
Do-it-yourself wardrobe made of plasterboard
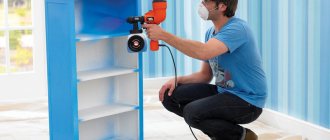
Step 1. First of all, the lighting box is made and the ceiling guide profile is installed. On a plasterboard wall, screw the profile where the metal profile passes in increments of forty centimeters. To secure the profiles, you can also use special plasterboard dowels.
Screwing the profile to a plasterboard wall
Step 2. The profiles are secured to a wall that is not made of plasterboard using nylon dowels. For ease of work, first drill the holes in advance and then mark them with a pencil.
Nylon dowel
Fastening profiles with nylon dowels
Step 3. Make the small ceiling profile lintels that you will need to secure the structure. The installation of segments occurs in increments of 40 centimeters. To begin, secure them only from the top.
Securing the ceiling profile lintels from above
Step 4. Check the correct location of the guide profiles using a level.
Checking profiles using a level
Step 5. After checking, secure the ceiling profile lintels from below.
Fastening the ceiling profile lintels from below
Step 6. Install the profiles in a horizontal plane in increments of 40 centimeters. To begin with, secure the horizontal profiles only to the wall, and then secure them near the vertical part so that it is plumb.
Fastening profiles in the horizontal plane
Step 7. Sew up the metal frame of the box with plasterboard. Drywall is mounted on the bottom of the box. The side part should not be sutured yet - it will be sutured later at the same time as the septum.
Covering the frame with plasterboard
Step 8. Install the rack profile and secure it in increments of thirty centimeters to make the partition stronger (when using a cabinet, the doors will hit it when opening).
Installing a rack profile
Step 9. Sew the inside of the cabinet partition with plasterboard in one layer (other layers will be added later). As already mentioned, the partition will experience heavy loads when using the cabinet, so it must be made as rigid as possible. In this regard, on each side it is sheathed with two layers of plasterboard.
Partition covered with plasterboard
Step 10. Attach drywall to the horizontal jumper from the inside. While drilling the jumper, make sure that it does not warp.
Attaching drywall to a horizontal lintel
Step 11. Proceed with the installation of the metal frame. First of all, the guide profile is installed.
Installation of metal guides
Step 12. Next, the rack profile is installed. It is advisable to install this profile in increments of 20 centimeters for greater shelf strength.
Installation of rack profile
Step 13. Cover the shelf on both sides with drywall. For convenience, the shelf is covered with two pieces of drywall. These halves will be joined at the location of the future partition.
Wardrobe frame covered with plasterboard
Subsequently, the skeleton of the future cabinet is puttied and doors are installed on it. A protective profile is installed on all external corners.
You can read below about what types of doors are suitable for plasterboard wardrobes.
Types of doors for wardrobes
By the way! You can read about how to plan space in a closet in a separate article on our portal.
Choosing a niche for your interior
There are quite important nuances that influence the design of a niche in your living room. It is worth taking a closer look at them and those who chose the standard solution and decided to be original. In any case, listen to the advice of the masters.
How to choose a niche for your interior:
- Niche location. This parameter will influence both the choice of material and the properties of the material. If you place a niche near a window or door opening, in partitions, they may have different parameters.
- Number of recesses. If there are a lot of niches, they will look a little heavy in a small living room, and everything should look harmonious.
- Integrity of the design idea. If the installation of niches is intended to decorate the room, think about how to make them an accent in the interior. At the same time, the external arrangement should distract from the possible shortcomings of the room. These can be such successful “irritants” as decorative vases, flowers, figurines, photos, plates.
- Functional purpose. If any equipment is inserted into a niche, then the supports must be reinforced; even a TV can be very heavy for such a design. And be sure to think about where to hide the wires from the same TV.
Think about lighting too. If the niche is located near a window, then there will be enough sunlight. But you also need to think about artificial lighting. Spot lamps, for example, will create the effect of a cabinet, and books can be placed on the shelves. Well, if the lamps are of different colors, it will greatly refresh the room.
Mistakes when handling drywall
Even such a simple material as drywall can behave unpredictably if you do not know a few basic rules for handling it. In this chapter we will talk about the main mistakes that both beginners and experienced professionals make and tell you how to avoid them. There are several disadvantages when working with drywall:
- incorrect placement of screws;
- non-compliance with the screw tightening depth;
- ignoring the putty stage;
- improper cutting of drywall;
- non-compliance with indentations;
- use of low-quality or inappropriate profiles;
- incorrect connection of profiles.
Read more about how to hang a cabinet on a plasterboard wall.
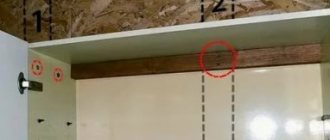
Driving the screws too close to the edge
When installing drywall, profiles, sheets of material and self-tapping screws are used to hold these two elements together. If you tighten the screws in the wrong place, the drywall, due to its fragility, runs the risk of starting to crumble, which puts an end to the entire further structure. Correct installation involves placing the screws at a distance of 10-15 millimeters from the edge of the sheet.
An incorrectly screwed self-tapping screw destroys the gypsum board
Incorrect screw depth
If the screw is placed too deep, the cardboard layer may tear, which will further affect the quality of the structure, since the frame will not be rigid enough. The surface location of the screws will primarily affect the time of puttying, since the spatula will cling to the protruding screws.
Deep as well as superficial placement of self-tapping screws harms the structure
The suitable depth for screwing the screws is one millimeter (we are talking about the distance from the sheet to the head of the screw). To make it easier to determine the distance, it is recommended to use special attachments with a limiter, forcing the screwdriver to stop at the right moment, preventing damage to the plasterboard. This attachment can be easily purchased at any building materials store.
Ignoring the putty stage
For many inexperienced craftsmen, the puttying stage raises questions - what is the point of leveling a material that is smooth from the start? However, this meaning is still present. There are three good reasons why masters do not neglect this stage:
- The smoothness of drywall is deceptive. With suitable lighting, it is easy to see that the surface of such a leaf is strewn with microscopic grooves. If you want to paint the drywall right away, the paint will fall on these grooves sloppily, which will be noticeable after it dries;
In the absence of putty, grooves may be visible on drywall
- putty allows you to balance the joints between the screw heads and the material, as well as between adjacent gypsum board sheets. You also need to remember that most sheets of drywall are painted green-blue, which will certainly show through when light, thin wallpaper is placed on it. White putty makes it easy to avoid this misunderstanding;
If you skip the putty, the screw heads may be visible.
- the absence of putty increases the likelihood of damage to the front layer of drywall when changing wallpaper. This oversight usually manifests itself during repairs. And if the surface layer of plasterboard is really torn off, then the apartment owners will have to change not only the wallpaper itself, but also the plasterboard sheets.
You can skip the puttying step if the material is subsequently hidden by wallpaper (preferably embossed), which will allow you to “retouch” all the imperfections of the raw material.
Incorrect cutting of drywall
Despite the fact that drywall is a very flexible material that can be cut with any saw, there are a number of nuances in cutting it that you need to be aware of. There are special files designed for working with drywall, but after using them, the edges of gypsum boards often remain uneven, which makes them untidy. When making straight cuts, craftsmen periodically turn to an ordinary stationery knife and ruler.
Cutting drywall with a utility knife
Failure to indent
One of the common mistakes when handling plasterboard is mounting it close to the floor. During installation, it is important to leave gaps, which perform two important functions:
- prevent drywall from absorbing moisture. Of course, moisture absorption will occur in any case, but the presence of a gap will reduce it to a minimum;
- After installation, the drywall sheet gradually expands under the influence of the microclimate. If it does not have this opportunity due to its tight fit to the floor, then bumps may begin to form on the material.
An example of bumps on drywall when finishing a ceiling
Full compliance with the rules requires not only leaving a gap, but also gluing a damper tape, which will compensate for the expansion of the gypsum board and, moreover, reduce vibrations of the mechanical profile, which will help improve sound insulation.
Using low-quality profiles
The main drawback when choosing profiles is the purchase of too thin (0.3 millimeters thick) copies. The strength of these elements is much like foil - they can be easily bent by hand if desired.
Such profiles are completely unsuitable for creating walls or installing wardrobes. The optimal strength of profiles that can fix plasterboard sheets starts from 0.6 millimeters. Thinner options are used only for the formation of small boxes that do not involve loads.
The thickness of the profile is of great importance for subsequent installation and determines its success or failure
In addition to the thickness of the profile, it is also necessary to take into account its texture. Basically, there are two types of profiles in stores - smooth and embossed. Embossed profiles are great for beginners who tighten screws using a screwdriver (by fixing the screw in the recess). When working with a smooth profile, the self-tapping screw may slide, which sometimes leads to incorrect tightening, the danger of which we have already discussed earlier.
Incorrect profile connection
This point includes several errors that are observed periodically even by experienced craftsmen. One of these mistakes is connecting two profiles together using a press washer. It is believed that the use of such self-tapping screws allows you to reliably connect the profiles.
Connecting profiles using a cutter
The main problem is the protrusion of the caps of such washers, which does not allow subsequently to correctly apply a sheet of drywall - it simply does not adhere to the profile. Accordingly, despite the strength of the frame, we do not end up with a reliable structure due to the wobbly sheets of drywall. In order to carry out installation correctly, the best solution is to use a cutter.
Where to start making a kitchen from gypsum plasterboard
It is worth noting that it is difficult to make such a kitchen without a project. That is why you need to start with it. They plan the space to scale and draw furniture designs with dimensions in the drawing. How to make a project:
- First, they measure the kitchen using a tape measure, taking into account the height of the room, the dimensions of the window, the height to the window sill, and the doorway.
- Transfer dimensions to scale drawing. It is difficult to do a detailed project on your own, so draw the layout of each wall separately.
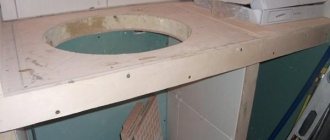
- Place household appliances on the kitchen plan, maintaining the dimensions (refrigerator, stove, dishwasher, oven). For it you need to make separate niches from gypsum board.
- When drawing the shelves, it is important to take into account the dimensions of the profiles and gypsum board sheets (regular and moisture-resistant 12.5 mm thick).