Modern stores undoubtedly have a huge selection of a wide variety of designer coffee tables. Of course, the price tag for such products is sometimes surprising and even shocking. Therefore, we recommend trying to make an interesting, stylish option with your own hands. Thanks to this, you will not only save a decent amount, but also realize your creative potential.
Glass coffee table
When it comes to a coffee table, the first thing that comes to mind is a glass product. This is not surprising, because they used to be especially popular. But still, we suggest making a slightly more modern version that will become a stylish decoration for your home.
We will need:
- glass plate;
- sheets of plywood or OSB boards;
- saw;
- roulette;
- pen;
- paper;
- sandpaper;
- glue for glass and wood;
- brush;
- dye.
On a sheet of paper we make a schematic drawing of the table. The dimensions must match your requirements and the size of the room.
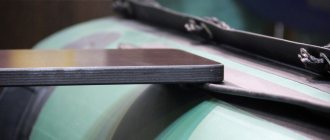
We measure the thickness of plywood or OSB board.
In this case, the plywood sheets are connected to each other using cut gaps. Therefore, they must have a width that matches the thickness of the wooden piece. For convenience, we make marks with the correct sizes.
We cut out the gaps according to the marks.
We connect the frame parts together. Please note that it must stand level on the floor and not wobble.
We place a glass slab on top of the wooden frame. You can also fix the parts using glass and wood glue.
If desired, you can sand the coffee table and paint it in a shade that matches the interior.
Glass tables can look completely different, depending on what materials you plan to use in your work.
Advantages, disadvantages
A glass table has many positive qualities.
- High aesthetics and versatility allow you to use this piece of furniture in almost any room with different design solutions. In addition, a wide range of glass products allows you to choose the ideal countertop (be it simple transparent glass or frosted, white or colored).
- Glass products are environmentally friendly, do not absorb odors, fats, paints, and are resistant to chemical materials. These characteristics are ideal for the kitchen.
- It is very practical: caring for glass involves regular washing or wiping, even without the help of detergents.
- The technology used in the manufacture of glass makes this piece of furniture very resistant to impacts, chips, scratches, and a special film will retain all the fragments even after breaking, eliminating the risk of injury.
Along with many positive qualities, there are also negative aspects of glass countertops:
- Glass is not capable of absorbing sound, so it produces a lot of noise when it comes into contact with other objects. To solve this problem, you can use special stands. But under no circumstances should you set a glass table, as it will completely lose its main role - transparency and weightlessness.
- On glass, with its high reflective abilities, any, even the most insignificant marks and stains are visible. To solve this problem, it is enough to choose the right cloth napkins for polishing the tabletop and cleaning products, position the table away from light sources, or choose a frosted type of glass.
- If more affordable plain glass was used in manufacturing, there is a risk of scratches and such a surface can easily break.
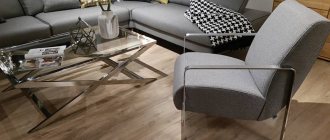
Wooden legs paired with glass belong to the classic or loft style, and are suitable for any color scheme of the interior.
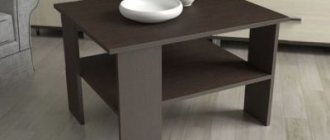
Wooden coffee table
For lovers of wooden objects in the interior, we suggest paying attention to unusual coffee tables. They look truly luxurious despite the fact that they are made by hand.
Necessary materials:
- logs;
- wood knife;
- sandpaper;
- Sander;
- screws;
- drill;
- small wheels – 4 pcs.;
- wrench;
- primer;
- roller;
- brush;
- pencil;
- parquet varnish.
To begin with, it is worth noting that the wood must be dried before work. After this, use a knife to separate the bark.
Since wood always has quite a lot of roughness, it must be processed. To do this, we use sandpaper and a sanding machine. Remove sawdust and dust with a wet cloth.
Turn the log over from the bottom to the top. We distribute the wheels evenly and make marks in the places where the screws should be.
We select a suitable drill bit and make holes according to the marks.
We distribute the wheels and all the screws. After that, we secure each of them with a wrench.
We turn the wooden table over and check its stability.
Cover the surface of the wood with primer.
Apply the parquet varnish using a roller and leave until completely dry.
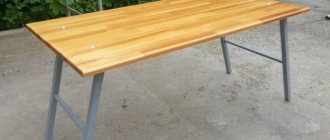
The beautiful wooden table is ready.
If desired, it can be painted in any shade.
If this option seems too cumbersome to you, then we offer another master class. With its help you can make a beautiful coffee table from birch.
We will prepare the following materials:
- plywood sheets;
- birch logs;
- wood glue;
- saw;
- putty knife;
- screws;
- screwdriver;
- wheels;
- plaster.
From plywood we cut out the base for the table, as well as the sides and the tabletop. We assemble the sides and install them in the center of the base. Keep in mind that the base must protrude, since it is to it that the logs will be attached.
We glue the prepared logs to a wooden blank using wood glue. For reliability, you can additionally fix them from the inside of the box with screws.
Attach the tabletop to the drawer.
We cut several logs into pieces of small thickness. Glue them to the tabletop using wood glue.
We fill the empty space with plaster. Remove excess and leave until dry.
We attach wheels to the bottom of the table and turn the structures back over. The stylish coffee table is ready!
There are actually many options for a wood coffee table.
Attaching the apron
Cut two more pieces of 5 by 20 cm board, 80 cm long, and two boards of narrower boards equal to the narrow side of the tabletop. The boards must be flush against each other. Apply wood glue to the wide part of the boards and attach them to the edges of the tabletop and screw them in place with self-tapping screws at a 45-degree angle.
Laconic table made of pipes
You will need the following:
- copper pipe;
- pipe cutter;
- clamps for fastening;
- epoxy adhesive;
- copper caps;
- boards;
- copper tees.
First you need to prepare the parts from the pipe. You can use the dimensions shown in the photo or use the parameters that suit you.
Once all the parts are ready, you can safely begin assembling the lower part. In the process, refer to the diagram shown in the photo.
We are gradually assembling the workpiece for the table.
If you are sure that all the parts are well connected to each other, then you can use glue for reliable fastening.
We attach the boards to the coffee table.
A beautiful, unusual, laconic table with your own hands is ready!
Useful tips
Look for upcycling materials at flea markets. In such places you can find antique doors, windows, and fittings that will form the basis of your craft. Moreover, they will cost mere pennies.
Pallets, boxes and scraps of boards and plywood can often be found on special stands in large hardware stores. The trimmings are subject to write-off, so they are given away free of charge.
You can even use waste material to create tables. For the countertop, you can use old tree stumps, metal or plastic barrels, even bottle caps or drink cans glued together.
Don't be afraid to show your imagination. Frequently visit flea markets and yard sales and let the materials tell you what you can make with them.
Unusual coffee table made of foam
Unusual designer tables are becoming more and more popular every year. For example, the concrete option looks very beautiful, but at the same time has a number of disadvantages. Of course, it has a high cost. It is also incredibly heavy, which is not always convenient. Therefore, we suggest making an alternative option from polystyrene foam.
Necessary materials:
- Styrofoam;
- Sander;
- cement;
- putty knife;
- spray glue;
- sandpaper;
- hacksaw;
- dye;
- knife.
We cut the foam into squares of the same size and stack them on top of each other.
Glue the pieces together with aerosol glue. We give the workpiece the shape of a cylinder, cutting off the corners.
We sand the surface with sandpaper so that the cylinder has a more regular shape.
Apply cement mortar to the entire surface of the foam piece. After drying, you need to apply another layer. Keep in mind that the number of layers depends on how smooth you want the coffee table to be.
After drying, we sand the table to achieve smoothness. A stylish, original table made of foam is ready!
Features of the drawing
When selecting a model of furniture paraphernalia, it is necessary to take into account the size of the room in which it will be located. Particular attention is paid to the purpose of the future product.
For example, if a soft furniture set has dimensions of 45x55 cm, then the shape of the structure should be round or oval.
If a model sketch is made independently, then when drawing it up it is necessary to take into account several important criteria.
They are:
- Stability of the structure. In this case, it is recommended to calculate the area for supports;
- Design. Here it is necessary to take into account the decorative qualities of the future product. If we make a transformable coffee table, then its decorative part will be enclosed in the tabletop. It is better to make it from MDF panels.
- Table assignment. If it will be used for serving, then the tabletop should be wider and longer to accommodate all the guests. In the case of decorative qualities, the table dimensions may be minimal.
There are many options for drawings on the Internet, differing in size, height and purpose.
Coffee table: unusual DIY ideas
The process of creating a coffee table is quite complicated, sometimes even too complicated. But the result is definitely worth it. After all, such homemade interior items always look especially beautiful.
The process of creating a coffee table is quite complicated, sometimes even too complicated. But the result is definitely worth it. After all, such homemade interior items always look especially beautiful.
Height and dimensions
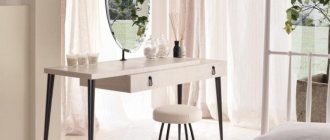
You can start with a small Scandinavian-style wooden coffee table made from scrap materials.
It can be placed in any room: bedroom, living room, children's room and even on the terrace of a private house.
When choosing the size of furniture for your home, you should take into account the area and purpose of the room, the number of family members and the desired height, which should be comfortable for relaxing in an easy chair or on a low pouf .
Reference : the height of the lowest products is usually 40 cm, and the highest - up to 65 cm.
Dimensions of individual parts:
- Base – 600*1200 mm, 16 mm MDF;
- Table top detail – 640*1240 mm, 16 mm MDF;
- Dividing partition – 450*600 mm, 16 mm MDF;
- 2 blanks for beams – 44*44*1800 mm made of pine timber;
- Shelf – 550*600 mm, 16 mm MDF;
- 2 front lower pads – 70*1200 mm, 16 mm MDF;
- 2 side bottom pads – 70*632 mm, 16 mm MDF;
- 4 parts of legs – 69*69*536 mm made of pine timber.
Important : MDF sheets and wood are used as materials for assembling a coffee table, since they are affordable and easy to process.