Screen manufacturing process
Creating an original screen of the required size is quite a feasible task not only for the home craftsman, but also for the creative housewife.
Moreover, you can use improvised materials to make a homemade partition if it is not possible to rent a specialized tool for working with plastic pipes.
Step #1 – creating a homemade screen project
If you have to make a partition structure for use by children, then its dimensions should be selected taking into account the height of future users.
And for use as a decorative element in a room, it is important to determine the required dimensions - if you build a partition that is too small, it will not bring the desired result. In addition, you need to decide on the shape of the screen, the number and dimensions of the sashes, as well as the type of homemade product - folding, mobile, stationary, etc.
In addition, you need to decide on the shape of the screen, the number and dimensions of the sashes, as well as the type of homemade product - folding, mobile, stationary, etc.
The easiest way for beginners is to make a simple version of the partition with a combination of plastic pipe + textiles. Or a very original option - just pipes.
The advantage of using only plastic is moisture resistance. Such a product can be safely placed in a combined bathroom without fear that splashes will spoil the appearance of your masterpiece.
Step #2 – preparing the necessary materials
Specialized tools are useful for working with metal-plastic pipes. If you don’t have them, you can rent or use improvised tools.
So, first of all, you will need plastic pipes. Their diameter and length depend on the draft of the future screen - the shape, height, length and width of the sashes.
A tool for soldering and cutting pipes – a special iron and a pipe cutter – will also be useful.
If you don’t have a soldering iron or pipe scissors, a lighter and a regular sharp knife or metal saw will do. Moreover, if the edges heat up, then they do not need to be processed additionally.
Step #3 - assembling the homemade product according to the project
In principle, the set of tools and materials depends on the design of the planned screen.
Depending on their purpose, products can be not only functional, but also decorative.
By the way, the latest version of the screen can be made in a large size to stage performances with the participation of live actors, rather than puppets.
Below we will consider two options for partitions made of plastic pipes, the manufacturing principles of which are radically different.
Option #1 – screen on wheels
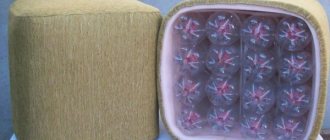
If you decide to make a designer version for wet rooms, then you have to decide on the depth of the partition and its functionality.
The minimum depth should be about 5 cm - narrower material is inconvenient to work with. If you plan to put magazines and other useful little things in the cells of the partition, then you can add another 10-15 cm.
Types of screens and their purpose
The design of the future partition completely depends on the functions that it will perform and on the time available for the implementation of ideas.
Depending on the purpose, screens can perform the following functions:
- decorative - a partition is used to decorate the interior of a room, being an artistically designed object;
- division of space - a screen visually divides the room into zones, which is often used by designers in large rooms;
- implementation of creative ideas - a small screen made of pipes acts as theatrical equipment when performances are staged at home.
The size of the future product is also important for the project, so you should immediately decide on its function. Most often, partitions are made from plastic for a kindergarten group, for playing tabletop puppet theater, for fulfilling household needs, for zoning a one-room apartment, trying to separate an office from a bedroom or living room.
And also, this is a favorite craft of creative and creative craftswomen who prefer to make an unusual and completely unique thing with their own hands.
In principle, it is not at all difficult to buy a screen for every taste and size - manufacturers offer a huge range of different purposes from a wide variety of materials.
Image gallery
Photo from
Plastic option - blinds. Lightweight partition, easy to clean, easy to carry to the right place, fits perfectly into modern interiors
Forging, apparently, will never go out of fashion. Artistic metal patterns embodied in the design of the screen will harmoniously fit into a room dominated by natural wood and leather
Wood is a very popular material for partitions. It is easy to work with, and the finished product looks noble and is lightweight compared to a metal screen
Textiles are no less popular. Moreover, it is often used in combination with a wooden partition frame or plastic pipes. Moreover, they use both ready-made fabrics with a suitable texture and pattern, and design the fabric according to their own sketch
Artistic forged partition
Wooden partition in the interior
Textile and wood screen
Ready-made solutions offered by art studios are not very expensive. Therefore, it is much more interesting to build a partition yourself. Moreover, there are always improvised materials at hand that will work, you just need to show your imagination.
You should immediately think about the design - mobile (on wheels), portable or stationary partition. It is also important whether it folds or not.
All these points need to be carefully considered, because the project of the future homemade screen depends on them.
Screen made of plastic pipes. Amazing things made from consumables
It is difficult to list all the products that you can make with your own hands, having only fragments of building materials on hand, as well as fasteners for connecting them. Using such raw materials, you can create incredible and necessary things.
There are truly countless ideas for creating crafts from simple hollow objects. These can be either ordinary organizers for organizing a workspace and a stand for a laptop or tablet, or designer masterpieces (chairs, beds, coffee tables and other furniture) that emphasize a person’s individuality.
Do-it-yourself objects and products made from polypropylene pipes is the most suitable activity for people with a rich imagination. At the same time, they do not have to purchase specialized equipment and tools to produce home crafts from plastic, because such materials can be joined quite simply.
Such designs can be:
- Collapsible, the installation process of which is simplified through the use of fittings, connectors, angles and tees.
- One-piece, for assembly you will need special assembly glue for plastic or bolts.
And, if the second method is more suitable for stationary interior products, then the first installation method is used by craftsmen interested in the production of seasonal items. For example: a folding fishing chair, a greenhouse, a canopy and a gazebo, a garden swing, etc. Such structures can be easily assembled in advance of the season, and then stored away without worrying that they will deteriorate in the winter.
Crafts made from hollow polyvinyl chloride pipes have a huge number of advantages. Among the main ones are the durability of raw materials and the aesthetic appearance of finished products.
Equally important is the relative cheapness of the materials, which is a big temptation for many who want to try their hand at creating universal plastic objects
Other advantages include:
- Practicality of installation and operation.
- Strength of structures due to high density of raw materials.
- A variety of craft options (configurations, sizes, appearance).
- The ability to create exclusive designer items that can later be put up for sale or given as a gift.
- Absolute safety and non-toxicity of raw materials, allowing the use of crafts in a wide variety of rooms and conditions.
Whatever design you decide to create, you should remember that the main raw materials (pipe cuttings) can be acquired quite easily, but you will have to prepare fasteners and tools in advance. The same bolts, plugs and fittings - you will need to first calculate how many of these or other parts are needed.
In addition, it is also necessary to prepare auxiliary tools that may be useful in the process of creating an exclusive:
- pencil and ruler/tape measure;
- drill and screwdriver;
- glue or screws.
If you decide to bend materials to obtain a product of a certain shape, first think about exactly how you will be able to achieve the desired result. In general, crafts made from fragments of plastic pipes are easy and simple, as you can see by reading this article to the end.
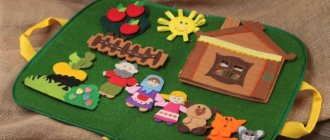
What is a multifunctional screen
Despite the prosaic name, this design is a very interesting interior item for a kindergarten. This is a kind of “transformer”, a useful attribute, which, sometimes, cannot be avoided when conducting role-playing games in kindergarten, showing puppet acts and more.
Taking into account the fact that the child spends most of the daytime in a group, the surrounding space and interior in it become part of the gaming and educational process.
Goal and tasks
In a large-scale sense, the purpose of a multifunctional screen, designed accordingly, is to develop in preschool children:
- cognitive abilities, interests and processes;
- intelligence in general - based on practical actions using sensory standards.
The objectives of the manual are indirect assistance in:
- development in children of integrative qualities, outlook and all types of perception;
- formation of elementary ideas about mathematics, a holistic picture of the world;
- improving eye-hand coordination.
This design will also serve as an excellent assistant for the development of fine motor skills in children.
The child treats objects and space as a resource, seeing in them opportunities for realizing his plans.
Let's give examples. For example, on the screen canvas (if you attach the appropriate materials), children can:
- fasten buttons and buttons;
- learn lacing;
- fasten and unfasten straps;
- braid hair;
- zip up and perform many other tasks.
At the same time, the lower part of the structure (again, the panel) can be conveniently used as a “guide” for getting to know each other:
- with color and its spectrum;
- letters;
- geometric shapes;
- account.
And also - for the development of abilities in mathematics, in general, for the purpose of learning to compose words, for the formation of mathematical concepts (definitions of size - short-long, smaller-larger, narrow-wide), etc.
Being an important attribute of theatrical performances, with a touch of mystery, it evokes genuine delight and curiosity among children.
Description of the manual
The design consists of 3 parts: central and two side. The screen is double-sided. A learning tool with hidden fun elements that solves important problems that contribute to the learning, development and education of preschool children.
The simplest puppet theater attracts children much more than painted fictional characters.
The multifunctionality of the screen allows you to keep the attention of young children for a long time (this is achieved by changing tasks and functions), and also avoid overload.
Depending on the size, with the help of a screen you can stage scenes both for puppet theater and for real small actors, adding entertainment to the process and increasing interest.
Types of screens
They can be tabletop or floor-mounted. The size of the device depends on the purpose. For preschool children, the optimal height of the structure is 0.8 - 1.4 m. The ideal option for table screens is a height of 15 to 40 cm.
If the group’s budget does not allow purchasing a ready-made option, but the children have a desire to organize a theater club, you can make your own screen from plastic pipes.
A screen can be made from a variety of materials. One thing is important - compliance with their safety and hygiene requirements. Also, the material should not be heavy or toxic.
The design of this multifunctional device is very simple.
Suitable for making:
- plastic;
- polyethylene;
- artificial leather;
- polycarbonate;
- tree;
- rubber.
For fabric base:
- tulle;
- nylon;
- chintz;
- fleece
However, screens whose frames are made of ordinary propylene pipes used in plumbing are considered the most mobile and lightest.
The design panel is usually attached using: Velcro, buttons, braid or buttons.
To fasten screen elements, various methods are also used (Velcro, pockets, clothespins, buttons, hooks, elastic bands, ties).
Depending on the purpose of use and the age of the children, various designs can be made.
Specifications
The design is made from inexpensive materials and is quite simple in execution. The result is a device:
- accessible;
- safe;
- transformable;
- content-rich;
- multifunctional.
In addition, such a screen fully meets the requirements of the Federal State Educational Standard, in this case - for the construction of a spatial-subject environment that promotes the active development of preschool children.
Children really appreciate the rare opportunity to independently change the arrangement of interior items.
Manufacturing process
The step-by-step instructions for making a screen from kindergarten are quite simple.
Once the dimensions of the future screen have been determined, you need to cut the PVC pipes to the desired length. You can either do this yourself (plastic material does not require much effort).
You can ask for cutting when purchasing at the store.
Next, we fasten the section frames using corner joints.
All material is quite strong and durable to use.
Here you will need either a special apparatus or a little physical effort to heat and insert the plastic pipe profile into the corner.
The manufacturing process is simple and will take you a little time.
Now it's time to move on to the next step: sewing the covers.
The cover can carry a semantic load.
The area of the selected fabric should correspond to the size of the frame section. It is recommended to stitch the edges of the segment. Fastenings made from Velcro tape or loops are sewn or glued along the top side of the future cover.
Covers can be of different colors, from plain pastel to brightly delicate children's drawings.
If the assembled screen requires painting, do it in a well-ventilated area and let the structure dry.
It is better to paint the intersectional fasteners separately so that they do not lose their functionality.
The final stage is decoration. You can stick colorful appliqués or sew small pockets onto stretched covers.
These additions will help develop children's motor skills and further increase the functionality of the new screen, allowing it to be used in various games and performances.
From the choice of design and materials to decoration
The screen manufacturing instructions include the following steps:
- Drawing up a drawing;
- Selection of materials;
- Creating a frame;
- Decoration.
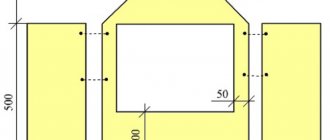
Stage No. 1: drawing up a drawing
At this stage, it is enough to decide on a couple of criteria:
- Number of doors. The best option is three. This design is quite multifunctional and can be used:
- For the room. Separate a corner or bed from the rest of the room to create a separate cozy corner in it;
A three-leaf partition will optimally fit into both the living room and the bedroom
- For puppet theater. It is enough just to leave a hole on the central flap for the appearance of dolls;
The theater screen is distinguished by the presence of a window on the central sash
- For garden. Three sections are quite enough to create a place protected from prying eyes and sunlight on your suburban area;
In the garden, a screen can be no less useful than in the house
- Dimensions. The room should be selected in accordance with its dimensions; large structures will be used more effectively on the site, but, for example, in a kindergarten, on the contrary, a low partition will be sufficient.
Children's screens, as a rule, are not large in size.
After you decide on the specified parameters, you don’t even have to draw the diagram from scratch, but find a suitable template on the Internet and insert your own size values:
The simplest drawing of a three-section partition can always be found on the Internet
Stage No. 2: selection of materials
The screen can be made literally from scrap materials. Here are examples of some interesting solutions:
- Plastic pipes. If you have a pipe soldering iron, then there is nothing easier and faster than soldering a frame made of polypropylene pipes. They will make a practical and moisture-resistant design, perfect for use outdoors, near a river, in a bathroom or next to a pool;
A structure made of plastic pipes is not afraid of either moisture or direct ingress of water.
- Cardboard. The price of this option is the lowest, it is well suited for a children's room;
You can quickly make a fancy screen out of cardboard for children, let them do what they want with it, don’t mind
- Polycarbonate. Another not very expensive and practical option that can look stylish indoors and withstand all weather conditions outdoors;
Polycarbonate construction matches modern interiors
- Tree. Despite the abundance of different materials, wooden frames covered with fabric and paper are an immortal classic for making screens, which we will also turn to.
You can make a real work of art from wood, fabric and paper
If children or allergy sufferers live in the house, but you should not experiment with artificial materials that often contain allergens, it is better to opt for natural wood and natural fabric.
Stage No. 3: creating a frame
A master class on making frames looks like this:
- 12 pine planks 170 by 2 by 6 cm;
- 12 pine planks 60 by 2 by 6 cm;
- Pencil;
- Carpentry adhesive;
- Brush;
- Wood varnish;
- Chisel;
- Hammer;
- Clamps;
- Cordless or corded screwdriver;
- Sandpaper;
- 12 metal corners;
- Screws
- Apply glue to the inner parts of the notches with a brush;
- We connect the planks into frames, fixing them with clamps;
- We sand the frames with sandpaper after the glue has hardened;
- We process it with varnish.
Stage No. 4: decoration
All that remains is to assemble the frames together and decorate them:
- We draw patterns on cardboard or glue ready-made ornaments onto it;
- We cut them out, creating stencils.
- We impregnate the gauze with the appropriate paint;
- We attach it on top of the patterned fabric.
- We stretch the finished canvases onto the frames, fixing them with screws;
- We connect the frames with hinges.
I recommend installing limiters on the hinges that allow the doors to open no more than 135 degrees. The fact is that if they are opened more strongly, they significantly lose stability.
Rope stops will make the screen more stable
Homemade plastic pipes
- 1. Popular homemade plastic pipes
- 2. DIY pipe flower garden
- 3. Greenhouse made of plastic pipes
- 4. Small fence made of plastic pipe
You recently completed renovations and you still have scraps of plastic pipes - don’t rush to take them to the landfill. Perhaps, from the remains of the pipe, you will like some useful homemade product that will come in handy in the country house or on the balcony.
Most of the homemade products from plastic pipes that are presented in this article will not be difficult to assemble with your own hands. The only tools you will need are a screwdriver, a hacksaw or a grinder, as well as various hardware (screws, bolts and self-tapping screws). So, let's go.
Popular homemade products made from plastic pipes
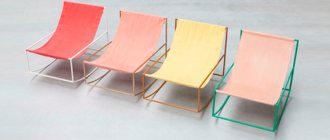
It’s very easy to make a small chair or table with your own hands from scraps of plastic pipe. True, you need to have a soldering iron on hand for welding pipes and fittings with tees.
The process of making a chair from plastic pipes is quite simple:
1. First, using corners and a pipe, we solder two frames. The lower frame, which will be used under the seat, should be slightly smaller than the main support frame.
2. Next, we weld a U-shaped frame from pieces of pipe and corners, which will serve as a backrest holder.
3. We connect the frames at the intersection points (as in the picture) with bolts.
4. The seat of a homemade chair deserves special attention; it can be made from thick fabric or from scraps of plastic pipes. In the latter option, you will have to fasten each tube to each other with a strong rope, and then fix the seat to the frame.
DIY pipe flower garden
To make the next homemade product from plastic pipes, you will need a 110 sewer pipe or at least a 50 diameter pipe, tees and bends. If there is one pipe, without fittings, then it doesn’t matter, because it will be perfect for making a flower bed.
We take a pipe and make preliminary markings of where and how the holes for the flowers will be located. Using a small angle grinder (125 circle), we cut holes into which the plants could be planted.
In the case of assembling a flower bed from sewer tees and bends, the whole work is much simplified. For these purposes, you only need to connect one tee to another, and insert 110 corners along the edges of the structure.
If desired, a homemade flower bed made from pipes can be attached to the wall with clamps, and then the facade of your house will have an original look.
Greenhouse made of plastic pipes
Who hasn’t dreamed of owning a real greenhouse on their own country plot? In the case of homemade products made from plastic pipes, it is quite possible to make a greenhouse with your own hands. Moreover, in this case, you will be able to save a considerable amount, because factory greenhouses made of polycarbonate and other materials cost a lot of money.
To make a greenhouse from pipes, it is better to sketch out a simple drawing in advance with the dimensions and diameter of plastic products. As support posts for the greenhouse, it is recommended to use a pipe of at least 32-40 in diameter, while for jumpers, a 25 pipe is quite suitable.
It is best to start assembling a greenhouse from plastic pipes from the base; for this, four pipes are welded together through corners in the shape of a rectangle. Then, in each pipe, every 0.5 m, a tee is soldered into which the vertical guides of the greenhouse will be installed.
You should think in advance about strengthening the structure in the place where the door will be provided. After the frame is assembled, it will remain covered with thick polyethylene film, which, if the greenhouse is used correctly, will last for many years.
Small fence made of plastic pipe
You need a small fence that will not only be a barrier for stray animals, but also a real decoration of the site - no problem. Taking into account the fact that plastic does not rot or deteriorate when exposed to moisture, such a fence will last for many years.
To make a plastic fence, you will need a pipe, angles and tees into which vertical crossbars will be soldered. A pipe fence has a very simple design in the form of supports (they are made of thick pipes) and crossbars (vertical and horizontal) that are welded to the supports through tees with corners.
Upon completion of construction, a homemade fence made of plastic pipes can be painted with “silver” or other paint, at your discretion. Such a homemade product made from unnecessary pipes will become a real decoration for any suburban area.
Garden decor from scrap materials (photo)
- A compact vertical garden can easily be made from plastic pipes or gutters. To do this, it is enough to hang them on a vertical plane so that they are located one above the other, thereby creating a natural living wall of flowers and plants.
A composition made of vertically placed wooden pallets and pots of flowers mounted on them will look no less beautiful. As a result, you will get a stylish green trellis that will look spectacular in your garden.
- Very often, a cheerful hanging flower garden is made from unnecessary buckets. To do this, each bucket is painted in bright colors and hung along the fence using plastic or metal hooks.
Wooden boxes in the form of shelves nailed to the walls, on which flower arrangements are placed, will help give the old gazebo a new image.
A large flower bed will look quite unusual, the perimeter of which is decorated with decorative flower pots, which will serve not only as a fence, but also as a kind of creative border if low-growing flowering plants are sown in them.
Also, the role of fencing for a flower bed is perfectly performed by tree branches installed vertically in the ground, plastic or wooden dies.
A small garden can comfortably accommodate a multi-story flower bed made from flower pots of different sizes stacked vertically on top of each other.
Advice! The stumps remaining after cutting down trees can easily be turned into stylish flowerpots if you make a recess in their center for containers with herbs.
Screen made of plastic panels. Materials
When you decide to make a screen with your own hands, first decide on the appropriate material. Traditionally, a product of this type was made of wood - slats or solid boards. Today, creativity and originality are valued, so a variety of materials are used to make partitions. Common options:
- Tree. A simple smooth board or material with a pattern cut out on it, or a structure made of slats or beams will do. Plywood is easy to process, light and inexpensive. You can even build a partition from old doors, after first restoring their panels and giving them a fresh look.
- Plastic. Pipes made of this material are widely used, which are suitable for creating frames or frames. They are cheaper than metal ones and weigh less. The product made from plastic pipes is easy to assemble and disassemble. They are easy to care for: you just need to periodically brush off the dust from their surface. An alternative is plastic panels; it is very easy to make a partition from them. You can select several panels that have the same pattern and connect them to each other. The finished partition is well suited for a bathroom, swimming pool or garden shower.
- Metal. Metal frames of a given shape are often used, which can be ordered from a specialist. Panels made of plastic, glass, wood are inserted into them, or fabric is stretched. Iron sheets look bulky and do not make the room cozy, but an ornament forged from twigs will give the partition a spectacular look. Often, metal pipes with a diameter of no more than 5 cm are used to create a frame. A screen of this type will decorate a garden or yard.
- Cardboard. Cheap and affordable material from which you can make a creative, original screen with your own hands. It is very easy to work with it, because... you just need to cut out the parts in accordance with the diagram and fasten them into one sheet. Ready-made partitions are not suitable for the street, because... they will quickly deteriorate under the influence of weather factors.
- Branches. This includes reed, willow, and bamboo. Screens made from them are mobile, light and visually simple. They go well with various interior styles: tropical, classic, empire, eco-style. Their production requires the performer to have wicker weaving skills. The finished product will look great in the garden and will not deteriorate from wind, rain and sun if the material is processed correctly.
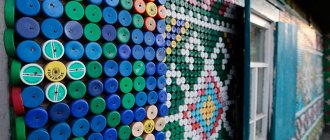
- CDs and vinyl records. These parts are connected to each other using staples or threads. The result is an original openwork canvas that can be hung anywhere in the room in the form of a wave, a semicircle or in a straight line.
The simplest screens for a puppet theater
The screen is made of 8 wooden frames, fastened with hinges and covered with fabric. This screen can be set up and folded in 2-3 minutes. It is easy to carry and inexpensive, but only 3-4 people can fit behind it, there is no curtain, there is nowhere to strengthen the decorations, unless you put something light on the bed itself. Such a screen does not have a “backdrop” - in other words, the wall or curtain next to which you are placing it is visible above it. And, nevertheless, do not immediately dismiss this type of screen. It is very suitable for variety acts where decorations are not needed. And if you get at least one or two tripods, you can also put up parts of the scenery. If you need the screen to be larger, make an additional insert - “extend” the screen.
You can make the frame of the screen from duralumin tubes. They are more difficult to obtain than wooden planks, but the screen will be lighter.
By inserting the tubes one into the other (and securing them with studs), it is easy to reduce or increase not only in length, but also in height.
Speaking of the height of the screen. Usually this is 170 cm (i.e. the average height of an adult; for children the screen should be smaller). Here we have to take into account the actual growth of the troupe members. The heads of the performers cannot be seen from the auditorium, but the screen cannot be raised so high that the performers can barely reach the top edge, otherwise it will be difficult to play, and the audience will only see the head of the doll.
Of course, in a team, people will be of different heights and the “average” height may not be so easy to establish, especially in children’s circles, because children have the ability to grow. But grief can be helped: the one whose crown of the head is visible from behind the screen should sew himself a black cap to hold his hair and put on slippers, and those who are short should learn to walk on “cothurns”
A simple three-leaf screen can be somewhat complicated by attaching a longitudinal bar on the side flaps on which the decorations are installed. But the decorations should be light, made of cardboard or thin plywood. Please note that in this case the doll will not be able to come out from behind the decoration or go behind it, except by “diving” and “shouting out”, because it is worn on the hand.
Often there is a need to create a “background” for the screen. In this case, attach vertical posts to the back slats of the screen, and connect them with a crossbar. A fabric backdrop is placed on the crossbar, which is usually made in a light tone - blue, grayish or light green, so that the dolls stand out clearly against the background.
Here it is appropriate to say that the entire screen should be covered with such material that would not overwhelm the dolls with either brightness or large patterns. In other words, the covering should be a calm, neutral color, without a pattern or a very small pattern. Black is not always a good color - it is gloomy. Light colors get dirty easily. Do not go for silk or velvet - the shine of the material tires the eye. The simplest and even coarse fabrics - canvas, sackcloth - are best here.
In an amateur team it is difficult to build a new screen every time. But it is possible that, having started with the simplest screen and with the simplest settings, you will want to move on to more complex ones, and you will feel the need for more advanced technical equipment for your screen. Look at the pictures for different options for your stage equipment.
The presence of a curtain seems very tempting. But don’t get carried away with it; frequent flickering of the curtain is tiring and annoying.
The simplest and most generally accepted technique for “clean changes” of scenery is that all the design elements of a particular picture are removed from their places and at the same time all parts of the scenery needed for the next picture are lifted and pulled out from behind the screen.
This is usually done to the music and the entire change of scenery occurs in the rhythm of this music.
And one last piece of advice. A puppet show benefits a lot from well-staged lighting. Of course, you will have to play in daylight or in the diffused artificial light of a hall that is not intended for your performances. But try to get at least the simplest and lightest lighting equipment.
There are portable projectors, flashlights, and special lighting. They must be arranged so that the shadows from the dolls do not fall on the scenery.
Screen made of plastic pipes for kindergarten
Before starting the main work, it is necessary to prepare all the parts used. It will be very unpleasant if at the most crucial moment one of the pipe parts or finishing material is missing.
In order to create a simple screen from plastic pipes, you will need:
Having prepared all the necessary materials and tools, you can begin assembling the structure. If the plastic pipes were not cut in advance, this must be done before starting assembly.
Connection of plastic pipes
The height of each section depends on the purpose of the screen, but there is no need to make it much larger than the child’s height. To assemble one section you will need:
- Two identical pipes that determine the height.
- Two pipes of the same length, defining the width of the section.
- Four plastic angles for connecting PVC pipes.
Cold or hot welding methods can be used to connect the structure. If you have at your disposal a special apparatus for heating polyvinyl chloride pipes, then it is worth using it.
Otherwise, you need to purchase glue for connecting PVC pipes from a specialized store.
This glue melts for a short period of time the section of the pipe to which it was applied, allowing you to quickly connect the parts.
The complete process of assembling one section of the screen will look like this:
- Clean and degrease the edges of the pipes.
- We apply cold welding at the joints - on the outer side of the edge of the pipe and the inner surface of the connecting corner.
- After the surface has softened, the pipe is connected to the fittings.
- After a few seconds, you can begin connecting the remaining parts of the section. Pipes of the same length must be parallel to each other.
- Excess glue is removed with a soft cloth.
- The remaining sections are assembled in the required quantity in a similar manner.
More detailed information on how to independently connect PVC pipes using cold welding can be found in this video:
Connecting sections to each other
After all parts of the screen have been adjusted to size and assembled, it is necessary to fasten them into a common structure. To do this, you can use double fasteners for plastic pipes, and if they are missing, fastening can be done with plastic clamps.
In both cases, the screen doors will be movable, which will allow it to be conveniently moved and installed in rooms of various sizes.
DIY sliding screen for the bathroom
Decor
To designate the enclosed space, you will need to sew covers for the plastic screen. The choice of design depends entirely on personal preference, so feel free to use your imagination completely.
For example, for holidays and other significant events it is worth preparing the appropriate design of the fabric. You can involve children in this process so that they themselves can suggest some ideas for decorating such a screen.
To secure the fabric along its perimeter, fabric strips of the required length are sewn or fastened with Velcro. This will allow you to change the design at any time and wash the fabric if it becomes dirty. All you have to do is tie a piece of fabric to a plastic screen, and it will be ready for use.
For additional decoration, you can sew pockets for storing small items, various appliques, or paint it with safe paints.
Note! All activities, except those that are potentially hazardous to health (for example, working with PVC glue or a pipe soldering iron), can be performed with children. Such work, if done in a playful way, develops children’s motor skills and teaches children to work
Examples
Here are a few photos of finished products that have been successfully made and are used in educational institutions at various levels, as well as at home. We hope that they will give you new ideas that can be implemented in reality.
Using the recommendations outlined above, you can make a simple screen from plastic pipes with your own hands for kindergarten or personal use at home.
If you have the necessary materials and tools, such work will take very little time.
If you have your own ideas for making plastic screens, do not forget to share them with other visitors to the site mainavi.ru.
Category: Life
Preparation of all materials and tools
Very often, plastic pipes remain after renovation of premises and can be used for folk crafts, including screens for kindergartens. If you don’t find any, the materials can be bought at your nearest hardware store, and they are inexpensive.
Making a screen from plastic pipes with your own hands will not require large expenses.
Before purchasing, you need to accurately determine the dimensions of the future product, make a drawing of the required frame, calculate the pipe footage from it, as well as the number of plastic corners (fittings) and double-sided fasteners.
You will need propylene pipes of various lengths, plastic corners and double-sided fasteners to connect the sections to each other.
- For example, a traditional three-leaf screen made of polypropylene pipes consists of flaps that require pipes of sizes 60-80 cm (top and bottom width, 6 pieces) and 100-120 cm (side height, 6 pieces). Thus, the total footage of the pipes should be approximately 10-12 m.
Note! As a rule, the standard length of plastic pipes in stores is 5 m. Keep this in mind when calculating the length of the required pipes for the product, because they all must be solid.
- For the standard screen in question, you will also need 12 corners, or fittings (4 for each section), as well as 6-8 double-sided connecting fasteners.
- For drapery in sections of the screen you will need fabric and materials for decoration.
You can use any available fabric to sew covers. It must be remembered that it must be durable and easy to wash.
The set of tools and materials for the work should include a hacksaw for cutting plastic, an iron for heating the ends of pipes before joining (or buy special glue for PVC), and alcohol wipes for degreasing the surface. Having a special plumbing apparatus for welding plastic pipes will greatly simplify the work.
A special machine for welding plastic pipes made of propylene, which is used by professional plumbers during installation, can be a good help.
Attention! A child can help in the process of making a screen, but work with glue or iron should only be carried out by an adult using all safety measures!
Vintage wall for a photo shoot (master class)
Wanting to leave a piece of the celebration as a souvenir, the newlyweds create accessories and decoration elements with their own hands. Background walls are no exception. A screen for a photo zone in a rustic style is created very simply.
Materials and tools
- wooden boards (size depends on the desired size of the screen),
- frames of different sizes,
- beautiful hooks or furniture handles,
- water-based wood impregnation,
- white acrylic paint,
- wood glue,
- wood screws,
- drill or screwdriver,
- brush,
- sandpaper or sponge.
Time: 2-3 hours
Step-by-step instruction
- For the frame, lay boards of suitable size evenly and close to each other on a horizontal surface. Place 3 stiffening ribs perpendicular to them at the top, middle and bottom.
- Nail the two outer boards of the “fence” to the stiffening ribs to create a frame-type structure. Do not drive the nails all the way in.
- Turn the resulting frame over and apply wood glue to the stiffeners. Then glue each board one by one, including the last one, after removing the nails. Don’t know how to make a screen for a wedding with your own hands and not spend a lot of time and effort? – Find an element of an old fence or use a pallet - this will save both time and money. Also read about the design of a wedding arch - it will make the celebration even more fabulous.
- At a distance of 20 cm from the edge of the middle stiffener, attach the stops of your decorative wall with self-tapping screws and a drill. At the bottom, connect them together with a perch of the same size for stability. The frame is ready!
- If the wood is untreated, sand it with fine sandpaper and remove dust. Then apply the impregnation with a brush, or rub it in with a woolen rag (this will make the wood texture look nicer).
- After the impregnation has absorbed and dried, apply white paint with an artificial bristle brush.
- After waiting for it to dry (2-4 hours), take an emery sponge and lightly remove the top layer of white paint, revealing the impregnation. This will create the effect of aged wood.
- Prepare the frames, paint them, attach the ropes on which they will hang. Make markings for attaching them to the frame.
- Attach hooks or other furniture fittings to the markings. Hang up the frames. Complete the composition by hanging antique lamps, clocks or flower pots.
- The vintage wedding screen is ready, and no one else will have one like it, because you made it with your own hands.
Use Cases
In addition to the fact that such a wall is an excellent backdrop for a wedding photo shoot, use it as a seating plan for guests. Attach as many frames as there will be tables. Place a sign with the table number in the center of each, and stickers or pin flags with names around them.
Take care of the design of the wedding photo zone, and in memory of this day you will have many stunning photographs with your family and friends.
- 29 photos
What materials can it be made from?
A real classic is the wooden screen. Now it is no longer possible to establish what the very first structure of this kind in history was made of. But there is no doubt that wood is traditional and has been used since ancient times. Along with monolithic boards, partitions in the past were also made from slats. In the second case, fabric of various types was pulled over them - whatever was at hand and whatever they liked.
Today, wooden screens are still in demand, and their main types are still the same. But, along with simple slats, timber is used quite often. Plywood structures have also gained considerable popularity because they:
- allows you to save money;
- weighs relatively little;
- processed without any problems.
Design developments do not stand still. And recently, screens made from louvered doors (and simply from unnecessary wooden doors) have begun to appear more and more often. They usually still contain fairly good quality wood, but the structure itself becomes morally or technically obsolete.
But some home craftsmen try to use metal (usually stainless steel or aluminum). In this case, you will need a frame of a certain shape. Any experienced welder can make it, although sometimes it is better to contact a metalworking company. The following is inserted inside the frame:
- wooden panels;
- sheet glass;
- plastic.
Instead, small pipes (up to 5 cm in diameter) are also suitable. Tubular screens are widely used in gardens and courtyards. Regardless of the shape of the frame, it should be covered with elegant fabric or paper with an original image.
If you choose a high-tech style, then it is logical to use a steel screen for blinds to frame it with your own hands. But those who want to simplify their work as much as possible should abandon metal and focus on PVC. Pipes made of this material are quite light and, in addition, practical.
You can also use it in your work:
- cardboard;
- polymer panels;
- cane;
- willow or bamboo branches;
- CDs or vinyl records.
Original feeders and birdhouses for birds
A bird feeder or birdhouse will become an additional design element of the garden landscape if it is made in an interesting and unusual style.
They are made from wood cuts, cardboard boxes, plastic containers, leftover boards and other available materials. If you show your imagination, you can even weave a birdhouse from branches.
- By fixing a glass with a slight tilt back to a wooden board, we get a simple and practical bird feeder.
- All that remains is to hang the finished product on a tree and fill it with food (seeds, crushed nuts, bread crumbs.
Important! In order not to create competition among birds, you can make several of these wonderful feeders in the garden.
If you do not have the opportunity to pour out food every day, then it is best to make a feeder from a plastic bottle, using a little ingenuity.
- To do this, fill a plastic container to the very top with cereal.
- Then they are fastened with the neck down above the horizontal shelf, leaving a small gap.
In this design, the grains will fall out as they decrease, and when the food runs out, you just need to top it up.
Use of plastic pipes
Craftsmen with great imagination can use almost any materials in the household. So, it would seem that specialized PVC products can be used exclusively for their intended purpose. But human imagination shows a completely different result.
A variety of crafts are made from such a light but durable material - decorative elements for the garden, greenhouses for fruits and vegetables, stylish shelves for storing small items and much more.
The children's screen, which can easily be used at home or in preschool educational institutions, deserves special attention. This decorative element helps to separate a small comfort zone, which is especially important in a society with young children of different sexes.
But such a screen can be used not only for changing clothes. It can be used in creativity as a puppet theater or to fence off a small play area.
It may seem that installation work will require special skills or tools, but even a beginner can handle it. Next, we will conduct a small master class on making a simple screen from available materials.
DIY pipe screen
A screen is a very simple and affordable way to zone a space. In addition to the function of dividing the room, screens of certain designs can serve as a mirror, a storage system, an exhibition area for paintings and photographs, and can also become the visual center of the room. Today, using the example of the designer space divider Casa Ideal from Sunindusa, we offer to see how to make a screen from pipes with your own hands.
To make such a pipe screen with your own hands, you need:
- six meters or more of PVC pipes, preferably of different diameters (3-4 types);
- metal saw;
- adhesive suitable for gluing PVC surfaces.
If you have the opportunity to cut pipes on a machine at a construction supermarket when purchasing, be sure to take advantage of it. Think about the width of your screen in advance, but at least 5 cm. Otherwise, you will have to cut the pipes yourself. To do this, measure and mark every 5 cm (or more) on the pipe. Secure the pipe in a vice and use a metal saw to cut the pieces. When you have cut all the pieces, you need to make their edges even and smooth. An iron is perfect for this purpose. Heat it to maximum temperature and iron the pipe sections through baking paper. After each approach, peel off the paper from the cuts, otherwise it will be difficult to do this later.
Proceed to gluing the resulting rings. First, lay out the pipes on the floor the way you want the finished screen to look. If you are using rings of different diameters, lay out the composition with large rings and fill the space between them with small ones. The screen pattern can be symmetrical, or the rings can be placed in a random order. At the same time, think about the edges of the screen. If it is assumed that the pipe screen will be adjacent to the wall, make the edge smooth. Otherwise, the edge may have a curved shape.
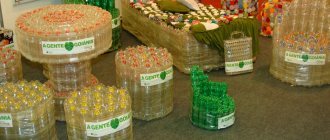
Once you have decided on the design of the screen, start gluing the rings together. To do this, carefully coat the contact points of the rings with glue or liquid nails. Do not overdo it; remove excess immediately with a cloth. After the glue has dried, the screen can be painted in any color with spray paint. If you want the rings to be multi-colored, paint them before gluing. The finished screen made of pipes can be attached to the wall or be completely mobile, on a stand with wheels. Rings can be used to store bottles, rolled up magazines and newspapers, and things.
A contact grill is a device that can quickly heat or fry food on all sides. This feature of the pressure grill allows it to be used in fast food restaurants, especially when there is a large flow of customers. On the grill you can heat sandwiches and toast, bake meat or fish in a short period of time. A wide selection of grills for professional use at https://technofood.com.ua/shop/category/teplovoe-oborudovanie/kontaktnye-grili-i-tostery-1
Choosing design and sizes
Depending on the purpose of use and the age of the children, various designs can be made.
This could be a large full-length theatrical screen.
Or a small tabletop version of the screen to independently show scenes with puppet characters.
An important factor is the lightness and versatility of the design: children really appreciate the rare opportunity to independently change the arrangement of interior items, using them not as a mandatory established order, but as a resource for realizing ideas.
This develops management skills and also gives more space for play and creativity.
As a rule, the standard model of a screen made of PVC pipes is made with three sections.
It is enough to collect 3 frames, connect them together and cover them with beautifully decorated curtains.
However, this is not a mandatory rule, and if you wish and have the material, you can make a larger number of frame components. The design of the fabric stretched over the frame depends only on personal preferences - you can choose it together with your children from several options by making removable covers with Velcro fastenings.
When choosing covers, you can show your imagination and creativity.
Different colors of covers can be associated with seasons or themed holidays. For example, a green background in the spring, yellow and orange - with the onset of autumn, blue or dark blue - in the winter season.
There is a lot of room for imagination here for the teacher.
Corn husker from grass cutter
Making a homemade grass cutter step by step:
Holes were drilled and threaded in the flange.
The knives were made from a piece of an old rusty two-handed saw.
The knives were screwed to the flange.
The grass cutter frame was made from a sheet of metal 4 mm thick. A strip of metal with a cross-section of 4x40 mm was welded to the square, which was bent in a circle. A hole was drilled in the center of the bed.
I bent the strip with a hammer, striking the metal on the jaws of a vice. The radius was controlled in a circle by drawing it on the bed.
At the finish, the user welded the legs to the base. Fixed the electric motor. I made a large tank with a lid so that debris would not fly out of the grass cutter while the engine was running.
The tank is removable for ease of use of the grass chopper.
Alex Nk decided, based on a grass cutter, to make a mechanism for shelling corn. The result is a two-in-one unit. To make a homemade product you need:
Cut a disk out of metal.
Drill holes in it for M6 bolts.
Grass cutter-corn sheller assembled.
Places for storing fasteners.
I found experimentally that the optimal option for chopping grass is two knives. Four knives turn the grass into mush. I also threshed apples for the poultry. One bucket of apples is crushed in 4-5 minutes. The result is a grass cutter-vegetable cutter-fruit cutter.