Choosing material
You can make a doll house with your own hands from any sheet building material. The thickness of the material for a house about a meter high (on two floors) is 9-15 mm, for one-story houses it can be thinner. Let's look at the most common materials used in the construction of a dollhouse:
- Plywood. An excellent choice, as it is durable, holds its shape well, can be glued, connected using nails and self-tapping screws. Cut plywood with a metal saw (with a fine tooth) or a jigsaw (manual or electric). The ends will need to be sanded well so that there is no possibility of driving in a splinter. Upon completion of the work, you can varnish or stain, paint, wallpaper, etc.
Dollhouses are most often made from plywood. - Drywall. After the repair, there are scraps left that can be used. To fasten the sheets together you will need tin corners (you can use a perforated corner). You will have to attach it with special screws, but they will stick out from the back, so this is not the best option. You can try to “plant” it with glue, but you will have to align the cut lines to reduce glue consumption.
A dollhouse made of plasterboard is one of the possible options - OSB (OSB). The properties of the material are similar to plywood, the only difference being that it is moisture resistant and made from wood chips. Working with it is approximately the same as with plywood.
OSB is also a good material - Cardboard. The most inexpensive and most delicate material that does not hold loads very well. The situation is better with cardboard for scrapbooking (you can buy it in craft stores). It is denser and more durable; it can be made into one-story houses or used for roofing. Connect using glue or staples from a stapler. To make the dollhouse more reliable, it is better to assemble a frame from planks and then cover it with cardboard.
A house for Barbie or other not very large dolls can be made from cardboard - Regular chipboard or laminated chipboard (LDSP). The advantage of this material is that it can already be finished. If you wish, you can order sawing of the entire “box” of the house with gluing of the edges from some furniture company. Then all that remains is to assemble. Moreover, it will be possible to use screws or furniture fittings. There are three disadvantages - the material is too thick, which increases weight, formaldehyde emissions and fragility under lateral loads. If you can put up with the thickness and weight, then the release of formaldehyde should not be ignored. You need to look for ones with emission class E0-E1. Unfortunately, there is nothing you can do about fragility. Unless you use corners to connect parts, and this is not very beautiful.
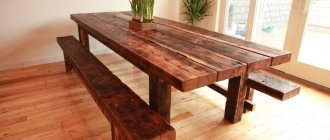
A chipboard house can support the weight of a child - Furniture panels. They are made from wooden planks glued together using wood glue. An ideal option for making a dollhouse: environmentally friendly, durable, easy to process. But furniture panels cannot be called cheap, although they are not as expensive as solid wood. In any case, it can be used to make a box - the bottom, side walls and ceiling. The roof and back wall can be made from other materials (for example, fiberboard, plastic, etc.).
Furniture board is an environmentally friendly and beautiful material
There are also such options as laminate, wooden lining, thin planed board. But they don't work with them that often. In any case, the minimum thickness of materials is 6-7 mm. Then the dollhouse will be reliable and will even support your child.
Why is this necessary?
A happy childhood is not so much a room full of toys as it is the love and attention of parents. A gift created by yourself emphasizes these feelings in the best possible way. By making a house yourself, you can:
- do not limit yourself to the capabilities of your wallet (good quality factory products are quite expensive);
- make a structure of any size;
- leave the rooms of the house empty or fill them with furniture at your discretion;
- build a fairytale castle, a forest fairy hut or implement any other idea.
Dollhouse with transparent walls for self-assembly Source pikabu.ru
The production of dollhouses from plywood and other available materials does not require special knowledge or a significant investment of time and effort.
Features of working with plywood
Most often, plywood is used to make a dollhouse. As you probably know, it can come in different brands. It is better to make a dollhouse with your own hands from sanded furniture plywood. You can use them from coniferous trees, but preferably from birch. It’s better not to take a construction one, even though it costs twice as much.
In general, working with plywood is not difficult. If you have a jigsaw and sanders, cutting and preparing the parts will take a couple of hours. The only difficulty that may arise when making a two-story plywood doll house is the installation of the second floor ceiling. T-fastening plywood is not the easiest task.
We need to figure out how to secure the floors
The glue is not very reliable, and trying to install screw-type fasteners into the end with a thickness of 6 mm is difficult - the material can split, even with pre-drilled holes (the thinnest self-tapping screw is 1.8 mm). There are several options:
- do it on nails (not very reliable, unless you coat it with additional glue);
- install corners at the bottom (not very nice);
- install a glazing bead around the perimeter, which will both support the floor and “work” as a ceiling plinth (the best option).
After cutting out the parts, all joints must be sanded well. First, use medium-grain wood sandpaper and gradually move on to fine sandpaper. Once the edge is smooth, you can begin assembly.
Dollhouse project
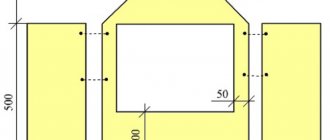
The first thing to start building a dollhouse is creating a project. You need to decide on the height and number of floors, the width of the room, the type of roof, and whether or not there will be a basement floor. Choose the number of floors as desired. This is arbitrary, but all other parameters must be calculated.
The size of the dollhouse depends on the size of the doll inhabitants. To make playing comfortable, the height of the ceilings in the rooms must be at least twice the height of the doll. For example, with a doll height of 22 cm, ceilings of 40-45 cm will provide enough space for them to move freely, but if the ceilings are even higher, it will be even more convenient to play. But you also need to take into account the child’s growth. The height of the topmost ceiling should be slightly below eye level. In this case, it will be convenient to play, and the dollhouse will be “growth-able” - its height will be enough for a couple of years.
The depth of doll rooms also depends on the height of the dolls, but also on the availability of free space. On average, the depth is 30-45 cm. This is enough to accommodate the entire furnishings. But it could be deeper.
This is roughly what you need to do before you start working.
The width of the dollhouse depends on the number of rooms in it. Here you decide depending on the available free space. In shape, the frame of a doll's house usually looks like a rectangle, but whether it is extended in length or in height - this is determined by each person. If the structure turns out to be rather large, you can attach furniture wheels to the bottom. This is very convenient - the toy turns out to be mobile.
You can draw the project itself in any design program, but if you don’t own them, it’s easier to do it on paper. Why do you need a dollhouse project? To calculate the amount of materials required for its manufacture, and without the dimensions and number of walls, you will definitely be mistaken.
Dresser or dressing table
It is very convenient to cut from a small box, where the cabinet is about 7 cm, the wall for the mirror is 16 cm, the width is 8 cm. Connect everything by gluing foil as a mirror and handles with beads. Decorate according to your desire and imagination.
Another simplified version of a chest of drawers is glued matchboxes. All children will like it because it has drawers.
It is enough to glue the boxes tightly to each other, or you can additionally attach a cardboard frame. Cover with wallpaper, napkins or other decor.
Finishing features
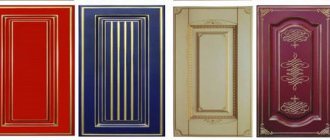
Decorating a dollhouse with your own hands raises no less questions than building it. In principle, you can use the same finishing methods as in apartments or houses. For example, in doll rooms, walls can be decorated in the following ways:
- Paint it. Only you need to take special paint, which is approved for use in children's and medical institutions. This can be any type of composition, but the best choice is probably water-based washable paint. It is not too expensive, does not smell when painted, can be wiped off, and can be easily tinted to any color.
- Put up wallpaper. If you have plain wallpaper left over from renovation, this is a good option. But leftovers with a pattern are unlikely to be suitable, since the pattern is usually too large for miniature rooms. For such a case, you can find a sample of wallpaper on the Internet and print it on a color printer. Using the same technology, by the way, you can make “linoleum” or “parquet” - print it, stick it, cover it with at least a layer of PVA. For complete authenticity, use varnish or epoxy resin.
It's easier to glue the wallpaper before starting assembly.
If you have chosen the option to “hang wallpaper”, it is easier to do this before the assembly stage. Even if there are several floors, the blanks are drawn out and wallpaper is glued. This is much easier than trying to cover the corners later.
The exterior decoration is not much different. Painting is most often used. This is the best option in terms of practicality and labor costs. If you want, you can make something similar to decorative plaster. It can be imitated using gray toilet paper. You just need to choose thicker. It is torn into pieces, glued with PVA diluted with water (1 to 1), laid out on the walls, forming the desired relief. After drying, you can paint using acrylic paints. This is a decoupage technique and can be used with colored or regular napkins.
Window and door decoration
Cutting windows in plywood, OSB, or any other material is not such a problem. First, using a drill and a drill bit, make a hole into which you can pass the saw blade. Next is a matter of technology. The cut hole is sanded until it is smooth, and then it is necessary to make the holes look like windows. For this you need frames and curtains. If desired, you can also make glass from transparent plastic bottles.
A lot depends on the details
Frames with bindings can be made of white cardboard. They are glued on after finishing the “finishing work”. Children love to open/close doors, so it is better to make them from thin plywood. Fasteners can be found - there are piano hinges or small furniture hinges. You can make deadbolts from wire and thin tubes.
Refrigerator for dolls
In addition to traditional furniture for rooms, in a doll house its inhabitants may also need household appliances. Setting up a kitchen and filling it with accessories is not that difficult if you follow the step-by-step instructions in this article. We offer an interesting option for creating a toy refrigerator.
Materials:
- Empty packaged tea packaging.
- Water-based acrylic or gouache paints.
- Cotton swabs.
- The cardboard is quite thick.
- Stationery knife.
- Ruler.
- Glue.
- Scotch.
Step-by-step instruction:
After all the materials have been collected, you can begin to work.
Take a utility knife and carefully cut one rectangular side of the tea box exactly in half. This way you will have two refrigerator doors.- Using a ruler, carefully measure the distance inside the box in order to make shelves. Using these dimensions, we cut out shelves from another thick cardboard and glue them in with tape or glue.
- We paint the entire structure with white paint. Let it dry.
- We cut off the tops with cotton wool from a cotton swab; they are perfect for the role of handles; it is convenient to fix them with a glue gun.
- If you wish, you can decorate the refrigerator with some designs with paints, or you can use stickers, they will completely imitate magnets, like on a real one.
Let there be light!
A house for dolls with lighting is aerobatics. Moreover, there is no need to fence the system with wires, converters, light bulbs and other electrical “stuffing”. There is a very simple and effective solution. Any more or less large lighting store has small LED lamps that run on batteries. Moreover, they are mounted with Velcro. Each lamp is equipped with its own switch and operates on a voltage of several volts. In general, a very good solution.
These are non-volatile LED lamps
If you still want to make real light in a dollhouse, you need a 220/12 V converter or a battery with the appropriate voltage. You will also need light bulbs or an LED strip of the appropriate value, and a bunch of wires. In general, this path is much more difficult and requires much more time, but it is also a possible option.
Lighting
Making lighting in the house seems almost impossible, because connecting to the network and the presence of wires is far from safe. Especially if the home is made of wood or cardboard. In the event of a short circuit, a fire may occur.
However, there is a simple, safe solution - small LED bulbs that run on batteries. Their voltage is very low, and fastening is simple - using double-sided tape.
Making a dollhouse is a fascinating and long process in which not only parents, but also their children should participate. Even a small child can make small parts or hold tools. At the same time, working together brings people together, and children will learn the acquired skills much faster and the process will be interesting.
How to make a roof
If the roof is planned to be ordinary - gable, the layout of the attic space or attic floor must be done so that there is a partition in the center that will support the roof at the junction of the two halves of the roof. This is the easiest way. There are also more complex ones.
The roof on a dollhouse can be made in different ways can be made in different ways
If you need a roof of a complex shape, we cut out several rafters from plywood that will define the shape. We attach them to the walls and cover them with some flexible material. It can be cardboard, fiberboard. The ends of the rafters are coated with glue (preferably carpentry glue), after which the material is laid. If the bend is too steep, additional fasteners may be needed. Usually thin small nails, like shoe nails, are used.
Creation of toys with extended functionality
A large dollhouse made of plywood can become a full-fledged piece of furniture if you attach drawers to it on the side, bottom, and equip shelves. In this case, from an adult’s point of view, it will be a convenient storage system for the child’s toys, and the child will enjoy cleaning.
Wooden dollhouse with shelves and drawers Source oozor.ru
If you attach a house to your baby's bed when he goes to bed, he will be able to continue playing. This option will be of interest to those parents whose children have difficulty switching, have difficulty falling asleep and are capricious.
Photo options of different doll houses
Building a doll house is a creative process. You can make it the way you dream of your home, or recreate a house from a fairy tale or fantasy. And there are no restrictions here. Everything you want and how you want.
Can be made from boards, and the back wall from fiberboard
Two-story doll house with a garage and a highway above it
This is roughly how we make a gable roof
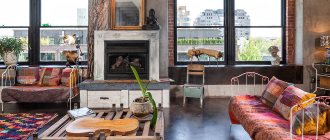
Modern style doll house
A one-story house is not so bad either. But you can put it on the table and play while sitting
The height of the ceilings in the room for dolls should be twice as high as the dolls
You can even make a castle for dolls
The dollhouse should be slightly taller than your child
So different…
Can be made very similar to a real house
Any house can be made
There are different ways of decorating
This is how to make shutters
We make tiles from painted pieces of cardboard