Types of loops and their features
First you need to decide which hinges are suitable for your door. There are the following types of fittings:
- Invoices. The plates differ in their shape and fit into each other when closed. They are attached directly to the surface of the canvas and the box.
- Mortise. The plates are screwed to the canvas and core so that they are recessed to a depth equal to their thickness.
- Hidden. They are installed directly in the doors, their main mechanism is hidden in the door leaf.
- Screw-in. Instead of plates, the design uses pins that are screwed into the material and thus masked.
Types of hinges for interior doors
Mortise hinges are the simplest and most commonly used.
When it comes to an interior door, it is best to use overhead or mortise hinges. Hidden variations are mostly installed for entrances, but doing this with your own hands is quite difficult.
What and how to install hinges on the door
What types of door hinges are there, and which ones should we choose for our doors? This is the first question that needs to be dealt with. Such fittings for interior doors, such as hinges, come in the following types:
- Overhead hinges are attached directly on top of the door leaf and door frame, and they differ in shape, and when the doors are closed, they fit into each other.
- Mortise hinges are screwed over the door leaf and frame into specially prepared recesses in such a way that the screwed hinge does not rise above the surface of the door or frame. They are the most commonly used and considered the simplest.
- Hidden loops are not visible from the outside, because... are recessed into the thickness of the door leaf, in specially cut recesses.
- Screw-in loops look like pins, not plates; they are also not visible from the outside, since they are screwed into the thickness of the fabric.
Interior doors are most often hung on mortise or overhead hinges, but exterior doors are hung on hidden and screw-in hinges. It may seem to an inexperienced builder that using hidden hinges is very difficult, however, this is not so. Installing hinges on a door is possible without outside help and without any experience.
Installing the Top
Since the most popular fittings are mortise card hinges, the process of installing them should be considered in more detail. To do everything flawlessly you will need the following tools:
- screwdriver;
- chisel;
- blade;
- ruler;
- hammer;
- pencil.
The best option for carrying out the work is the following sequence: the upper part is installed first, and then the lower.
First you need to outline the position of the parts. Usually two loops are enough. In this case, the top one is installed at a level of 20 cm from the edge, but it is better to move the bottom one a little and fix it another 10 cm higher. If necessary, the third loop is installed clearly in the middle between the top and bottom.
Sequence of installation of mortise card loops
Disassemble the loop into two parts and attach its top to the end of the fabric. Trace the outlines, and then remove some of the material according to these marks. To carefully select the excess, you need to run a blade along the contour, and then use a hammer and chisel to scrape off the coating and the top layer of wood. The depth of the notch must match the thickness of the plate.
After all the parts are recessed flush, they can be fixed in the prepared place. For this, screws or self-tapping screws are used. For screws, you need to pre-drill holes.
Correct marking
Installing door hinges by eye is unacceptable - even a small error can lead to distortion and deformation of the door leaf and structure. Marking is done with a pencil as follows:
- Attach the hinges to the intended installation locations. Hinges should be placed with a minimum distance of 20 centimeters from the edges of the door (top and bottom).
- Trace the hinges attached to the door end with a pencil, then set them aside.
- Using a chisel and hammer, make the indentations in the marked areas necessary to install the mortise hinges.
General view of the cutout for the door hinge
Pay close attention to the thickness of the recess. If it exceeds the thickness of the hinge, the door will rest against the frame when closing. Ultimately, this will lead to deformation of the door leaf and problems with opening and closing the door.
Before installing hinges on the door, you need to mark the door frame. This operation will require skill and patience to correctly determine the location of the loop:
- Place the canvas in the box and secure it with wooden wedges in the way it should be in the installed state. To level the door leaf, use a building level.
- After aligning the canvas, mark on the frame where the door hinges come into contact with the door.
- As with the door leaf, use a hammer and chisel to make the required number of recesses for installing door hinges.
The alignment of the door leaf in the frame should be carried out not only vertically, but also horizontally. Incorrect vertical installation will cause the door to open spontaneously, and horizontal installation will make it difficult to close.
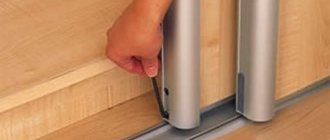
A hinge already embedded in the doorway
Bottom assembly
After the upper part of the hinge has been fixed to the door, you can begin installing the lower fragments. To determine the exact level of their location on the frame, you need to attach the door to the opening. Place the canvas in the box and move it to the open position. Then place the bottom of the loop so that it can be pushed up. Mark its location, taking into account that after installation the canvas should not touch the floor and, at the same time, should not rub from above.
After the extreme border has been outlined, attach the part to the frame and repeat the operation of installing it in the same sequence: trace the outline, cut off the sides with a stationery knife and clean it with a chisel. Then screw the parts with self-tapping screws.
Correct installation of door hinges
Installation of mortise hinges
Inserting hinges into an interior door is the most complex procedure possible, so once you master it, you can easily install overhead and screw-in hinges. The installation procedure for mortise hinges is as follows:
- Sink the hinges into the recesses made in the previous stages of work on the door.
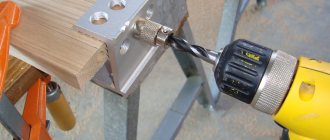
- Using a screwdriver, make holes in the wood for the hinges.
- Take screws of suitable diameter and use a screwdriver to secure the hinges on the door leaf.
- Place the door in the doorway and secure it with wooden wedges.
- Sink the loops into the indentations made, then repeat steps 2-3.
Attaching hinges to the canvas
During installation, carefully ensure that the door is level in the frame and does not move during installation. Before hanging the door on its hinges, carefully level it in the doorway using a building level (as when marking).
Installation of overhead hinges
This is the easiest method to use, which does not require insertion and preliminary preparation of the door and door frame (without creating recesses). The simplicity lies in the design of such hinges and in the installation features - you don’t have to think about how to weld the hinges and secure them as firmly as possible in the socket.
Installation is similar to installing mortise hinges, however, the parts are not installed in special recesses, but are simply screwed to the end of the door and frame using screws. As in the previous case, it is important to maintain the correct position of the door leaf in space throughout the installation of the hinges.
Overhead hinges are simply screwed on
Hanging the door
The last step is to directly hang the door itself. The lower part of the hinge contains an axis on which the door with the upper fragments must be placed. Bring the canvas to the open position, lift it and put it on the hinges. If it is not possible to lift the door leaf, then detachable hinges with a removable rod are installed. It is necessary to remove the rod from the hinge, connect the two parts of the fittings and insert the rod into place. Before hanging the door, it is recommended to lubricate the parts with machine oil or grease.
Be sure to check the level, otherwise misalignment will occur over time.
To avoid problems during operation, the door must be installed exactly level
As you can see, hanging a door correctly on its hinges is not difficult, but for a beginner it may seem like a difficult task, which may result in minor defects. Some of them can be eliminated quite simply:
- if the plates are recessed too deep, place a piece of cardboard, thin plywood or rubber under them;
- if the canvas rubs against the threshold or floor, you need to put a gasket on the rod to raise its level;
- It also happens that you need to reweigh the plates, in this case there may be a problem with unscrewing the screw; you can drill it with a drill and then close the hole using a dowel plug.
To get the job done better, hire an assistant. An outside perspective and free hands will significantly speed up the process.
How to properly hang a door on its hinges
Now you can begin installing the door in the opening. To properly hang the door, insert one screw into the frame through the hinge card holes. Try opening the door - it should not rub against the door frame. Otherwise, you will need to deepen the hinge slots a little or place a thin sheet of cardboard under the cards. If the door is located symmetrically and moves freely without touching the frame, then all you have to do is tighten all the screws.
- By the way!
There are mortise hinges that lift the door slightly when it is opened. This allows the door to close independently under its own weight. This also prevents the door from touching the carpet. These hinges consist of two parts: the first is the lower card with a fixed axis, which is installed on the door frame, and the upper card, which is installed on the door leaf. The upper part with a hinge is attached to the door and fits onto the lower part, fixed to the frame.
Lifting mortise hinges, just like regular ones, can be either left or right - it depends on how the holes for the screws are located in the hinge card with a fixed axis.
Required Tools
In order for the installation process to proceed without complications, you need to prepare the necessary tools in advance:
- door hinges;
- pencil for marking;
- ruler;
- screws;
- screwdriver;
- level;
- chisel;
- hammer;
- drill with a thin drill bit.
To install mortise structures, specialists use a milling machine. In this case, the selection for the loop will be the most even. You can replace the machine with a chisel and a hammer.