What are hidden-mounted drawer slides and which ones are better to choose?
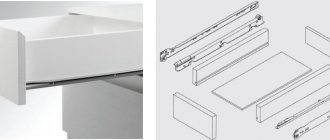
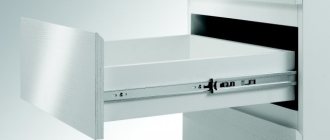
Hidden installation implies the absence of visible fittings on the sides of the drawer. Thanks to this, furniture elements look more attractive and stylish. This effect of “hidden” fittings is achieved due to the lower fastening of the guides to the drawer, under its bottom.
Because of this, the runners attached to the body of the cabinet have a massive L-shape. And the second part, with fastening under the bottom of the box itself, is telescopic, with a ball mechanism integrated inside. The kit also includes trunnions and fasteners for surface mounting. To facilitate the dismantling of the box and re-installation using a sliding method, special locking locks are offered.
Concealed mounting guides can also be equipped with a soft closing mechanism and a push-to-open system. Just like ball guides, they can be fully or partially extended. They have the same size range - lengths 250, 300, 400, 450, 500 and 550mm.
It is most convenient to consider the types of concealed mounting guides using the example of Hettich QUADRO. The manufacturer has two series, QUADRO 25/30 partial extension and QUADRO V6 full extension. Each series has three possible configuration options:
- Quadro Stop Control – smooth pulling (self-closing).
- Quadro Silent System – built-in damper (closer) for smooth closing.
- Quadro Push to open – built-in push-to-open mechanism.
Pull-out drawers with hidden-mounted guides are an excellent complement to pushers for hinged facades. All other options for possibly equipping drawers with push-up mechanisms are either too expensive or of insufficient quality (in terms of failure-free operation of the opening mechanism when the drawer is loaded differently).
In addition to Hettich Quadro, there are good quality, more budget-friendly options from manufacturers: Boyard and Hafele , with a similar division into series, but with their own articles.
You can also note the quality of Tandem from Bum , as well as the higher cost. However, Blum has one undeniable advantage: the series also offers a so-called stabilizer - an indispensable element when designing long drawers with push-pull opening. Thanks to it, the opening mechanism is triggered by pressing anywhere on the facade and ensures uniform extension of the drawer. Therefore, when designing long TV cabinets with drawers that open when pressed, it is better to immediately choose Bloom tandems.
Among the advantages of hidden-mounted guides, it is worth noting excellent load-bearing capacity and stability. Essentially, they represent an alternative between conventional ball guides and metaboxes.
Which retractable mechanism to choose
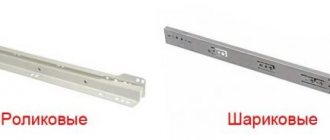
When choosing a mechanism, you need to consider three things: budget, expected load, design. The choice depends only on the consumer. If you want furniture without handles, a reverse ball system is suitable. If you want to get a super economy, you should choose standard roller guides.
Design of wooden legs for furniture in different interior styles
If significant loads are planned, ball guides or hidden installation options are recommended (here it is also worth considering how much the bottom can withstand). Those who have an unlimited budget can choose tandem boxes. It is also worth considering the safety and depth of the structure. As already mentioned, reverse action guides are not recommended for children. And the depth determines how far the fittings can extend the drawer. If you take deep furniture, for example, 900 mm, it is better to give preference to full extension systems and tandem boxes. In terms of product quality, it is better to focus on the market leaders - Boyard, Blum, TBM, Hettich, Braun or Raumplus.
Reverse ball system suitable for furniture without handles
Standard roller guides are worth choosing for super-economy
For significant loads, ball guides are recommended
If the budget is not limited, choose tandem boxes
Calculation of a drawer for hidden mounting guides for Boyard, Blum, Hettich and Hefale
The calculation scheme for drawer parts for installing hidden-mounted guides is the same for all manufacturers, with the exception of one nuance. But if the depth of the cabinet body is 20-30mm greater than the depth of the drawer, this nuance is not particularly important.
The standard installation scheme assumes the general design of a drawer with a recessed bottom relative to the sides. The fiberboard bottom is installed in the groove of the sidewalls.
But the load capacity of the guide mechanism with bottom mounting is quite good (20-30 kg) and stable due to installation under the bottom. Therefore, you can simplify your task and replace the fiberboard with an inset bottom made of laminated chipboard. This will make the box 1.5-3 kg heavier, but at the same time it will be more rigid and durable, suitable for storing heavy items and will allow full use of the resource of the guides.
To calculate the details of a drawer for installing flush-mounted slides, you need to study the specific manufacturer's instructions and the recommended gaps between the sides and the drawer itself.
And here there are differences. For example, in the Hettich calculation diagram you can see that the distance between the inner side of the cabinet and the front of the drawer is 20mm, and the bottom should be raised by 12-13mm. And on Blum’s installation diagrams the numbers are slightly different - 21mm versus 20mm and 12-15mm versus 12-13mm (and Boyard’s is 10-11mm).
As the experience of assemblers shows, with a difference of 20mm, the drawer on the hidden-mounted guides moves too tightly, catching the heads of the screws on which the rails are attached. Therefore, we take average numbers to calculate the “box forehead” part.
Also specifically for Blum, the Boyard side of the drawer should be shorter than the nominal length of the guide itself. That is, with a guide of 500mm, the depth of the drawer is 490mm. At the same time, the mechanism that “steals” this 10mm from the depth of the drawer, “saves” it on the cabinet - its depth can be more than 10mm.
But with Hettich and Hafele, the depth of the drawer is taken equal to the length of the guides. In this case, the depth of the cabinet should be 20-30mm greater.
The general scheme for calculating the details of a drawer for hidden mounting guides will be as follows.
- The length of the drawer is equal to the length of the guides NL or (NL-10). Moreover, in the first case, the depth of the cabinet itself should be (NL+20) minimum, and in the second case it should be sufficient (NL+10).
- The length of the drawer forehead is equal to the internal size of the cabinet minus 42mm.
- The height of the drawer is usually 30-50mm less than the front. Moreover, if we take the height of the drawer sides to be 100mm, the height of the forehead parts will be 12mm less.
- The bottom is calculated as an inset horizontal line between the vertical parts.
Blum tandems. Calculation and installation. TANDEM BLUMOTION.
| This article describes the principle of calculation and installation of drawers on the TANDEM BLUMOTION partial extension system from Blum . Those. tandem guides with built-in closing closers. Article number in the Blum : 550Н5000В. |
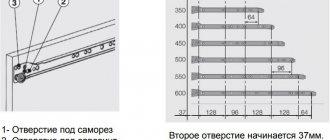
The dimensions for fastening the guides on the side of the cabinet will be given taking into account the possible interchangeability of the drawers. The calculation and example are given on the basis of a three-drawer kitchen cabinet section (Fig. 2.). At the end, a fully parametric model of such a cabinet with all the fittings will be given for more detailed acquaintance. Model PRO100 in “*.sto” format.
! All calculations are made on chipboard with a thickness of 16 mm.
| Fig.2 | Cabinet parameters: Width 400 mm. Height 720 mm. (without legs), Facades - 3 pcs. Guides - 500 mm. Facade dimensions: 140x396 mm. - top. 284x396 mm. - lower ones. The very principle of assembling this cabinet. To begin with, theory and diagrams from the official Blum . |
Drawer length.
Fig.3
where, NL is the nominal length of the guide. SKL - box length. SKL = NL - 10 mm.
Drawer width.
Fig.4
where, LW is the internal size of the cabinet (between the sidewalls). SKW is the length of the front or back part of the drawer (provided that this part is placed between its sides).
Drawer height.
Fig.5
Diagram for calculating the height of the box.
Practical part. Calculation and installation.
In practical application, we will move a little away from catalog diagrams and make a diagram for ourselves. See Figure 6. Black numbers
- dimensions of the body, drawer sides, fronts and gaps.
Red
- dimensions for attaching guides.
Blue
- the size of the front and back panels of the drawers.
Green
- gaps in the drawer body between other parts.
Fig.6
With this scheme, the lower and middle drawers turned out to be interchangeable.
Tandem box diagram.
Fig.7
The Blum catalog suggests making boxes with a groove for fiberboard in all four parts, and then making cutouts in the front and back parts for the clamps. For what? It is enough to make only grooves in the sides of the box, and reduce the height of the front and back walls accordingly.
Fig.8
We take the length of the side of the box as according to the catalogue. Those. 500 mm - 10 mm = 490
mm.
Then, the dimensions of the drawer parts
:
- The sides of large drawers are 490 x 210 mm.
- Front and back parts of large drawers - 326 x 194 mm.
- The sides of the top drawer are 490 x 100 mm.
- The front and back parts of the top drawer are 326 x 84 mm.
Cabinet depth.
When mounted to the side of the cabinet, the guides are fastened by 4 mm. from the front edge of the sidewall. Hence, the minimum
the depth size (the width of the side of the cabinet) should be = Length of the guide + 4 mm. For convenience, the depth of the cabinet should be considered as follows: Length of the guide + 10 mm. In our version, with a guide length of 500 mm. the depth of the cabinet will be = 510 mm.
Assembly.
1. Fastening the guides.
| TANDEM BLUMOTION partial extension slides from Blum | Marking. |
| The guides are attached with an indentation of 4 mm. from the front end of the sidewall of the cabinet. |
| Cabinet frame with guides. |
2. Assembling boxes.
| Groove for fiberboard in the sides of the drawers. Such a groove can be made using a hand-held plunge-cut saw. Cutting depth 9 mm. |
| Box details. | Croaking box. |
| Installing the bottom of a fiberboard box. |
| Tandem front locks. | The clamps are attached to the front panel of the drawer. |
| Fastening the clamp. | The clamp is in operation. |
| In the back panel of the box, on the left and right, blind holes with a diameter of 8 mm are drilled. to a depth of 12-13 mm. The hole is drilled at a distance of 8 mm. below and to the side of the corner of the part. |
| The box is installed on the guides and pushed in until the latch clicks. In order to remove the drawer from the guide, just lightly press the orange locking flag. |
Cabinet with drawers on Tandems assembled.
Bottom line. General formulas.
In order to calculate the detailing of a product for using Tandem guides, we present the general procedure for universal calculations.
- Sidewall of the cabinet =
Tandem guide length
+
10 mm. - Drawer side =
Tandem guide length
-
10 mm. - The length of the front and back panels of the drawer =
the width of the cabinet
-
32 mm.
(thickness of the sides of the cabinet) -
42 mm. (catalog size). - The height of the side of the drawer (for facades with a height of 200 mm.) =
The height of the facade
is
40-41 mm.
(gap at top) -
17 mm. (gap from the lower edge of the facade or from the bottom, connection). - The height of the front and back panels of the drawer =
the height of the drawer side
-
16 mm. - Height of the drawer side (for facades less than 200 mm high) =
Front height
-
23 mm (gap from the top of the facade)
-
17 mm. (gap from the bottom of the facade). - The bottom of the box is made of fiberboard. Width =
Length of the front and back panels of the drawer
+
14 - 16 mm.
(for placement in the grooves of the drawer sides). Length =
drawer side. - Dimension for marking the fastening of the guides to the side of the cabinet. 40 mm
. from the lower edge of the facade or from the connection, bottom.
A complete parametric model of the cabinet with tandems and all the fittings.
Questions and discussion on the forum:
Supporting Information.
(all links open on a new page)
- Making a drawer.
- Tool for assembling furniture.
- How to drill assembly holes.
- Kitchen cabinet with three drawers.
Calculation example for a drawer with an internal front on bottom mounting rails
Suppose you need to make two drawers in a wardrobe section with a width of 400mm. At the same time, the depth of the sidewalls is 450mm, and the height of the drawer fronts is 180mm. We will install Boyard guides 400mm long.
We use a general calculation scheme for concealed mounting guides.
We get the following parts for the drawer:
- Drawer sides 390x130 – 4 pcs. The edge is circular (along the perimeter).
- Box front 326x118 – 4 pcs. Edge on two long sides (326mm top and bottom).
- Box bottom 358x326 – 2 pcs. No edge.
- Drawer front 176x364 – 2 pcs. Circular edge (maximum 1mm thick).
Types of guides
Everything in our world is improving and changing. This also applies to furniture fittings. Both cabinet and modular furniture are equipped with various retractable mechanisms. A wide variety of retractable systems on the furniture market allows Clients to make a choice - roller guides; ball guides; with closer; full or partial extension; hidden installation; reverse action; tandem boxes and meta boxes. We can conclude that, regardless of the choice of guides, they are very important elements in various furniture interiors. And above all, it is their work that directly determines how easily and correctly the drawers will work.
General diagram of installation of hidden mounting guides on a drawer
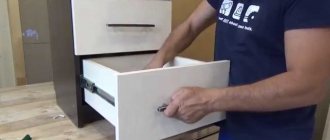
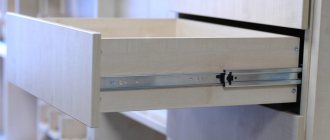
The lower mounting guides are installed on an already assembled drawer and, preferably, on a disassembled cabinet - this makes it easier to mark and screw on the fittings.
Usually, installing a part of a telescopic guide with a set of trunnions and a lock on the bottom of the drawer from the reverse side does not cause any difficulties. It is enough to study the instructions and mark the fastening points.
When marking the sidewalls for attaching the fixed part of the concealed mounting rail, you should start from the bottom drawer. And those recommendations that are given for indentation from the bottom edge.
Next, taking into account the height of the facade, the same principle is repeated for marking the remaining drawers.
To install the lower mounting guides, the so-called push-on or slide-on installation is used. In the first case, the assembled box is placed on the extended guides at an angle on the hooks and pushed in until connected to the axles.
The second one involves locking locks. The drawer is placed on the extended guides and pushed in until the locks click into place.
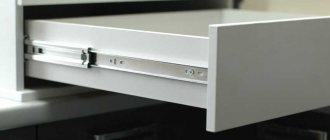
Fronts on concealed-mounted drawers are installed in the same way as on regular ones, with ball guides. Using double-sided tape and pads, the position of the facades is first leveled, taking into account the uniformity of the gaps. And then they are screwed to the forehead of the drawers using 4x30 self-tapping screws from the inside.
Installing ball guides
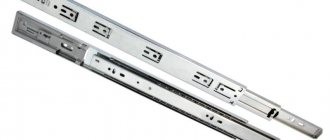
In terms of design features, telescopic guides for drawers from different companies may differ slightly, but the base for all has the same appearance: it consists of balls that move along stamped grooves. Such products can be 2- or 4-row. The second type is considered more durable; it can withstand a fairly large load (about 30-40 kg).
Telescopic drawer slides have the following advantages:
- ease of installation;
- easy and silent movement;
- ability to withstand heavy weight;
- long service life.
Among the disadvantages of such structures, it is worth highlighting the rather high price and the need for precise assembly.
To carry out installation work, you need to prepare the following tools and materials:
- drill with drill bit;
- screwdriver or screwdriver;
- a simple pencil;
- ruler;
- guides;
- fasteners.
For proper installation, you need to calculate as accurately as possible all the dimensions of the parts and their attachment points. There should be small gaps about 12mm wide on the sides of the assembled drawer and on the sides of the furniture. This should be taken into account when calculating the dimensions of the furniture. The depth of the drawer and the length of the guides must be the same
. Standard dimensions of the telescopic mechanism can be from 25 to 80 cm with a length difference of 5 cm between the following models.
The installation principle of ball guides is quite simple. First, the telescopes are disassembled into 2 parts, one of which is installed on the inner side of the furniture, and the second on the side of the box. In this case, the main and most difficult task is to accurately determine the mounting locations of the product. To do this, a line is marked horizontally and strictly in the center on the side of the box along which one half of the guide mechanism is screwed with screws.
After this, you need to mark a similar horizontal line on the inner wall of the cabinet. To do this, you can use a drawing of a furniture product. After this, the second half of the telescope is attached along the marked line.
If everything is done correctly, then you can try to insert the removable fastening parts located on the box into the grooves of the guides and connect them. In this case, both parts of the product should fit smoothly into each other, and the drawer should move easily along them. Otherwise, everything will need to be done all over again.
Return to contents