Many novice craftsmen who decide to assemble furniture with their own hands are intimidated by installing drawers themselves. In fact, there is nothing complicated about it. And there is no need to first draw up any additive maps or do complex mathematical calculations. In my experience working in manufacturing, I only knew one assembler who meticulously calculated everything down to the millimeter before installing drawer slides. Everything else was done “by eye”, observing only the elementary rules of geometry. And it “worked” no worse.
What you need to know before you start installing drawers
The principle of attaching the runners to the sides of the cabinet is the same for almost all retractable systems. As a rule, 2 mm are removed from the front edge and then screwed along the outer mounting holes and several central ones, depending on the size of the guides themselves.
The only difference is the calculation of the height at which the skids are mounted.
There are three main types of drawer slides, with different slide positions:
- Along the bottom edge (bottom). The simplest and most cost-effective roller guides are installed strictly under the bottom of the drawer frame itself, overlapping on the fiberboard. As in fact, the most expensive options for equipping drawers are tandem boxes. They are also installed on the lower level of the drawer frame.
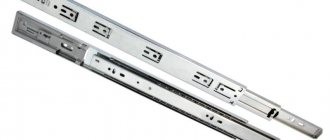
- In the center of the side of the box. Ball telescopic ones give greater freedom during installation - they can be mounted at any level of the sidewall of the box box. But it’s still better to stay at the central one. As practice shows, installation and adjustment are greatly simplified.
- With top mount. For metaboxes (metalboxes), the roller guide runners are located along the upper level.
In each case, the box will “sit” completely differently. Let's look at the example of a drawing of a regular chest of drawers with three drawers. To make the task easier, let’s assume that the boxes begin to be installed from the bottom of the side of the cabinet itself, without deduction for the base box and bottom. This is possible in the following option.
- The height of the sides of the cabinet is 668 mm (with the height of the chest of drawers without legs being 700 mm).
- The height of the drawers is 150 mm with the height of the facades being 221 mm.
How to install roller guides
The bottom is captured by part of the runners that are attached to the box at a height of 8-10 mm, depending on the thickness of the bottom (fibreboard).
Let's take the distance from the bottom to the lower edge of the facade to be 20 mm (usually it ranges from 10-30 mm).
The installation diagram of the roller guides will look like this.
There will be no harm in rounding the values. Take not the height level 32/255/478, but round for convenience to 40/260/280. The main thing is to secure the roller guides equally on both sides.
How to install ball guides
With a similar tolerance under the bottom of 20 mm, the installation diagram of the ball guides will look like this.
The difference is that it is customary to install ball guides in the center of the sidewall. Since they come in different widths, it's easier not to move them higher or lower.
Also, the values 99/322/545 can be rounded and made, say, 100/330/550.
How to install metaboxes on a drawer
A distinctive feature of a drawer with metal sides is its fastening along the top edge. The main thing here is to choose the right height of the metaboxes relative to the vertical of the facade. It can be 54 mm (optimal for installation in a narrow niche under the built-in oven in the kitchen), 86, 118 or 150 mm. If a deeper drawer is required, it can be “expanded” using one or two rows of special rails.
In our case, it is optimal to take a 150 mm metabox; the installation diagram will look like this.
As in previous options, rounding is acceptable for convenience: instead of 134/357/580, it is quite possible to take 130/360/580.
How to install fronts on a drawer
Fronts on drawers are always installed after “testing” and alignment of the inner box.
First you need to make sure that the box moves freely and smoothly, does not warp during movement and does not jam.
Only then, with the help of special linings (chipboard scraps, a wooden or plastic ruler will do), is the uniform position of the facades pretended.
Then, using double-sided tape, the facade is fixed and attached from the inside using 4x30 self-tapping screws. The through fastening of the handle also “holds” the facade. But it is worth drilling for the handle only after the facade is securely fixed.
How to avoid installation errors
If the guide rails themselves are screwed at the same level, strictly opposite each other, and the drawer does not warp in any way during the extension process, then everything will “work” well.
This is the main rule in installing any box - maintain alignment.
The second rule is the need to correlate the height of the sides of the box itself with the height of the facades. Before you start “distributing” them in height. I recommend immediately making marks with a pencil on the end of the body, noting the position of the facades, in order to have a visual representation.
The main pitfall is the irrational distribution of the guides in terms of the useful volume of the box itself.
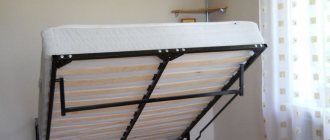
For example, in the photo, the drawers in the pencil case function absolutely normally.
But due to the fact that the top drawer was “lifted up” too high, its capacity was greatly reduced. It would seem that the middle drawer is more spacious. But no. The lower edge of the front of the top drawer “does not allow” the middle drawer to be loaded along the entire height of the resulting niche.
In fact, this point is not critical. And if you don’t highlight it, the owner himself won’t even notice. But the one who did it will definitely remember that it would have been better differently.
Mounting the housing guide
Option #1. Take careful measurements, according to the diagram of the mounting points, which can be found in the catalogs of guide manufacturers (see the figure as an example).
READ How to install a second OS on a Windows 10 computer with a second hard drive
Mark the location for drilling holes for fasteners, drill holes, apply a guide and secure it in at least three places.
Option #2. Mark the location of the guide with a pencil. Then place the guide so that the line you drew runs through the center of the holes in the guide.
And do not forget that the housing guide roller should be on the facade side.
Source
Step-by-step instructions for installing a drawer
Before installing the drawer slides, you must determine the correct position of the fasteners. Calculations are the first step in installation.
Step 1 - determining the position of the drawers inside the cabinet
I recommend starting marking the position of the guide fasteners from the bottom drawer. Depending on the height of the facade, the gap between the bottom of the cabinet and the drawer can be 10-30 mm.
The greater the difference between the height of the front and the height of the sides of the drawer, the larger the gap should be. This is done for reasons of stability of fastening: after all, the facade is attached to the sides of the box itself and the fastening points should be close to the center.
The remaining distance is evenly distributed between the remaining boxes. Moreover, it is customary to leave the same amount on the bottom of the box as was given on the bottom.
Such calculations are simple. Distances can be calculated using a calculator or drawn to scale. Many assemblers estimate directly on the body, measuring from point to point with a tape measure.
When the position of the boxes is determined, the attachment points for the runners are drawn. Depending on the drawer system, this may be the center, bottom or top edge of the drawer side.
After the calculations, begin installing the drawer guides. This will be the second step in installation.
Step 2 - fastening the drawer guides inside the cabinet
Strictly opposite each other, the outer part of the runners is attached to the sides of the cabinet, and the inner part is attached to the drawers themselves (the exception is metaboxes, in which the internal guides are already built into the assembled drawers).
Then they try to push the boxes of drawers inside the cabinet and adjust them so as to achieve smooth and uniform movement.
Step 3 - adjusting the smooth movement of the drawer guides inside the cabinet.
Then they begin installing the facades. But first, uniform gaps between them are measured using available material - various linings of the required thickness.
Step 4 - setting uniform gaps on the facades
Next, fix them with double-sided tape.
Step 5 - preliminary fixation of the facades with double-sided tape
and tighten them from the inside with self-tapping screws.
Step 6 - fastening the drawer facade with self-tapping screws
Now you can move on to the finish line - installing the handles.
That's all you need to know about how to install drawer slides yourself. I also recommend that you familiarize yourself with how to calculate the dimensions of a drawer for making your own.
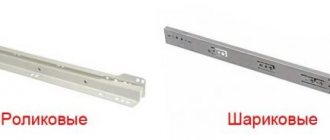
Design and advantages of roller guides
Roller-type furniture guides are the simplest structures, consisting of two or more parts connected by rollers (picture above).
The moving parts are made of metal, and the rollers are made of metal, plastic or nylon.
The most significant advantages of this type of retractable system are:
Among the disadvantages are: