Roller or ball guides, which one to choose?
From the point of view of calculating drawers, the formulas for roller and ball guides are absolutely the same. You can change one on a chest of drawers, a cabinet or a closet at any time without any changes in the design of the furniture. The only caveat is that there will be holes left from the fasteners, which can be masked somehow, because:
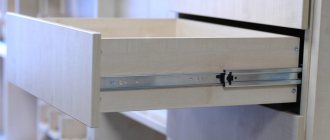
- Roller guides are attached along the bottom edge of the box, with a grip on the bottom.
- Ball guides are usually mounted in the center of the side of the drawer.
If we talk about which of the above guides is better, then the answer lies in the budget allocated for the manufacture of cabinet furniture.
Roller guides are economical. They are used on production office furniture. As in principle, ordinary roller guides are installed on any drawers of economy-class cabinet furniture, including kitchen ones. Fittings of this type are quite practical and durable. If you don’t heavily load the box (and the bottom made of thin fiberboard won’t allow you to do this), then it will last for decades. The design of the roller guides is such that there is nothing to break there.
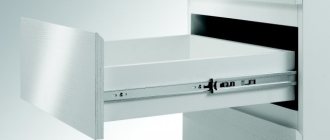
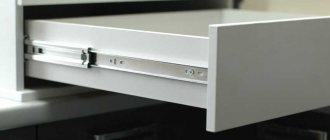
Full extension ball guides are in a higher class in terms of cost and performance characteristics. A drawer equipped with them extends completely, without blocking the back part with the top shelf (table top), which is very convenient for viewing everything stored in it. Also, ball guides boast a smooth, pleasant motion. There are options with a built-in closer (they can be identified by a spring built inside the mechanism with a plastic stop).
When choosing retractable mechanisms, you should not chase cheapness. A lot depends on the thickness of the metal and the accuracy of the calibration. Chinese analogues with thin metal fail very quickly - the guides themselves wrinkle and bend, rollers and ball bearings fly out even under non-critical loads. Therefore, be careful when purchasing and give preference to high-quality, popular items from well-known budget brands.
Completion of the assembly stage
The principle of assembling the cabinet itself is not very different from making a drawer. The sides and rear wall are attached to the bottom in the same way. The front walls of the drawers will form the façade - these are what we will be installing now. To do this, the body of the cabinet must be assembled without the back wall, and the drawers must be put in place.
Table 3. Assembly
| Steps, photo | A comment |
Step 1 - Assembling the Case | Once all the drawer slides are installed, you can assemble the box pieces together. The connection is made on confirmations. |
Step 2 - Installing the Drawers | Place drawers without fronts in their regular places and check that they slide out easily. |
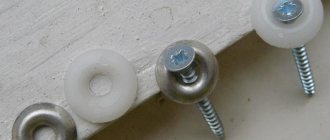
Step 3 — Marking the façade for drilling holes for the eccentric | Now you can start hanging the front strips on the drawers. Place the workpiece face down, and use a square to determine the points for fasteners. |
Step 4 - Marking the future hole with an awl | Punch the hole with an awl over the pencil mark. |
Step 5 - Drill the holes | The holes are drilled blind, the diameter should correspond to the diameter of the tie, and the depth should correspond to the length of its thread. |
Step 6 - Screw in the eccentrics | The ties are screwed into the holes on both sides up to the limiter. |
Step 7 – Putting the Drawer Front in Place | The eccentric legs are aligned with the holes in the ends of the side walls of the box, and the front strip is installed in its place. |
Step 8 - installing the eccentric head into the hole | Next, eccentric heads are placed in the wide side holes... |
Step 9 - Tightening the Connection | ... after which they need to be tightened with a screwdriver. |
Step 10 - Install the fittings | Install all the fronts on the drawers in the same way, mount the back wall - and, in principle, your cabinet is ready. |
Attention. Do not forget that before starting assembly, the ends of all workpieces must be covered with melamine edge. It is sold already with an adhesive layer; all you have to do is apply it to the cut and iron it with a hot iron.
In conclusion, all that remains is to screw the wheels to the bedside table - to make it convenient to move it, and install the handles on the drawers. If desired, the perimeter of the product body can be decorated with a wooden baguette or polyurethane molding.
Small-sized apartments exist not only in old Khrushchev-era buildings; completely new housing projects, designed for the poorer category of our fellow citizens, also save on passerby space. The industry takes into account the situation in the housing market and produces small-sized but very functional furniture specifically for such situations. In a special article you will find tips on choosing a cabinet for a small hallway, as well as instructions for assembling a door cabinet.
Video - How to make a cabinet with drawers
Calculation of drawers
To avoid confusion and misunderstanding, let’s define the initial data:
The furniture is made of laminated chipboard with a thickness of 16 mm; fibreboard with a thickness of 4 mm is used for the bottom.
- Width of the cabinet/cabinet (external dimensions) = X.
- The height of the niche for installing drawers in the cabinet/cabinet (minus the overhead countertop) = Y.
- Depth of the cabinet/cabinet stand (sidewall) = Z.
Calculation of the drawer front
Whatever one may say, the calculation of the inside of the box largely depends on the front part.
The facade can be internal (rolled over the side walls of the body) or overhead.
As you can see from the drawing, the choice of overlay or internal front can affect the depth of the drawer. In the case of an inset one, it is rolled deeper to the thickness of the facade (-20 mm from the depth of the stand).
The height of the drawer front usually varies between 150-200 mm. It all depends on what will be stored inside. For documents and stationery in office cabinets, smaller drawers are made, 120-150 mm deep, rarely 180 mm. The linen drawers of the chest of drawers are designed deeper, ranging from 180 mm to 250 mm. For toys and bedding, drawers can be even deeper along the height of the facade, but in this case it is necessary to reinforce the bottom with a stiffener or partitions.
The size of the drawer fronts, taking into account the technological gap, is calculated by analogy with other doors; you can read more in detail here. In short, 2-3 mm is subtracted from the dimensions along the outer perimeter; the gap between adjacent facades is also 2-3 mm.
An example of how to calculate the fronts for two drawers relative to our cabinet with dimensions X*Y*Z.
- Internal facade: ( X-16*2-3) x(( Y-16*2)/2-3)
- Overlay facade: ( X-3) x( Y/2-3)
The height and length of the facade can be swapped if there is a texture and the desired direction of the pattern - longitudinal or transverse. When edging PVC facades around the perimeter, it is necessary to take into account the thickness of the edge!
How to calculate the side of a box
Drawer guides are available in 50 pitches, ranging from 250 mm to 550/600 mm. Hardware manufacturers always have a similar layout in their catalogs, which can help you navigate the dimensions and markings for fasteners.
roller guide dimensions
ball guide dimensions
Thus, the depth of the sides of the drawers is taken in increments of 50. For the shallowest drawers, 250 mm, and further, correlating the depth of the standing cabinet/cabinet with the length of the suitable guide - 300, 350, 400 mm, etc.
The narrowest side of the cabinet/cabinet for built-in is 260 mm for the overlay facade and 280 mm for the internal facade (for a 250 mm guide). The required clearance at the front edge for installation is usually 2 mm. The gap at the back is arbitrary, from 1-2 cm to 5 cm. If there is more left, it is better to purchase longer guides so as not to waste space behind the drawer. It turns out:
(drawer depth) = length of the guide and less than Z by no more than 50 mm.
How to calculate the front (front and back) of a drawer
If we again turn to the manufacturers' catalogs, we can see that the gap between the sides of the cabinet/cabinet body and drawers is about 12.5-12.7 mm.
In fact, when calculating, these numbers are rounded by subtracting 13 mm. This makes the drawer move more freely and is easier to adjust.
In the drawing, the calculation diagram for the box is clear and understandable. Thus, to calculate the “forehead” of a drawer, you need to subtract the thickness of the chipboard from the dimensions of the cabinet/cabinet 4 times (2 on each side) and a gap of 13 mm, also on both sides. 16*4+13*2=90. It turns out:
(forehead length)=X-90mm.
How to calculate the depth of a drawer
There are no special standards regarding depth. Usually 10-20 mm are left under the facade (Z5), and 30-80 mm above the facade.
Thus, if, for example, the height of the facade is 150 mm, then the depth of the drawer will be about 80-100 mm. I base my calculations on the cut cards. If reducing the depth of the drawers allows you to more compactly place the parts on a sheet of chipboard, then this is worth taking advantage of. There are situations when several parts fit onto a new sheet, but if you “play” with such unprincipled dimensions of the parts, you can save on buying a whole sheet with a huge remainder!
Fiberboard bottom calculation
There are two ways to install the fiberboard bottom - overlapping and in a groove. In the first case, the bottom is nailed to the drawer frame from the back side. In the second, it slides into a special groove.
- When fastening with an overlap, a gap of 2 mm is taken away. That is ((length of forehead)+16*2-2)x((depth of drawer)-2).
- When the groove depth is A, mm on each side is added to the internal dimension (A-2) mm on each side. That is ((length of forehead)+ (A-2)*2)x((depth of drawer)-16*2+(A-2)*2).
Gap between dresser drawers
Accurate calculation of drawer guides is the key to correct installation of drawers. Correctly installed boxes are interchangeable, i.e. the drawer can easily take the correct position in the place of another without additional adjustment.
!
Interchangeability is only possible among drawers with fronts of the same size in height.
In this article I will describe a method for calculating the mounting dimensions of roller box guides. At the end of the article, as a logical conclusion, I will try to derive a universal formula for such a calculation. Using this formula, it will be possible to calculate the mounting dimensions of roller guides on all types and sizes of cabinets, tables, and chests of drawers.
A little bit of material. Diagram of the roller guides themselves and their mounting holes (Fig. 1):
Rice. 1.
For clarity, we will carry out the calculation using the example of a cabinet - the basis of a computer desk, with four drawers of equal height.
Rice. 2
| Rice. 3 |
|
And so, here is the classic marking of the guides for the table stand, the classic height of 734 mm. (Fig. 5).
Rice. 5
The diagram below (Fig. 6) shows the initial data for such a calculation.
Rice. 6
Explanations for the drawings.
Calculation of guides, universal size.
The height of the side of the cabinet = 734 mm. Base = 70 mm. 4 box fronts. The amount of gaps between the facades is 4 x 3 mm. = 12 mm. We get: 734 - 70 -12 = 652 mm. And divide by 4, then the height of the facades (highlighted in yellow in Fig. 6) = 163 mm.
In order to calculate the mounting height of the guides so that they are interchangeable, it is necessary to take into account all the extreme positions of the drawers and the overlap of their facades with the frame of the cabinet. The extreme positions are the top and bottom drawers, where their fronts overlap the top link or bottom of the cabinet. The easiest way is to start from the bottom, where the bottom of the cabinet sets the lower limit of the guide mounting. The center line of the mounting holes, as can be seen in Fig. 1, is 18 mm. from its lower edge, while the bottom of the box installed on the guide just coincides with its lower edge (Fig. 1).
We consider this: if the bottom of the drawer coincides with the bottom edge of the guide, then we will add another 4 mm in height to the protruding screw head so that they do not touch the bottom of the cabinet. Then we get 18 + 4 mm. = 22 mm. — height of fastening of the first guide from the bottom of the cabinet. Or 70 mm (base) + 16 mm (bottom) + 22 mm. = 108 mm. from the lower end of the sidewall of this cabinet (Fig. 5.).
Why exactly 4 mm? For a self-tapping screw head, 1 - 1.5 mm will be enough. 4mm. This is a universal size, taking into account the fact that the frame of the cabinet can possibly be made not only from a 16 mm thick slab, but also from an 18 mm thick slab. Then, even in this case, there will be enough clearance for the screw head.
Size 1.
From the above calculation and Fig. 6 it is clear that the distance from the lower end of the front of the lower drawer to the axis of the guide fastening is 38 mm.
, i.e. 22 mm. + 16 mm. (the bottom onto which the facade overlaps). From here it is very easy to determine what the distance will be from the lower end of the front of the lower drawer to the bottom of the drawer. This is 38 - 18 = 20 mm
. (see Fig. 6).
And so, the key size for calculations is
38 mm
.
, applicable to other drawers to make them interchangeable.
The next guideline is calculated even more simply. Let's look at Figures 5 and 6. Base (70 mm) + first facade (163 mm) + gap between facades (3 mm) + 38 mm
. (Size 1.) = 274 mm. (see Fig. 5). And so on, along the remaining guides.
Constant: 38 mm.
Calculation of the height of the box itself and the facade attached to it.
Now let's turn our attention to the top drawer. In most cabinet designs, a connected part is installed at the top - a connection that ensures the rigidity of the entire structure and allows you to maintain the exact distance between the sidewalls to avoid jamming of the drawers when moving. What should you pay attention to here?
Calculation of a drawer using an example
How to calculate the dimensions of parts for drawers in a niche 400 mm wide, 500 mm deep and 600 mm high. Let there be internal facades, the gap is not 3, but 4 mm for each (2 mm on each side), taking into account an edge 0.5 mm thick. The bottom is attached with an overlap.
It is most convenient to enter formulas in Excel tabular form, indicating the names of the parts and their size (length and width), quantity.